
AirDog 150 & tank vent mod install on a Megacab

Thread Starter
Registered User
Joined: Mar 2005
Posts: 6,259
Likes: 1
From: Utah
AirDog 150 & tank vent mod install on a Megacab
Well after TONS of reading and research I finally decided on a fuel system that fit my needs and wants. I went with the AirDog 150 cause of it's ability to separate air and vapor from the fuel..it's small all in one package, cheap long lasting filters, 2-3micron filtering, water separator, long lasting QUIET motor/pump and a great price right now as well.
My install is a little different then the way the AirDog instructions install, so I will show you all what I did.
When I got my AD150 it came with a 1/2" drawstaw..but after doing some looking I really liked the way the Vulcan "drawstaw II" installed so I ordered one and I decided to use the AD pickups bulkhead fitting to do the tank vent mod.
Here is what I ordered from Vulcan to help with my install...
Vulcan DrawstawII make sure it is the 1/2" version
CP3 fitting with FP sensor port
I was worried about running out of fuel at 1/4 tank so a DTR member suggested taking the bed off to do the install to make sure the tank stayed in it's installed form. With the tank on the ground or jack it may get pushed up in the middle where the drawstaw is then when you raise the tank back into it's mounts the bottom of the tank drops down away from the Drawstaw causing stumbling and running low on fuel at 1/4 tank...I really did not want to have to worry about that.
before I removed the bed I climbed under the truck and looked at where the bed cross members went over the tank...I marked each side of the crossmember with a paint pen on the tank so once I removed the bed I could see where the crossmembers went.
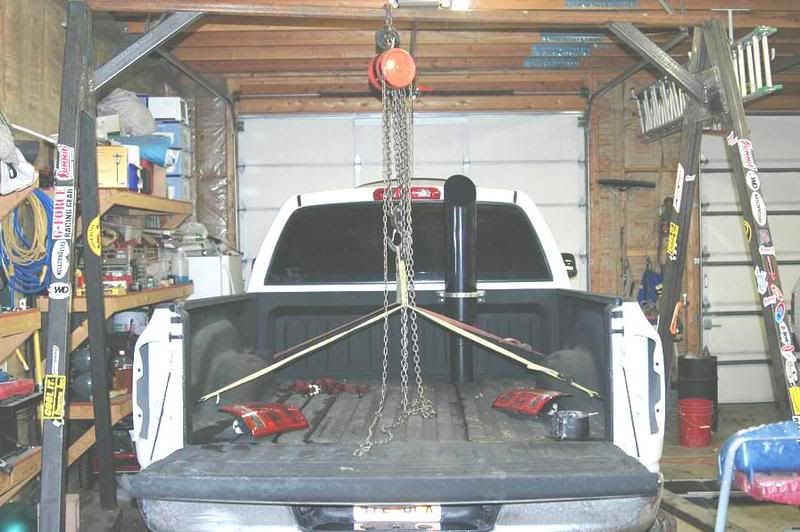
I thought that taking the bed off would be a big PAIN but to my surprise it was VERY simple...all it takes is 3 bolts on each side total of 6 bolts, you also have to remove the taillights so that you can take the electrical plugs off the light housing's...then on my truck there was one small ground wire on the passenger front corner of the bed that mounts to the cab..this must be removed too dont forget to disconnect the filler and tank vent as well.....since I have a stack I also had to remove my stack...I just left the stack clamped to my Staxxclamp and disconnected the stack under the bed.
I have a crane that I used to remove my bed but it is pretty lite and could be moved with 2 guys on each side really easy.
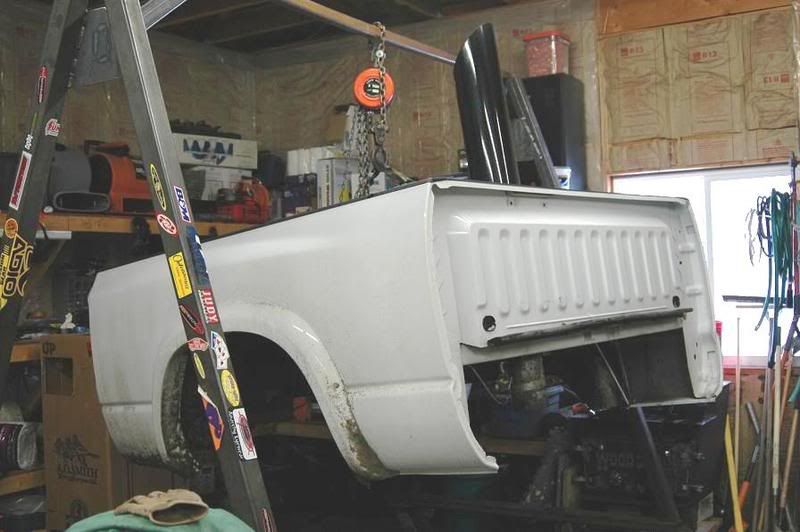
after I pulled the bed I started on the Drawstaw and tank vent mod bulkhead install...on the megacab there is not really any flat spots to mount the drawstaw except right in front of the stock fuel module. I was a little worried about it being mounted in front of the module but that is the only option on a megacab unless you do the liberty fuel module.(i was being cheap and did not want to pay for a new module)
once the bed is off you need to remove the stock fuel module so you can hole saw the holes into the tank...make sure to use a cup inside the tank to catch any chips or shavings that may fall through.
The Vulcan drawstraw instructions said to cut the pick-up at a slight angle but I did not like the sound of the angle cut and was afraid it would suck air when the tank got low...so I cut mine straight and left about 1/16" of gap on the bottom..I found a washer in the shop that was just a hair over 1/16" and used it to fine tune the cut on the bottom of the drawstraw...it better to make 20 small cut then to try and get it perfect in the first cut..least for me it is...
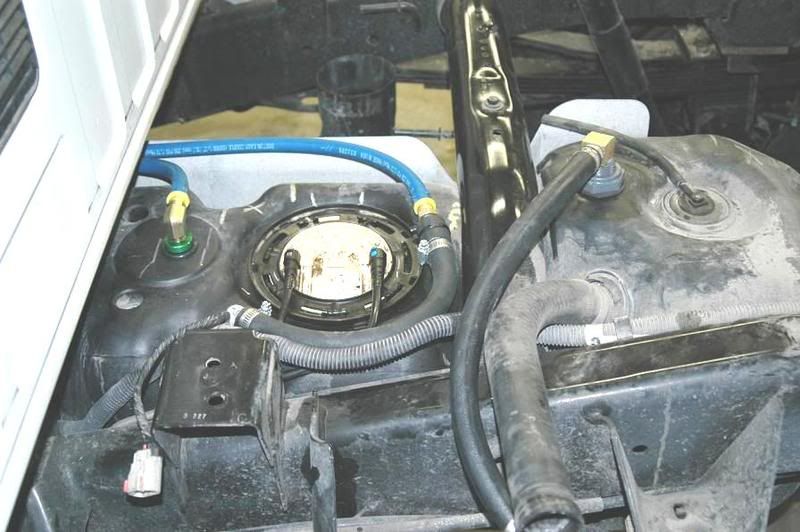
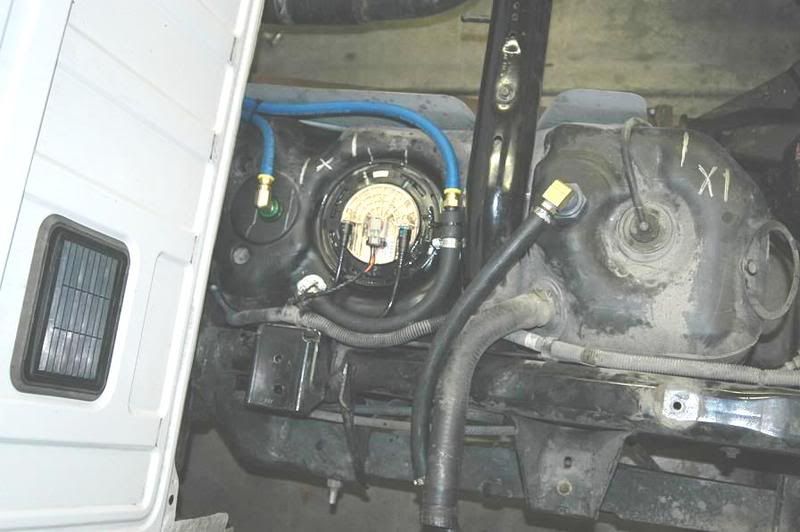
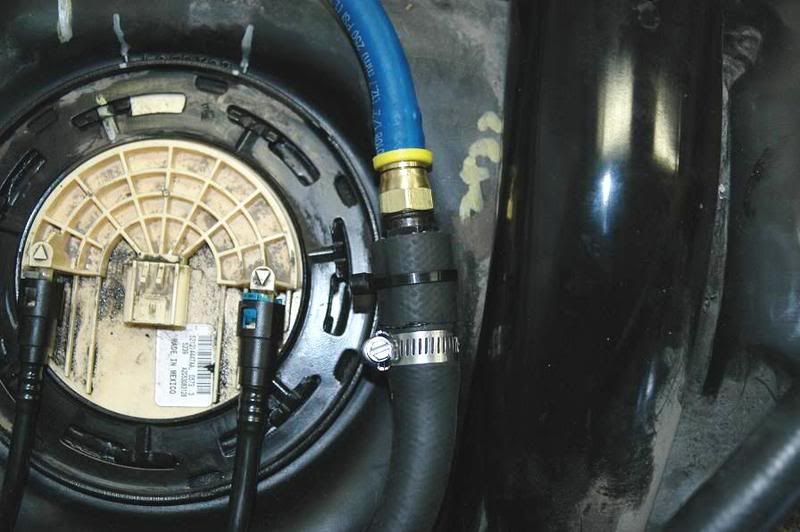
here is a shot of what mine looked like after the install was done..*Note in this pic the plastic bulkhead fitting is on backwards the treads and the nut need to be on the inside of the tank not the outside other wise the washer will flare out and not seal.
also note the silver paint marks on the tank with the X in the middle that is where the bed cross members are so dont mount anything in that space.
also before you drill the hole for the Drawstaw make sure it will clear the tank baffle inside..I was going to take a pic of it but I got going and forgot...I dont know if all the tucks have the baffle in the tank but my megacab tank did.
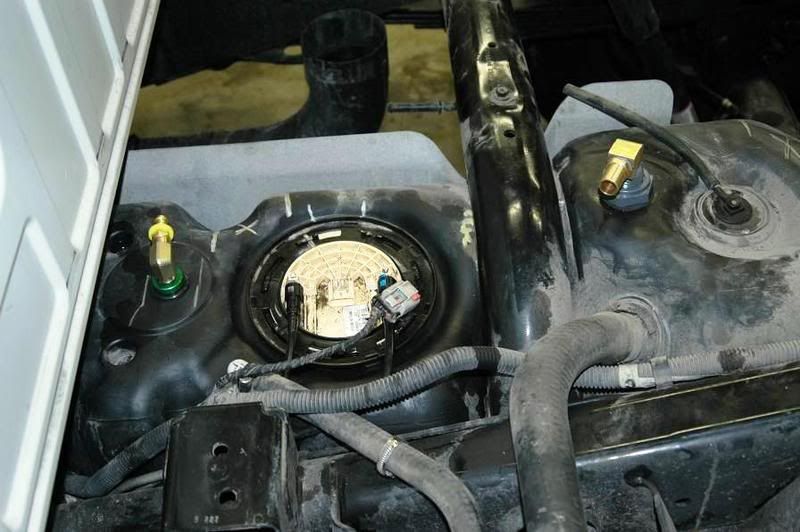
I left my factory feed line on for now.
the tank vent mod is pretty easy all you do is remove the factory hose and then mount the bulkhead on a flat surface as high on the tank as possible.
I also bought a brass 90*,3/4" a hose barb adapter and 4 feet of 3/4" diesel rated hose.
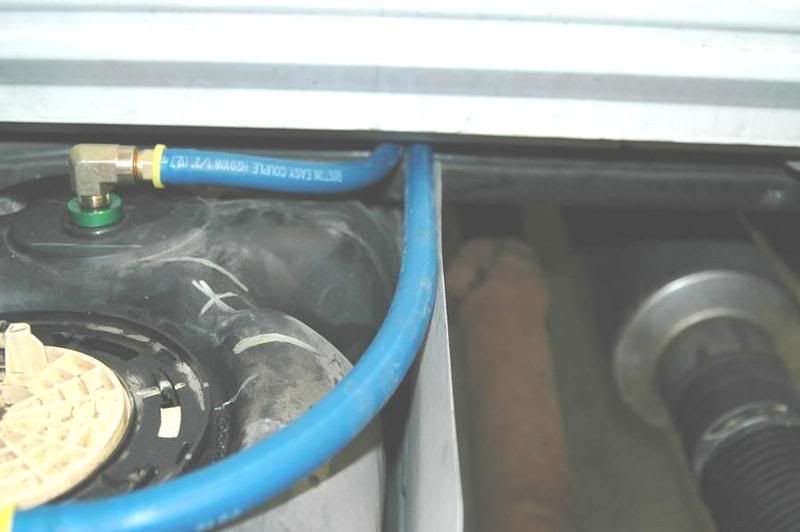
instead of capping the factory vent hose I removed it and and added a about 6"-8" of the left over 3/4" hose, then instead of cutting the factory filler hose and adding the airdog return fitting I cut the 8AN fitting off and welded a piece of 3/4" pipe on the end so I could use the old vent as a airdog return.
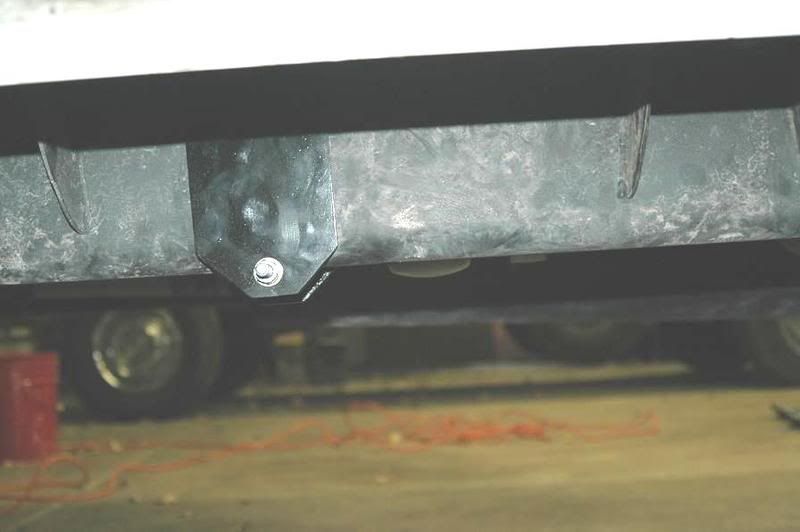
here is what it looks like now.....
just cut the vent hose to be about the same length as the filler hose and you should be good...then you can see in the pic I wrapped some hose around the metal return fitting so it would not rattle against the crossmember.
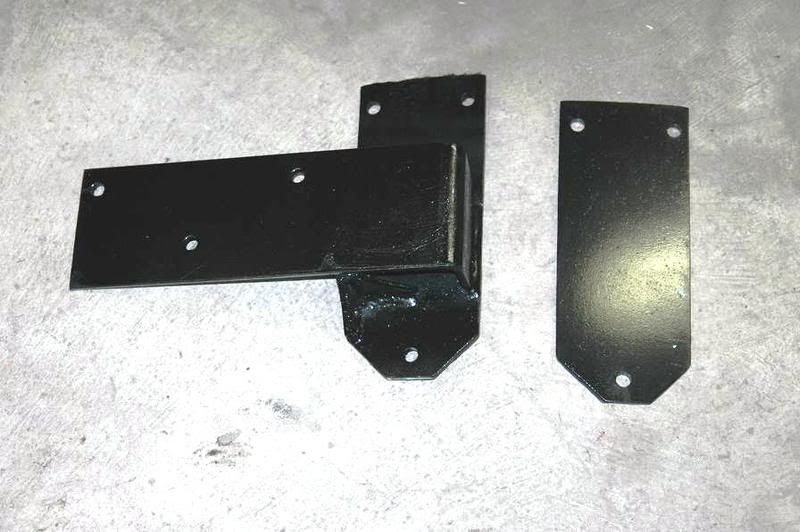
Now it was time to mount the Airdog....I soon found out they sent me the wrong sandwich bracket (old 2nd gen version)..it was too short to fit my frame..by this time it was to late in the day to call so I just made a new bracket myself...I wanted to mount my AirDog parallel to the frame instead of parallel to the transfercase....this was actually easier then I thought it would be all I did was cut the old airdog mounting plate off of the sandwich plate..then I just welded it to point backwards/parallel to the frame..I also had to cut a grove out of the bracket to allow for the factory return line..
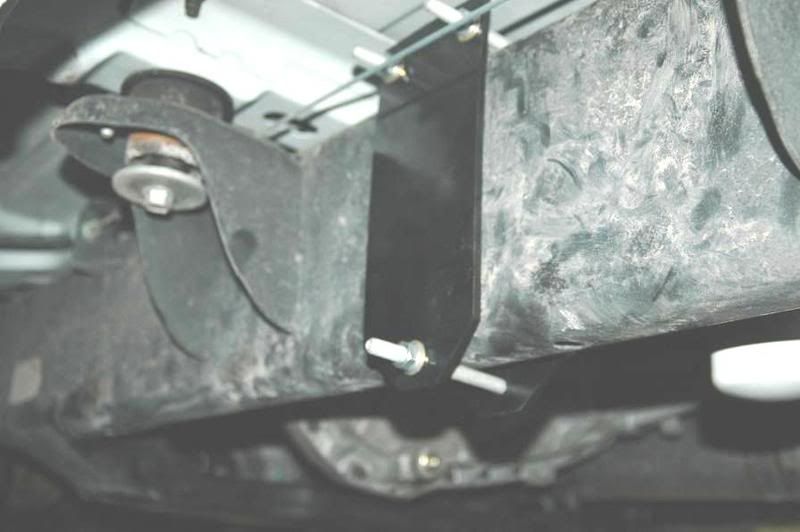
here is what my bracket looked like when I was done...
you can see that I welded a couple gussets on just to add some strength.
you can also see the small angle cut I made for the return line on the top right of the bend.
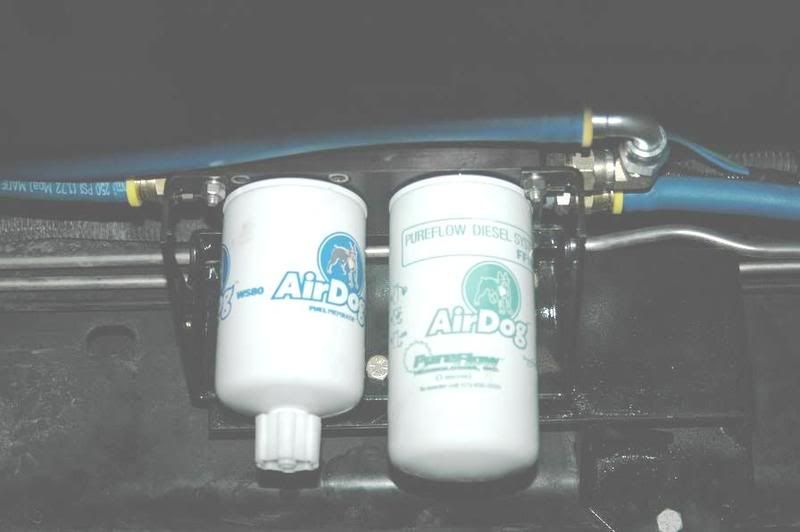
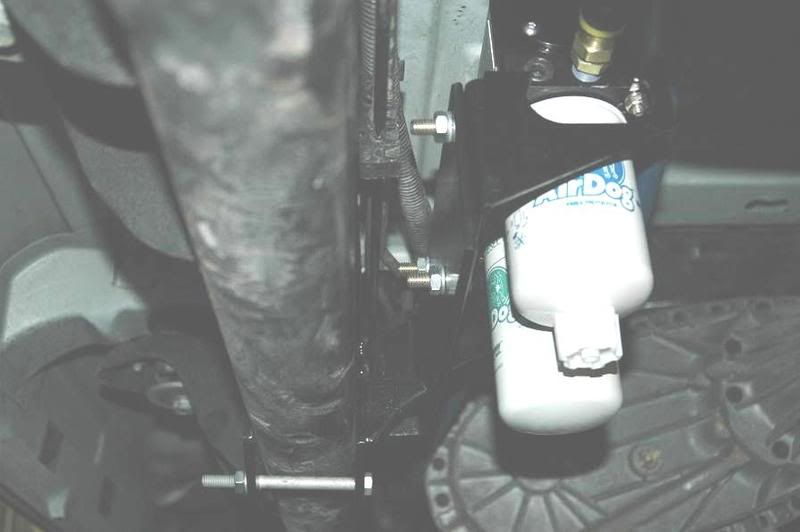
here is what it looks like installed....I mounted mine with the CP3 fuel supply line and the return pointing to the front of the truck..witch makes the tank suction line come in from the back..then you have to route the return line back to the tank...if you mount it parallel to the frame with the Airdog stickers pointing out you would have to run the lines from the back to the front...doing it my way makes for a cleaner looking install IMHO
My install is a little different then the way the AirDog instructions install, so I will show you all what I did.
When I got my AD150 it came with a 1/2" drawstaw..but after doing some looking I really liked the way the Vulcan "drawstaw II" installed so I ordered one and I decided to use the AD pickups bulkhead fitting to do the tank vent mod.
Here is what I ordered from Vulcan to help with my install...
Vulcan DrawstawII make sure it is the 1/2" version
CP3 fitting with FP sensor port
I was worried about running out of fuel at 1/4 tank so a DTR member suggested taking the bed off to do the install to make sure the tank stayed in it's installed form. With the tank on the ground or jack it may get pushed up in the middle where the drawstaw is then when you raise the tank back into it's mounts the bottom of the tank drops down away from the Drawstaw causing stumbling and running low on fuel at 1/4 tank...I really did not want to have to worry about that.
before I removed the bed I climbed under the truck and looked at where the bed cross members went over the tank...I marked each side of the crossmember with a paint pen on the tank so once I removed the bed I could see where the crossmembers went.
I thought that taking the bed off would be a big PAIN but to my surprise it was VERY simple...all it takes is 3 bolts on each side total of 6 bolts, you also have to remove the taillights so that you can take the electrical plugs off the light housing's...then on my truck there was one small ground wire on the passenger front corner of the bed that mounts to the cab..this must be removed too dont forget to disconnect the filler and tank vent as well.....since I have a stack I also had to remove my stack...I just left the stack clamped to my Staxxclamp and disconnected the stack under the bed.
I have a crane that I used to remove my bed but it is pretty lite and could be moved with 2 guys on each side really easy.
after I pulled the bed I started on the Drawstaw and tank vent mod bulkhead install...on the megacab there is not really any flat spots to mount the drawstaw except right in front of the stock fuel module. I was a little worried about it being mounted in front of the module but that is the only option on a megacab unless you do the liberty fuel module.(i was being cheap and did not want to pay for a new module)
once the bed is off you need to remove the stock fuel module so you can hole saw the holes into the tank...make sure to use a cup inside the tank to catch any chips or shavings that may fall through.
The Vulcan drawstraw instructions said to cut the pick-up at a slight angle but I did not like the sound of the angle cut and was afraid it would suck air when the tank got low...so I cut mine straight and left about 1/16" of gap on the bottom..I found a washer in the shop that was just a hair over 1/16" and used it to fine tune the cut on the bottom of the drawstraw...it better to make 20 small cut then to try and get it perfect in the first cut..least for me it is...
here is a shot of what mine looked like after the install was done..*Note in this pic the plastic bulkhead fitting is on backwards the treads and the nut need to be on the inside of the tank not the outside other wise the washer will flare out and not seal.
also note the silver paint marks on the tank with the X in the middle that is where the bed cross members are so dont mount anything in that space.
also before you drill the hole for the Drawstaw make sure it will clear the tank baffle inside..I was going to take a pic of it but I got going and forgot...I dont know if all the tucks have the baffle in the tank but my megacab tank did.
I left my factory feed line on for now.
the tank vent mod is pretty easy all you do is remove the factory hose and then mount the bulkhead on a flat surface as high on the tank as possible.
I also bought a brass 90*,3/4" a hose barb adapter and 4 feet of 3/4" diesel rated hose.
instead of capping the factory vent hose I removed it and and added a about 6"-8" of the left over 3/4" hose, then instead of cutting the factory filler hose and adding the airdog return fitting I cut the 8AN fitting off and welded a piece of 3/4" pipe on the end so I could use the old vent as a airdog return.
here is what it looks like now.....
just cut the vent hose to be about the same length as the filler hose and you should be good...then you can see in the pic I wrapped some hose around the metal return fitting so it would not rattle against the crossmember.
Now it was time to mount the Airdog....I soon found out they sent me the wrong sandwich bracket (old 2nd gen version)..it was too short to fit my frame..by this time it was to late in the day to call so I just made a new bracket myself...I wanted to mount my AirDog parallel to the frame instead of parallel to the transfercase....this was actually easier then I thought it would be all I did was cut the old airdog mounting plate off of the sandwich plate..then I just welded it to point backwards/parallel to the frame..I also had to cut a grove out of the bracket to allow for the factory return line..
here is what my bracket looked like when I was done...
you can see that I welded a couple gussets on just to add some strength.
you can also see the small angle cut I made for the return line on the top right of the bend.
here is what it looks like installed....I mounted mine with the CP3 fuel supply line and the return pointing to the front of the truck..witch makes the tank suction line come in from the back..then you have to route the return line back to the tank...if you mount it parallel to the frame with the Airdog stickers pointing out you would have to run the lines from the back to the front...doing it my way makes for a cleaner looking install IMHO
Thread Starter
Registered User
Joined: Mar 2005
Posts: 6,259
Likes: 1
From: Utah
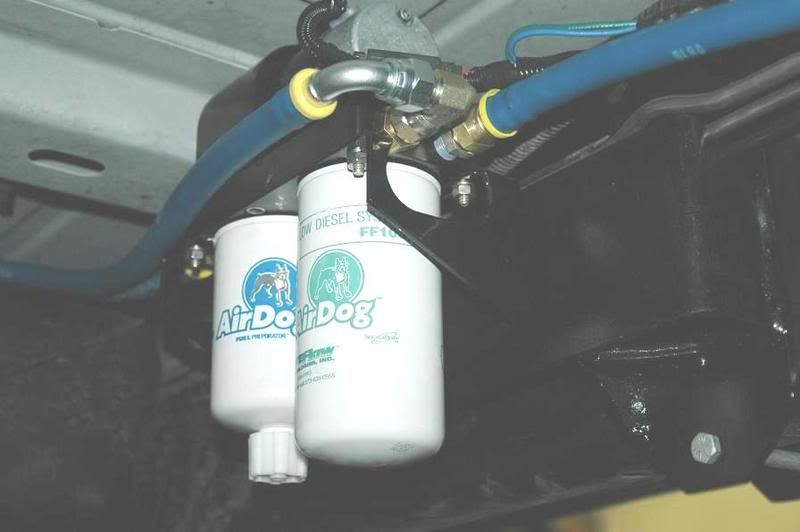
more pics of the installed airdog.
You can see the filter bottom in this pic...it does not hang lower then the frame it is about even with it tho.
After you mount the AD it is time to start cutting the fuel lines to fit....pretty easy really just route the line to each fitting and cut to length....MAKE SURE TO USE SOME OIL TO LUBE THE PUSH LOCK FITTINGS OTHER WISE THEY WILL NEVER GO ON ALL THE WAY OR COME OFF..so you will have to cut the hose off and you may be short on hose if you do..
return line connection.
Still need to zip tie the lines up so they dont bounce around of get chaffed.
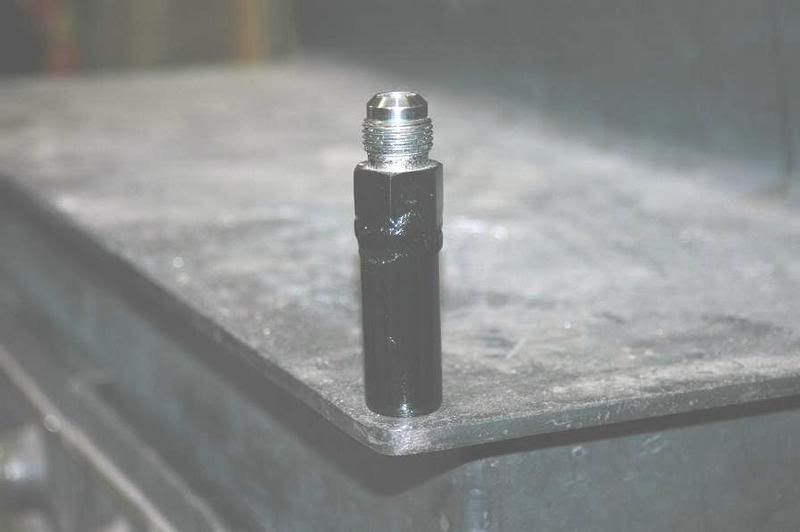
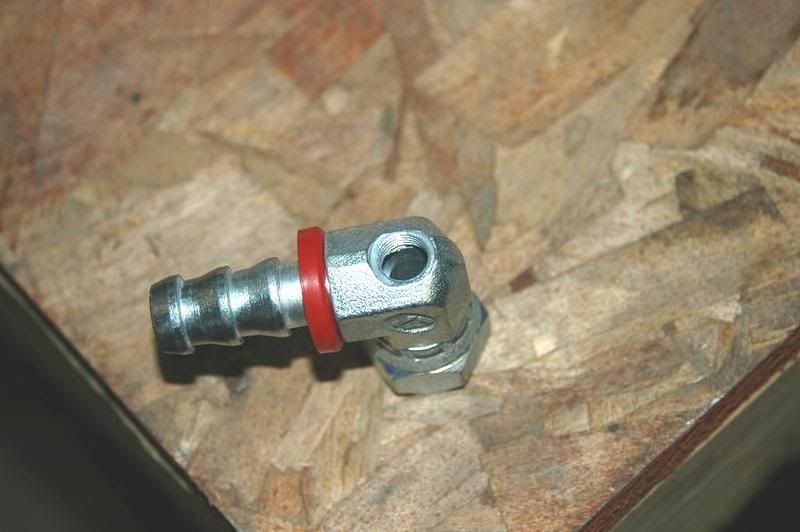
This is what I used to hook the FP gauge up to the CP3.
I still need to snap a few pics of the wiring and do the instructions...so stay tuned
I have to work today so I wont be able to finish the wiring part today...
if you have any questions let me know
You can see the filter bottom in this pic...it does not hang lower then the frame it is about even with it tho.
After you mount the AD it is time to start cutting the fuel lines to fit....pretty easy really just route the line to each fitting and cut to length....MAKE SURE TO USE SOME OIL TO LUBE THE PUSH LOCK FITTINGS OTHER WISE THEY WILL NEVER GO ON ALL THE WAY OR COME OFF..so you will have to cut the hose off and you may be short on hose if you do..
return line connection.
Still need to zip tie the lines up so they dont bounce around of get chaffed.
This is what I used to hook the FP gauge up to the CP3.
I still need to snap a few pics of the wiring and do the instructions...so stay tuned
I have to work today so I wont be able to finish the wiring part today...
if you have any questions let me know

Thread Starter
Registered User
Joined: Mar 2005
Posts: 6,259
Likes: 1
From: Utah
let me know if you have any questions....
I probably should have taken a few more photos..but I had a family party to go to on the last day so I was kinda rushed.....
BTW I cut my drawstaw straight...I did not angle it like the Vulcan instructions said to.....
*edit* I added a few tips about the drawstraw cut that I made in the first post.
Oh I almost forgot the best part...I took the truck on some steep hills on the way to fuel up and I was able to get the FP gauge to read zero like 6 times and the truck never stumbled...the tank was soooo low that the overhead console DTE was flashing "LOW FUEL"...I have never run my tank that low before so it surprised me to see it flashing that.....apparently the drawstraw cut must work VERY well..since I would never run it that low again, I dont think I have to worry about running out of fuel at 1/4 tank
Registered User

Joined: Jul 2003
Posts: 2,069
Likes: 0
From: Lloydminster, Alberta, Canada
53 ******,
Why the 150 instead of the 100? Where did you get yours? Did you just pull the OEM feed line off the CP3 and cap?
After much reading and such, I think the AD is the route I may go to take care of my low fuel pressure issues.
Box removal looks like the way to go as well. Great write-up! Thanks.
Why the 150 instead of the 100? Where did you get yours? Did you just pull the OEM feed line off the CP3 and cap?
After much reading and such, I think the AD is the route I may go to take care of my low fuel pressure issues.
Box removal looks like the way to go as well. Great write-up! Thanks.
Trending Topics
Thread Starter
Registered User
Joined: Mar 2005
Posts: 6,259
Likes: 1
From: Utah
53 ******,
Why the 150 instead of the 100? Where did you get yours? Did you just pull the OEM feed line off the CP3 and cap?
After much reading and such, I think the AD is the route I may go to take care of my low fuel pressure issues.
Box removal looks like the way to go as well. Great write-up! Thanks.
Why the 150 instead of the 100? Where did you get yours? Did you just pull the OEM feed line off the CP3 and cap?
After much reading and such, I think the AD is the route I may go to take care of my low fuel pressure issues.
Box removal looks like the way to go as well. Great write-up! Thanks.
my OEM cp3 feed line kept leaking fuel really slowly...I dont know if it is cause my tank is super full or what...but I picked up a adapter like this 6ANx12m with a cap
from my local hydro store and will remove the factory feed line at the filter and cap it with that
when I get some more time I think I will buy the GDP fuel filter canister replacement bracket...then I will remove all the OEM stuff except the engine return line..that will really clean it all up...
Registered User
Joined: Dec 2006
Posts: 1,118
Likes: 0
From: Winchester, TN
Nice job! I'm doing mine next week too as soon as it gets here. I went with an AD100 festus it's good up to 550hp and more than enough for me. You don't have to drop the tank or remove the bed to drill for a draw straw with the 100 either.
Thread Starter
Registered User
Joined: Mar 2005
Posts: 6,259
Likes: 1
From: Utah


Registered User
Joined: May 2007
Posts: 27
Likes: 0
From: east central MN
I just installed my AirDog100 this week and I had lift the bed to connect to the factory fuel module. Other than that it was pretty easy to do. My truck seems to run a lot stonger now. Nice write up and great pics.
Thread Starter
Registered User
Joined: Mar 2005
Posts: 6,259
Likes: 1
From: Utah
HAHA Thanks Jd...yeah it was a bit cold till the shop warmed up...but we do have a giant woodsman stove that helps a ton.
I dont know how long it was???? I think I cut 2 3/4" off on the first cut then I just fine tuned the straw gap with a washer that was just a little over 1/16" thick...I would hate to tell you a exact size and then have it be just a little to short....dont be scared...just get a washer or something that is 1/16" thick and use it as a gauge...if you cut the straw and it does not fit the washer under it then take your utility knife and trim it down a little more......it's better to do 20 small shaves then one big cut.
thanks