
What did you do to your Gen 1 today?

Registered User


Joined: Dec 2008
Posts: 7,300
Likes: 2,886
From: vermont
I sprung the extra cash for the coolers you saw, that add the extra quart, on my NV-4500 2nd gen trucks as those tow heavy a LOT.
The 1st gens that I rarely if ever, hook to the trailer get the the flat aluminum plate finned coolers I was getting for $60 a pop.
My buddies shop that does my yearly inspections on a lift, always mention the "cool, coolers" under the rigs.
I did finish the in-board throttle linkage mod yesterday to get a few more RPMs out of the VE pump.
I adjusted a few other pump screws, and took it for a ride last night.
Less smoke, less turbo lag, more power, more RPM - LOVE IT.

Registered User
Joined: Aug 2013
Posts: 4,918
Likes: 603
From: Tulsa, OK
I sprung the extra cash for the coolers you saw, that add the extra quart, on my NV-4500 2nd gen trucks as those tow heavy a LOT.
The 1st gens that I rarely if ever, hook to the trailer get the the flat aluminum plate finned coolers I was getting for $60 a pop.
My buddies shop that does my yearly inspections on a lift, always mention the "cool, coolers" under the rigs.
I did finish the in-board throttle linkage mod yesterday to get a few more RPMs out of the VE pump.
I adjusted a few other pump screws, and took it for a ride last night.
Less smoke, less turbo lag, more power, more RPM - LOVE IT.
The 1st gens that I rarely if ever, hook to the trailer get the the flat aluminum plate finned coolers I was getting for $60 a pop.
My buddies shop that does my yearly inspections on a lift, always mention the "cool, coolers" under the rigs.
I did finish the in-board throttle linkage mod yesterday to get a few more RPMs out of the VE pump.
I adjusted a few other pump screws, and took it for a ride last night.
Less smoke, less turbo lag, more power, more RPM - LOVE IT.

Registered User
Joined: Dec 2008
Posts: 7,300
Likes: 2,886
From: vermont
Registered User

Joined: Dec 2010
Posts: 6,838
Likes: 1,683
From: Land of the Toxic Avenger
Well Oliver got me motivated today, with his posting of his "Fluid Film-ing" his truck, so I decided to get off the duff, and do some to mine.
Last year, I sprayed rust converter in all the cavities of the brick, but never followed up with how it all turned out. Well, to say the least, I'm disappointed. Even though the RC worked, it left lots of residue, and in the adjoining areas, there's surface rust forming. Time to go back to old ways and FF the cavities this time.
Started out with the sun shade removal, and sprayed the roof area above the windshield inside. I then went to each hole along the way that is created by the interior trim screws, and sprayed in each screw hole, working my way back to the rear window on both sides. I shot a can in each side, and then worked my way to the floor.
I pulled the rubber mats I have in there, and opened up the body mount holes. I used my scope to see what was going on, and found surface rust. I then pumped tons of FF in there and closed them back up. I also sprayed inside the door light actuator switches and lubed them up as well. Anywhere I found a hole, I sprayed the stuff in. I then went under the truck and opened up the rubber access holes in the body, and shot it in there. I guess I used about 6 cans of the stuff. We'll see how well it lasts compared to the phosphoric acid I used previously.
Registered User
Joined: Mar 2010
Posts: 7,265
Likes: 1,346
From: Prince George, BC
Places like those cab mount bolts, where you have really good access, I like to use good old grease. Just a couple finger fulls spread on, and around the area. It will weep out to the adjoining areas for at least 6", and is stubborn about being dislodged by winter weather conditions.
Registered User
Joined: Mar 2010
Posts: 7,265
Likes: 1,346
From: Prince George, BC
Today I helped an out of province 1st gen'er look at a truck.
Over on CF he was asking some questions about what to look at, I suggested that he say where the truck was located and maybe some 1st Gen'er in the area could help him out. He responds with the trucks location...about 45 min from me! What are the odds.
So I contact him and tell him I could go look at the truck, but he responded that he had already booked a flight into town to check it out, but would appreciate a second set of eyes since he's not "that" familiar with what to look for.
So met him this morning about 9:30 and went over the truck. Nice unit, but guy was asking a little more then what I/we truly believe it is worth. So he passed.
Nice guy, and I hope he finds the right truck.
Registered User
Joined: Dec 2010
Posts: 6,838
Likes: 1,683
From: Land of the Toxic Avenger
Registered User
Joined: Sep 2011
Posts: 99
Likes: 1
From: Ohio
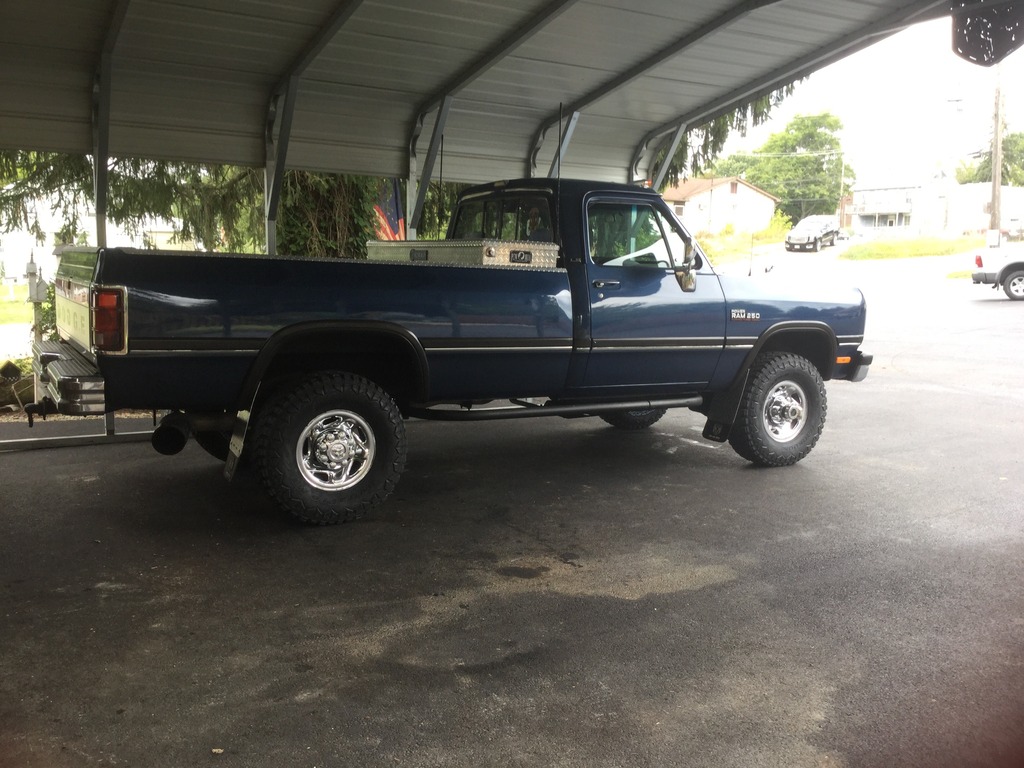
This week installed new rotors,calipers,brake pads, all new brake lines and hose up front. New rear shoes,drums turned down and new wheel cylinders. New tires and front end aligned. Made a big difference.


Registered User
Joined: Apr 2010
Posts: 403
Likes: 18
From: Alberta, Canada
[QUOTE=Jaybird1962;3283723]This week installed new rotors,calipers,brake pads, all new brake lines and hose up front. New rear shoes,drums turned down and new wheel cylinders. New tires and front end aligned. Made a big difference.
WOW, just wow! That is a nice looking truck. Congrats on keeping it looking and running good!
Cheers!
Mike
WOW, just wow! That is a nice looking truck. Congrats on keeping it looking and running good!
Cheers!
Mike

Banned
Joined: Aug 2015
Posts: 884
Likes: 93
From: Jacksonville, FL
Got 2 of my new wheels machined to clear the front hubs. The rears will clear with the center caps on and a 1.5" spacer. This is how they'll sit on the front with a 1.5" spacer. They're from a 2014 ram power wagon.
In this first picture you can see how much bigger the opening had to be machined
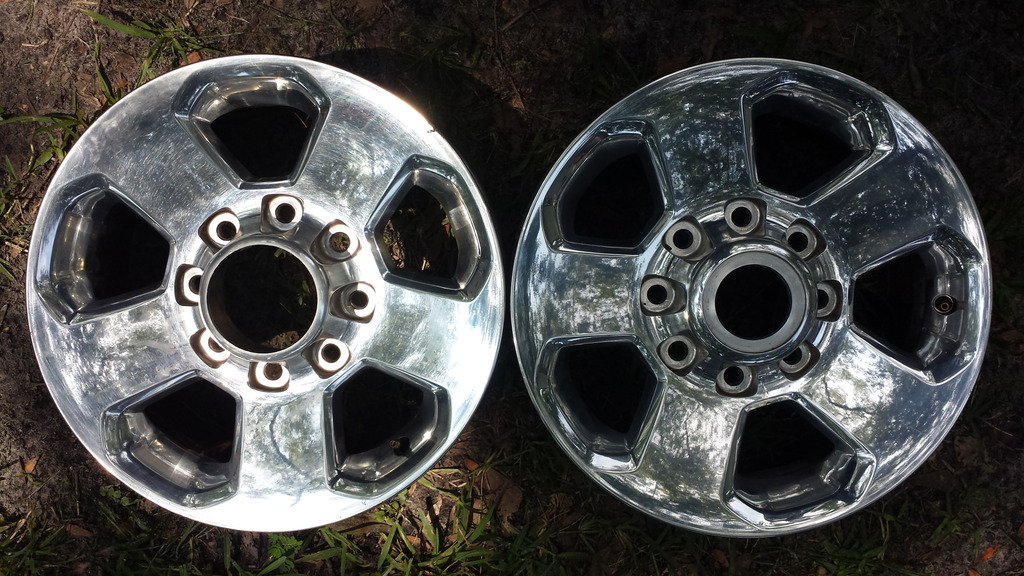


In this first picture you can see how much bigger the opening had to be machined


Registered User
Joined: May 2005
Posts: 2,867
Likes: 536
Nice wheels, man!!! Envious!! Clean rig to boot! Well, I finally get to post something on this thread- finished up my Fluid Damper install. Awsome product that is. For the $$ forked out, you will be glad in the investment. My OEM 22 year old damper, looking closely at it, was on its way to balancer heaven. The rubber surrounding the steel was 2/3 cracked, and at one spot was protruding outward. Not much, but if you looked real close one could see the imperfection. I also redid my KDP tab with the TST kit. It is a very beefy tab. The tab I had previous was a piece of light gage sheet metal, and although it was doing its job, my reasons for re doing my KDP was to re tourque all timing case bolts, put a new crank seal in, and re seal the gear cover, this time with both gasket and sealant. The underside of the gear cover was oil wet, meaning probably a slight leak. Good maintenance and feel good about re tourqueing things. Also swapped out the original fan pulley bearing. Good times there. Just wanted to add that the Stickey was a big help- I was able to print out Thrashing's Fluid Damper post, the post on the fan bearing, and on a search I found NJT's post on his KDP fix back in 2012. So in a round about way, thanks to you all
Registered User
Joined: Aug 2013
Posts: 4,918
Likes: 603
From: Tulsa, OK
Nice wheels, man!!! Envious!! Clean rig to boot! Well, I finally get to post something on this thread- finished up my Fluid Damper install. Awsome product that is. For the $$ forked out, you will be glad in the investment. My OEM 22 year old damper, looking closely at it, was on its way to balancer heaven. The rubber surrounding the steel was 2/3 cracked, and at one spot was protruding outward. Not much, but if you looked real close one could see the imperfection. I also redid my KDP tab with the TST kit. It is a very beefy tab. The tab I had previous was a piece of light gage sheet metal, and although it was doing its job, my reasons for re doing my KDP was to re tourque all timing case bolts, put a new crank seal in, and re seal the gear cover, this time with both gasket and sealant. The underside of the gear cover was oil wet, meaning probably a slight leak. Good maintenance and feel good about re tourqueing things. Also swapped out the original fan pulley bearing. Good times there. Just wanted to add that the Stickey was a big help- I was able to print out Thrashing's Fluid Damper post, the post on the fan bearing, and on a search I found NJT's post on his KDP fix back in 2012. So in a round about way, thanks to you all

Registered User
Joined: May 2005
Posts: 2,867
Likes: 536
I didn't want to repeat myself for fear of putting all here to sleep. I posted a long result reply on my own thread" in preparation for the FD install". But for you,T here is a condensed version: Big difference in idle. When I say big, I mean, that could mean different to others, but for me, big means a nice diesel humm. Couldn't wait to get my rig on some open road like on the freeway. Now, once I got on the 101 on ramp heading south I punched it to get it up to around 2200-2400 rpm. This time it was different. Before the install, it felt like my rig was working hard to get and maintain that rpm. By sense of feel, I wouldn't want to keep the truck at that rpm for long. Felt like I was overdoing it, y' know? Now, though, man it felt good- smooth at that rpm level like others have documented. Pros and cons to the FD. Addition? Pros would be: 1. The smoothness of the idle as noted 2. Now easier to adjust the sensor gap, and because of the new location of the sensor, easier to keep clean. It's out in the open. 3. The new sensor bracket is freakin beefy and well designed. I suggest to anyone doing this in the future to invest in a new cummins sensor from Geno's, cause the new sensor has wider, ovaled, holes to make gap adjustments a snap, vs. rat tail filing the original sensor that has one oval and one round hole on the sensor bracket. 4. This FD is a done deal. Never have to get another balancer again. Now the cons: 1. Fan blade vs. damper thickness is very real. You have to shim the clutch bolt head forward towards the radiator to clear the blades from the damper. Others have used a thick washer on the face of the pulley. I avoided that and instead filled the bolt head with 3 thick washers from my local Ace hardware. They were 3/8" cut washers, grade 8, and were 1/8" in thickness( they were labeled in the Ace bins as Extra Thick Washers). I had to grind the diameter down to fit cleanly into the bolt. While on the clutch, if yours has straight on top of the hex portion, your golden cause that means more thread to attach to the pulley hub. If yours is just a hex head like mine was, you will be left with about 3 or less threading to attach to the hub. Luckily, I had a spare Hayden brand clutch, which had the straight above the hex. That gave me close to 4.5 threads. 2. Access to a belt swap in the future will be cumbersome, due to the new sensor bracketry. I must be prepared with a set of brass feeler gages to reset the .050 gap, along with wrenches to remove the sensor to clear the fishing in of the belt. 3. Lastly, the $$$ cost for that FD. Searched everywhere, and took Thrashin's advice on going thru XDP diesel performance. They were the lowest in coin, and the shipping was free. Sensor bracket included in the price. I saved up for almost a year to get this thing. Every once in awhile we look at certain expenditures as pricey, but a feel good investment. FD was no different