When you click on links to various merchants on this site and make a purchase, this can result in this site earning a commission. Affiliate programs and affiliations include, but are not limited to, the eBay Partner Network.
1st Gen. Ram - All TopicsDiscussion for all Dodge Rams prior to 1994. This includes engine, drivetrain and non-drivetrain discussions. Anything prior to 1994 should go in here.
New to the site here and Cummins owner for only a year now. Before I did any work on my truck I came here for advice.. just wanna say thanks to all who have done what I've done and posted it. 91.5 w250....Last weekend I did an nv4500 conversion as well as installed the compounds I've been putting together. Billet 60mm h1c 12cm housing feeding a massive Cummins Qsx premier 84mm turbo i won at auction on eBay for $226 shipped.. thing was brand new!! Zoom racing clutch and flywheel. Running 200hp 5x.16 nozzles with pump tuning, pin, etc... 5" turbo back to 6" stack laid horizontal out the side of my bed. It's not done nor is it pretty but it runs **** good and I pull approx 8,000# every day averaging 16 mpg. If anyone is interested in seeing pics tell me how to upload them and I'll b happy to show off my back yard mechanics
ABS8504..... I resize my pictures to 640 x 480. Save them in JPG format (compresses the file) Then I upload them to photobucket. (free, and quite a bit of free storage) Then click on the direct URL for that picture, and it'll copy it's URL to your clipboard.
Now, when composing a message, click on the "insert image" icon, paste that URL in from your clipboard, and it'll display.
It actually works better and easier than trying to upload them to DTR.
The reason you resize the pictures (in any photo editor) is that a megapixel picture will spread way out, making it hard to view, and requiring readers to use the bottom slider to see all the messages on that same page. Irritating to say the least. 640 x 480 is big enough to see, and small enough to fit on everybody's screen.
ABS8504..... I resize my pictures to 640 x 480. Save them in JPG format (compresses the file) Then I upload them to photobucket. (free, and quite a bit of free storage) Then click on the direct URL for that picture, and it'll copy it's URL to your clipboard.
Now, when composing a message, click on the "insert image" icon, paste that URL in from your clipboard, and it'll display.
It actually works better and easier than trying to upload them to DTR.
The reason you resize the pictures (in any photo editor) is that a megapixel picture will spread way out, making it hard to view, and requiring readers to use the bottom slider to see all the messages on that same page. Irritating to say the least. 640 x 480 is big enough to see, and small enough to fit on everybody's screen.
ASB- I'd be proud to say those welds were mine but I'm not a gold standard by any means.
JM - looks like you know a keyboard almost as well as a Fluke LOL
Well I take that as a compliment I don't mean to boast but I did take a college welding class in high school.. been about 12 years. Using a real crappy Campbell and hausfield mig/flux welder. It gets the job done with enough patience but nothing like a Lincoln or Miller.
I use a HF mig welder. In fact I used it yesterday to fix a manufacturer's mistake in my rear brakes.
Brakes worked fine till the parking brake failed. Opened it up and found that the parking brake tang had over ridden the rear brake shoe. Fixed the left side, then decided to start documenting what I did, so here's the right side.
Found the parking brake tang about to ride over the rear (left) shoe. The shoes had worn very nicely. As I remember they are a high service grade semi-metalic I bought on close out at Rock Auto.
Took the shoe off. The upper ear on the shoe should be about as large as the lower one. You can see that the tang had already gouged into it some.
Added some weld metal, and ground it down to shape. After I installed it, I trimmed up the top a bit with a die grinder to clear the drum. Building up the ear was super easy with the HF mig welder.
Put everything back together and the brakes are again good.
I use a HF mig welder. In fact I used it yesterday to fix a manufacturer's mistake in my rear brakes.
Brakes worked fine till the parking brake failed. Opened it up and found that the parking brake tang had over ridden the rear brake shoe. Fixed the left side, then decided to start documenting what I did, so here's the right side.
Found the parking brake tang about to ride over the rear (left) shoe. The shoes had worn very nicely. As I remember they are a high service grade semi-metalic I bought on close out at Rock Auto.
Took the shoe off. The upper ear on the shoe should be about as large as the lower one. You can see that the tang had already gouged into it some.
Added some weld metal, and ground it down to shape. After I installed it, I trimmed up the top a bit with a die grinder to clear the drum. Building up the ear was super easy with the HF mig welder.
Put everything back together and the brakes are again good.
I ran into the same thing on some napa relines.
Other problem that I found with them was they didnot line up with the cylinder.
Cylinder has the little arms coming out of the to push shoes they were pointing downward.
The H shape at the end of the arm that goes into the shoes casing. Well the slot on the casing was huge + sloppy fit.
Bought some Hecho in Mexico raybestos they fit like they should..
Had a squeak that has been getting worse over the last few weeks. I could hear it over on the passenger side, up around the RH side of the dash, and up by the window seal. Turned out one of the dash screws had come loose. Tried tightening it back down, and it stripped. SO out it came, and long piece of bailing wire went in to the hole, then screwed it back in....seemed to grab and tighten down nicely!
That quieted it down a bit, but it was still there. Pulled the pillar post cover and replaced the foam tape on the end and replaced. Was still noisy. SO pulled the kick panel. Turned to it was the factory rubber anti-squeak strip was so hard from age that it was causing a lot of that noise. Again put some foam tape in that area and installed.
Nice and quiet now! Well as quiet as these old rattle traps can be....
My Brick is at the shop having the fender painted that I scratched backing my trailer into the yard......
in the meantime...
Fair warning to you guys: When I first took my plow apart this year, another snow storm moved in, and i needed to put the plow back together for my commercial account who wanted the lot done for the event.
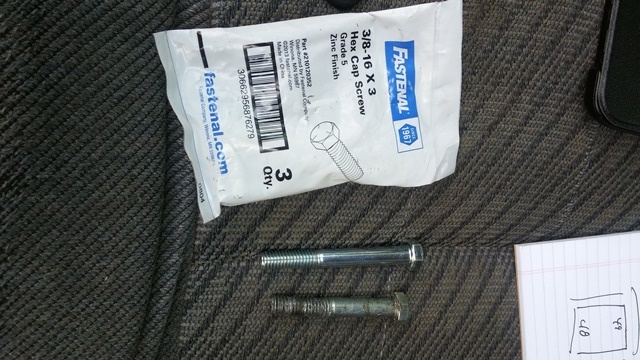
With that.. I misplaced a few of the bolts that I had with the plow, so I went to Blowes (Lowes) Home Impruuuveeement and bought what I needed for quick reassembly. Normally, I buy from Fastenal, but I was in a pinch.
SO, fast forwards to taking the plow back apart:
After one storm, which consisted of two commercial lots, and a few residentials, I took the plow back a part again, and found the new bolts I bought were BENT. I was floored that after only one push they were shot.
So I brought the bolts to fastenal to get the Grade 5 bolts I needed, and western specifies for their plows. When I showed them the bolts they said:
"oh, you have grade 2 bolts here, and that's why they bent ".
Turns out Blowes is selling GR 2 bolts as GR 5. Nice, huh ? So for everyone out there who works on your own (anything).... use their crap at your own risk.
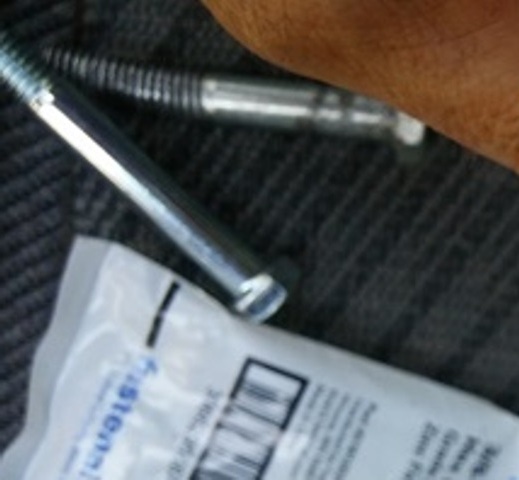
Hard to see in this pic, but the bolt is banana shaped.
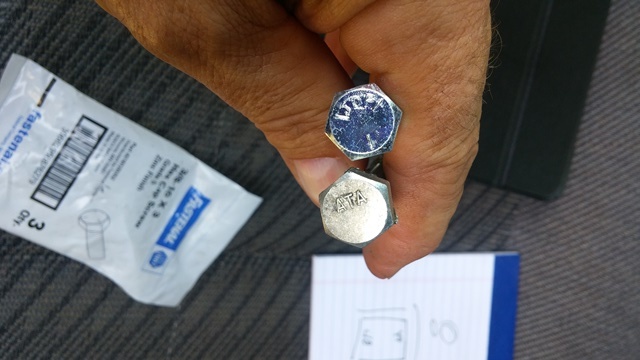
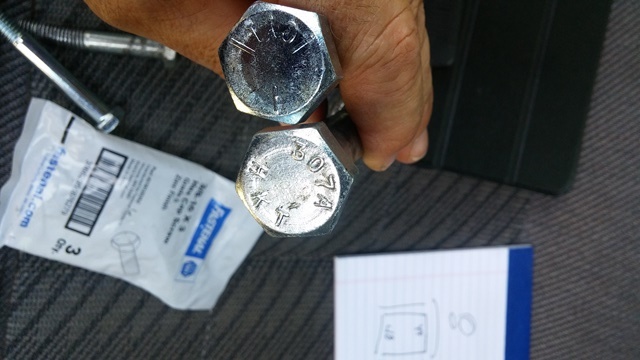
Real GR 5 bolts have the 3 lines on the bolt head like the one on top in this picture. GR 2 bolts (bottom bolt) have no lines, but letters so the check out girls know what bolts you're getting.
Here are the larger 5/8" bolts that hold the quadrant to the blade, and you can see the Banana Bolt in the left hand side of the picture on the seat of my truck.
One Push and even the 5/8" bolts were slightly curved. Again, use at your own risk...
Other problem that I found with them was they didnot line up with the cylinder.
Cylinder has the little arms coming out of the to push shoes they were pointing downward.
The H shape at the end of the arm that goes into the shoes casing. Well the slot on the casing was huge + sloppy fit.
Bought some Hecho in Mexico raybestos they fit like they should..
I noticed that they were slightly displaced downward also. The end of the push rod is rounded. I presume that is to compensate for slight misalignment. Anyway, it'll have to do till next round, which will be new drums, decent shoes, and new parking brake cables. Boots and retainers are gone on these. Bailing wired at the wheel, and Minnesota road salt in the boot end will soon lock them up if not replaced.
T-Man...Wow those bolt are junk! And yes I knew about the hash marks denoting grade strength....but always good to remind, and inform others to look out for this cheap hardware.
T-Man...Wow those bolt are junk! And yes I knew about the hash marks denoting grade strength....but always good to remind, and inform others to look out for this cheap hardware.
Employees at most chain stores wouldn't know the difference between a coconut and a peanut. Understanding the ages old bolt grade marking system is way beyond them.
Same crew at Menards that can't dazzle you with knowledge, so they try to baffle you with b*******.


 I don't mean to boast but I did take a college welding class in high school.. been about 12 years.
 Using a real crappy Campbell and hausfield mig/flux welder. It gets the job done with enough patience but nothing like a Lincoln or Miller.