
Crewcab update...


Super Moderator


Joined: Nov 2015
Posts: 955
Likes: 419
From: NE Wa
The only movement they were able to do was the approx. 2.5" in the dogbone.. the only reason I asked was on my sons 91.5 it had a solid shaft and if you grabbed the steering wheel you could pull it towards you about 3/4".
We changed the column and built a shaft from parts off a 95 and everything seems ok.. not sure if that was the problem hence the question.
We changed the column and built a shaft from parts off a 95 and everything seems ok.. not sure if that was the problem hence the question.
Thread Starter
Registered User

Joined: Mar 2010
Posts: 7,265
Likes: 1,346
From: Prince George, BC
Sorry never responded...sounds like the upper snap ring came off on the steering column main shaft....it snaps on just below the splines where the steering wheel attaches.
Thread Starter
Registered User
Joined: Mar 2010
Posts: 7,265
Likes: 1,346
From: Prince George, BC
Pulled the front driveshaft and dropped off at a local driveline shop for a rebuild. All three U-joints were toast which is a little disappointing since I paid good money for Spicer U-joints when I rebuilt it the first time and it was still sporting the OEM units at that time, so I only got 5 years out of them. 
Registered User
Joined: Dec 2010
Posts: 6,838
Likes: 1,683
From: Land of the Toxic Avenger
Pulled the front driveshaft and dropped off at a local driveline shop for a rebuild. All three U-joints were toast which is a little disappointing since I paid good money for Spicer U-joints when I rebuilt it the first time and it was still sporting the OEM units at that time, so I only got 5 years out of them.
By having them balanced and Spicer greaseless units installed, I'm hoping to get 10 years before redoing them. The local driveline shop doesn't charge a lot for replacing and balancing. I think I paid $250 for new Spicer non grease joints and balamcing
I did provide them a new carrier bearing from Dodge, though. I had previously used eBay unit, and I didn't get a year out of it before the rubber ripped out of it.
I think balancing properly is key.
Thread Starter
Registered User
Joined: Mar 2010
Posts: 7,265
Likes: 1,346
From: Prince George, BC
 But as we all know with work, wife and kids (mine are now teens and driving) the amount of spare time for things "you" want to do is sometimes hard to find.
Registered User
Joined: Jan 2019
Posts: 9
Likes: 3
I have lots of project that are required on the truck but my focus has been getting my shop built so I have somewhere to do these projects. But as we all know with work, wife and kids (mine are now teens and driving) the amount of spare time for things "you" want to do is sometimes hard to find.
But as we all know with work, wife and kids (mine are now teens and driving) the amount of spare time for things "you" want to do is sometimes hard to find. I think I know that feeling all too well. It�s been a great thread. A whole lot of ah ha! moments and ideas came to mind. The detailed write ups are killer.
Thread Starter
Registered User
Joined: Mar 2010
Posts: 7,265
Likes: 1,346
From: Prince George, BC
When we had the super cold arctic temps here a couple weeks ago I hopped in the truck after work, gave the shifter a tug back and forth to make sure I was in neutral and the shift boot shattered! Guess 25 year old rubber and -40*C temps conflict with each other. 

I never had an inner boot so I was dealing with the cab pulling in exhaust fumes....my exhaust is very old and starting to sport a few holes here and there. I spent several hours searching for an OEM NV4500 shift boot but could not find one so finally researched aftermarket shift boots until i found something I thought might work.
I went with a small shift boot that said it would cover a 4"x5" hole for the inner boot...

And went with a larger one that said it's outside dimensions were 7.5" x 8.75"...


I never had an inner boot so I was dealing with the cab pulling in exhaust fumes....my exhaust is very old and starting to sport a few holes here and there. I spent several hours searching for an OEM NV4500 shift boot but could not find one so finally researched aftermarket shift boots until i found something I thought might work.
I went with a small shift boot that said it would cover a 4"x5" hole for the inner boot...
And went with a larger one that said it's outside dimensions were 7.5" x 8.75"...
Thread Starter
Registered User
Joined: Mar 2010
Posts: 7,265
Likes: 1,346
From: Prince George, BC
Now the install...
My NV4500 is still running the old "bottle top" top and shift tower so I had to force the boots over the shift ball. I used my heat gun and some fluid-film spray to get the boots onto the shifter stock without damage or tearing the new rubber.
Small shift boot installed...


My NV4500 is still running the old "bottle top" top and shift tower so I had to force the boots over the shift ball. I used my heat gun and some fluid-film spray to get the boots onto the shifter stock without damage or tearing the new rubber.
Small shift boot installed...


Thread Starter
Registered User
Joined: Mar 2010
Posts: 7,265
Likes: 1,346
From: Prince George, BC
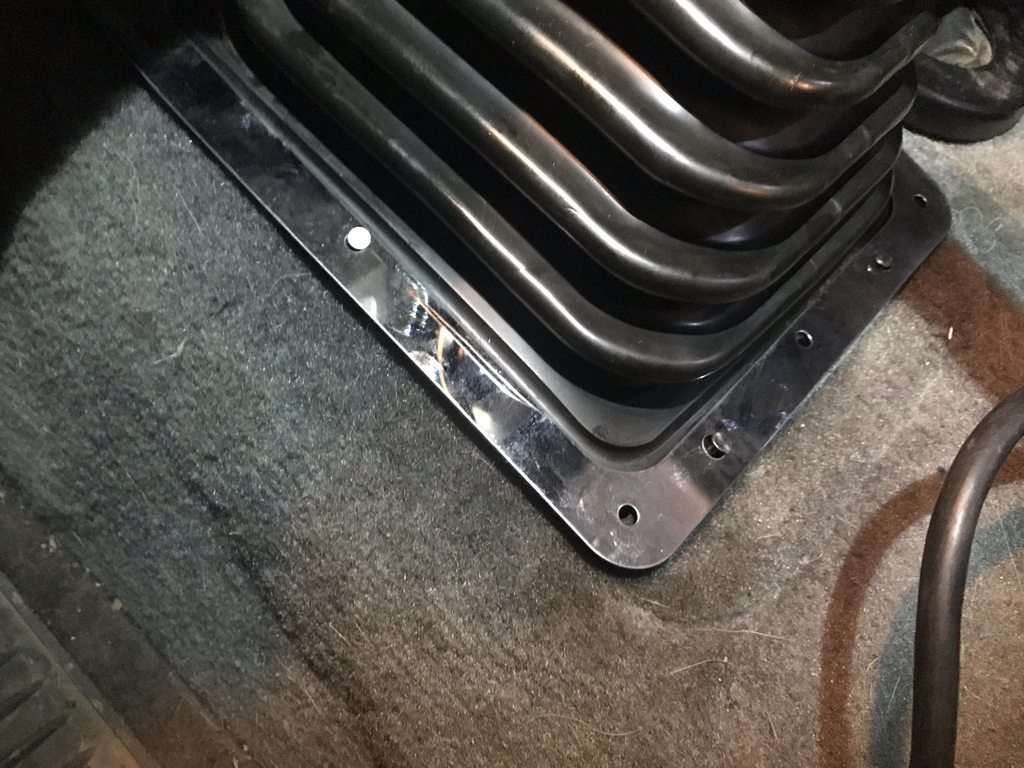
Then came the big boot. I did not want to drill new holes so I used the OEM boot retaining ring to mark out the current screw locations, then punched the rubber and drilled the retaining ring. Oncew that was done I used my trick of placing nails through all the holes and down through the carpet to get everything aligned.

Once aligned you just remove one nail at a time and place a screw....works pretty well.
Screwed down and in place...


And managed to get the OEM plastic trim piece in place as well....


Been using it now for a week and it's not too bad, the new rubber is pretty stiff though in the cold so not sure how it's going to stand up long term but at least I'm not choking on fumes anymore.
Thread Starter
Registered User
Joined: Mar 2010
Posts: 7,265
Likes: 1,346
From: Prince George, BC
This spring I will finally order a new Stainless 4" exhaust system for Patches, been milking the OEM pipes for 10 years now, and they were old when I put it together then, so I think it's time. As well will be ordering a couple KKS aluminum radiators, one for Patches, and the other for when I get the Cummins Conversion done on Sno-ball.
As well will be ordering a couple KKS aluminum radiators, one for Patches, and the other for when I get the Cummins Conversion done on Sno-ball.
Registered User
Joined: Dec 2010
Posts: 6,838
Likes: 1,683
From: Land of the Toxic Avenger
This spring I will finally order a new Stainless 4" exhaust system for Patches, been milking the OEM pipes for 10 years now, and they were old when I put it together then, so I think it's time. As well will be ordering a couple KKS aluminum radiators, one for Patches, and the other for when I get the Cummins Conversion done on Sno-ball.
As well will be ordering a couple KKS aluminum radiators, one for Patches, and the other for when I get the Cummins Conversion done on Sno-ball.