
Replace your Dodge blower motor using a GM Blower Motor


Thread Starter
Administrator


Joined: Nov 2004
Posts: 4,084
Likes: 235
From: Southern California
Part-1 How to replace your Dodge blower motor using a GM Blower Motor.
It all started 2 days ago when my heater/ defroster blower motor decided to fail me during a heavy downpour, finally made it home looking through fogged up windows, as I waited for the rain to stop I got out my spare blower motor and a few tools for a simple replacement.
So the rain stops and I am ready to work.
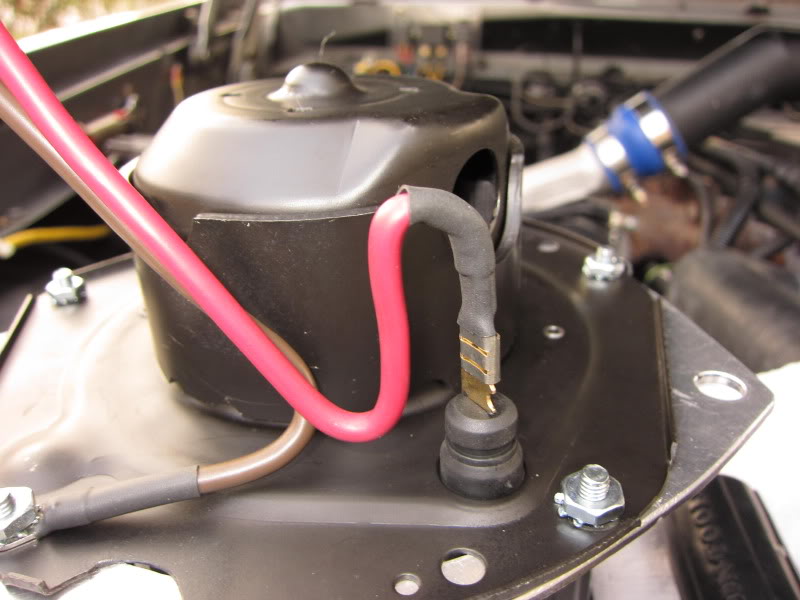
First I needed to remove my auxiliary battery and tray so I had plenty of room to work, then I had to disconnect lots of connectors, relays and heavy gauge cables, unless you have small linear accelerator like I do you should not have very many things to disconnect.
With everything out of the way you then need to remove I believe the 6) 5/16� hex head screws that secure the insulation cover to the firewall and then carefully remove it, it takes a lot of twisting and turning back and forth to get it but it does slip out.
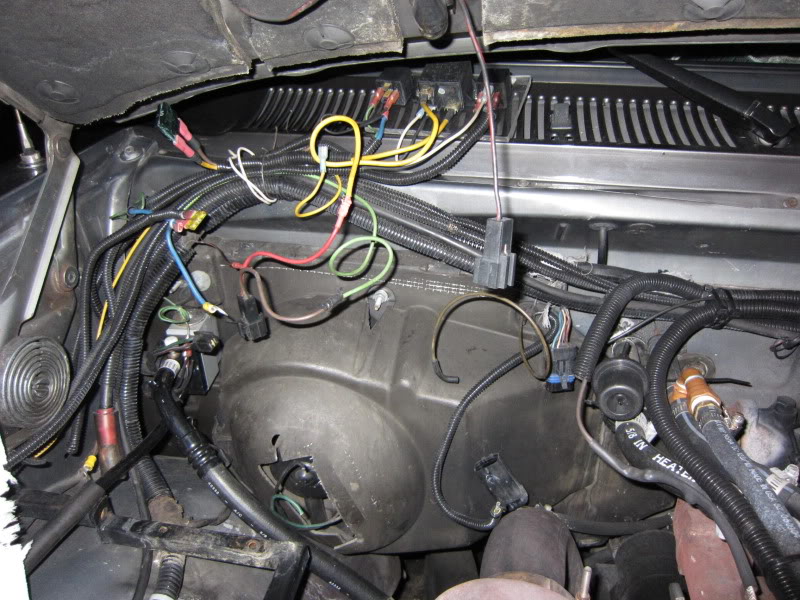
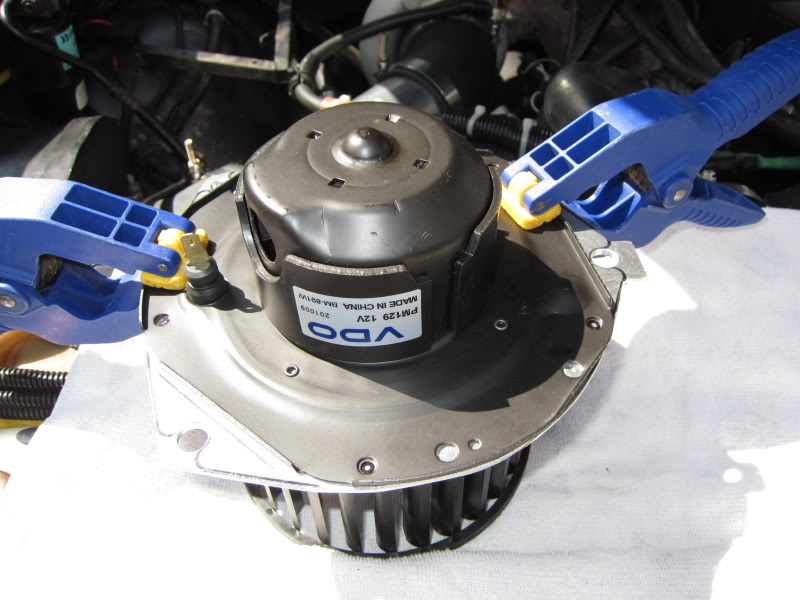
Now with the cover off it is east to see how the motor is mounted, I had already diagnosed the problem as a bad motor so I already disconnected the wires to my relay.
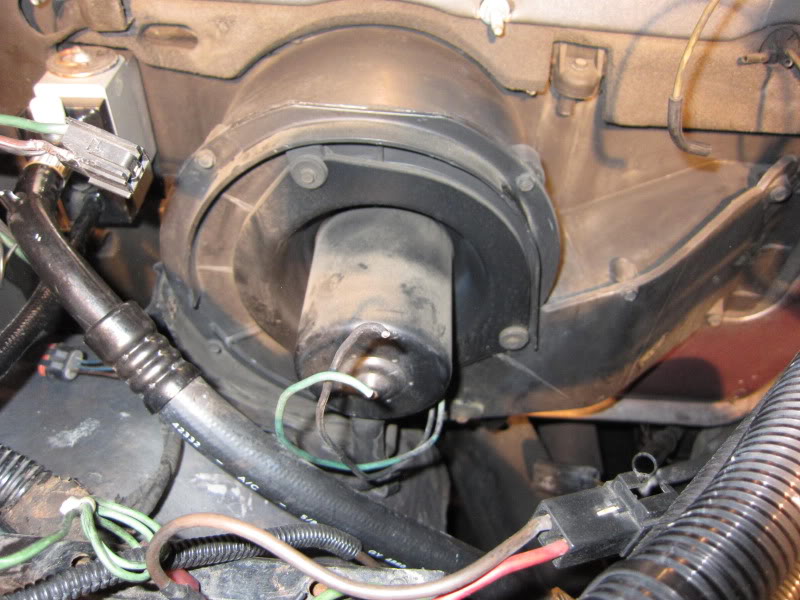
Remove the 3) �� hex head screws and then remove the motor and rubber isolation mount together as one.
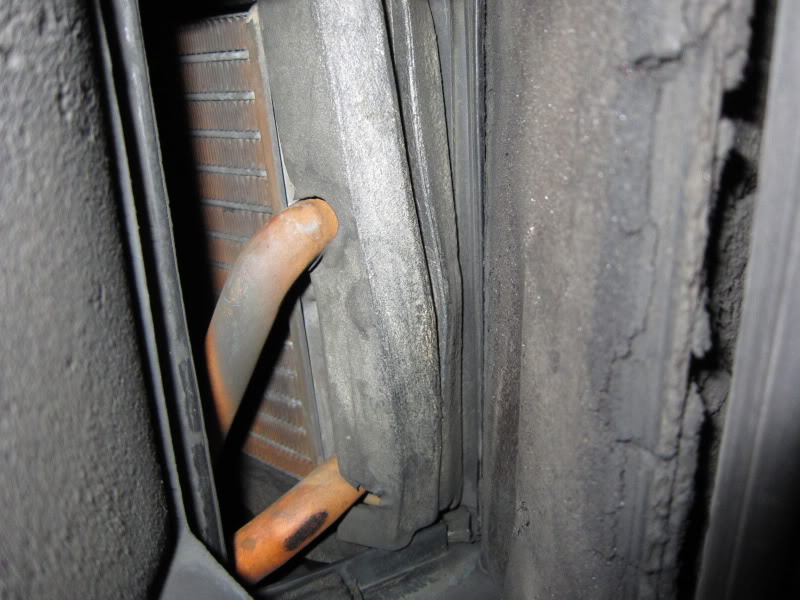
Rotate the motor to the flat side of the frame and you can carefully slip it off next to the refrigerant line, try not to pry on the line.
Here you can see how it draws fresh air through the evaporator.
And discharges it out through the heater core, now you can see why it is important that your hot water valve needs to shut off the hot water for the air conditioner to produce good frigid air.
A/C units on transit coaches rely on tempering the air to keep from freezing the passengers solid like a deep freeze.
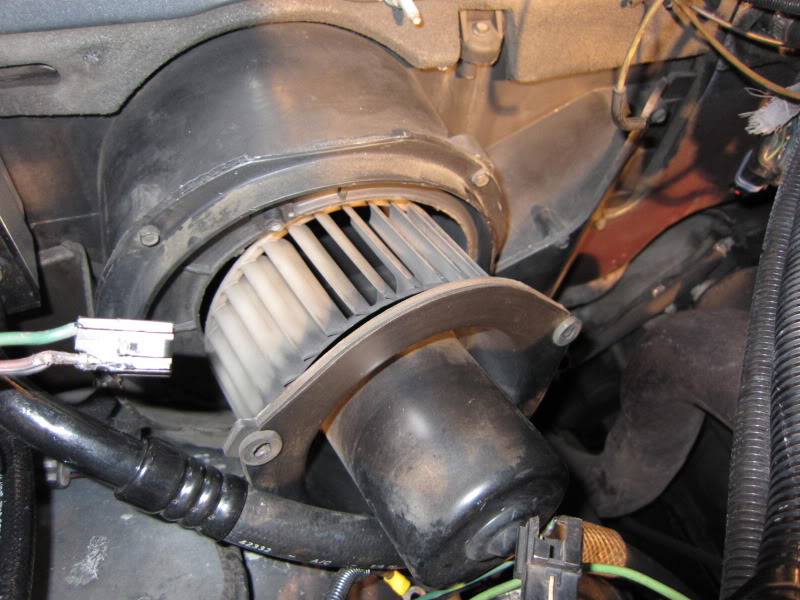
Now if I was going to just replace the blower motor here it would be a simple task of swapping out the motor on the old blower wheel, clean out the air box using compressed air from the inside to the outside, I would them wipe down all of the air box and plenum using a cotton towel and Windex to get rid of the dust.
And then simply reverse the order to finish the job,
But when I took the blower wheel off the old motor I found out that I had several broken vanes on the blower wheel.
So after about a hour on the phone with every auto parts and automotive A/C shop I could think of I came up empty handed, I had called West Covina Dodge and he told me that blower wheel has been discontinues several years ago so I ask him if he could use the locator and he said he found ONE at a dealer CW Beamgard in Atwood Kansas remember I am in Southern California so he gave me the phone number, I called them and I talked to a guy also named Jim and I ask him about the blower wheel and I ask him if he could get it and describe it to me. He comes back and I ask him to read the part number off the casting and guess what, IT IS THE WRONG PART, someone put the wrong wheel in the right box so now there are NO blower wheels at any Dodge Dealer anywhere, but he did say they had a couple of wrecked D-350�s on the lot and he was going to go and see if they had the blowers in them yet and he would call my back.
He said he had a D-350 like mine, bought it new and he really loved that truck.
So now here I am with a broken blower wheel, I cannot get one anywhere at least right now and I need my heater. So what to do�
I will make something else fit.
So I went to Pep Boys and started looking at the computer for blower motors that came with wheels, that were close to the original size and vane count and it had to turn in the right direction and before he could find anything I said get me a blower motor for a late 1982 Chevy truck, he brought one out and they are almost a perfect match except for the mounting flange on the motor.
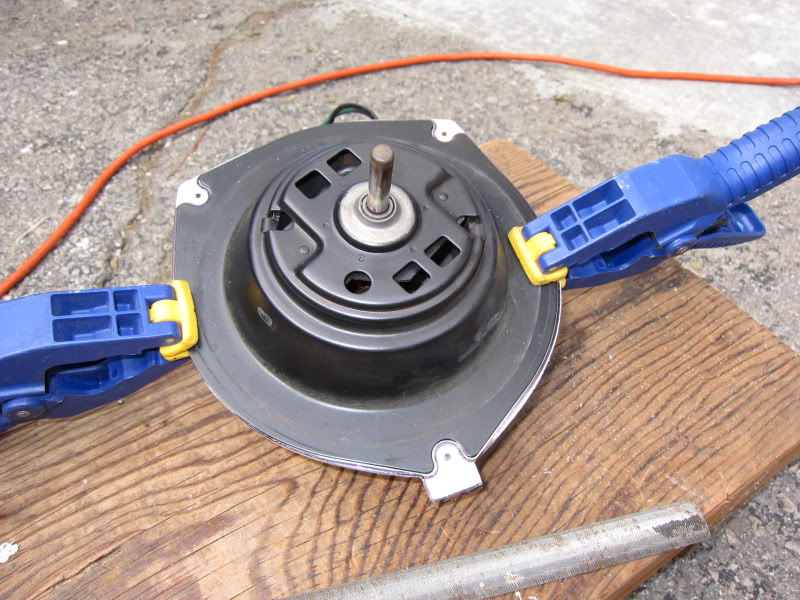
Here is the motor that I bought, it fits 1988-1993 Chevy Truck and probably many more GM applications, it is a short motor with a permanate magnet field.
VDO
PM129
#35334
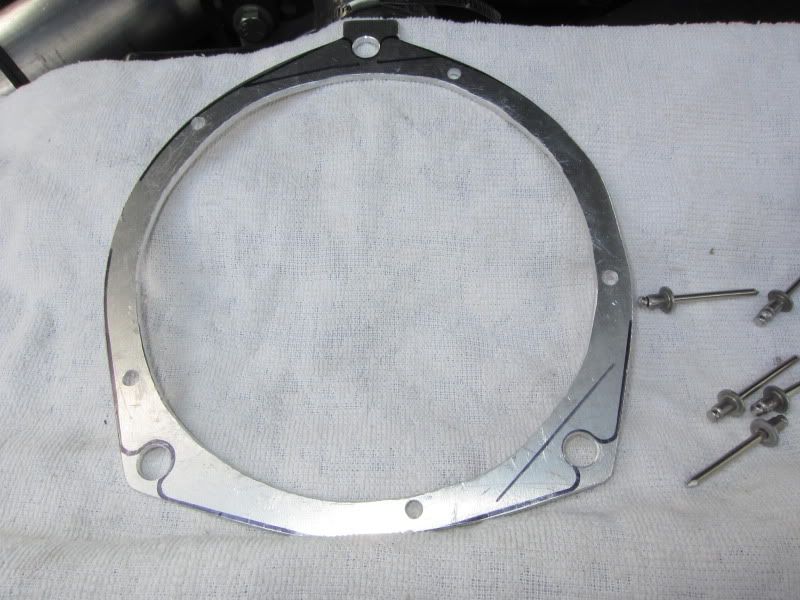
So since the mounting flanges are different I figured the best thing to do would be to make a mounting ring so I could adapt the new motor to the old flange so with the motor out I took a piece of cardboard and using the old motor and the rubber isolator drew out a template of the motor and cut out the inside so I could mount the new motor inside of it.
After a few trial fits I came up with a design I felt would work, then I transferred it to a piece of aluminum and using only a jig saw to cut out the initial shape I then brought it into its final shape using only my 4� angle grinder, � round file and my deburring tool.
Here you can see its progression from idea to the finished product.

Here I them lined up the ring to the old Dodge blower motor so I could transfer the mounting holes using my trusty Sharpie, then using my 18-volt Rigid drill I drilled 3/8� holes in the 3 locations.
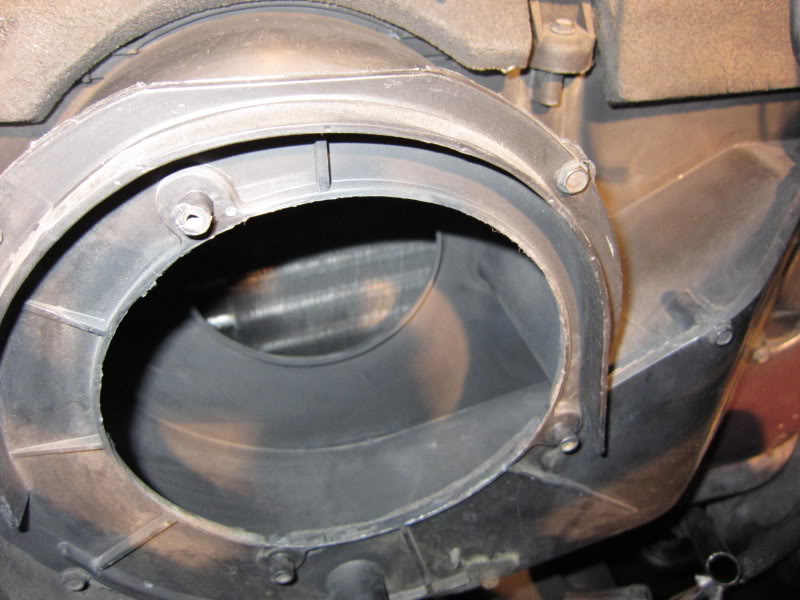
Then I tried the new ring onto the blower housing and checked the perfect fit, not bad for the first try.
After it was to my liking I then took my Sharpie and traced out the inside of the opening of the blower housing so I could center the wheel.

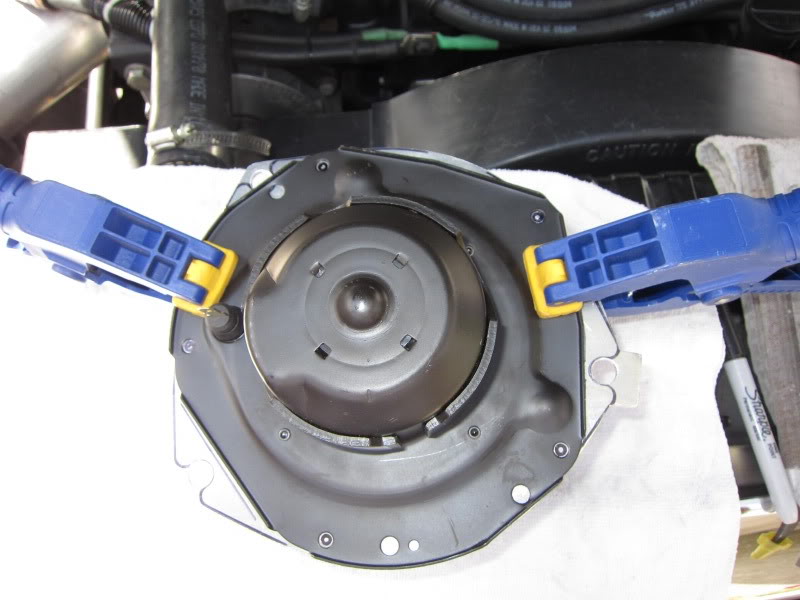
Here I mount it to the new GM blower motor after determining the proper clocking I then centered the blower wheel in the housing and marked the new mounting holes.
Here I drilled out the 5) holes to 3/16� for a #10-32x1/2� countersunk head sheet metal screw.
Pay no attention to the pop rivets; I used them to temporarily locate the motor in the ring I could not find my Cleco fasteners.
It all started 2 days ago when my heater/ defroster blower motor decided to fail me during a heavy downpour, finally made it home looking through fogged up windows, as I waited for the rain to stop I got out my spare blower motor and a few tools for a simple replacement.
So the rain stops and I am ready to work.
First I needed to remove my auxiliary battery and tray so I had plenty of room to work, then I had to disconnect lots of connectors, relays and heavy gauge cables, unless you have small linear accelerator like I do you should not have very many things to disconnect.
With everything out of the way you then need to remove I believe the 6) 5/16� hex head screws that secure the insulation cover to the firewall and then carefully remove it, it takes a lot of twisting and turning back and forth to get it but it does slip out.
Now with the cover off it is east to see how the motor is mounted, I had already diagnosed the problem as a bad motor so I already disconnected the wires to my relay.
Remove the 3) �� hex head screws and then remove the motor and rubber isolation mount together as one.
Rotate the motor to the flat side of the frame and you can carefully slip it off next to the refrigerant line, try not to pry on the line.
Here you can see how it draws fresh air through the evaporator.
And discharges it out through the heater core, now you can see why it is important that your hot water valve needs to shut off the hot water for the air conditioner to produce good frigid air.
A/C units on transit coaches rely on tempering the air to keep from freezing the passengers solid like a deep freeze.
Now if I was going to just replace the blower motor here it would be a simple task of swapping out the motor on the old blower wheel, clean out the air box using compressed air from the inside to the outside, I would them wipe down all of the air box and plenum using a cotton towel and Windex to get rid of the dust.
And then simply reverse the order to finish the job,
But when I took the blower wheel off the old motor I found out that I had several broken vanes on the blower wheel.
So after about a hour on the phone with every auto parts and automotive A/C shop I could think of I came up empty handed, I had called West Covina Dodge and he told me that blower wheel has been discontinues several years ago so I ask him if he could use the locator and he said he found ONE at a dealer CW Beamgard in Atwood Kansas remember I am in Southern California so he gave me the phone number, I called them and I talked to a guy also named Jim and I ask him about the blower wheel and I ask him if he could get it and describe it to me. He comes back and I ask him to read the part number off the casting and guess what, IT IS THE WRONG PART, someone put the wrong wheel in the right box so now there are NO blower wheels at any Dodge Dealer anywhere, but he did say they had a couple of wrecked D-350�s on the lot and he was going to go and see if they had the blowers in them yet and he would call my back.
He said he had a D-350 like mine, bought it new and he really loved that truck.
So now here I am with a broken blower wheel, I cannot get one anywhere at least right now and I need my heater. So what to do�
I will make something else fit.
So I went to Pep Boys and started looking at the computer for blower motors that came with wheels, that were close to the original size and vane count and it had to turn in the right direction and before he could find anything I said get me a blower motor for a late 1982 Chevy truck, he brought one out and they are almost a perfect match except for the mounting flange on the motor.
Here is the motor that I bought, it fits 1988-1993 Chevy Truck and probably many more GM applications, it is a short motor with a permanate magnet field.
VDO
PM129
#35334
So since the mounting flanges are different I figured the best thing to do would be to make a mounting ring so I could adapt the new motor to the old flange so with the motor out I took a piece of cardboard and using the old motor and the rubber isolator drew out a template of the motor and cut out the inside so I could mount the new motor inside of it.
After a few trial fits I came up with a design I felt would work, then I transferred it to a piece of aluminum and using only a jig saw to cut out the initial shape I then brought it into its final shape using only my 4� angle grinder, � round file and my deburring tool.
Here you can see its progression from idea to the finished product.
Here I them lined up the ring to the old Dodge blower motor so I could transfer the mounting holes using my trusty Sharpie, then using my 18-volt Rigid drill I drilled 3/8� holes in the 3 locations.
Then I tried the new ring onto the blower housing and checked the perfect fit, not bad for the first try.
After it was to my liking I then took my Sharpie and traced out the inside of the opening of the blower housing so I could center the wheel.
Here I mount it to the new GM blower motor after determining the proper clocking I then centered the blower wheel in the housing and marked the new mounting holes.
Here I drilled out the 5) holes to 3/16� for a #10-32x1/2� countersunk head sheet metal screw.
Pay no attention to the pop rivets; I used them to temporarily locate the motor in the ring I could not find my Cleco fasteners.
Thread Starter
Administrator
Joined: Nov 2004
Posts: 4,084
Likes: 235
From: Southern California
Part-2
After determining the position of the new motor I transferred their location to the aluminum ring.
Here I checked to make sure the new blower wheel is centered inside the housing, I kept the wheel as close to the back of the housing as possible to keep the most efficient airflow.

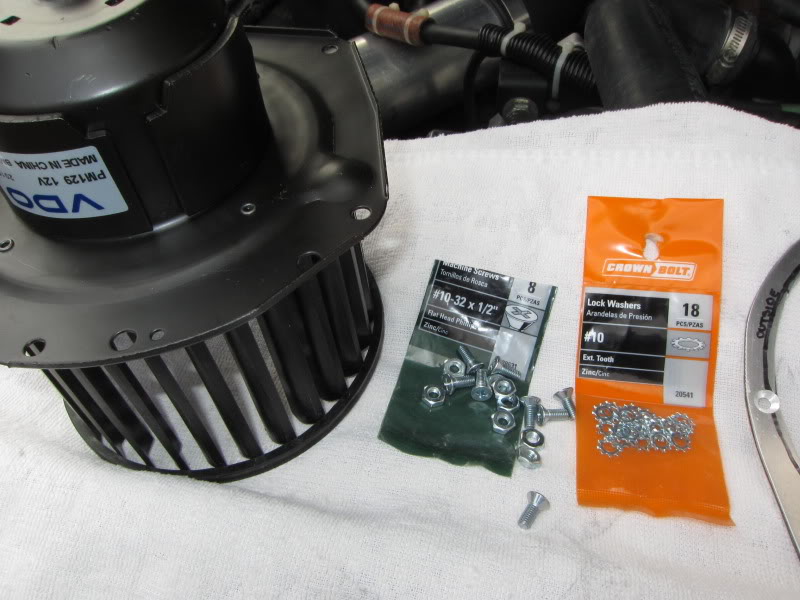
After I drilled the holes to 3/16� I then countersunk them to keep the backside of the ring flat as this is also the mounting surface.
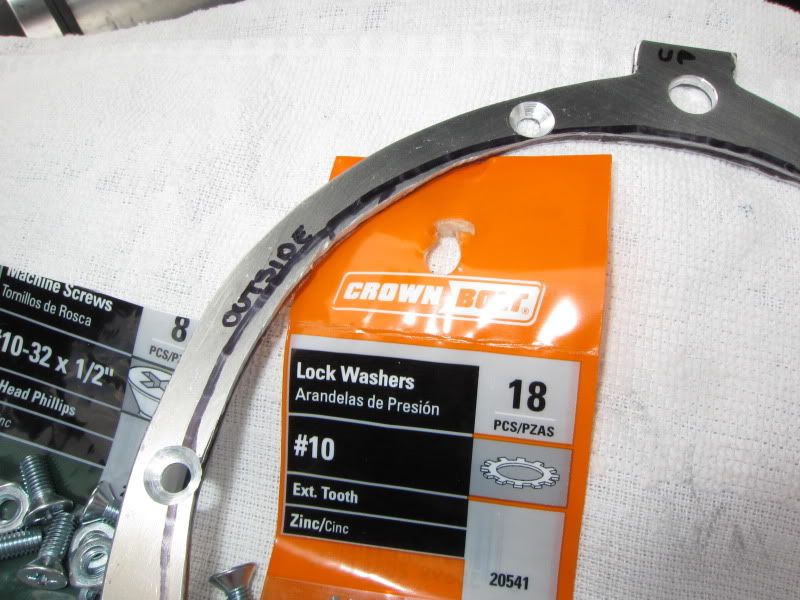
Here is the hardware I used:
5) #10-32x1/2� machine screws
5) 10-32 machine nuts
5) #10 external tooth lock washers
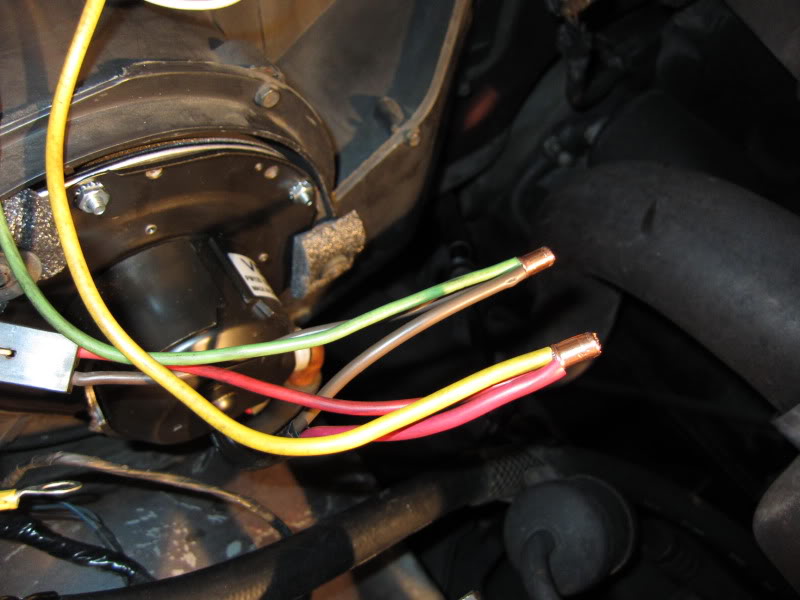
Here since the configuration of the wiring is different on the GM Blower Motor I made my new (-) lead using Brown #10-gauge automotive wire with a High Temperature Ring Terminal crimped and soldered then heat shrink tubing over the terminal.
This is to be secured under the mounting screw and tightened securely.
*Note, the only modification to the GM Blower Motor to fit my adapter ring is the edge of the flange needs to be radiused out around the new mounting hole near the ground wire.
I used my 4� grinder to cut the hole.
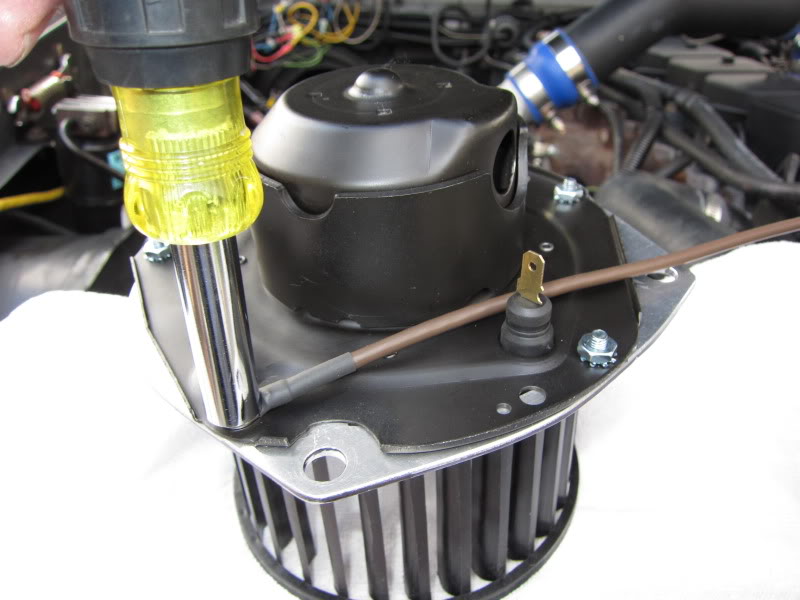
Here is my (+) lead made from Red #10-gauge automotive wire with the High Temperature female spade terminal crimped and soldered and then covered with heat shrink tubing.
I then slipped a section of convoluted tubing over the entire terminal and rubber plug to protect them.
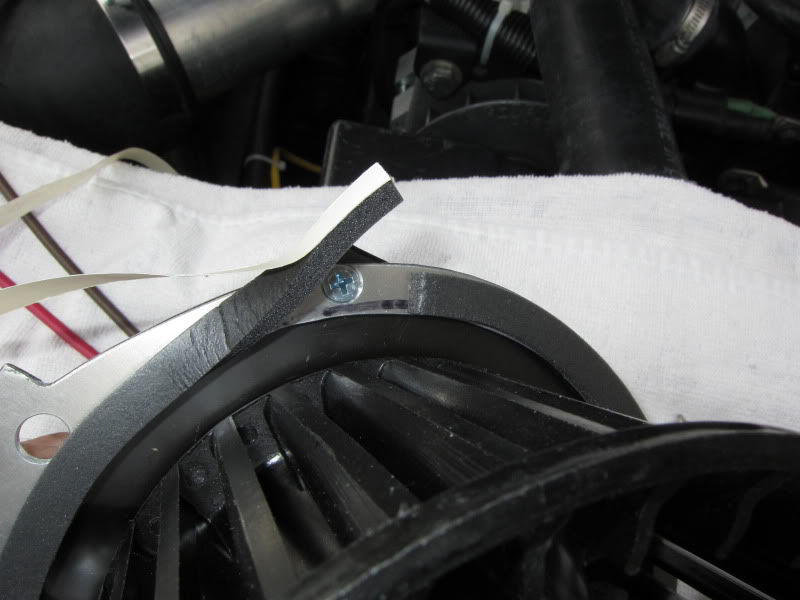
Now with all of the mounting screws tightened I applied Foam Rubber Weatherstripping around the base of the ring where it will seal up to the housing, this will help give an air tight seal and help isolate the motor from the housing.
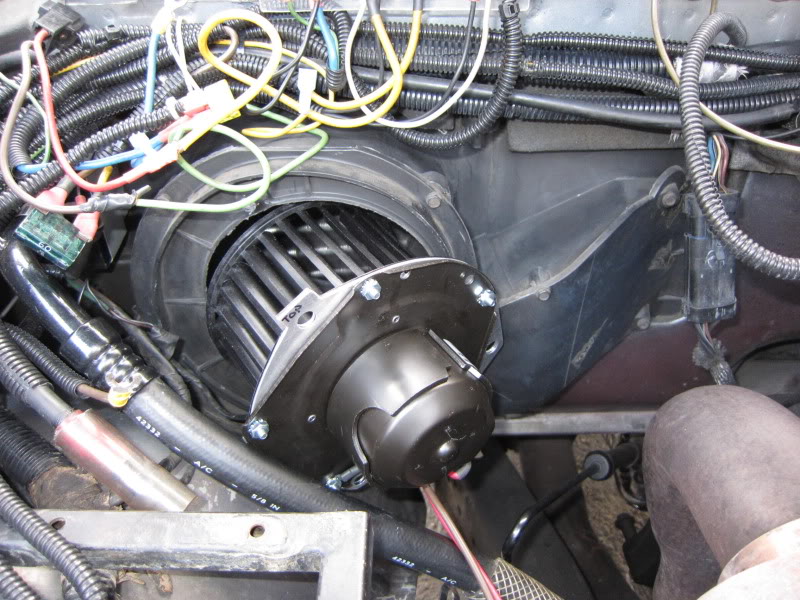
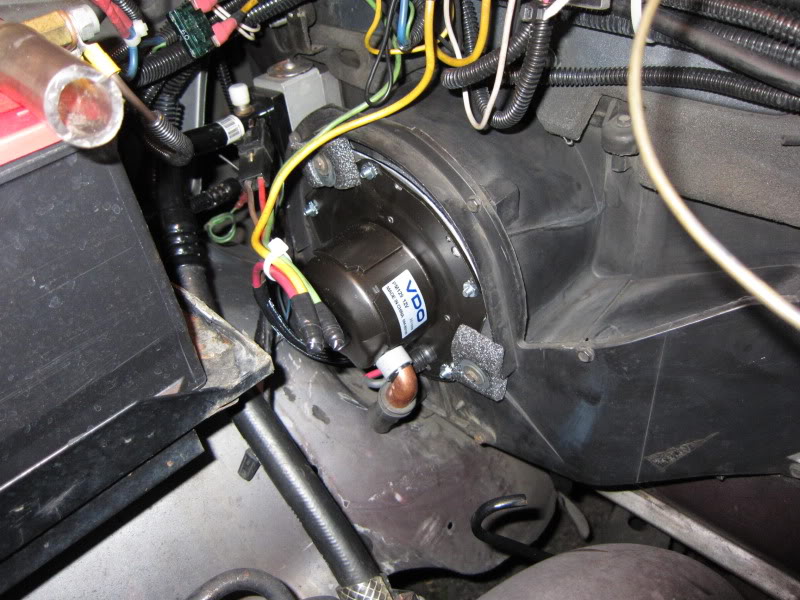
Now the blower assembly is installed into the blower housing.
This was my first idea of how I would secure the motor to the housing but I want the motor and ring to be isolated from the housing for vibration.
Idea
I am going to improve this; I will open up the 3 mounting holes and insert 3/8� rubber grommets so the ring will be suspended on rubber.
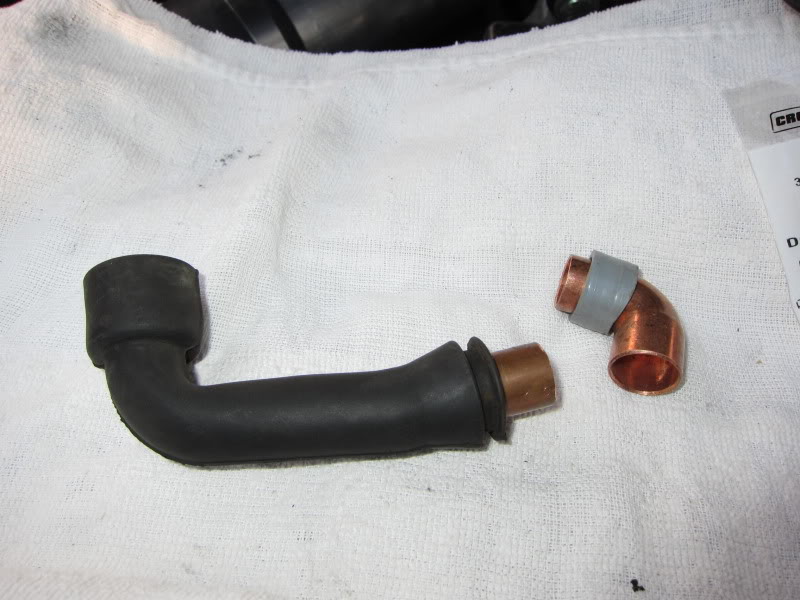
This motor is air cooled by forcing a portion of the air back through the housing, since the clocking of this motor is different I had to modify the factory rubber tube using a 1� section of �� copper tubing and a �� street ell and see where I slipped a section of tubing over the male end of the ell over a single wrap of electrical tape. (tape not seen here)
After determining the position of the new motor I transferred their location to the aluminum ring.
Here I checked to make sure the new blower wheel is centered inside the housing, I kept the wheel as close to the back of the housing as possible to keep the most efficient airflow.
After I drilled the holes to 3/16� I then countersunk them to keep the backside of the ring flat as this is also the mounting surface.
Here is the hardware I used:
5) #10-32x1/2� machine screws
5) 10-32 machine nuts
5) #10 external tooth lock washers
Here since the configuration of the wiring is different on the GM Blower Motor I made my new (-) lead using Brown #10-gauge automotive wire with a High Temperature Ring Terminal crimped and soldered then heat shrink tubing over the terminal.
This is to be secured under the mounting screw and tightened securely.
*Note, the only modification to the GM Blower Motor to fit my adapter ring is the edge of the flange needs to be radiused out around the new mounting hole near the ground wire.
I used my 4� grinder to cut the hole.
Here is my (+) lead made from Red #10-gauge automotive wire with the High Temperature female spade terminal crimped and soldered and then covered with heat shrink tubing.
I then slipped a section of convoluted tubing over the entire terminal and rubber plug to protect them.
Now with all of the mounting screws tightened I applied Foam Rubber Weatherstripping around the base of the ring where it will seal up to the housing, this will help give an air tight seal and help isolate the motor from the housing.
Now the blower assembly is installed into the blower housing.
This was my first idea of how I would secure the motor to the housing but I want the motor and ring to be isolated from the housing for vibration.
Idea
I am going to improve this; I will open up the 3 mounting holes and insert 3/8� rubber grommets so the ring will be suspended on rubber.
This motor is air cooled by forcing a portion of the air back through the housing, since the clocking of this motor is different I had to modify the factory rubber tube using a 1� section of �� copper tubing and a �� street ell and see where I slipped a section of tubing over the male end of the ell over a single wrap of electrical tape. (tape not seen here)
Thread Starter
Administrator
Joined: Nov 2004
Posts: 4,084
Likes: 235
From: Southern California
Part-3
For now I used a piece of pipe insulation with a mounting hole punched to isolate the screws in rubber, these will be replaced using rubber bushings as isolators when it is finished.
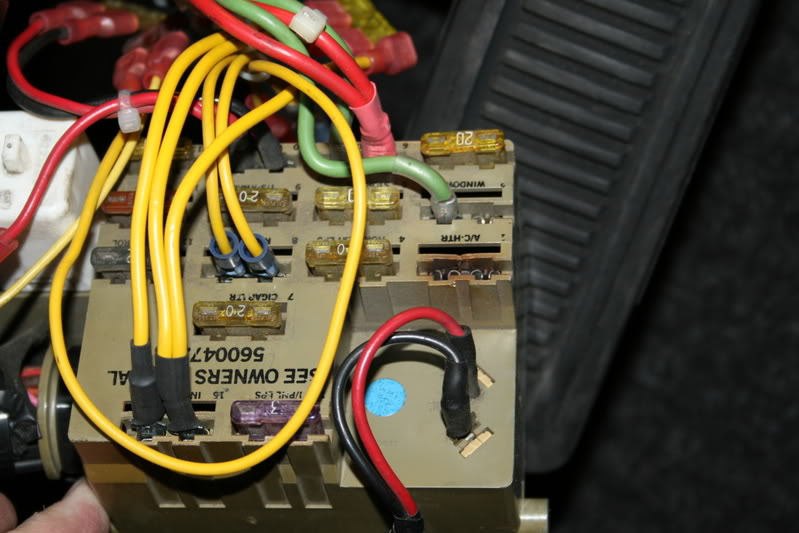
Next the new motor was connected to my upgraded power relay (Relay Upgrade) AND to the factory wiring, to pass all of the current of the relay I decided to crimp them all together using copper crimp connectors that were then soldered and insulated.
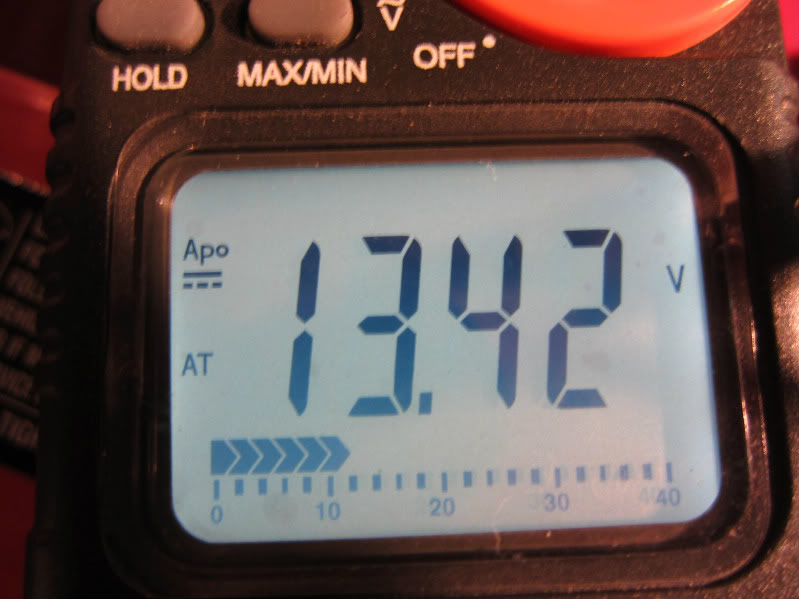
Here is the real test, with the truck idling and the blower on High I was getting 13.42-volts at the motor terminals.
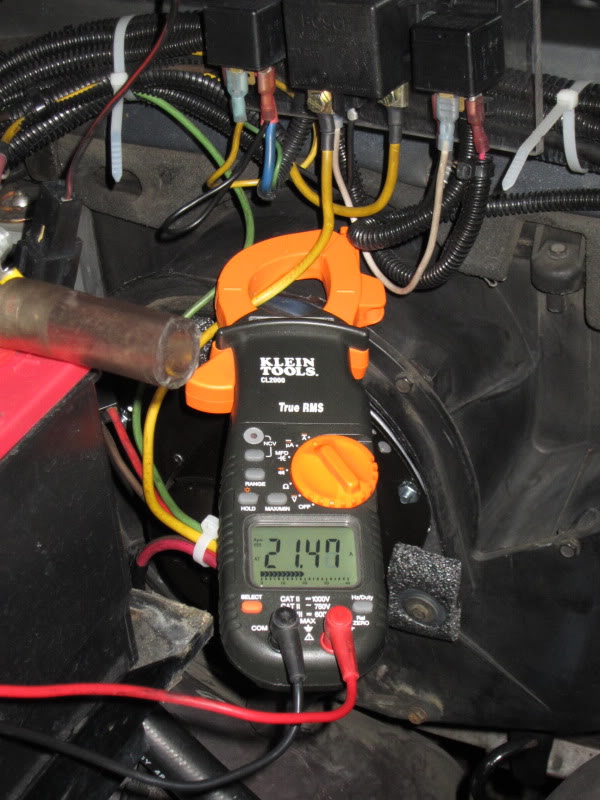
Then with the blower on High the new GM motor is consuming 21.47-Amperes
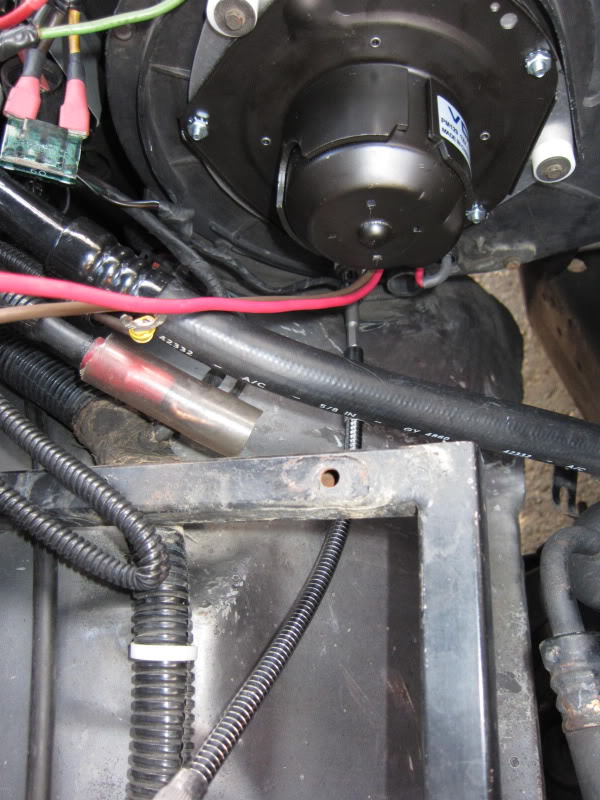
Here is what the finished project looks like, notice how the cooling tube had to be relocated.
After I finish the mounting for the motor I will reinstall the insulated cover to complete the installation.
My impressions of the new blower:
As soon as I can find a good used blower wheel I am going to reinstall it so I can get a baseline for a comparison.
I was afraid this new blower might not have enough velocity but I was pleasantly surprised, just by the feel of the airflow I feel this new blower is at least equal if not more powerful than the old one.
This is a quote from my Put your blower motor on relays :
That is 12.92 volts AT the motor connection, this is with the truck idling, and AC on MAX, the battery was at 13.0 volts.
The blower is now almost twice as fast as it was before going by the sound it was making.
A check with an ammeter shows the motor is now consuming 16.0 amps, which is UP from 11.5 amps that I got before I made any repairs.
The new GM motor is consuming 21.47-amperes so it is defiantly running harder.
Note: This conversion definatly required the relay upgrade.
This entire conversion only took about 8 hours including trying to find a suitable blower motor and wheel, I have had 3 Chevy trucks in the past and I remembered the blower motors always came with a new wheel.
All of the other materials I had on hand in my vast assortment of �stuff�
When I found the blower wheel was broken and I could not find a replacement I could have given up and cried but I didn�t, I just thought to myself I will make something else fit.
Now as the parts on our trucks become more and more scarce and the guy at the parts counter tells you they can no longer get the part, I found a way to take an inexpensive part from a very common truck and make it fit.
Don�t worry I did keep a copy of the template, I scanned it and saved it as a PDF file so anyone with opposing thumbs and a jig saw can make their own.
Materials needed for this conversion:
1) GM Blower motor with blower wheel.
VDO PM129
#35334
Pep Boys $31.99 comes with Lifetime Warranty
5) #10-32x1/2� machine screws
5) 10-32 machine nuts
5) #10 external tooth lock washers
Roll of Foam Rubber Weatherstripping
10-gauge wire to make motor leads
#10 ring terminal
10-gauge female spade terminal
Scrap of aluminum.
Template for adapter ring.
As I make the improvements to the mounting system I will upgrade the instructions with text and pictures.
If you have any questions feel free to ask.
BTW if anyone knows the whereabouts of a good used blower wheel please contact me via PM
Jim
For now I used a piece of pipe insulation with a mounting hole punched to isolate the screws in rubber, these will be replaced using rubber bushings as isolators when it is finished.
Next the new motor was connected to my upgraded power relay (Relay Upgrade) AND to the factory wiring, to pass all of the current of the relay I decided to crimp them all together using copper crimp connectors that were then soldered and insulated.
Here is the real test, with the truck idling and the blower on High I was getting 13.42-volts at the motor terminals.
Then with the blower on High the new GM motor is consuming 21.47-Amperes
Here is what the finished project looks like, notice how the cooling tube had to be relocated.
After I finish the mounting for the motor I will reinstall the insulated cover to complete the installation.
My impressions of the new blower:
As soon as I can find a good used blower wheel I am going to reinstall it so I can get a baseline for a comparison.
I was afraid this new blower might not have enough velocity but I was pleasantly surprised, just by the feel of the airflow I feel this new blower is at least equal if not more powerful than the old one.
This is a quote from my Put your blower motor on relays :
That is 12.92 volts AT the motor connection, this is with the truck idling, and AC on MAX, the battery was at 13.0 volts.
The blower is now almost twice as fast as it was before going by the sound it was making.
A check with an ammeter shows the motor is now consuming 16.0 amps, which is UP from 11.5 amps that I got before I made any repairs.
The new GM motor is consuming 21.47-amperes so it is defiantly running harder.
Note: This conversion definatly required the relay upgrade.
This entire conversion only took about 8 hours including trying to find a suitable blower motor and wheel, I have had 3 Chevy trucks in the past and I remembered the blower motors always came with a new wheel.
All of the other materials I had on hand in my vast assortment of �stuff�
When I found the blower wheel was broken and I could not find a replacement I could have given up and cried but I didn�t, I just thought to myself I will make something else fit.
Now as the parts on our trucks become more and more scarce and the guy at the parts counter tells you they can no longer get the part, I found a way to take an inexpensive part from a very common truck and make it fit.
Don�t worry I did keep a copy of the template, I scanned it and saved it as a PDF file so anyone with opposing thumbs and a jig saw can make their own.
Materials needed for this conversion:
1) GM Blower motor with blower wheel.
VDO PM129
#35334
Pep Boys $31.99 comes with Lifetime Warranty
5) #10-32x1/2� machine screws
5) 10-32 machine nuts
5) #10 external tooth lock washers
Roll of Foam Rubber Weatherstripping
10-gauge wire to make motor leads
#10 ring terminal
10-gauge female spade terminal
Scrap of aluminum.
Template for adapter ring.
As I make the improvements to the mounting system I will upgrade the instructions with text and pictures.
If you have any questions feel free to ask.
BTW if anyone knows the whereabouts of a good used blower wheel please contact me via PM
Jim

Registered User
Joined: Jan 2007
Posts: 306
Likes: 0
From: Northwest Mississippi
Jim when is your next week of vacation? I want to fly you to Mississippi and hire you for a week to improve and tinker with my truck to get it to your specks. Your threads are amazing...I really appreciate the detail and knowledge! Just wish I had the time! Soo please let me know when you have a week or soo....Ha!!!!
Registered User
Joined: Nov 2011
Posts: 4,479
Likes: 211
From: Isanti, MN
Jim,
Did you look into getting just a wheel aftermarket.
http://www.hitechblowers.com/home/ce...blower-wheels/
Did you look into getting just a wheel aftermarket.
http://www.hitechblowers.com/home/ce...blower-wheels/
Registered User
Joined: Mar 2008
Posts: 4,389
Likes: 114
From: Orange County, California
Jim,
Did you look into getting just a wheel aftermarket.
http://www.hitechblowers.com/home/ce...blower-wheels/
Did you look into getting just a wheel aftermarket.
http://www.hitechblowers.com/home/ce...blower-wheels/
Thread Starter
Administrator
Joined: Nov 2004
Posts: 4,084
Likes: 235
From: Southern California
Jim,
Did you look into getting just a wheel aftermarket.
http://www.hitechblowers.com/home/ce...blower-wheels/
Did you look into getting just a wheel aftermarket.
http://www.hitechblowers.com/home/ce...blower-wheels/
Also found out that blowers for non-A/C applications were more plentiful but run C/W instead of CC/W like I need for my A/C.
Also as usual I needed a solution NOW.
GM blower motors are easily obtained and come with the wheel as a unit, although I seem to have a slight vibration probably only noticeable by me (wife said she could not feel it) on high speed I am sure I will dampen using rubber mounts.
I still need to find a good used wheel so I can have something to compare this one to.
Jim
Trending Topics
Registered User


Joined: Mar 2010
Posts: 7,265
Likes: 1,346
From: Prince George, BC
Absolutely stellar upgrade Jim!! 
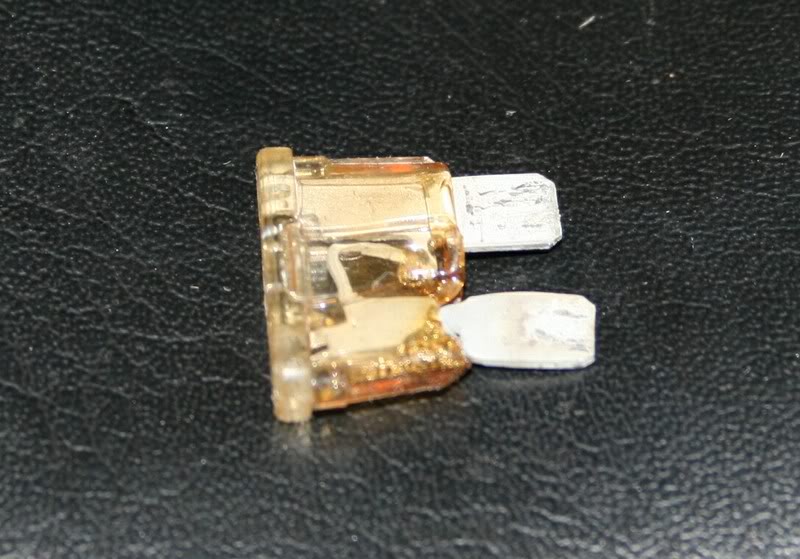
Just checked my fuse panel the other day and noticed my fuse for the heat/AC was cooked and melted...not good. So I will definitely be doing the relay, as well as this motor upgrade.
This is sticky worthy in my opinion...since when are any of Jim Lanes threads not sticky material....
Just checked my fuse panel the other day and noticed my fuse for the heat/AC was cooked and melted...not good.
So I will definitely be doing the relay, as well as this motor upgrade. This is sticky worthy in my opinion...since when are any of Jim Lanes threads not sticky material....
Thread Starter
Administrator
Joined: Nov 2004
Posts: 4,084
Likes: 235
From: Southern California
Absolutely stellar upgrade Jim!!
Just checked my fuse panel the other day and noticed my fuse for the heat/AC was cooked and melted...not good. So I will definitely be doing the relay, as well as this motor upgrade.
This is sticky worthy in my opinion...since when are any of Jim Lanes threads not sticky material....
Just checked my fuse panel the other day and noticed my fuse for the heat/AC was cooked and melted...not good.
So I will definitely be doing the relay, as well as this motor upgrade. This is sticky worthy in my opinion...since when are any of Jim Lanes threads not sticky material....
Jim


Registered User
Joined: Mar 2008
Posts: 4,389
Likes: 114
From: Orange County, California
Hey Jim,
About what size was the sheet of aluminum you cut the adapter out of for the GM blower motor? I'd like to do this upgrade as well. Looks as though I'll have to relay the blower motor first. I'm not sure what kinda of shape the wheel is in mine but, if it's good, I'll gladly let you have it and the motor for R&D purposes .
.
About what size was the sheet of aluminum you cut the adapter out of for the GM blower motor? I'd like to do this upgrade as well. Looks as though I'll have to relay the blower motor first. I'm not sure what kinda of shape the wheel is in mine but, if it's good, I'll gladly let you have it and the motor for R&D purposes
.
Thread Starter
Administrator
Joined: Nov 2004
Posts: 4,084
Likes: 235
From: Southern California
Thread Starter
Administrator
Joined: Nov 2004
Posts: 4,084
Likes: 235
From: Southern California
Hey Jim,
About what size was the sheet of aluminum you cut the adapter out of for the GM blower motor? I'd like to do this upgrade as well. Looks as though I'll have to relay the blower motor first. I'm not sure what kinda of shape the wheel is in mine but, if it's good, I'll gladly let you have it and the motor for R&D purposes.
About what size was the sheet of aluminum you cut the adapter out of for the GM blower motor? I'd like to do this upgrade as well. Looks as though I'll have to relay the blower motor first. I'm not sure what kinda of shape the wheel is in mine but, if it's good, I'll gladly let you have it and the motor for R&D purposes
.Jim,
I think it was about 1/8" aluminum, it was some pieces I had lying around from my turn signal adapters.
I'm not sure what kinda of shape the wheel is in mine but, if it's good, I'll gladly let you have it and the motor for R&D purposes
Thanks I would appreciate that.
Jim


Thread
Thread Starter
Forum
Replies
Last Post
mknittle
1st Gen. Ram - All Topics
10
May 11, 2014 09:27 PM
oliver foster
1st Gen. Ram - All Topics
3
Jul 5, 2010 09:35 AM
Copenhagenjunkie
2nd Gen. Dodge Ram - No Drivetrain
2
Jun 1, 2003 04:20 PM