
What did you do to your Gen 1 today?


Registered User


Joined: Dec 2010
Posts: 6,838
Likes: 1,683
From: Land of the Toxic Avenger
Registered User
Joined: Dec 2010
Posts: 6,838
Likes: 1,683
From: Land of the Toxic Avenger
I have zero experience with them, so that's why I asked.
I do, however, have lots of experience with my 12 x 12 pop up canopy being wiped out by a sudden deluge.....
Always fun to come home to find your canopy in pieces on the ground due to some rogue storm.
I do, however, have lots of experience with my 12 x 12 pop up canopy being wiped out by a sudden deluge.....
Always fun to come home to find your canopy in pieces on the ground due to some rogue storm.
Registered User
Joined: Mar 2008
Posts: 4,389
Likes: 114
From: Orange County, California

Registered User
Joined: Mar 2008
Posts: 4,389
Likes: 114
From: Orange County, California
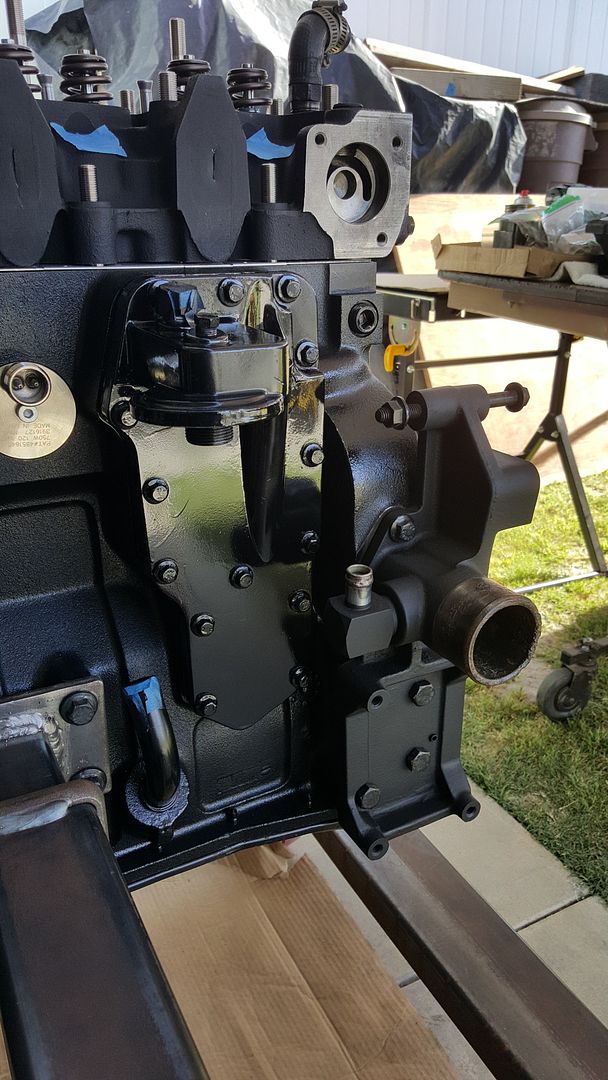
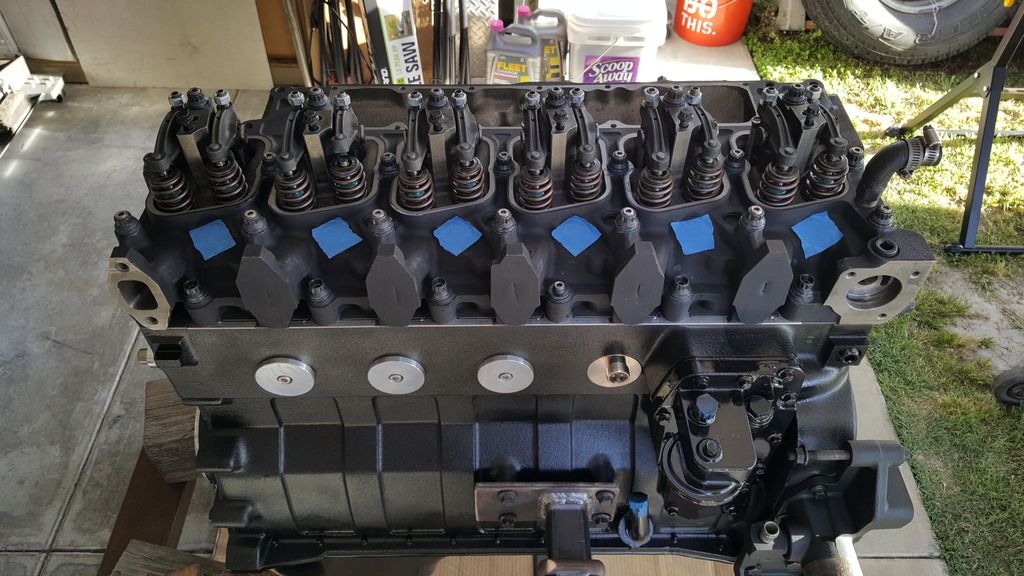
Finished assembling the remaining 3 rocker lever assemblies. Bolted on the oil cooler and filter head package and the water inlet connection.

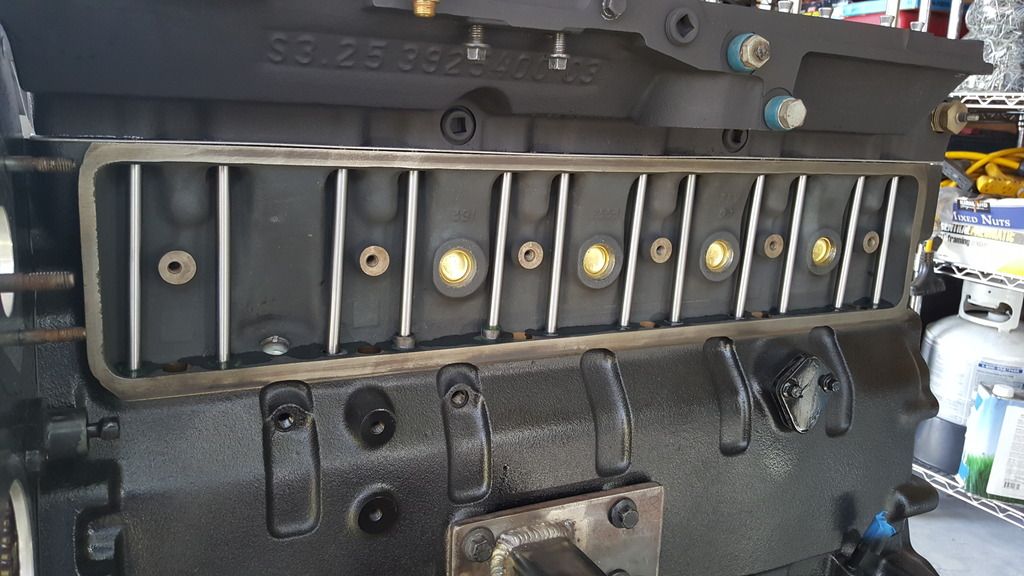
Set the head on the block and dropped in Hamilton's HD push rods, threaded in the ARP CA625 studs. Ran them in until hand tight as per their instructions.

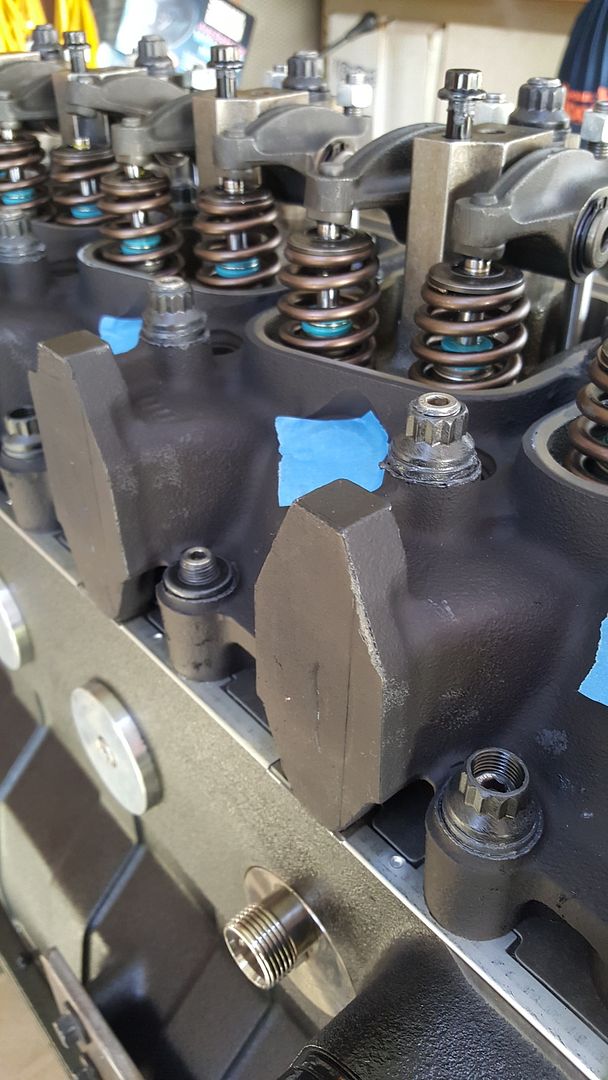
Something didn't look quite right with the shorties between the exhaust runners. But the head wasn't seated just yet so I waited.

Sure enough...


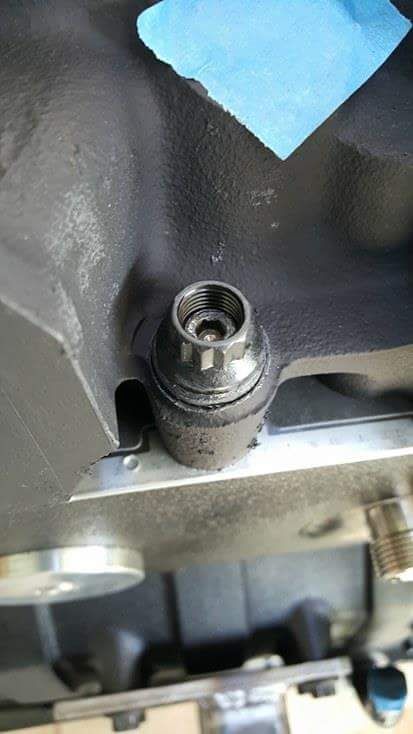
I did notice that while bottom tapping the bores, the 6 along the exhaust side were about 3/8" deeper than the rest of the bores. I started to think that maybe those didn't need to be tapped. But, after counting 14 threads on the stud and 14 turns until it stopped in the bore, that tells me that all of the threads wouldn't have been engaged if I hadn't tapped them deeper.
Some guys I've talked to said to back them out until they're flush or that ARP says to back them out 1/4 of a turn. None can provide an official ARP document stating to back these studs out 1/4 of a turn and the instructions found on their website and that came with the studs do not say anything about backing them out. Only stating to run them in hand tight only. Nothing more. I ain't about to back them out because then it would be as if I didn't bottom tap and therefore, all of the threads again would not be fully engaged. Is this common for the early 12 valve blocks?
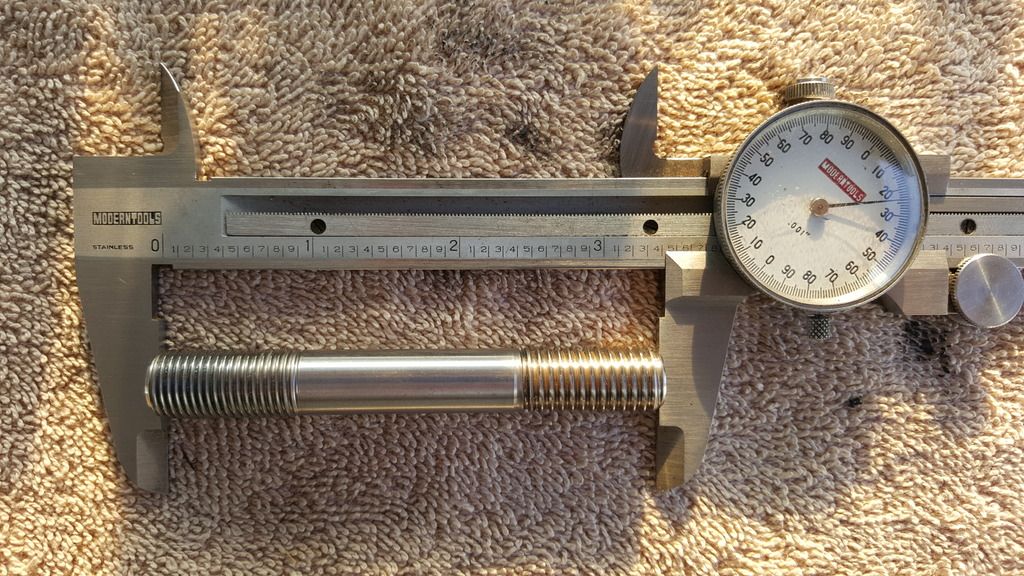
I measured one of the studs I took out with my calipers, 3.424". It appears they need to be 3/8-1/2" longer. Does anyone happen to have a 625+ set for a 12v and be willing measure the short stud for me? Kit #247-4205.

I'm gonna call ARP tomorrow and ask what happened. Before I go any further, I need to ensure that I can get the head seated fully before starting the torque sequence. I don't want to pull the head down with the studs.
Set the head on the block and dropped in Hamilton's HD push rods, threaded in the ARP CA625 studs. Ran them in until hand tight as per their instructions.
Something didn't look quite right with the shorties between the exhaust runners. But the head wasn't seated just yet so I waited.
Sure enough...
I did notice that while bottom tapping the bores, the 6 along the exhaust side were about 3/8" deeper than the rest of the bores. I started to think that maybe those didn't need to be tapped. But, after counting 14 threads on the stud and 14 turns until it stopped in the bore, that tells me that all of the threads wouldn't have been engaged if I hadn't tapped them deeper.
Some guys I've talked to said to back them out until they're flush or that ARP says to back them out 1/4 of a turn. None can provide an official ARP document stating to back these studs out 1/4 of a turn and the instructions found on their website and that came with the studs do not say anything about backing them out. Only stating to run them in hand tight only. Nothing more. I ain't about to back them out because then it would be as if I didn't bottom tap and therefore, all of the threads again would not be fully engaged. Is this common for the early 12 valve blocks?
I measured one of the studs I took out with my calipers, 3.424". It appears they need to be 3/8-1/2" longer. Does anyone happen to have a 625+ set for a 12v and be willing measure the short stud for me? Kit #247-4205.
I'm gonna call ARP tomorrow and ask what happened. Before I go any further, I need to ensure that I can get the head seated fully before starting the torque sequence. I don't want to pull the head down with the studs.

Administrator

Joined: Nov 2004
Posts: 4,084
Likes: 235
From: Southern California
Jimbo,
Do the new core plugs still offer any freeze (expansion) protection or are they for Southern California only?
Do the new core plugs still offer any freeze (expansion) protection or are they for Southern California only?
Finished assembling the remaining 3 rocker lever assemblies. Bolted on the oil cooler and filter head package and the water inlet connection.
Set the head on the block and dropped in Hamilton's HD push rods, threaded in the ARP CA625 studs. Ran them in until hand tight as per their instructions.
Something didn't look quite right with the shorties between the exhaust runners. But the head wasn't seated just yet so I waited.
Sure enough...
I did notice that while bottom tapping the bores, the 6 along the exhaust side were about 3/8" deeper than the rest of the bores. I started to think that maybe those didn't need to be tapped. But, after counting 14 threads on the stud and 14 turns until it stopped in the bore, that tells me that all of the threads wouldn't have been engaged if I hadn't tapped them deeper.
Some guys I've talked to said to back them out until they're flush or that ARP says to back them out 1/4 of a turn. None can provide an official ARP document stating to back these studs out 1/4 of a turn and the instructions found on their website and that came with the studs do not say anything about backing them out. Only stating to run them in hand tight only. Nothing more. I ain't about to back them out because then it would be as if I didn't bottom tap and therefore, all of the threads again would not be fully engaged. Is this common for the early 12 valve blocks?
I measured one of the studs I took out with my calipers, 3.424". It appears they need to be 3/8-1/2" longer. Does anyone happen to have a 625+ set for a 12v and be willing measure the short stud for me? Kit #247-4205.
I'm gonna call ARP tomorrow and ask what happened. Before I go any further, I need to ensure that I can get the head seated fully before starting the torque sequence. I don't want to pull the head down with the studs.
Registered User
Joined: Mar 2008
Posts: 4,389
Likes: 114
From: Orange County, California
You got me there. I'm not sure if they still allow expansion. Their main objective is just to keep the excess coolant pressure from pushing them out too far (entirely) while running in the higher RPM range.
Registered User
Joined: Mar 2008
Posts: 4,389
Likes: 114
From: Orange County, California
According to Zach at ARP, there are variances with the early 12v blocks that they recently became aware of. They're currently working towards producing a kit for the early 12v blocks that will have longer shorties but they won't have them available for about another 6 months. He said a few guys he's spoken with about this have just removed the hardened washer and run only the nut. I mentioned that the washer isn't quite 3/8" of an inch and that the stud may still be a little short. He said that if the stud is 1 or 2 threads below flush, that is acceptable. He also said no to backing the stud out to make it flush for the same reason I suspected, not having full thread engagement in the block.
Once the new kits become available, I may see if they'd let me exchange these for the longer ones. At worst, I'd probably have to buy the new ones.
Once the new kits become available, I may see if they'd let me exchange these for the longer ones. At worst, I'd probably have to buy the new ones.
Registered User
Joined: Feb 2005
Posts: 2,658
Likes: 85
My 425 ARPs were just as short for the 1991.0 non i/c block. I bottom tapped as well. I read a lot of good results on just backing out the studs, so I did the same on mine, and am not worried. I've read a lot of forum posts going back 10 years complaining to ARP about this, it isn't something they recently became aware of based on that info.
The threads are engaged enough in this manner to accept full torque. The only length of thread that needs to be engaged to clamp at full strength is equivalent to the width of the stud/bolt itself. To my understanding, the reason we have to bottom tap is to clean the threads (often full of oil and crap) and to get deep enough so the valve covers will clear. (even with the machining)
https://www.dieseltruckresource.com/...-short-257773/
Registered User
Joined: Mar 2008
Posts: 4,389
Likes: 114
From: Orange County, California
My 425 ARPs were just as short for the 1991.0 non i/c block. I bottom tapped as well. I read a lot of good results on just backing out the studs, so I did the same on mine, and am not worried. I've read a lot of forum posts going back 10 years complaining to ARP about this, it isn't something they recently became aware of based on that info.
The threads are engaged enough in this manner to accept full torque. The only length of thread that needs to be engaged to clamp at full strength is equivalent to the width of the stud/bolt itself. To my understanding, the reason we have to bottom tap is to clean the threads (often full of oil and crap) and to get deep enough so the valve covers will clear. (even with the machining)
The threads are engaged enough in this manner to accept full torque. The only length of thread that needs to be engaged to clamp at full strength is equivalent to the width of the stud/bolt itself. To my understanding, the reason we have to bottom tap is to clean the threads (often full of oil and crap) and to get deep enough so the valve covers will clear. (even with the machining)
Bottom tapping is really only required for the rocker pedestal bolt bores if the installed height of the stud is above 6.665" (specs say 6.615-6.665" installed height). Milling the pedestals is highly recommended but not required. The idea is so that the stud is the same installed height as a factory bolt when fully torqued which will clear the valve cover webbing.
I'm in agreement with this....
Good advice . The rule of thumb I learned from being a machinist for a thousand years is a fastner must engage one bolt diameter to be OK and two bolt diameters to be safer. When a threaded fastner is torqued to proper stretch, the top three threads take 75% of the load and the remainder threads spread the remaining load between them. As time goes on the load eventually spreads out to the rest of the hole but not evenly. Of course it is just a rule of thumb and the material that you are using has a lot to do with the integrity of the threads. In cast iron I would want two diameters of stud engagement as a minimum. The nuts are a heat treated alloy and one diameter of engagement is good.
. The rule of thumb I learned from being a machinist for a thousand years is a fastner must engage one bolt diameter to be OK and two bolt diameters to be safer. When a threaded fastner is torqued to proper stretch, the top three threads take 75% of the load and the remainder threads spread the remaining load between them. As time goes on the load eventually spreads out to the rest of the hole but not evenly. Of course it is just a rule of thumb and the material that you are using has a lot to do with the integrity of the threads. In cast iron I would want two diameters of stud engagement as a minimum. The nuts are a heat treated alloy and one diameter of engagement is good.Registered User
Joined: Apr 2007
Posts: 278
Likes: 99
From: Priest River, ID
Finished painting the cab floor after the rust removal and Ospho treatment.
Ordered new door seals (Rockauto) and seat belts (LMC).
Still trying to find G360 for sale west of the Rockies for my auto to manual conversion.
Ordered new door seals (Rockauto) and seat belts (LMC).
Still trying to find G360 for sale west of the Rockies for my auto to manual conversion.
Registered User
Joined: Mar 2008
Posts: 4,389
Likes: 114
From: Orange County, California
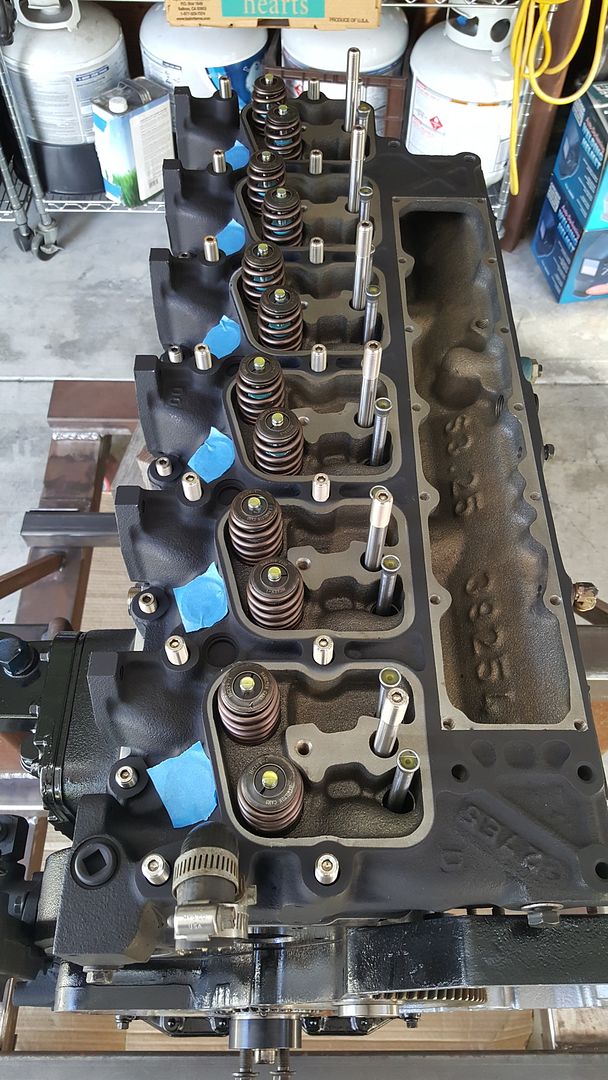
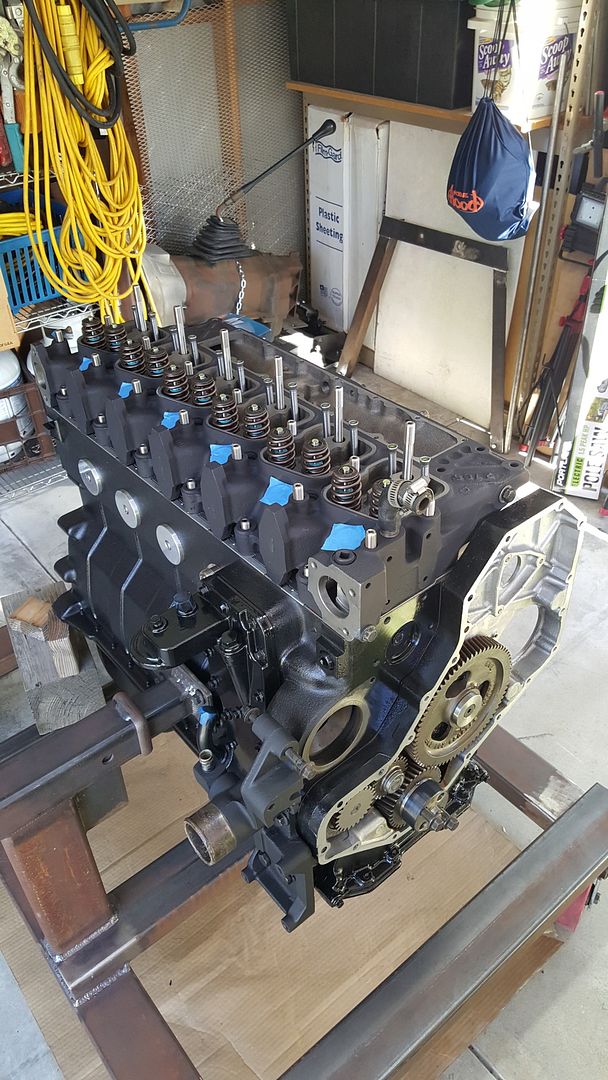
This is a lot better. Between 1 and 2 threads from flush just as ARP said. Whew! Good shoulder workout pulling these down to 150ft. lbs.! Glad to have that out of the way. Also set the valve lash.
Picked up a thermostat housing from a '94-'98 motor which has a vent port and where the coolant bypass will plumb to. Looks like 1/4" NPT though so I'm not sure if that will allow sufficient flow for the bypass. If there's room, I could probably drill it out and tap it to 1/2" NPT.


I just placed an order for a Watts PRV, LF530C in 1/2", for the coolant bypass.

Picked up a thermostat housing from a '94-'98 motor which has a vent port and where the coolant bypass will plumb to. Looks like 1/4" NPT though so I'm not sure if that will allow sufficient flow for the bypass. If there's room, I could probably drill it out and tap it to 1/2" NPT.
I just placed an order for a Watts PRV, LF530C in 1/2", for the coolant bypass.