Crewcab update...


Registered User
Joined: Feb 2010
Posts: 68
Likes: 0
From: Pyeongtaek, South Korea
I hear you, TC. When I put my exhaust on, I slid a clamp too far forward and it touched the transmission crossmember. I've never heard or felt anything like it. It was like driving a really high speed paint shaker.  Any reduction in vibration is a good thing.
Any reduction in vibration is a good thing.

Registered User
Joined: Aug 2013
Posts: 4,918
Likes: 603
From: Tulsa, OK
http://www.summitracing.com/parts/an...dge/model/w250
http://www.summitracing.com/parts/an...dge/model/w250

Thread Starter
Registered User


Joined: Mar 2010
Posts: 7,265
Likes: 1,346
From: Prince George, BC
Having some brake squeal and wear issues on the crewcab.
Drivers side is wearing fine, inside and outside pads are making contact fine. But pass side is hanging up and both pads are not engaging properly. I have cleaned caliper track surfaces of all paint and debris. There is a little bit of wear on the caliper brackets where the inner pad rides, but I don't think it's enough to cause any "hang up" issues. Everything looks good, but that one side refuse to work properly.
With the drivers side doing most of the front braking I now have a warped rotor as well...
Also the front end is starting to develop a "clunk" or ""bang" when I angle up to get a line on backing into a parking spot. When I turn the wheel to either side, left or right, and start to back up and turn the wheel to adjust my angle...occasionally it will make this noise.
It doesn't have to be a full lock turn to make the noise either. Had it make the noise today when I left work, making a left out of the parking stall....first time it's done it going forward.
Going to have to climb under there tomorrow and see if I can find what's going on.
Drivers side is wearing fine, inside and outside pads are making contact fine. But pass side is hanging up and both pads are not engaging properly. I have cleaned caliper track surfaces of all paint and debris. There is a little bit of wear on the caliper brackets where the inner pad rides, but I don't think it's enough to cause any "hang up" issues. Everything looks good, but that one side refuse to work properly.
With the drivers side doing most of the front braking I now have a warped rotor as well...
Also the front end is starting to develop a "clunk" or ""bang" when I angle up to get a line on backing into a parking spot. When I turn the wheel to either side, left or right, and start to back up and turn the wheel to adjust my angle...occasionally it will make this noise.
It doesn't have to be a full lock turn to make the noise either. Had it make the noise today when I left work, making a left out of the parking stall....first time it's done it going forward.
Going to have to climb under there tomorrow and see if I can find what's going on.

Registered User
Joined: Jan 2014
Posts: 12
Likes: 0
I was getting the same sort of clunk on my drivers' side front. It turned out I had thrown anti-rattle spring (look like a elongated m) that sits between retaining clip and and brake caliper. Without the spring, the caliper would pivot down and hit the rotor.
Raybestos H5453, 0413KR, Support Spring
Raybestos H5453, 0413KR, Support Spring

Registered User
Joined: Nov 2006
Posts: 3,238
Likes: 574
From: Central KY
Are your rubber lines new? They can deteriorate on the inside, swell and not allow brake fluid to escape.
You cleaned the track surface, what about the caliper itself? Could it be sticking? Are the boots in tact?
You cleaned the track surface, what about the caliper itself? Could it be sticking? Are the boots in tact?
Thread Starter
Registered User
Joined: Mar 2010
Posts: 7,265
Likes: 1,346
From: Prince George, BC
Everything in the front end is new. I rebuilt the entire front King pin Dana 60 before I even started my 4wd conversion. The parts have less then a year of use on them.
And Yes the support springs are present and accounted for...
And Yes the support springs are present and accounted for...

Registered User
Joined: Jan 2004
Posts: 230
Likes: 1
From: SW Utah
I had a clunk on my right front, it ended up being the caliper mount was so worn it would spit out the spring and the caliper would rattle on the mount, had to replace it with a good used one.
Thread Starter
Registered User
Joined: Mar 2010
Posts: 7,265
Likes: 1,346
From: Prince George, BC
Well it was a beautiful sunny day here today, Probably about 10*C (50*F) in the sun, so I climbed around under the front of the truck with my pry bar and start trying to find the source of the clunk/bang.
After about 5 minutes or so I finally located my noise.....turns out the rad support bolt had come loose. Both had backed off at least 1/2". So I drained the cooling system, removed rad and shroud, and then contorted myself to be able to hold a wrench on the top of the bolt, and then tighten up the nut from underneath with a long extension and ratchet.
I had used a couple used stover nuts when I assembled it the first time, but clearly they had lost their "stover" and were just regular nuts. So I tossed on a couple new stover nuts and torqued it all down.
Hope that eliminates that noise.
After about 5 minutes or so I finally located my noise.....turns out the rad support bolt had come loose. Both had backed off at least 1/2". So I drained the cooling system, removed rad and shroud, and then contorted myself to be able to hold a wrench on the top of the bolt, and then tighten up the nut from underneath with a long extension and ratchet.
I had used a couple used stover nuts when I assembled it the first time, but clearly they had lost their "stover" and were just regular nuts.
So I tossed on a couple new stover nuts and torqued it all down.Hope that eliminates that noise.
Thread Starter
Registered User
Joined: Mar 2010
Posts: 7,265
Likes: 1,346
From: Prince George, BC
Well I decided I would getting the front end to ride a bit smoother with the help of the thread below and user sevnt300 and his findings. Those "smooth ride" parabolic springs I installed during the 4wd conversion really did not smooth anything out in the ride....actually I think it made it stiffer. 
Well Sevnt300 over in this thread...https://www.dieseltruckresource.com/...301721/page10/ ....Post #138. He has a cummins long box crew as well with these springs was not happy with the ride either. He did a lot of R&D work to finally come up with a ride he was comfortable with.
So first I had to pull apart an old set of rear springs and find two leafs that would be 34" long and allow an even 17" on each side of the center hole. Think it was the 3rd leaf up from the bottom.
One side already had a hole for the spring clamp and was 17", the other required about 3" to be cut off. Then I had to tapper the tip.
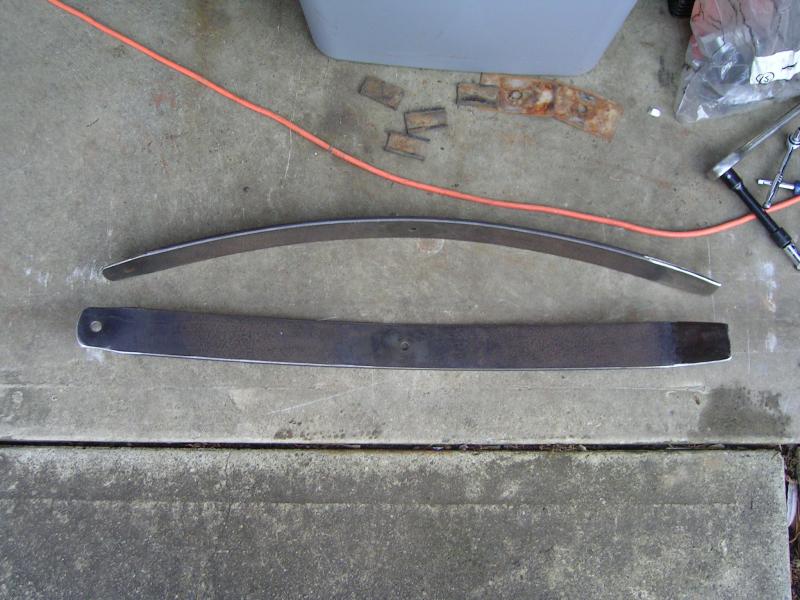
I then went down to the shop that sold me the Smooth Ride springs...they are local....and picked up some new wear tips and spring clamps.

The rubbers that came with the new spring clamps would not work with their style, so i used some neoprene sheet I had to cut out some new ones that would.

Then I had to drill three 1/2" holes in each spring. One for the wear tip, and two for the new spring clamps to lock into. I positioned the spring clamps 6" back from the wear tips.

Tossed on some paint and got ready to do the swap.
Well Sevnt300 over in this thread...https://www.dieseltruckresource.com/...301721/page10/ ....Post #138. He has a cummins long box crew as well with these springs was not happy with the ride either. He did a lot of R&D work to finally come up with a ride he was comfortable with.
So first I had to pull apart an old set of rear springs and find two leafs that would be 34" long and allow an even 17" on each side of the center hole. Think it was the 3rd leaf up from the bottom.
One side already had a hole for the spring clamp and was 17", the other required about 3" to be cut off. Then I had to tapper the tip.

I then went down to the shop that sold me the Smooth Ride springs...they are local....and picked up some new wear tips and spring clamps.

The rubbers that came with the new spring clamps would not work with their style, so i used some neoprene sheet I had to cut out some new ones that would.

Then I had to drill three 1/2" holes in each spring. One for the wear tip, and two for the new spring clamps to lock into. I positioned the spring clamps 6" back from the wear tips.

Tossed on some paint and got ready to do the swap.
Thread Starter
Registered User
Joined: Mar 2010
Posts: 7,265
Likes: 1,346
From: Prince George, BC
Did the spring prep last week in teh evenings. So decided since I had a couple days off I would tackle the swap today. Took about 5 hours from start to finish.
First was to get the sway bar end links off, and the shocks as well. Then remove the U-bolts. Once all the was off I could start to jack up the truck to give me enough clearance to loosen the retaining bolt in the center of the spring pack and remove the lower spring.

Ready to remove lower spring.

Here is a comparison of the second spring in this smooth ride set-up, and the new one that is going in.

Of the 3 wear tips on the lower springs only one was still in place and secure. The others had broken loose.

First was to get the sway bar end links off, and the shocks as well. Then remove the U-bolts. Once all the was off I could start to jack up the truck to give me enough clearance to loosen the retaining bolt in the center of the spring pack and remove the lower spring.

Ready to remove lower spring.

Here is a comparison of the second spring in this smooth ride set-up, and the new one that is going in.

Of the 3 wear tips on the lower springs only one was still in place and secure. The others had broken loose.

Thread Starter
Registered User
Joined: Mar 2010
Posts: 7,265
Likes: 1,346
From: Prince George, BC
Transferred the two plates from the original pack to the new spring and installed. Required a couple clamps to compress the spring so I could get the threads started on the center bolt. Then it was just snug everything up and make sure all the plates and springs stayed in alignment.

Then once both side were done I had to lower the truck back down and get everything to line up. Had to go back and forth taking a few inches out of each side to slowly lower it back down. Once the weight was on the springs I installed the spring clamps. Then finished re-installing everything. Only had to cut about 3/4" to 1" off the U-bolts to make up for the difference in spring pack thickness.
All done and ready to go.


Then once both side were done I had to lower the truck back down and get everything to line up. Had to go back and forth taking a few inches out of each side to slowly lower it back down. Once the weight was on the springs I installed the spring clamps. Then finished re-installing everything. Only had to cut about 3/4" to 1" off the U-bolts to make up for the difference in spring pack thickness.
All done and ready to go.

Thread Starter
Registered User
Joined: Mar 2010
Posts: 7,265
Likes: 1,346
From: Prince George, BC
I measured from the ground to the top of the wheel well arch before I started, and after I was done, lost exactly 1.5" on each side. And I can say the ride is like night and day!! I used to cringe every time I ran over a manhole cover in the road....now it just absorbs the bump and you barely feel it.
I couldn't be happier with the ride so far. Although I've only put a couple miles on it, but so far so good!
I couldn't be happier with the ride so far. Although I've only put a couple miles on it, but so far so good!