


Advice plzzzz!


Thread Starter
Registered User
Joined: Jul 2007
Posts: 56
Likes: 0

Sorry for the late input been real hetic if you know what I mean. Anyway just bought a whole new boster and master kit...might as well you never know. I'm goin to put this in right after I eat lunch here and see what happens. Anyone know a sticky or something about out to bleed the brakes? My first time to bleed brakes so go easy on me.
I'm goin to put this in right after I eat lunch here and see what happens. Anyone know a sticky or something about out to bleed the brakes? My first time to bleed brakes so go easy on me.

Adminstrator-ess

Joined: Mar 2003
Posts: 22,594
Likes: 19
From: New Holland, PA
You have to bench bleed the master first, follow the directions that come with it. There are probably good instructions in the box with the master on how to bleed the brakes, too. Once the new master is on, bleed the RWAL dump valve, then the RR, LR, RF, and lastly the LF.

Registered User
Joined: Jan 2004
Posts: 995
Likes: 2
From: East Central OK
My thought exactly. Make sure that the rear brakes are manually adjusted correctly before starting on the MC. The self-adjusters on the 1st gens usually don't.

Registered User
Joined: Jan 2004
Posts: 1,578
Likes: 8
From: Charleston SC
yes, ensure...you bench bleed the master cylinder first.
http://www.teamscr.com/brakes.htm
you can GOOGLE some good advice:
Bleeding Process
1. Begin at the corner furthest from the driver and proceed in order toward the driver. (Right rear, left rear, right front, left front.)
2. Locate the bleeder screw at the rear of the caliper body (or drum brake wheel cylinder.) Remove the rubber cap from the bleeder screw – and don’t lose it!
3. Place the box-end wrench over the bleeder screw (10mm for discs, 8mm for drums.) An offset wrench works best – since it allows the most room for movement. (If you do not have an offset wrench, avoid pushing the wrench head to the bottom of the bleeder screw – since the wrench may interfere with other parts during movement. Allow a standard wrench to sit near the top of the bleeder screw contact point.)
4. Place one end of the plastic hose over the nipple of the bleeder screw.
5. Place the other end of the hose into the disposable bottle.
6. Place the bottle for waste fluid on top of the caliper body or drum unit. Hold the bottle with one hand and grasp the wrench with the other hand.
7. Instruct the assistant to "apply." The assistant should pump the brake pedal three times, hold the pedal down firmly, and respond with "applied." Instruct the assistant not to release the brakes until told to do so.
http://www.teamscr.com/brakes.htm
you can GOOGLE some good advice:
Bleeding Process
1. Begin at the corner furthest from the driver and proceed in order toward the driver. (Right rear, left rear, right front, left front.)
2. Locate the bleeder screw at the rear of the caliper body (or drum brake wheel cylinder.) Remove the rubber cap from the bleeder screw – and don’t lose it!
3. Place the box-end wrench over the bleeder screw (10mm for discs, 8mm for drums.) An offset wrench works best – since it allows the most room for movement. (If you do not have an offset wrench, avoid pushing the wrench head to the bottom of the bleeder screw – since the wrench may interfere with other parts during movement. Allow a standard wrench to sit near the top of the bleeder screw contact point.)
4. Place one end of the plastic hose over the nipple of the bleeder screw.
5. Place the other end of the hose into the disposable bottle.
6. Place the bottle for waste fluid on top of the caliper body or drum unit. Hold the bottle with one hand and grasp the wrench with the other hand.
7. Instruct the assistant to "apply." The assistant should pump the brake pedal three times, hold the pedal down firmly, and respond with "applied." Instruct the assistant not to release the brakes until told to do so.

1st Generation Admin
Joined: Jan 2005
Posts: 4,601
Likes: 118
From: Buies Creek, NC
In the case of the 1st Gen ~

............
yes, ensure...you bench bleed the master cylinder first.
Followed by the RWAL device (forward of the rear axle, above the fuel tank), then . . .
1. Begin at the corner furthest from the driver and proceed in order toward the driver. (Right rear, left rear, right front, left front.)
2. Locate the bleeder screw at the rear of the caliper body (or drum brake wheel cylinder.) Remove the rubber cap from the bleeder screw – and don’t lose it!
3. Place the box-end wrench over the bleeder screw (10mm for discs, 8mm for drums.) An offset wrench works best – since it allows the most room for movement. (If you do not have an offset wrench, avoid pushing the wrench head to the bottom of the bleeder screw – since the wrench may interfere with other parts during movement. Allow a standard wrench to sit near the top of the bleeder screw contact point.)
4. Place one end of the plastic hose over the nipple of the bleeder screw.
5. Place the other end of the hose into the disposable bottle.
6. Place the bottle for waste fluid on top of the caliper body or drum unit. Hold the bottle with one hand and grasp the wrench with the other hand.
7. Instruct the assistant to "apply." The assistant should pump the brake pedal three times, hold the pedal down firmly, and respond with "applied." Instruct the assistant not to release the brakes until told to do so.
[/I]
Followed by the RWAL device (forward of the rear axle, above the fuel tank), then . . .
1. Begin at the corner furthest from the driver and proceed in order toward the driver. (Right rear, left rear, right front, left front.)
2. Locate the bleeder screw at the rear of the caliper body (or drum brake wheel cylinder.) Remove the rubber cap from the bleeder screw – and don’t lose it!
3. Place the box-end wrench over the bleeder screw (10mm for discs, 8mm for drums.) An offset wrench works best – since it allows the most room for movement. (If you do not have an offset wrench, avoid pushing the wrench head to the bottom of the bleeder screw – since the wrench may interfere with other parts during movement. Allow a standard wrench to sit near the top of the bleeder screw contact point.)
4. Place one end of the plastic hose over the nipple of the bleeder screw.
5. Place the other end of the hose into the disposable bottle.
6. Place the bottle for waste fluid on top of the caliper body or drum unit. Hold the bottle with one hand and grasp the wrench with the other hand.
7. Instruct the assistant to "apply." The assistant should pump the brake pedal three times, hold the pedal down firmly, and respond with "applied." Instruct the assistant not to release the brakes until told to do so.
[/I]
............
Registered User
Joined: Jan 2004
Posts: 1,578
Likes: 8
From: Charleston SC
better listen to David about that RWAL thingy 
if you get stuck, or need advise, PM any of us for our phone number, and we will talk you through it.
we got plenty of kids your age at our church, and they end up at my house wrenching on thier cars. no problems, someone on here will help you, but ask around at church too.
(and lemme know waht the RWAL thingy looks like...)
if you get stuck, or need advise, PM any of us for our phone number, and we will talk you through it.
we got plenty of kids your age at our church, and they end up at my house wrenching on thier cars. no problems, someone on here will help you, but ask around at church too.
(and lemme know waht the RWAL thingy looks like...)
Thread Starter
Registered User
Joined: Jul 2007
Posts: 56
Likes: 0

LOL! Thanks for all your help and input guys! Its been so helpful...well I got everything in and got my friend to help me bleed them breaks. I'm soaking in blake fluid don't ask why but at least the breaks work. My friend decided he wasn't gonna trust riding a truck that once didn't have any brakes...I wonder why? Ok one last question what is the rear brake adjusters I keep hearing about? I notice even though the breaks are working great it still felt like the petal went down a little further than it did before. I know the front are working for sure but i'm wondering if the rear is dragging a little bit. So I guess I want to try adjusting them. But once again this truck was bought in real bad shape. But of course the CTD was fine everything else is falling apart. But anyway would like to get some more info about adjusting the rear brakes. And once again thanks for all the help!!!
Registered User
Joined: Jan 2004
Posts: 995
Likes: 2
From: East Central OK
There is a star wheel on the self-adjuster on the rear brakes that can be accessed thru the slotted hole in the dust cover right under the axle tube. Pull the rubber plug and use a screwdriver (or the special tool) to try and adjust the star wheel. If it's frozen solid (as many of them are), you'll need to pull the axle and drum to free it up. If it will turn, I usually adjust mine until I can just hear the shoes starting to drag as I turn the wheel.
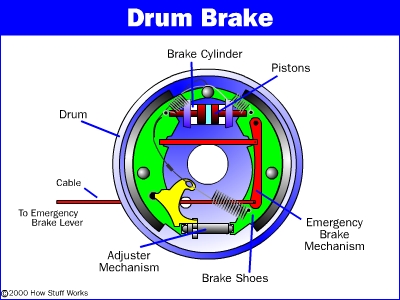
Hope this gives you a bit of a starting point.
Hope this gives you a bit of a starting point.
Thread Starter
Registered User
Joined: Jul 2007
Posts: 56
Likes: 0

ok guys here the update brake booster and master is working great! however I still have a little problem with the rear. I actually tried removing the rear drums but still havn't been able to pound them off. I heard of a trick on here if you jack up the rear end and start the truck put it in gear then slam on the brakes it should pop the drums off. Didn't work but I didn't notice that if I press the brake down as hard as I can it still has a slow drop down and there is no load being put on the engine. Which means there is still no rear brakes but if I hit the brakes when there is little boost left it they will engage.?. Very weird and puzzling me I guess the last thing is to check the dump valve? Hints plz...
Adminstrator-ess
Joined: Mar 2003
Posts: 22,594
Likes: 19
From: New Holland, PA
You won't be able to pound them off without breaking something. The drums are inboard of the hubs, you have to remove the axle shaft and the hub nut to get the hub and drum assembly off. Take a look in the sticky over in the 1st gen section for a detailed set of instructions.

Registered User
Joined: Aug 2007
Posts: 114
Likes: 0
If you go into the rear brakes, go ahead and put shoes AND wheel cylinders on. Then put new seals in the hub. It would not hurt to replace the rubber line from the frame to the axle. Also be ready to put new fronts with hoses and calipers too. What happens most of the time when you change out the m/c, it will cause other things to fail. Most likely the rear wheel cylinders will start leaking.
Be prepared for a mess, you have gear oil, brake fluid plus the dust to deal with. You may have problems getting the drum off after you remove the axle and hub nut because of a lip on the inside of the drum. All shoes will leave a lip right at the edge because the shoes do not contact that spot. Most likely you will have to back the shoes off then remove the drum. You will need to take something long and skinny to push the adjuster paw away from the starwheel to back the brakes off.
Good luck, keep asking questions and getting your hands dirty. That the only way to learn
Daniel
Be prepared for a mess, you have gear oil, brake fluid plus the dust to deal with. You may have problems getting the drum off after you remove the axle and hub nut because of a lip on the inside of the drum. All shoes will leave a lip right at the edge because the shoes do not contact that spot. Most likely you will have to back the shoes off then remove the drum. You will need to take something long and skinny to push the adjuster paw away from the starwheel to back the brakes off.
Good luck, keep asking questions and getting your hands dirty. That the only way to learn
Daniel
1st Generation Admin
Joined: Jan 2005
Posts: 4,601
Likes: 118
From: Buies Creek, NC
You won't be able to pound them off without breaking something. The drums are inboard of the hubs, you have to remove the axle shaft and the hub nut to get the hub and drum assembly off. Take a look in the sticky over in the 1st gen section for a detailed set of instructions.

Thread
Thread Starter
Forum
Replies
Last Post
dodgemaniac
Competition / Pulls / OffRoad
12
Jul 31, 2008 10:15 AM
ryan466
3rd Generation Ram - Non Drivetrain - All Years
3
Aug 30, 2006 10:10 AM
olchevrepl
2nd Gen. Dodge Ram - No Drivetrain
20
Oct 29, 2002 08:14 PM