
Started 6bt crewcab project - Pics on blog.

Thread Starter
Registered User
Joined: Mar 2007
Posts: 890
Likes: 4
From: Salem, OR
[QUOTE=Alwaysworking;2437227]
Yep. But that is the way it came off. If the square tube wasn't offset so much it probably wouldn't have cleared the front driveline.
Thread Starter
Registered User
Joined: Mar 2007
Posts: 890
Likes: 4
From: Salem, OR
After some confusion and deliberation, I finally ordered the Southbend Con-o clutch. Some told me they were happy with the con-o other said get the 13" sachs. I can tell you area wise the sachs had way more friction material than this con-o, and the sachs pressureplate is close in weight to the flywheel. I am confident that this clutch will be fine for the truck I am building, but I am wishing a bit that I had gone with the sachs. The $150 difference could have gone into another part of the truck.

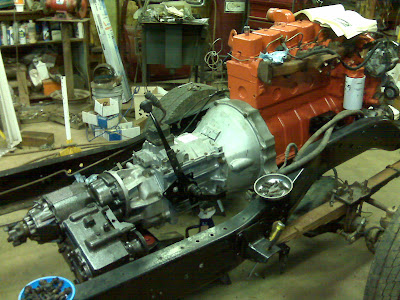
The con-o came with a new flywheel. Here it is bolted on and torqued down.

Tranny on it's way home. I hope to get this junk on the road before the warranty is out on the clutch .
.

205 covered in black hammerite. The cast iron case on the nv4500 is covered with silver hammerite.

Other side view.
I am not sure what to do next. I will either start in on the cab, or I will work on the core support/rad/cooler junk. In the mean time, I am working on puting some minivan buckets on 1st gen bucket bases for my cummins ramcharger. I do not like the sunken feeling of the bench seat, and my driver side minivan sead is powered.
The con-o came with a new flywheel. Here it is bolted on and torqued down.
Tranny on it's way home. I hope to get this junk on the road before the warranty is out on the clutch
.205 covered in black hammerite. The cast iron case on the nv4500 is covered with silver hammerite.
Other side view.
I am not sure what to do next. I will either start in on the cab, or I will work on the core support/rad/cooler junk. In the mean time, I am working on puting some minivan buckets on 1st gen bucket bases for my cummins ramcharger. I do not like the sunken feeling of the bench seat, and my driver side minivan sead is powered.
Registered User


Joined: Dec 2008
Posts: 7,293
Likes: 2,884
From: vermont
My buddy installed {power drivers] grand caravan seats in my crew cab before I bought it and I love them. I also have an old ramcharger console in the middle. The lite brown color match is close enough for me and a lot better than sitting in the old Govt. issue bench seat.
Thread Starter
Registered User
Joined: Mar 2007
Posts: 890
Likes: 4
From: Salem, OR
Well, I finally got some work done on the crew again. I mounted the ctd tank and played around with the drive line.

I thought I would get away with leaving the cross-member in front of the fuel tank in the same spot but flipping it over. It ends up I needed to move it forward a couple of inches. This will actually work out well because I need to take a couple inches out of the drive line as well. I will take it out of the fron piece and all will be no worries.

You can see where I had hacked on this member several years back when I installed a gasser tank to supplement the smallish cab tank when I was running the 440. With the cab tank, I couldn't even go 200 miles without a fuel stop before adding a the new tank.

I hope to stay on this project now. I am sick of taking two vehicles every time we pull the trailer and three of us and the black lab fill the standard cab '91.5 to the brim. Remember to visit my build blog http://crewcabcummins.blogspot.com/
I thought I would get away with leaving the cross-member in front of the fuel tank in the same spot but flipping it over. It ends up I needed to move it forward a couple of inches. This will actually work out well because I need to take a couple inches out of the drive line as well. I will take it out of the fron piece and all will be no worries.
You can see where I had hacked on this member several years back when I installed a gasser tank to supplement the smallish cab tank when I was running the 440. With the cab tank, I couldn't even go 200 miles without a fuel stop before adding a the new tank.
I hope to stay on this project now. I am sick of taking two vehicles every time we pull the trailer and three of us and the black lab fill the standard cab '91.5 to the brim. Remember to visit my build blog http://crewcabcummins.blogspot.com/
Registered User
Joined: Dec 2005
Posts: 912
Likes: 0
From: cornelius oregon
i did see someone in the midwest doing a crewcab and he heated the tank with one of those high output hair dryers and mashed the tank a bit. don't know about that but it is an option. wish i had an old plastic tank to try it on.

Thread
Thread Starter
Forum
Replies
Last Post
93D250
1st Gen. Ram - All Topics
63
Sep 23, 2016 09:11 PM
93D250
2nd Gen. Dodge Ram - No Drivetrain
2
Jun 6, 2010 04:51 PM
jrs_dodge_diesel
Other
16
Aug 26, 2006 08:01 AM