
How to ( BALL JOINTS )


Thread Starter
Registered User
Joined: Jan 2003
Posts: 401
Likes: 0
From: RALEIGH NC
Mr. Gadget Thanks for the great writeup. I�m not sure if this is the only place you posted this. But I could not find it when I saw several other ball joint threads. I took the liberty of putting in pdf format and posted it in this thread 2001 4wd wheel bearing assembly $$$. I did not think you would mind. I couldn�t give you proper credit as I did not have your name. You should post this in the article area.
I just did the ball joints on my truck. Here are a few things that might help others.
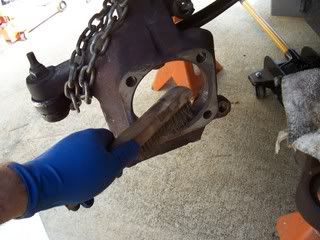
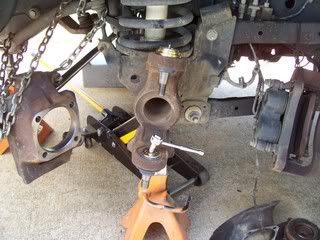
For the steering socket trick use wobble extensions. This will give you some flexibility to get a solid spot for applying pressure. Try to work your way from bolt to bolt. Eventually it will pop loose. This is definitely easier with two people.
I took out the upper ball joint first. None of the adapters in the kit from Advance Auto Parts tool loaner program seemed to be what I needed(23 pieces in total). So I cut a 1" long piece of pipe to slide up on the ball joint shaft. This along with the kit pieces removed the upper joint.
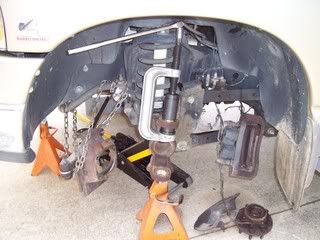
I could not get the c clamp in the position shown in the pictures. So I went down thru the upper ball join hole. While the alignment was not perfect, it did give me better alignment.
The other thing I felt that really helped was a 3/4" breaker bar (more mass & less flex than the 1/2"). I bought a cheap one from our local Harbor Freight ($20). It worked flawlessly and is still in one piece.
On the passenger side I put the ball joint under pressure (I thought the threads would strip on the clamp). Then I hit the area around the ball joint with a hammer and it popped. This is where you may need the hammer and heat.
Use plenty of penetrating fluid.
I put anti-seize on everything when I put it back together. The alignment shop said they do the same thing with anti-seize.
Also my Moog joint instructions said to put the grease fitting facing inward. Which didn't make much sense to me, so I offset mine so I could get a grease gun past the knuckle and onto the fitting.
I just did the ball joints on my truck. Here are a few things that might help others.
For the steering socket trick use wobble extensions. This will give you some flexibility to get a solid spot for applying pressure. Try to work your way from bolt to bolt. Eventually it will pop loose. This is definitely easier with two people.
I took out the upper ball joint first. None of the adapters in the kit from Advance Auto Parts tool loaner program seemed to be what I needed(23 pieces in total). So I cut a 1" long piece of pipe to slide up on the ball joint shaft. This along with the kit pieces removed the upper joint.
I could not get the c clamp in the position shown in the pictures. So I went down thru the upper ball join hole. While the alignment was not perfect, it did give me better alignment.
The other thing I felt that really helped was a 3/4" breaker bar (more mass & less flex than the 1/2"). I bought a cheap one from our local Harbor Freight ($20). It worked flawlessly and is still in one piece.
On the passenger side I put the ball joint under pressure (I thought the threads would strip on the clamp). Then I hit the area around the ball joint with a hammer and it popped. This is where you may need the hammer and heat.
Use plenty of penetrating fluid.
I put anti-seize on everything when I put it back together. The alignment shop said they do the same thing with anti-seize.
Also my Moog joint instructions said to put the grease fitting facing inward. Which didn't make much sense to me, so I offset mine so I could get a grease gun past the knuckle and onto the fitting.
Dave, No problem post it up and send it to anyone that it will help.
The hitting the joint, Ball joint or u-joint works good I have done it a lot in the past. It works good if you use two hammers one on each side and hold one to and casting and hit the other side with the other hammer, it will pop the joints out if under a little clamping force.
Jon Loughry
Raleigh NC


Registered User
Joined: Dec 2008
Posts: 16
Likes: 0
From: Central OK
Big thanks
Just wanted to say thank you for taking the time to put together this instructional thread. The pics are very helpful and you have no doubt saved many of us a lot of time, money and frustration. It's nice to know that there are people willing to do things like this! Thanks again, I owe you a few cold ones!

Registered User
Joined: May 2007
Posts: 704
Likes: 2
From: Bellingham, WA
Yes, very helpfull write up. I could not get the kuckle to break free using a pickle fork but i found a little trick for that. Just hammer up on the balljoint studs with BFH and it will pop the knuckle free pretty easy. For the upper i just turner the wheel all the way to one side so i could swing a hammer up in there and hit the stud. Thanks again Mr. Gadget!


Banned
Joined: Jan 2009
Posts: 65
Likes: 0
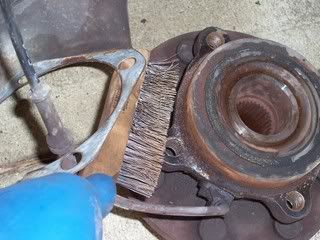
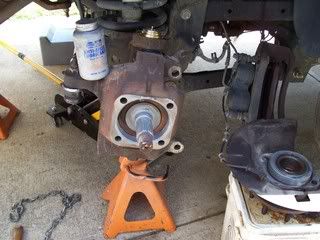
Clean up of the outer, wire brush and file to get all the rust off.
Clean up of the bearing to get all the rust off.
Put the new upper ball joint in.
Put the new lower ball joint in.
Put both the grease fittings in, something the old ones should have had.
Put the outer on and get the nuts tight. This is what you can grease the joints and put the flat plug in the bottom joint.
Put the axle back in and put a good coat of never seize on it so if you ever need to pull the hub it will be easy. Put it on the axle spline and flange of the bearing.
Install the bearing and the four bolts that hold it and put lock tite on them.
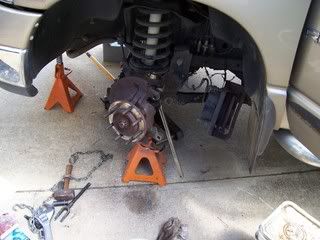
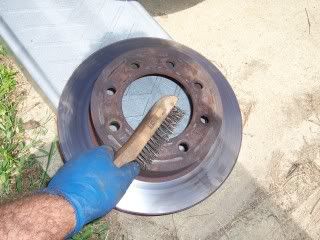
Wire brush the face of the bearing so the disk will fit without using the BFH.
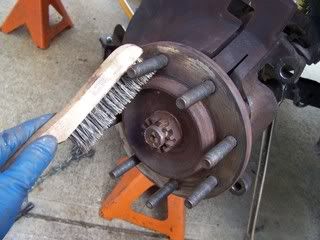
Its a good time to clean and look over you disks to see how they are and clean them up, wire brush out all the rust from the flange area.
Clean up of the bearing to get all the rust off.
Put the new upper ball joint in.
Put the new lower ball joint in.
Put both the grease fittings in, something the old ones should have had.
Put the outer on and get the nuts tight. This is what you can grease the joints and put the flat plug in the bottom joint.
Put the axle back in and put a good coat of never seize on it so if you ever need to pull the hub it will be easy. Put it on the axle spline and flange of the bearing.
Install the bearing and the four bolts that hold it and put lock tite on them.
Wire brush the face of the bearing so the disk will fit without using the BFH.
Its a good time to clean and look over you disks to see how they are and clean them up, wire brush out all the rust from the flange area.
__________________
Thread Starter
Registered User
Joined: Jan 2003
Posts: 401
Likes: 0
From: RALEIGH NC
after the hub and bearing is separated will the axle and u joint fit through the hole in the spindle where the bearing came out of ? i havent got the bearing separated yet but it seems like even when i do that the axle and u joint wont fit through the spindle, but im probably wrong?
__________________
__________________
When you take the 4 bolts out and pull the bearing it will be the next thing you pull is the axle ,ujoint and stub shaft.
Registered User
Joined: Sep 2007
Posts: 371
Likes: 2
From: Mississippi Gulf Coast

Thread Starter
Registered User
Joined: Jan 2003
Posts: 401
Likes: 0
From: RALEIGH NC
I do have one of those HF tools and for the money its great on ujoints and small stuff.

Registered User
Joined: Oct 2007
Posts: 9
Likes: 0
Tore it apart today (THANKS GADJET MAN )
Pulled my 06 apart today to replace front axle u joints , this post was awesome, walked me right through it , I had to add a little heat to get the hubs to budge , all apart now , will need to find u joints tomorrow BUT I DO KNOW I WILL NOT PUT THE FACTORY CRAP BACK IN IT. Ball joints seem very smooth still but will put brake pads on while its apart . My truck has 80,000 on it right now and these are the last of the u joint to be replaced the rear drive shaft went about 3 weeks ago so I did both shafts at the same time , , AGAIN THANKS FOR THE POST
Registered User
Joined: Sep 2007
Posts: 216
Likes: 0
From: Martinsburg, WV
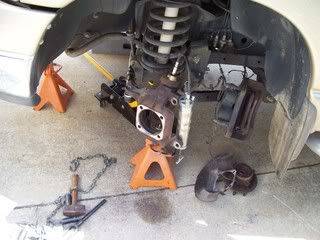
im following these directions but im stuck on getting the the four bolts to press out the spindal bearing thingy you say to use the power stearing as a press and the manual says just like you do back the out 1/4 in and tap on the bolt head and they will break loose. im using mass amounts of PB blaster and I have yet to use a cuss word so this is good. Im being as patiant as possible. any more advise would be outstanding
Registered User
Joined: Jul 2008
Posts: 109
Likes: 1
From: Catawba, VA
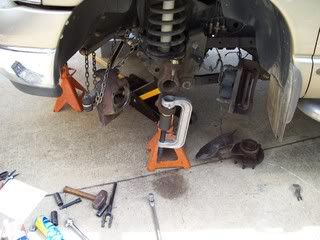
My passenger side was harder to get out than the driver side. It took some effort but they eventually popped loose. I had my wife turn the wheel and I alternated which bolt head got pressure applied to it. It took a few rotations of pressure to the bolt heads for it to pop loose. I used plenty of penetrating fluid (Free-All).
I'm sure PB blaster is about the same. I kept adding it like water on every crack that looked like it would help.
Good luck
I'm sure PB blaster is about the same. I kept adding it like water on every crack that looked like it would help.
Good luck