
How to ( BALL JOINTS )


Administrator ........ DTR's puttin fires out and workin on big trucks admin
Joined: May 2006
Posts: 2,013
Likes: 3
I am in the process of removing my ball joints now or at least trying to and can't get the lower one to come out, the upper came out tough, but finally budged. Great tips and pics, I would of never got the hub off if I hadn't done a search on the forum and saw yours. I have broke two adapter kits made by Astro and am on my third one now which is a different brand KD, the first two were just cast to thin and the screw punched through them. I am using a KD press just like this http://www.sears.com/shc/s/p_10153_12605_00999845000P with this adapter kit http://www.sears.com/shc/s/p_10153_12605_00994234000P and no luck. I rented them both from Oreilly's. Right now I have the thing as tight as I can get it with my 1/2" drive breaker bar and small cheater and not sure where to go from here. Any ideas? Do I have the wrong ball joint removal tool?  I am afraid to use a 3/4" drive breaker bar on it, which will probably be next, if my buddy has one.
I am afraid to use a 3/4" drive breaker bar on it, which will probably be next, if my buddy has one.With the ball joint press under tension, take a 2# mini sledge hammer and strike the rounded end of the axle between the upper and lower part of the press. You don not have to hit it very hard. Most time the shock load of striking it will pop the ball joint loose.
Tim
Administrator ........ DTR's puttin fires out and workin on big trucks admin
Joined: May 2006
Posts: 2,013
Likes: 3
Next back the four bolts out a little over 50% that hold the bearing on.
The front are harder to get to then the back.
This step is when you need to start the truck and then use a socket and ext to go from the bolt head to the axle tube and brackets. If you have someone help you remember take it slow and watch the hands the power steer is under a lot of pressure and you can bust stuff or that person.
Just take it slow and move 1/4" at a time side to side. Back the bolts out more and keep going. You want it to come out square...
The front works better with two sockets, the other side of the axle can be done with the socket and ext.
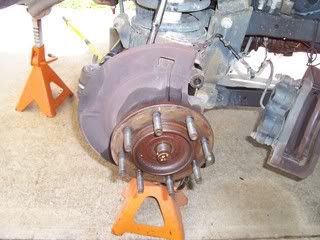
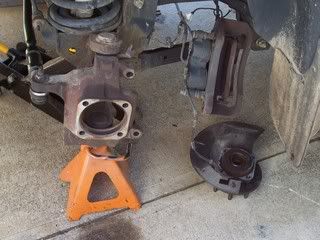
So the hub comes out and shows why it is so hard, lots of rust...
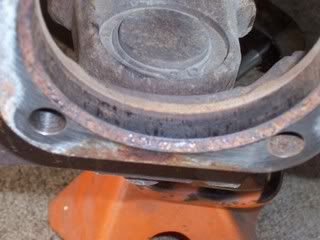
Close up of the bearing and some of the rust.
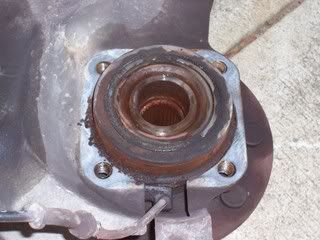
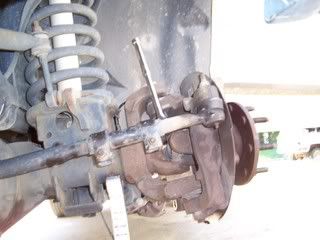
After the bearing has been pulled then you can pull the axle shaft. It shows more rust and also the circle clip on the Ball Joint you need to remember to remove. Now is a good time.
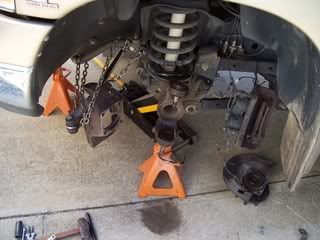
After removing the nuts on the ball joint the outer will fall off and you can just chain it and the tie rod out of the way. If you need to use a pickle fork leave one nut on some, if not the thing will jump off and get you. Its heavy.
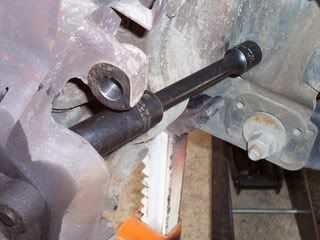
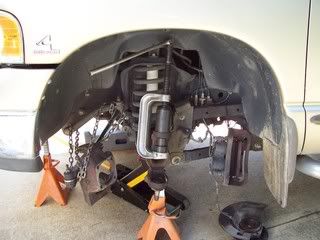
Now its time for the ball joints the upper old is coming out.
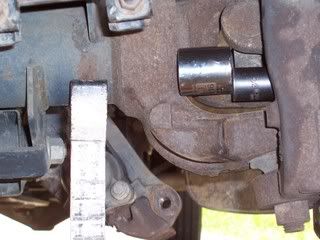
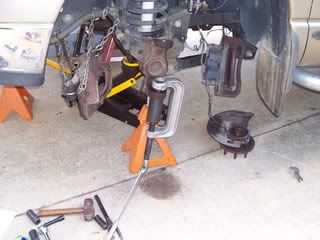
The lowed ball joint is coming out.
The front are harder to get to then the back.
This step is when you need to start the truck and then use a socket and ext to go from the bolt head to the axle tube and brackets. If you have someone help you remember take it slow and watch the hands the power steer is under a lot of pressure and you can bust stuff or that person.
Just take it slow and move 1/4" at a time side to side. Back the bolts out more and keep going. You want it to come out square...
The front works better with two sockets, the other side of the axle can be done with the socket and ext.
So the hub comes out and shows why it is so hard, lots of rust...
Close up of the bearing and some of the rust.
After the bearing has been pulled then you can pull the axle shaft. It shows more rust and also the circle clip on the Ball Joint you need to remember to remove. Now is a good time.
After removing the nuts on the ball joint the outer will fall off and you can just chain it and the tie rod out of the way. If you need to use a pickle fork leave one nut on some, if not the thing will jump off and get you. Its heavy.
Now its time for the ball joints the upper old is coming out.
The lowed ball joint is coming out.
See how Mt. Gadget has his press? Strike the axle on the outer rounded edge.
Nice job and excellent pics.
Tim
Thread Starter
Registered User
Joined: Jan 2003
Posts: 401
Likes: 0
From: RALEIGH NC
What thay are getting at is the C on the end of the axle tube that holds the ball joint, When you load the press its under compression to push the joint out. Take a hammer but it is best to use two, say 3-4 pounders. Put one on the C next to the joint and the other will be used to hit the other side. The C will flex and help it break loose. You should not need to beat it just a few blows. If that does not get it then stop and make sure the joint will fit inside the cup and the other will push it.
I have watched people that have the wrong cup and just compress the joint but never push it out.
I have watched people that have the wrong cup and just compress the joint but never push it out.

Registered User
Joined: Aug 2007
Posts: 22
Likes: 0
These hub assemblies in these trucks love to seize in the knuckles, plain and simple. Some times no matter what you do you can not separate the hub from the knuckle without damaging or destroying the hub. Take this for what you will, I don't have to do any repairs in my driveway. With that being said, and being in this business for the last 26 years of my life, I feel reasonably certain that the way I described is the most efficient and safest way to remove said parts without destroying them.
No, the safest and most efficient way to pop the hub out is with an air hammer... or if you don't have one handy, do it Mr. Gadget's way with the power steering. Sure, every once in a while you might find one that is well and truly stuck, and you might have to destroy it to get it off.
If you put a slide hammer on the lug studs, you are damaging a $400 hub ***'y. There's no way around it. The guys that do this for a living can afford to do the job however is fastest -- it's the customer or the manufacturer picking up the bill. If you're doing the work on your own vehicle, do it the right way. It'll probably save you some money.
Thread Starter
Registered User
Joined: Jan 2003
Posts: 401
Likes: 0
From: RALEIGH NC
A complete set of adapters and special large C-frame to remove and install ball joints on most Chrysler/Dodge light-duty trucks, 1999 - 2004 and Jeep Cherokee, Grand Cherokee, Wrangler, and Liberty vehicles, 1997 - 2004.
If I remember it will in the book. You could call OTC to make sure but the 99 and the 94 are the same axle. It was used on a dana 44, 60 and others just not the dodge dana 60 yet. Should do fine I would bet.

Registered User
Joined: Apr 2004
Posts: 42
Likes: 0
From: Kansas
[QUOTE=Hvytrkmech;2259085]With the ball joint press under tension, take a 2# mini sledge hammer and strike the rounded end of the axle between the upper and lower part of the press. You don not have to hit it very hard. Most time the shock load of striking it will pop the ball joint loose
Thanks for the assistance, I finally got the pesky thing to budge. The otherside was a piece of cake compared to this one, hub removal, ball joint and all.
My word of advice to others after doing this job is to go ahead and spend the extra money to by the specific press adapter for the application, the universal kit I rented worked, but it would of been much easier using the adapter specific to my truck.
Registered User
Joined: Apr 2003
Posts: 258
Likes: 0
From: Long Island, NY
Next back the four bolts out a little over 50% that hold the bearing on.
The front are harder to get to then the back.
This step is when you need to start the truck and then use a socket and ext to go from the bolt head to the axle tube and brackets. If you have someone help you remember take it slow and watch the hands the power steer is under a lot of pressure and you can bust stuff or that person.
Just take it slow and move 1/4" at a time side to side. Back the bolts out more and keep going. You want it to come out square...
The front works better with two sockets, the other side of the axle can be done with the socket and ext.
Registered User
Joined: Oct 2006
Posts: 37
Likes: 0
From: VIRGINIA BEACH, VA
SNAP ON Tool
SNAP ON does have a tool. http://buy1.snapon.com/catalog/item....re&dir=catalog
I just got back from deployment and installed a set of manual hubs in my truck. My brother had the tool at his shop in KY. It was a lot easier than using a socket and extension like I did when I did my ball joints.
BTW The manual hubs make a huge difference. I love the way my truck drives with them not to mention the better MPG.

Registered User
Joined: Sep 2006
Posts: 911
Likes: 0
From: Oklahoma
does anyone know the exact dimensions of this snapon tool?
SNAP ON does have a tool. http://buy1.snapon.com/catalog/item....re&dir=catalog
I just got back from deployment and installed a set of manual hubs in my truck. My brother had the tool at his shop in KY. It was a lot easier than using a socket and extension like I did when I did my ball joints.
BTW The manual hubs make a huge difference. I love the way my truck drives with them not to mention the better MPG.
I just got back from deployment and installed a set of manual hubs in my truck. My brother had the tool at his shop in KY. It was a lot easier than using a socket and extension like I did when I did my ball joints.
BTW The manual hubs make a huge difference. I love the way my truck drives with them not to mention the better MPG.
Registered User
Joined: Jul 2008
Posts: 109
Likes: 1
From: Catawba, VA
Mr. Gadget Thanks for the great writeup. I�m not sure if this is the only place you posted this. But I could not find it when I saw several other ball joint threads. I took the liberty of putting in pdf format and posted it in this thread 2001 4wd wheel bearing assembly $$$. I did not think you would mind. I couldn�t give you proper credit as I did not have your name. You should post this in the article area.
I just did the ball joints on my truck. Here are a few things that might help others.
For the steering socket trick use wobble extensions. This will give you some flexibility to get a solid spot for applying pressure. Try to work your way from bolt to bolt. Eventually it will pop loose. This is definitely easier with two people.
I took out the upper ball joint first. None of the adapters in the kit from Advance Auto Parts tool loaner program seemed to be what I needed(23 pieces in total). So I cut a 1" long piece of pipe to slide up on the ball joint shaft. This along with the kit pieces removed the upper joint.
I could not get the c clamp in the position shown in the pictures. So I went down thru the upper ball join hole. While the alignment was not perfect, it did give me better alignment.
The other thing I felt that really helped was a 3/4" breaker bar (more mass & less flex than the 1/2"). I bought a cheap one from our local Harbor Freight ($20). It worked flawlessly and is still in one piece.
On the passenger side I put the ball joint under pressure (I thought the threads would strip on the clamp). Then I hit the area around the ball joint with a hammer and it popped. This is where you may need the hammer and heat.
Use plenty of penetrating fluid.
I put anti-seize on everything when I put it back together. The alignment shop said they do the same thing with anti-seize.
Also my Moog joint instructions said to put the grease fitting facing inward. Which didn't make much sense to me, so I offset mine so I could get a grease gun past the knuckle and onto the fitting.
Last edited by Dave2001; Jan 9, 2009 at 08:48 PM. Reason: underline thread