
Quick way to change heatrer core(2-3hours)


Registered User
Joined: Feb 2013
Posts: 52
Likes: 0
Only problem I see is that multiple heating and cooling cycles expand and contract the hose and hose clamps and then they eventually leak.
I have to constantly re-tighten my hose clamps on my espar unit because of the expansion and contraction.
Good Idea, but it will get you later on. For the extra hour it would have taken to do it right the first time, doesnt make sense to me.
Found your heater core from NAPA in less than 5 minutes.
I guess your NAPA is lazy
http://www.napaonline.com/MasterPage...on=Heater+Core
When you do the heater core this way! Use contact cement on the hose and the tube and let it sit till tacky(the proper way to use contact cement) and you will have to carve the hoses off if you ever have to do it again.
We used to do this on all coolant hoses when I apprenticed for Mack Trucks to guarantee a no failure joint!!!
Cheers
Peter

Thread Starter
Registered User
Joined: Aug 2003
Posts: 2,021
Likes: 7
From: Cochrane Alberta
Please don't do that. Thats like the a holes that use use loctite on fan clutch hub threads to screw over the next guy. Makes the job that much more difficult for the next guy and requires replacing the hoses. As a mechanic I've had that done to me and don't appreciate it or see the need for it.
FYI, Dad still has this truck and still has no leaks.
FYI, Dad still has this truck and still has no leaks.
Registered User
Joined: Feb 2013
Posts: 52
Likes: 0
Please don't do that. Thats like the a holes that use use loctite on fan clutch hub threads to screw over the next guy. Makes the job that much more difficult for the next guy and requires replacing the hoses. As a mechanic I've had that done to me and don't appreciate it or see the need for it.
FYI, Dad still has this truck and still has no leaks.
FYI, Dad still has this truck and still has no leaks.
Edit, we will be civil or we won't be around............ Thank you for your cooperation.
Thread Starter
Registered User
Joined: Aug 2003
Posts: 2,021
Likes: 7
From: Cochrane Alberta
Actually I'm a dual ticketed mechanic with 20 years under my belt in the heavy duty industry. I've seen dealers use silicon sealer on hoses but never glue. I've also never seen a hose pop off other than when it wasn't tightened properly. I can't imagine any customer appreciating having to pay extra to have perfectly good hoses replaced.
You may not have had a customer complain to your face but I can only imagine the string of obscenities coming from the next guy that had to change that hose.
You may not have had a customer complain to your face but I can only imagine the string of obscenities coming from the next guy that had to change that hose.

Registered User
Joined: Aug 2007
Posts: 3,901
Likes: 37
From: On the Farm, Manitoba
Contact cement is exactly that, you leave it to dry then it sticks on contact. If you were to use contact cement "the way it's supposed to be used" like the directions tell you to, you would never get the hose on in the first place. That said I have always cut heater hoses off the heater core as the joints are too weak to have to start wiggling them around if you plan on reusing the core.
Thread Starter
Registered User
Joined: Aug 2003
Posts: 2,021
Likes: 7
From: Cochrane Alberta
I have two of these at work with slightly different bends/angles/lengths that allow me to work it around between the hose and fitting. Does a very good job of separating the two and allowing you to pull the hose off without damaging either.

Registered User
Joined: Aug 2007
Posts: 3,901
Likes: 37
From: On the Farm, Manitoba
I have a couple of the Snapon cotter pin pullers but I've never seen that brand before, who makes it?
Registered User
Joined: Jan 2003
Posts: 4,179
Likes: 142
From: The "real" Northern CA
Why not keep a good thread going..... 
I'm about to replace my heater core since the maple syrup smell is getting old. I've searched around for videos and proper procedures for some time knowing that this process was looming over me, but this thread has remained the best I've seen so far.
I also have ZERO intentions of messing with the AC condenser if I dont have to and anyone who calls me lazy or thinks I'm doing it wrong by not going through the agony of hours more work and money is beyond me.
That said, I'll be using spring hose clamps instead of screw band clamps. There's nothing wrong with screw band clamps but I feel spring clamps do a better job of retaining constant pressure on the hose.....and I've NEVER had one leak on any of the hoses under the hood.
Registered User

Joined: Jul 2004
Posts: 1,252
Likes: 52
From: Whitehorse, cultural hub of the universe..
Every time I've done a 2nd gen heater core, I don't take the dash, or the heater box all the way out. I don't drain coolant, nor do I disconnect the a/c lines. I do use the swivel joint heater cores, which btw, I have had 100% success with.
I start by taking the floor console, and stick (manual) off, and dropping the column onto the seat. I then take the dash bolts loose at the bottom rear, and take the top ones out. Then I lift the dash off of the right side bolt only. This allows the dash to swing back toward the passenger seat. I secure it in place with either a bungee strap, or the seat belt. The lower lip of the dash rests on the shift tower, like it was made to be there. You have to take the heater control vacuum lines loose at the large connector, pretty easy stuff.
I clamp the heater hoses, and taken them off of the core tubes. Remove the pcm from the firewall. I then take the heater box loose, and remember the bolt that is somewhat hidden by the valve cover, it goes from the engine bay side. Slide the box back a little, remove the clamp the holds the core tubes, and lift it out. Wipe the bottom of the core cavity clean, slide the new core in, and slam it all back together.
It takes a little longer to do, than it took me to type the instructions. That said, the very first one I did,took me just under 4 hours, since then I've gotten marginally faster.
There may be a couple of little things I've forgotten, but this is the way a lazy guy does the job. Yup, I said it, lazy. If you want to know the most efficient way to do a job right, watch the laziest guy on the job. He isn't going to waste any moves, or time, and he does it right because he's too lazy to want to do it twice.
Oh, contact cement. No. Hair spray works well, but only if absolutely required. And full circle "guarded" hose clamps. Another trick to keeping hose/tube joints from leaking, don't over tighten the freaking clamps. You have NO idea how many leaking cooling system joints I run across, where the whole problem is the clamp has crushed the hose, and either left it out of round or cut it.
Good luck, sorry about the epic post

Registered User
Joined: Nov 2010
Posts: 343
Likes: 0
why do these years truck heat suck so bad?
I have a 99 (since 2002) that I drive in the cold months, a 01 I store when the weather gets bad, I had a different 01 a few years ago, they all don't blow real heat.
I have good air flow, the air coming out is just warm.
the 99 last year I pulled the blower motor to see if there was blockage of dirt at the core, real clean, took off the hoses and blew through them, there not restricted at all clear, I back flushed it anyways. the coolant temp climbs fast as to be expected and is at 180*, the engine fan is not running
I believe the coolant to the core is being cooled somehow before it gets to the core, because when its warm outside the thing blows hot air.
stumped.
Registered User
Joined: Jan 2003
Posts: 4,179
Likes: 142
From: The "real" Northern CA
On the contrary these trucks have very good heat.....
But a few things to look for in assuring everything is OK is, if the air flow isnt ample then you'll need to make sure the AC evaporator isnt jammed up with sticks and leaves or random debris. When running the AC on "MAX" setting it will cause the recirculating door to open under the dash and potentially suck in hair and junk underneath by the passengers feet. Also, because there is no cowl filter, if you park under trees that drop a lot of stuff then it can get sucked up in the vent system and the AC evaporator is the first item the air comes in contact with after the fan.
But if the air flow is fine then you can open the glove box and feel the top tubes on the heater core. They should NOT be the same temperature. They'll be close but one should be cooler than the other if the heater is on and the core is dissipating heat properly. But if the core is plugged up or isnt flowing like it should then what happens is the hot coolant comes in and simply runs right back out without circulating down to the bottom. That results in the heater core tubes feeling the same. Now in saying that, it will sometimes be difficult to tell if ones hotter or cooler than the other but when checking you should run the heater fan on high in the hottest setting. Also a laser thermometer is better than checking by touch but you should still be able to tell.
Lastly, diesel engines are very tough on coolant. For that reason, it doesnt take too long for the coolant to loose its ability to protect the delicate parts like the heater core from corrosion. Looking at the coolant, it appears everything is fine but the core is slowly being plugged up with contaminants and reducing heat transfer. So most likely if you think there's a heat problem then its probably a heater core problem. Back flushing them can help if the core isnt terribly plugged up but generally the damage is done and a new core is in order. If you're still not sure then grab ahold of the heater core inlet lines under the hood. I bet ya they're too hot to hold which means that the temperature is around the normal 180* range flowing into the core.


Registered User
Joined: Jan 2003
Posts: 4,179
Likes: 142
From: The "real" Northern CA
I never posted back but I recently replaced my heater core as well. And let me tell everyone reading this.....I'm a "cheater" and I'm frigging proud of it. I got paid by the hour as a mechanic when I was a kid, but not anymore.
The way I look at it..... not only did I "cheat" myself out of a crappy way to have to disassemble everything underneath and behind the dash, but I also saved myself money by not having to pay someone else to evac and reinstall the Freon. Thats not even discussing the potential AC problems which may have arisen simply because of that unfortunate requirement too. Not too many of us are HVAC guys nor have the tooling to do this ourselves either so I could see that becoming an large third party bill if everything didn't go perfectly smooth.
Its simply a bogus move on Dodges part and someone in that dept should be lynched for making such a small job so difficult.
But as for how I actually "cheated"..... For those who care, this is what I did.
First I purchased an aluminum core with swivels from NAPA. Then I removed the heater hose lines under the hood at the engine, not the core. I then blew out the rest of the coolant in the core with an air compressor to assure there would be no coolant mess inside the cab.
Then with dash pulled back just enough to reach the heater core still in place, I measured and marked with pen on the OEM heater core tubes where I thought the splice should be with the least interference when splicing. Then I cut the OEM core lines, but not in any particular manner or location other than to make it possible to get the core out of its slot. No mess either because I cleared the coolant from the core with the air compressor. The core was TIGHTLY stuck in there too and took some force to get it out. Then I pulled the cut off core tubes sticking through the firewall with the rubber heater hoses still attached. (makes it much easier to get the rubber heater lines off the core tubes when its out of the truck since the rubber basically glues itself on the core tubes over time)
Then I matched up the OEM core tube cut markings, which I previously drew on them with pen, up to the new core tubes and cut the new core tubes at those appropriate location markings. Then I bought some new 5/8" heater hose and cut enough rubber line to splice the new core back together with the heater hose line covering the entire straight surface portion of the core tubes. I wanted my "sealing" surface of the rubber line to be as much as possible. Then I installed "constant pressure" hose clamps which, unlike screw type hose clamps, will never loosen but only maintain their cinching capability over time. Some people prefer screw hose clamps but you can easily get them too tight and smash the tubing under the rubber hose.
I then wrapped some foam insulation around the new core so as to seal and secure the new core in its new home. Then without the rubber heater core hose lengths connected to the core tubes, which I removed from the OEM core tubing, I was able to easily slip the new core in its spot by using both the flexible hose splices and the swivel connectors. It was surprisingly easy to install, and it when in without a problem.
Then I merely installed all the heater hoses back on where they came off, re-filled the coolant, and started up the engine. Works PERFECT. And for all those naysayers out there..... The odds of this "cheating" spice ever leaking is no more than any of the other many many rubber hoses found under the hood. Probably less of a chance too since I have two clamps per side of the splice. But in saying all of that, anyone who wants to spend more money and time tearing everything apart.....I have no qualms with that since its your truck, your time, and your money.
Here's some pictures to help understand what I described above.....
This was as far as I had to move the dash back.

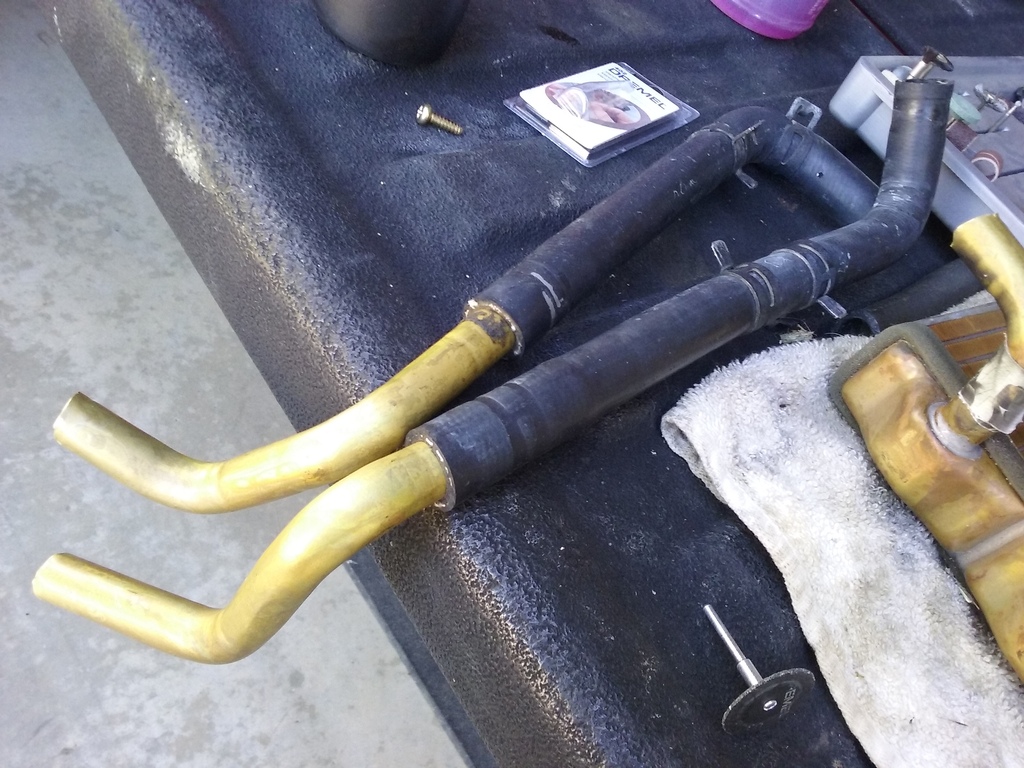
Here's the old core tubes cut off with the heater hose still attached.
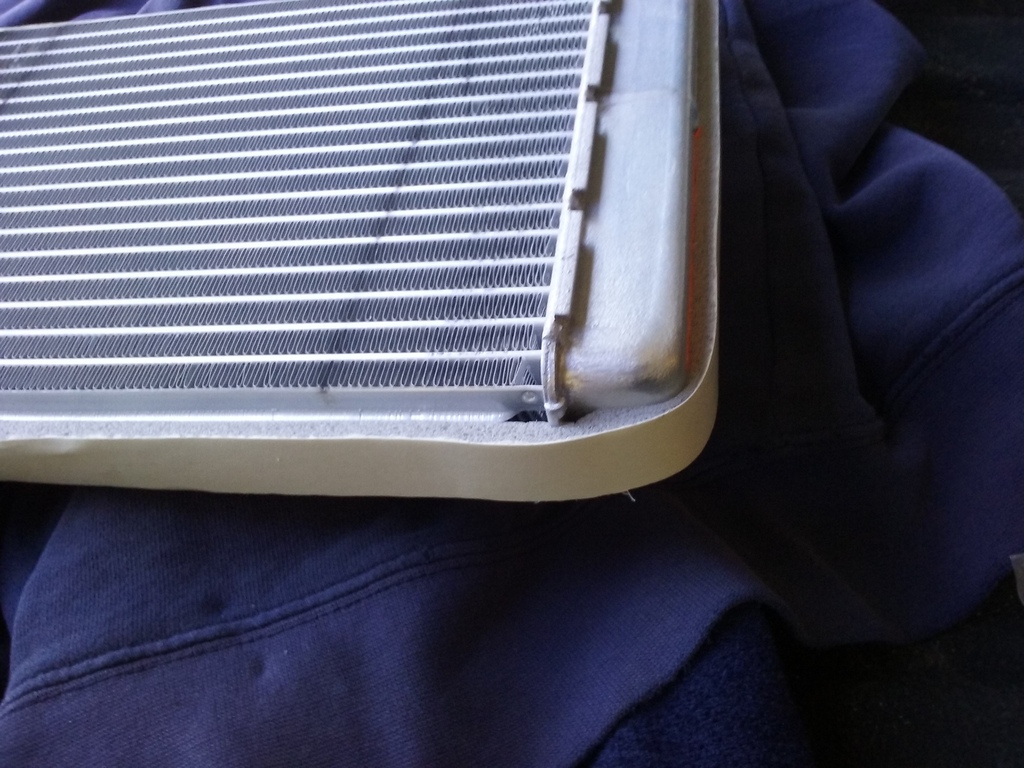
The new core wrapped with foam.
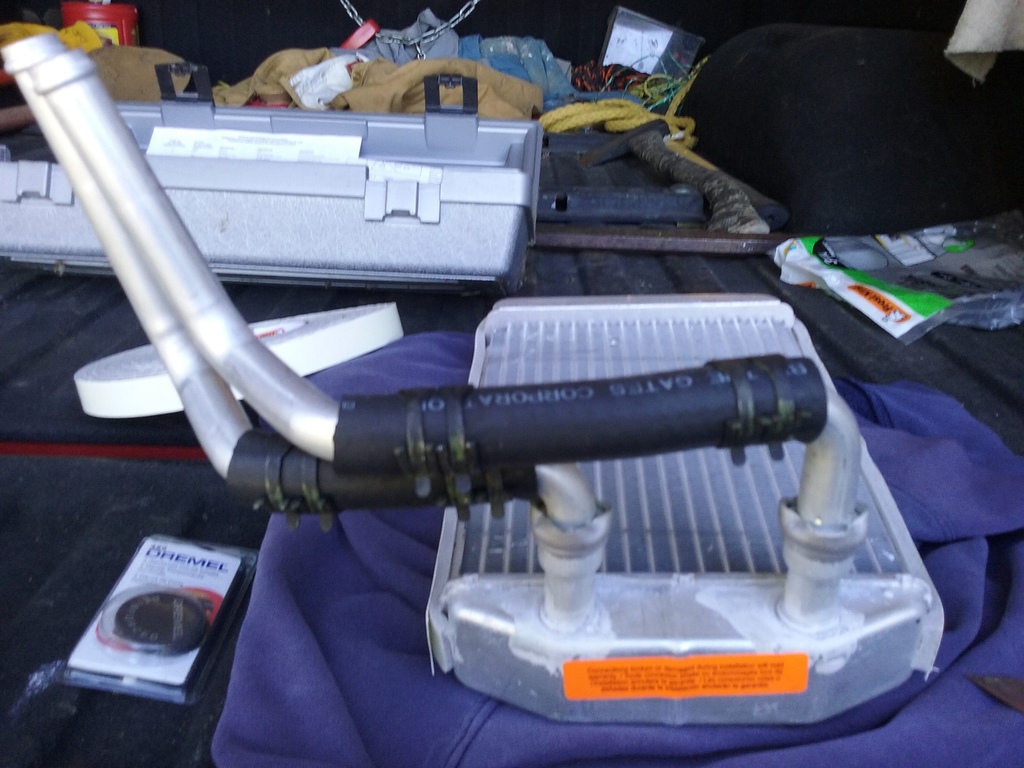
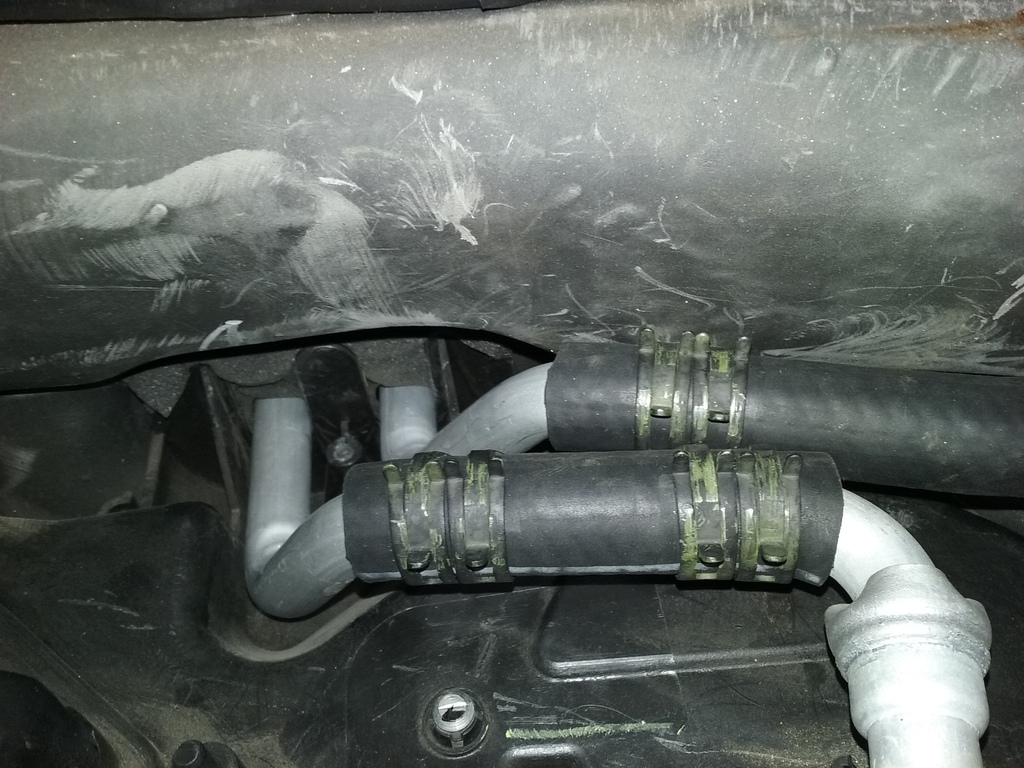
The new core tubes spliced back together with heater line and constant tension hose clamps.
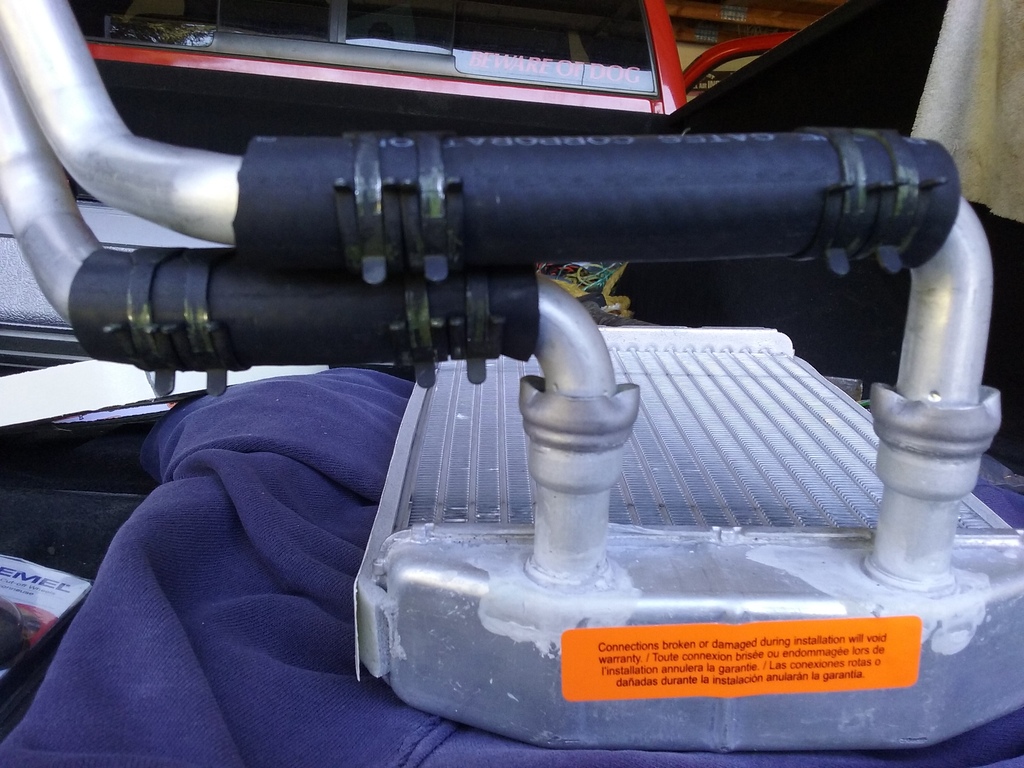
How they look sitting back in the truck.
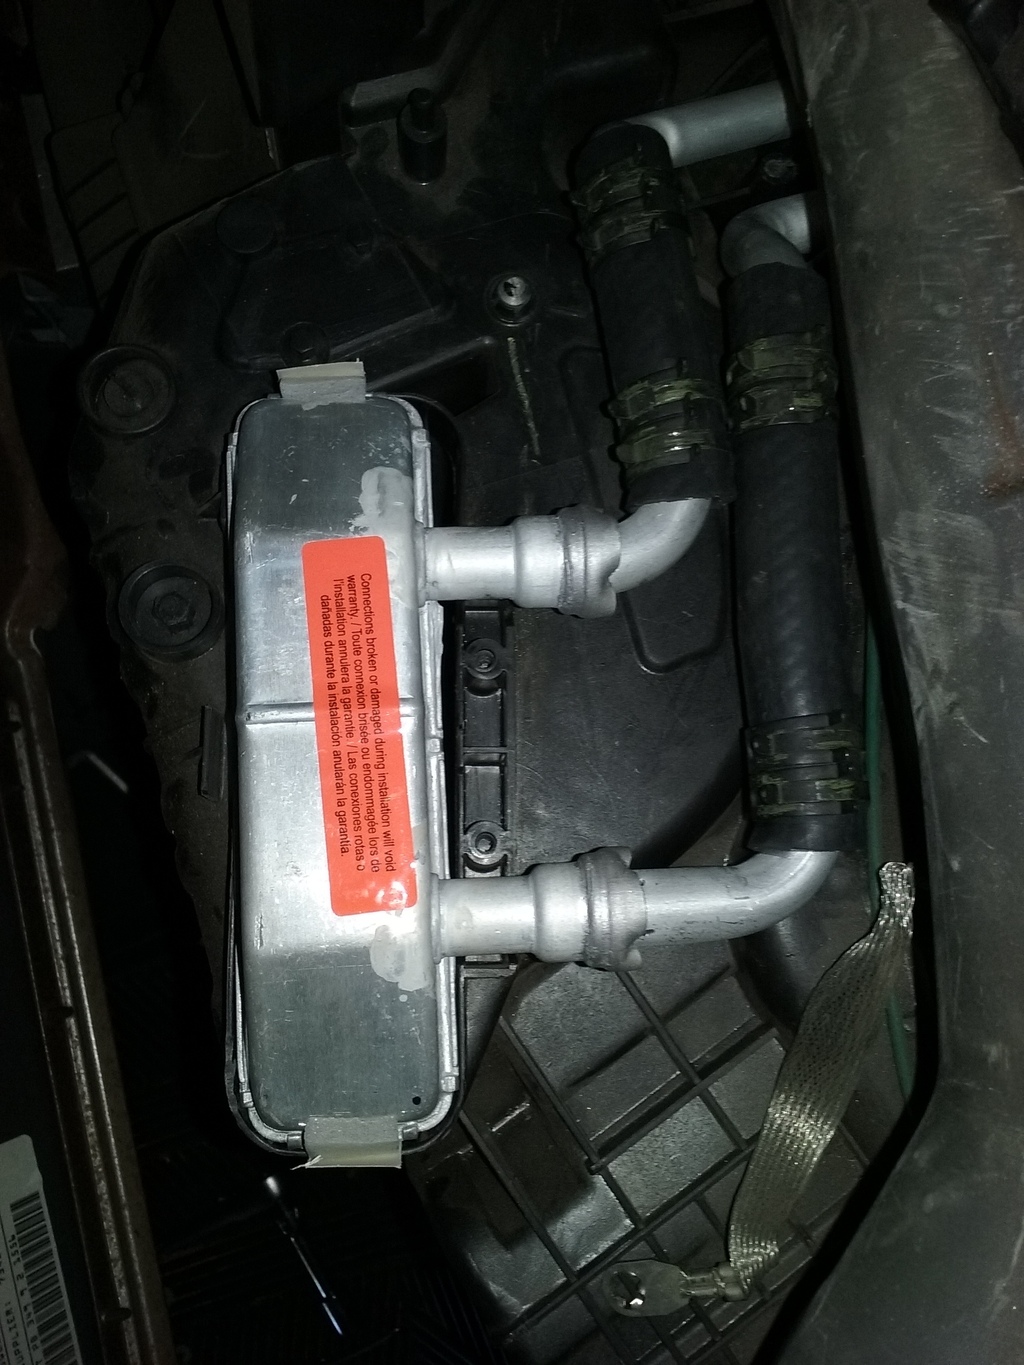
This is a top view.....but just note that the new core is not fully seated in its spot, nor is it clamped down or the ground strap put back.
Well worth not having to go through all the trouble of removing the center console, unplugging all the wiring and vacuum lines, removing the dash, evacuating the freon from the HVAC system, disassembling the AC lines, and removing the heater box away from the firewall. But again, to each is own.
I got paid by the hour as a mechanic when I was a kid, but not anymore.The way I look at it..... not only did I "cheat" myself out of a crappy way to have to disassemble everything underneath and behind the dash, but I also saved myself money by not having to pay someone else to evac and reinstall the Freon. Thats not even discussing the potential AC problems which may have arisen simply because of that unfortunate requirement too. Not too many of us are HVAC guys nor have the tooling to do this ourselves either so I could see that becoming an large third party bill if everything didn't go perfectly smooth.
Its simply a bogus move on Dodges part and someone in that dept should be lynched for making such a small job so difficult.
But as for how I actually "cheated"..... For those who care, this is what I did.
First I purchased an aluminum core with swivels from NAPA. Then I removed the heater hose lines under the hood at the engine, not the core. I then blew out the rest of the coolant in the core with an air compressor to assure there would be no coolant mess inside the cab.
Then with dash pulled back just enough to reach the heater core still in place, I measured and marked with pen on the OEM heater core tubes where I thought the splice should be with the least interference when splicing. Then I cut the OEM core lines, but not in any particular manner or location other than to make it possible to get the core out of its slot. No mess either because I cleared the coolant from the core with the air compressor. The core was TIGHTLY stuck in there too and took some force to get it out. Then I pulled the cut off core tubes sticking through the firewall with the rubber heater hoses still attached. (makes it much easier to get the rubber heater lines off the core tubes when its out of the truck since the rubber basically glues itself on the core tubes over time)
Then I matched up the OEM core tube cut markings, which I previously drew on them with pen, up to the new core tubes and cut the new core tubes at those appropriate location markings. Then I bought some new 5/8" heater hose and cut enough rubber line to splice the new core back together with the heater hose line covering the entire straight surface portion of the core tubes. I wanted my "sealing" surface of the rubber line to be as much as possible. Then I installed "constant pressure" hose clamps which, unlike screw type hose clamps, will never loosen but only maintain their cinching capability over time. Some people prefer screw hose clamps but you can easily get them too tight and smash the tubing under the rubber hose.
I then wrapped some foam insulation around the new core so as to seal and secure the new core in its new home. Then without the rubber heater core hose lengths connected to the core tubes, which I removed from the OEM core tubing, I was able to easily slip the new core in its spot by using both the flexible hose splices and the swivel connectors. It was surprisingly easy to install, and it when in without a problem.
Then I merely installed all the heater hoses back on where they came off, re-filled the coolant, and started up the engine. Works PERFECT. And for all those naysayers out there..... The odds of this "cheating" spice ever leaking is no more than any of the other many many rubber hoses found under the hood. Probably less of a chance too since I have two clamps per side of the splice. But in saying all of that, anyone who wants to spend more money and time tearing everything apart.....I have no qualms with that since its your truck, your time, and your money.
Here's some pictures to help understand what I described above.....
This was as far as I had to move the dash back.

Here's the old core tubes cut off with the heater hose still attached.

The new core wrapped with foam.

The new core tubes spliced back together with heater line and constant tension hose clamps.


How they look sitting back in the truck.

This is a top view.....but just note that the new core is not fully seated in its spot, nor is it clamped down or the ground strap put back.

Well worth not having to go through all the trouble of removing the center console, unplugging all the wiring and vacuum lines, removing the dash, evacuating the freon from the HVAC system, disassembling the AC lines, and removing the heater box away from the firewall. But again, to each is own.