
Rear Main Seal Install

Adminstrator-ess

Joined: Mar 2003
Posts: 22,594
Likes: 19
From: New Holland, PA
Registered User
Joined: May 2010
Posts: 531
Likes: 1
hey-Hey!!!,
I think all the engines have the starter teeth on the flywheel( or flex plate for youse auto folks ) and there is nooo way to get the engine going without it. Been contemplating exactly that question, as I'll have mine apart for a new clutch/flywheel/gearbox very soon. I do want to get the engine fired as quickly after installing the seal as is possible; don't want it getting oily and then not breaking in properly.
My source for the seal is a bit more expensive, at $80 but I am not going to complain too loudly whilst comparing its cost to the whole bill.
cheers,
Douglas

Registered User
Joined: Nov 2007
Posts: 780
Likes: 42
I had to pay about $80 also from cummins south. FYI the seal comes with instructions and makes no mention of lubricating the rubber outside part of the seal(where it presses in the housing). I tried it dry and it would set flush... an $80 botched job.
Got a new seal and am nervous on trying again- but this time with a dap of soapy water or something for the rubber. I'll probably use a very small dap of silicone gel. Just enough to make the outside shiny rubber.
Did you have problems getting it started into the housing?
Got a new seal and am nervous on trying again- but this time with a dap of soapy water or something for the rubber. I'll probably use a very small dap of silicone gel. Just enough to make the outside shiny rubber.
Did you have problems getting it started into the housing?
Registered User
Joined: May 2010
Posts: 531
Likes: 1
I had to pay about $80 also from cummins south. FYI the seal comes with instructions and makes no mention of lubricating the rubber outside part of the seal(where it presses in the housing). I tried it dry and it would set flush... an $80 botched job.
Got a new seal and am nervous on trying again- but this time with a dap of soapy water or something for the rubber. I'll probably use a very small dap of silicone gel. Just enough to make the outside shiny rubber.
Did you have problems getting it started into the housing?
Got a new seal and am nervous on trying again- but this time with a dap of soapy water or something for the rubber. I'll probably use a very small dap of silicone gel. Just enough to make the outside shiny rubber.
Did you have problems getting it started into the housing?
I will do mine on Election Day. I plan to lube the rubber with Hylomar; that stuff doesn't set( I recall VW pushrod tubes leaking with siliconed O-rings and being leak free when greased ). Now on the dry part I am a bit on the paranoid side; I plan to get the motor lit just as quickly as I can after installing the seal to break in the lip.
The driver is quite deep, the seal is supposed to sit that far in? Just want to be sure...
 these details worry the fork outta me; I don't want to get back in there any time soon.
cheers,
Douglas
Registered User
Joined: May 2010
Posts: 531
Likes: 1
Haven't seen the old seal yet...
Now on the order, clean up the crank, lube the outter seal surface with Hylomar and push seal with guide sleeve over the crank end. Drive seal in to depth set by the driver and remove the guide sleeve...replace flywheel and fire it up.
cheers,
Douglas
Now on the order, clean up the crank, lube the outter seal surface with Hylomar and push seal with guide sleeve over the crank end. Drive seal in to depth set by the driver and remove the guide sleeve...replace flywheel and fire it up.
cheers,
Douglas
Registered User
Joined: Nov 2010
Posts: 2,205
Likes: 9
From: Lloydminster SK/AB
Just did my seal last night. Found an easier way to remove the old seal instead of the two screw method, it didnt work well. Just used a flat blade screwdriver and snuck the blade under the metal part of the seal (where the metal and rubber meets) and pried it out using the crank hub as a fulcrum, came out easily.

Registered User
Joined: Sep 2006
Posts: 911
Likes: 0
From: Oklahoma
bump for a good thread... just be careful when using a screwdriver or seal removal tool. to not damage seal surface. ask me how I know 
this same procedure is good for front timing seal. there is no stop for seal. if you've got a groove on crankshaft. normally only option is re-sleeve. there's another option that rarely gets mentioned.
which is to drive seal a tiny bit further inwards or not as far in... to where seal has a completely new surface to seal with.
Registered User
Joined: Nov 2006
Posts: 807
Likes: 41
From: Englewood, TN
I took some pictures when I did my Rear Main seal.
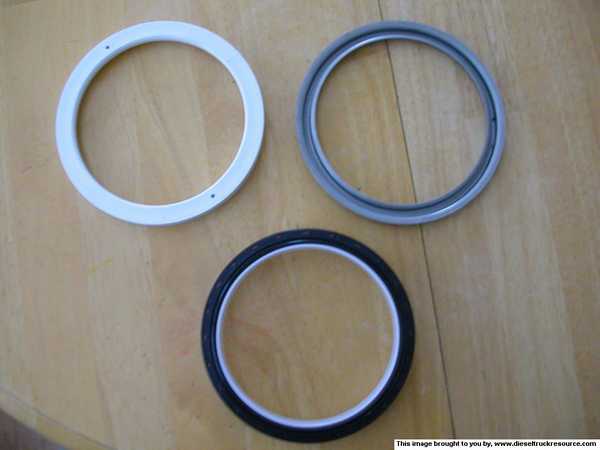
This is the Kit from Cummins.
You get a
1.) seal driver(metal ring top right)
2.) Seal and Installation Sleeve(Bottom)
3.) A driver for rear gear box engines(not used top Left)
P/N for the kit is Crankshaft Seal Kit
PN# 4089324
I didn't do the rear cover Gasket but here is the P/N if you go that route.
Gasket Rear Cover
PN# 3938159
Installing the new seal.
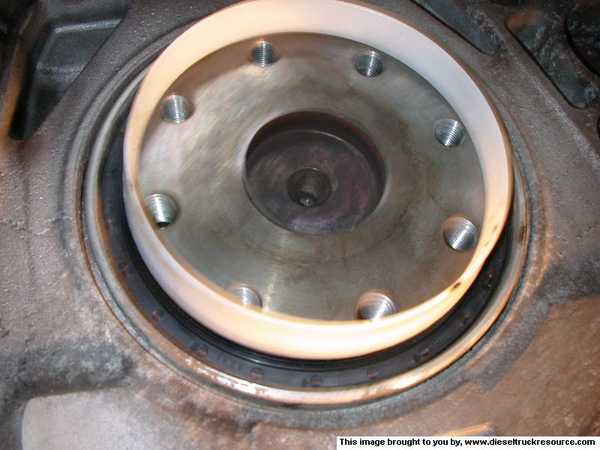
Clean is the key here. Seal goes on dry and clean. Wash your hands and/or find some gloves. wipe the area down good with some brakeleen or thinner. FSM says There are 2 types of seals. Ones with metal on the outside and ones with rubber. Mine was half rubber and half metal. Per The FSM Seals with Rubber on the outside circumference get coated with Soapy water. Seals with Metal on the outside circumference get loctite 277 or equiv. I used hylomar which was the equilvilent of my choice. Side the Installation sleeve on the Crank hub and push it on.
Driving the New seal Home
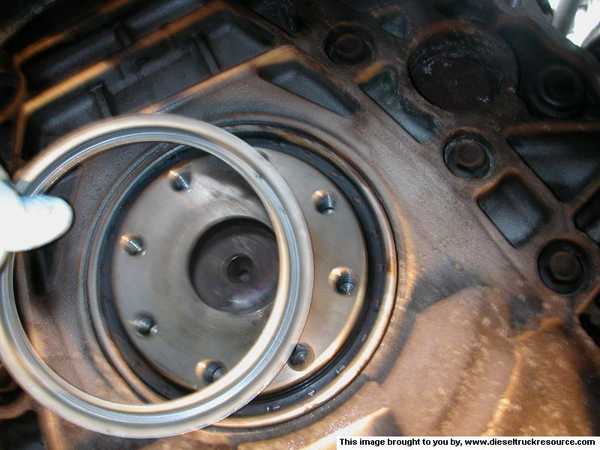
Once on the crank hub and lined up the best you can by hand use the driver to press the seal into the proper depth. Tap the driver with a mallet or plastic hammer(sorry no action shot) evenly all around til the driver sits flush with the seal housing(basically as far as it can go til you hear the driver hit metal). Take the driver out and your done. Put it all back together (Flywheel, clutch, Trans, Etc) and your ready for a leak check.
This is the Kit from Cummins.
You get a
1.) seal driver(metal ring top right)
2.) Seal and Installation Sleeve(Bottom)
3.) A driver for rear gear box engines(not used top Left)
P/N for the kit is Crankshaft Seal Kit
PN# 4089324
I didn't do the rear cover Gasket but here is the P/N if you go that route.
Gasket Rear Cover
PN# 3938159
Installing the new seal.
Clean is the key here. Seal goes on dry and clean. Wash your hands and/or find some gloves. wipe the area down good with some brakeleen or thinner. FSM says There are 2 types of seals. Ones with metal on the outside and ones with rubber. Mine was half rubber and half metal. Per The FSM Seals with Rubber on the outside circumference get coated with Soapy water. Seals with Metal on the outside circumference get loctite 277 or equiv. I used hylomar which was the equilvilent of my choice. Side the Installation sleeve on the Crank hub and push it on.
Driving the New seal Home
Once on the crank hub and lined up the best you can by hand use the driver to press the seal into the proper depth. Tap the driver with a mallet or plastic hammer(sorry no action shot) evenly all around til the driver sits flush with the seal housing(basically as far as it can go til you hear the driver hit metal). Take the driver out and your done. Put it all back together (Flywheel, clutch, Trans, Etc) and your ready for a leak check.
Apololgize in advance for being dense -- please confirm the following is correct? TIA.
1. After removing old seal and cleaning area thoroughly, first step is to separate the white plastic installation sleeve from the seal and push the installation sleeve onto the crank hub.
2. Step two is install the new seal onto the crank hub.
3. Step three is to remove the white plastic installation sleeve.
4. Step four is to drive the new seal to proper depth using the round metal seal driver supplied by Cummins.
5. Step five is to remove the metal seal driver.
6. Last step is to replace the flywheel/flexplate.
Again, thanks in advance.
Registered User
Joined: Dec 2008
Posts: 1,642
Likes: 96
From: Martinsburg WV
Ok, I am looking to order a spare RMS to keep on hand. I am confused as one of you has bought a kit with this part # 4089324 and Jimbo bought part #3934486. Which kit comes from Cummins with the installation ring and the white plastic seal installer? Thanks
Registered User
Joined: Mar 2008
Posts: 4,389
Likes: 114
From: Orange County, California
I'm certain #3934486 superseded #4089324. IIRC, I referenced #4089324 when I went to Cummins for one and #3934486 is the number that came up.
It did come with the seal driver and plastic installation ring as well. If there's a doubt when you pick it up, just open the box and look or verify with the parts counter that it comes with them.
It did come with the seal driver and plastic installation ring as well. If there's a doubt when you pick it up, just open the box and look or verify with the parts counter that it comes with them.
Registered User
Joined: Sep 2007
Posts: 63
Likes: 17
From: CA & SD
I replaced mine, checked my records here is what I came up with:
Crankshaft Seal Kit- Cummins
3934486 Cost $69.55 A/O Sept. 2012
Purchased at Cummins. I'm sure the price has changed since 2012.
Probably less expensive. ;-)
Be sure and install the new one completely dry, and exceptionally clean surface.
Crankshaft Seal Kit- Cummins
3934486 Cost $69.55 A/O Sept. 2012
Purchased at Cummins. I'm sure the price has changed since 2012.
Probably less expensive. ;-)
Be sure and install the new one completely dry, and exceptionally clean surface.