Rear Main Seal Install
 04-28-2008, 11:05 PM
#1
Registered User
Thread Starter
Rear Main Seal Install
I took some pictures when I did my Rear Main seal.
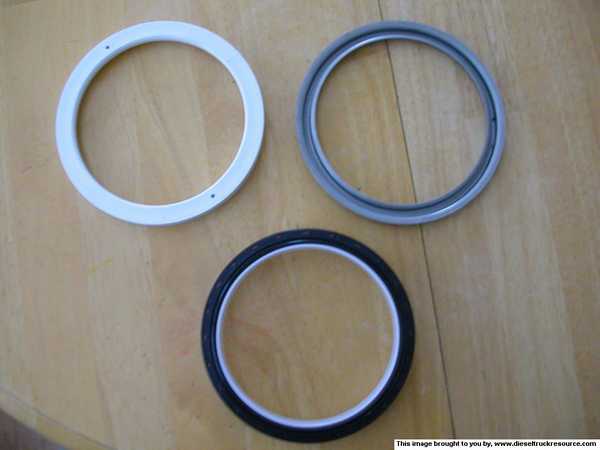
This is the Kit from Cummins.
You get a
1.) seal driver(metal ring top right)
2.) Seal and Installation Sleeve(Bottom)
3.) A driver for rear gear box engines(not used top Left)
P/N for the kit is Crankshaft Seal Kit
PN# 4089324
I didn't do the rear cover Gasket but here is the P/N if you go that route.
Gasket Rear Cover
PN# 3938159
Removing the Old Seal

Carefully drill 2 1/8in holes 180 degrees apart. Screw in some sheetmetal screws. I used vise grips and a small pry bar. A slide hammer would work great as well. Mine came out rather easy.
Installing the new seal.
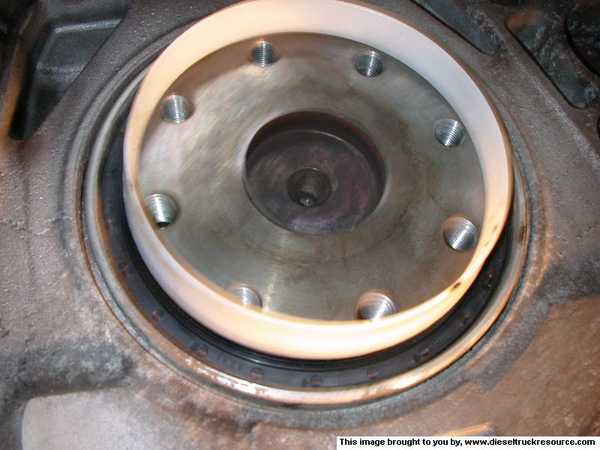
Clean is the key here. Seal goes on dry and clean. Wash your hands and/or find some gloves. wipe the area down good with some brakeleen or thinner. FSM says There are 2 types of seals. Ones with metal on the outside and ones with rubber. Mine was half rubber and half metal. Per The FSM Seals with Rubber on the outside circumference get coated with Soapy water. Seals with Metal on the outside circumference get loctite 277 or equiv. I used hylomar which was the equilvilent of my choice. Side the Installation sleeve on the Crank hub and push it on.
Driving the New seal Home
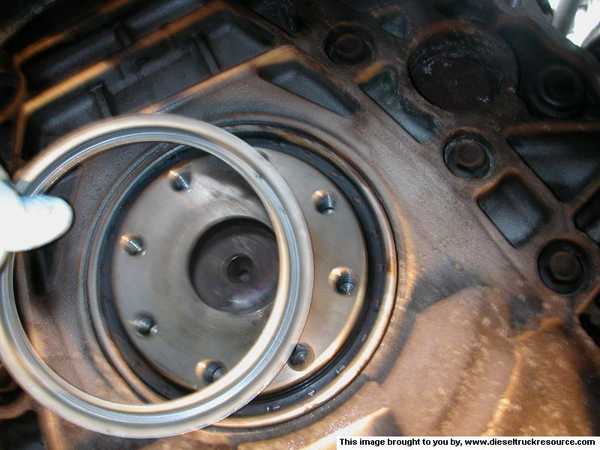
Once on the crank hub and lined up the best you can by hand use the driver to press the seal into the proper depth. Tap the driver with a mallet or plastic hammer(sorry no action shot) evenly all around til the driver sits flush with the seal housing(basically as far as it can go til you hear the driver hit metal). Take the driver out and your done. Put it all back together (Flywheel, clutch, Trans, Etc) and your ready for a leak check.
This is the Kit from Cummins.
You get a
1.) seal driver(metal ring top right)
2.) Seal and Installation Sleeve(Bottom)
3.) A driver for rear gear box engines(not used top Left)
P/N for the kit is Crankshaft Seal Kit
PN# 4089324
I didn't do the rear cover Gasket but here is the P/N if you go that route.
Gasket Rear Cover
PN# 3938159
Removing the Old Seal
Carefully drill 2 1/8in holes 180 degrees apart. Screw in some sheetmetal screws. I used vise grips and a small pry bar. A slide hammer would work great as well. Mine came out rather easy.
Installing the new seal.
Clean is the key here. Seal goes on dry and clean. Wash your hands and/or find some gloves. wipe the area down good with some brakeleen or thinner. FSM says There are 2 types of seals. Ones with metal on the outside and ones with rubber. Mine was half rubber and half metal. Per The FSM Seals with Rubber on the outside circumference get coated with Soapy water. Seals with Metal on the outside circumference get loctite 277 or equiv. I used hylomar which was the equilvilent of my choice. Side the Installation sleeve on the Crank hub and push it on.
Driving the New seal Home
Once on the crank hub and lined up the best you can by hand use the driver to press the seal into the proper depth. Tap the driver with a mallet or plastic hammer(sorry no action shot) evenly all around til the driver sits flush with the seal housing(basically as far as it can go til you hear the driver hit metal). Take the driver out and your done. Put it all back together (Flywheel, clutch, Trans, Etc) and your ready for a leak check.

 02-11-2009, 09:18 PM
#4
Registered User

Join Date: Dec 2007
Location: Mohrsville Pennsylvania
Posts: 593
Likes: 0
Received 0 Likes
on
0 Posts
I just replaced mine a couple days ago. i got it from cummins for $62.00. Mines didn't come with the white ring like pictured above. i didn't even need it so it wasn't a problem. I ordered 2 so i had an extra just incase.
Archer:
If your looking to get one i have one here i rather see it get used then just let it go to waste.
Archer:
If your looking to get one i have one here i rather see it get used then just let it go to waste.
02-11-2009, 09:22 PM
#5
Chapter President
I just replaced mine a couple days ago. i got it from cummins for $62.00. Mines didn't come with the white ring like pictured above. i didn't even need it so it wasn't a problem. I ordered 2 so i had an extra just incase.
Archer:
If your looking to get one i have one here i rather see it get used then just let it go to waste.
Archer:
If your looking to get one i have one here i rather see it get used then just let it go to waste.
 09-20-2009, 08:54 PM
#7
Registered User

Join Date: Nov 2008
Posts: 6
Likes: 0
Received 0 Likes
on
0 Posts
taking the seal out
i tried the one in the picture and i scored the seal housing on both sides.
how do you repair the housing?
sorry to hi jack this topic but i do need to know if i can fix it without buying
a seal housing. thanks
how do you repair the housing?
sorry to hi jack this topic but i do need to know if i can fix it without buying
a seal housing. thanks
Trending Topics
09-20-2009, 08:57 PM
#8
Adminstrator-ess
Smooth it out as best you can (no burrs sticking up) and put a dab of RTV in each score before you install the seal.
Haven't tried it but that's what I'd do if faced with the situation.
Haven't tried it but that's what I'd do if faced with the situation.
09-20-2009, 09:02 PM
#9
Registered user

Join Date: May 2008
Posts: 1,520
Likes: 0
Received 0 Likes
on
0 Posts
 09-21-2009, 01:27 PM
#12
Registered User
If memory serves, instructions say that it needs to go in totally dry or it won't seal up. I think brake-clean or the equivalent is recommended on the crank surface.
09-21-2009, 07:59 PM
#14
Registered user
Join Date: May 2008
Posts: 1,520
Likes: 0
Received 0 Likes
on
0 Posts
10-09-2009, 09:17 AM
#15
Registered User

Join Date: Oct 2009
Location: Milan, Michigan
Posts: 34
Likes: 0
Received 0 Likes
on
0 Posts
Could someone explain what keeps a metal chip from falling in the oil pan when you drill the holes to remove the old seal?
I have been bitten by the old mechanics trick of putting grease on the drill bit to hold the chips. It was a very expensing lesson (on a different vehicle).
I have been bitten by the old mechanics trick of putting grease on the drill bit to hold the chips. It was a very expensing lesson (on a different vehicle).