
Fix your leaking, whistling door

Thread Starter
1st Generation Admin
Joined: Jan 2005
Posts: 4,601
Likes: 118
From: Buies Creek, NC
Folks, this is another attempt to repay the vast knowledge afforded me by you the 1st gen community. 
Today I'm replacing the aged/damaged gasketing and weatherstripping for both doors of my old heap.
The following comments, instruction, and techniques are based solely and exclusively on my mess using the materials available at the moment. My mess amounts to a 1993 Dodge W250 ClubCab with standard manual door windows. Another truck's mileage may vary.
NOTE: Those of you with power windows will have to bear with me and improvise where needed.
As always ~ SAFETY FIRST!
- Wear Safety Glasses.
- Chock the wheels as needed.
- Disconnect the Negative battery cable from the battery (unless you have power windows, with that, be careful Sparky).
- Have a known good fire extinguisher within sight.
- Have a clean, uncluttered work area.
- Have good lighting.
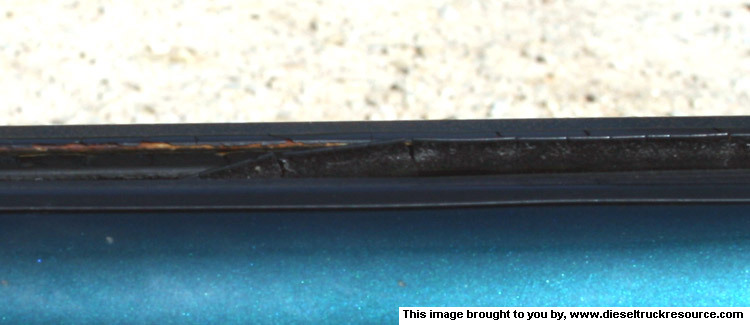
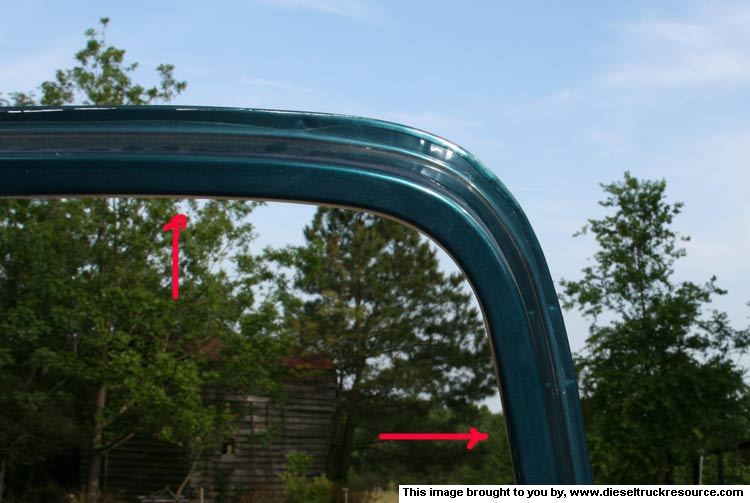
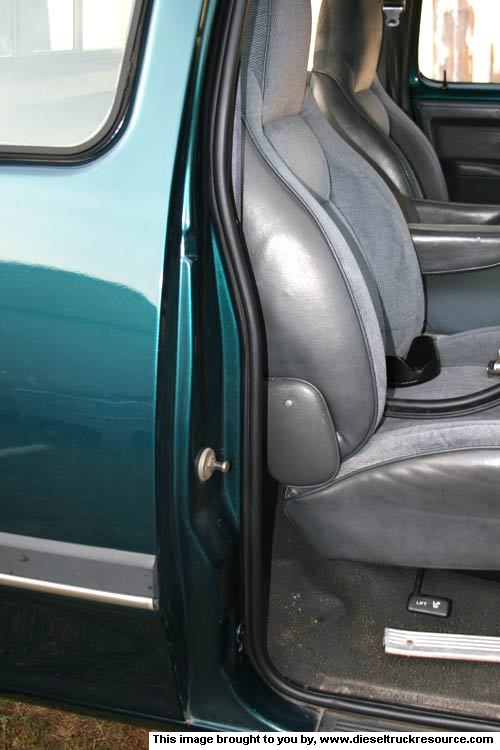
OK, the gist of it is my door/window rubber goods are degrading with time resulting in water leaks and wind whistles. You can see hints of trouble from the outside. ~

The issue is more apparent looking out. Things are falling apart. ~
The replacement is pretty-much straight forward using no special tools. Patients is however a must. You'll see.
There are two tools that proved invaluable, those being: a fairly stiff, blunt putty-knife (about 2" wide worked good for me), and a small bowl of diluted, mild dish-washing liquid as a lubricant.
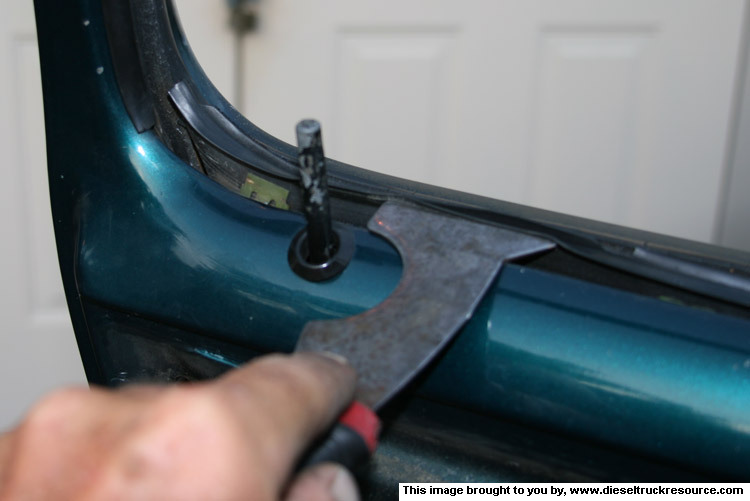
- Start by removing the three Phillips screws found in the inner door panel. Two at the bottom corners, and a third adjacent to the inner door latch handle. ~
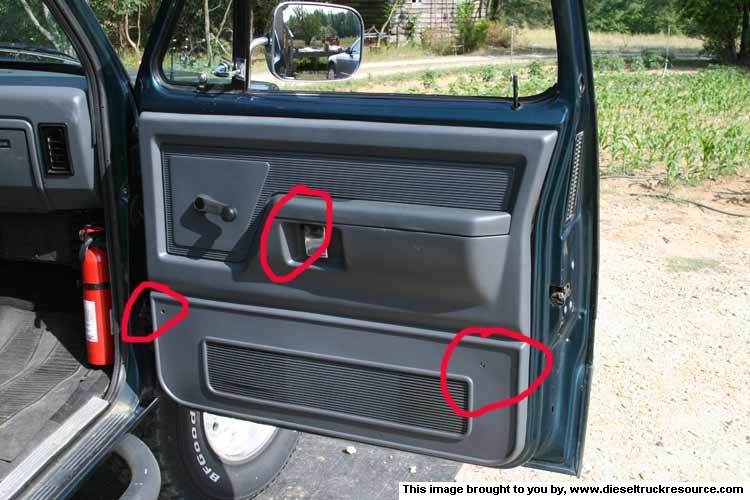
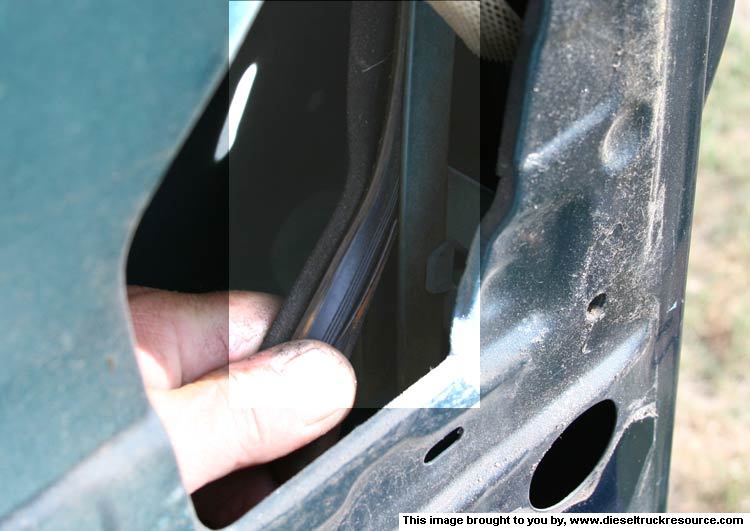
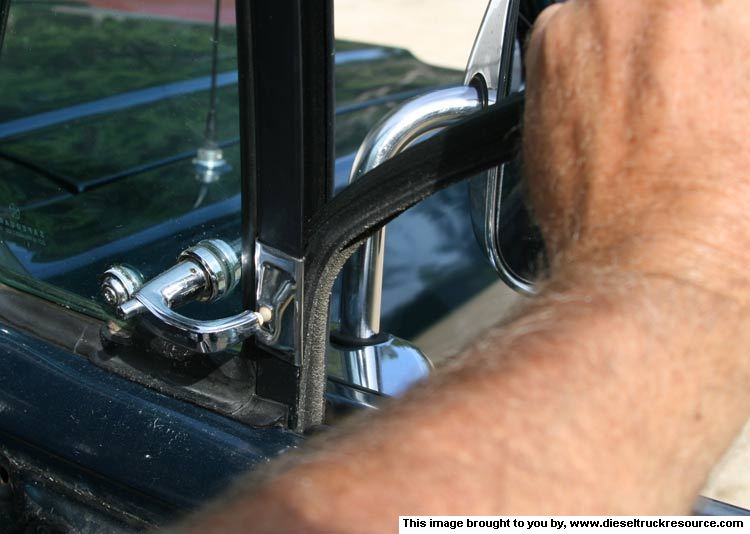
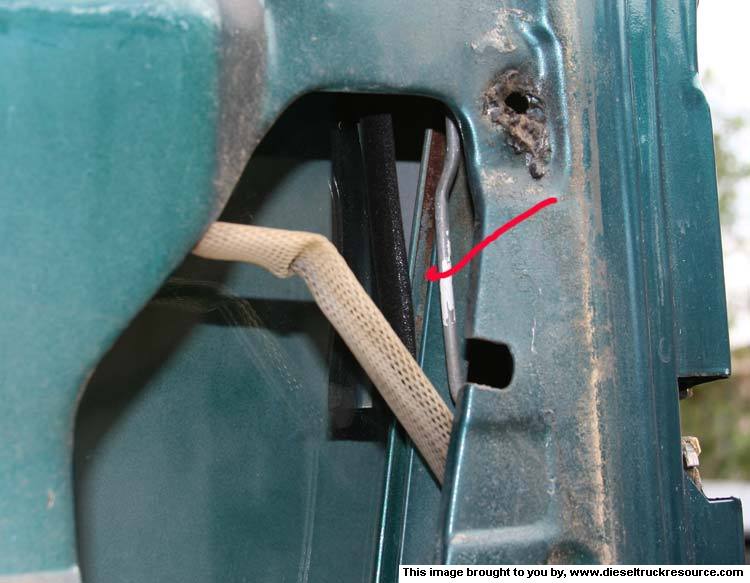
- Now remove the inner door latch handle itself (I've highlighted it so you can see in there). ~

- Now remove the inner door panel by unsnapping the retainer clips found just inside the panel's perimeter. Being careful of the paint, I used my putty-knife. Setting the inner panel aside reveals the door's Water Dam. It's nothing more than a sheet of plastic glued to the door. Carefully peel it away from the door so so as to be reinstalled later. I've got 1/2" thick RubaTex rubber insulation glued to mine for additional noise control. ~
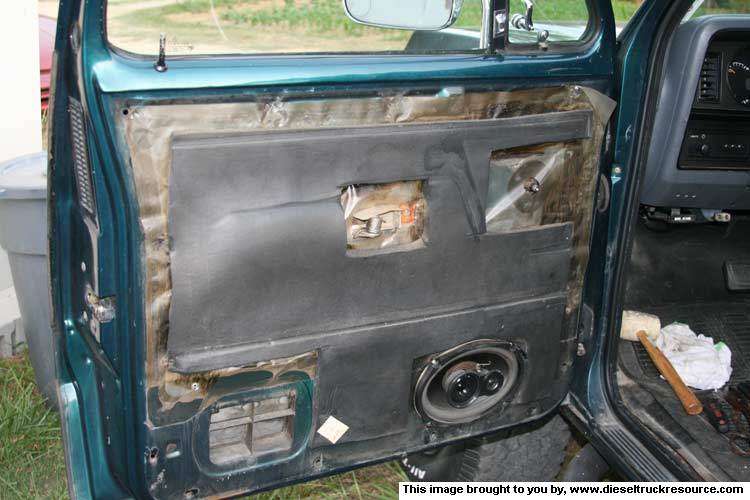
- Having exposed the door interior, you'll need to move the two water shields. I just flipped them up and stuck them to the Water Dam's glue. ~
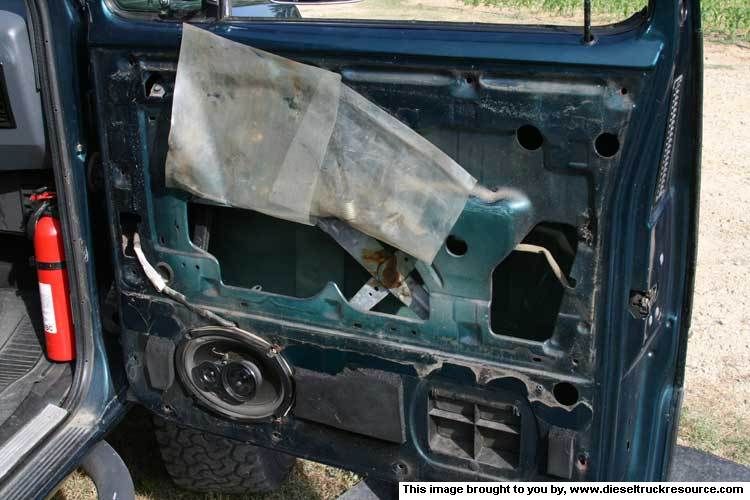
- Remove the bolt from the window crank so you don't loose it and place the crank back on the window crankshaft. Roll the window all the way down. Those of you with power windows will most likely have to have the inner door panel hanging off to the side with the window controls connected and active.
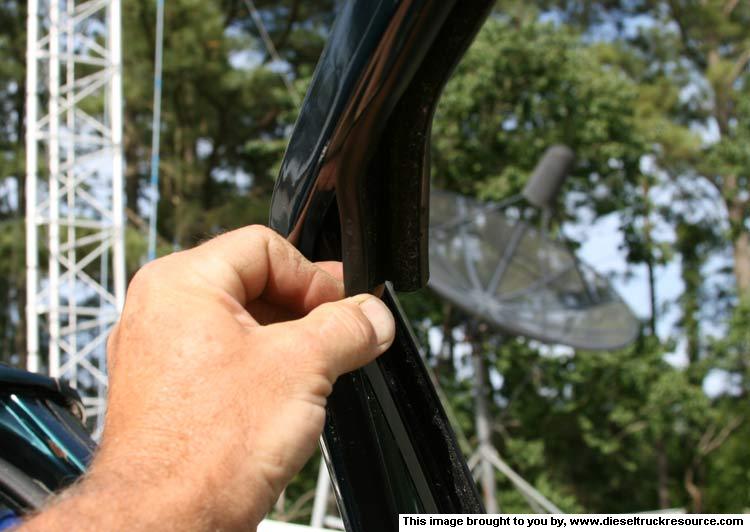
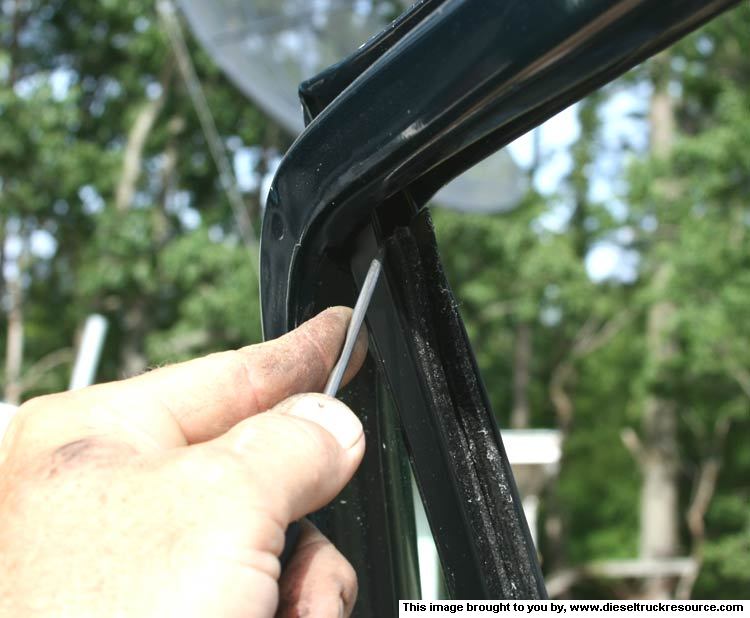
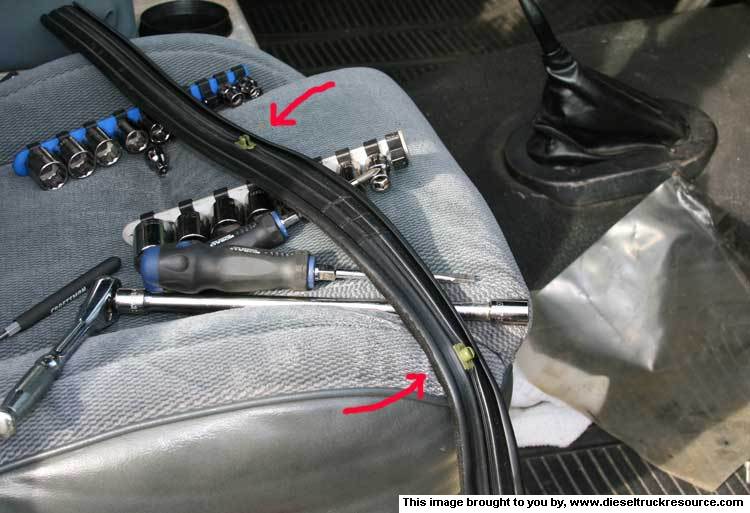
- We'll start the task by first removing the window weatherstrips both inner and outer. I used my putty-knife and being careful of the paint, started with the end away from the vent window (at the B column). As you pry the strip up, push it toward the glass as you go. You can see the mounting clips simply snap into corresponding slots in either side of the door. ~
- Now remove Top/Rear Window Channel by starting at the vent window end pulling the channel out of it's track. ~
- As you get back toward the rear top corner of the door, the channel will most likely tear as there's a Tab that's snapped into the track. There's a second Tab just down from the corner as well.
Today I'm replacing the aged/damaged gasketing and weatherstripping for both doors of my old heap.
The following comments, instruction, and techniques are based solely and exclusively on my mess using the materials available at the moment. My mess amounts to a 1993 Dodge W250 ClubCab with standard manual door windows. Another truck's mileage may vary.
NOTE: Those of you with power windows will have to bear with me and improvise where needed.
As always ~ SAFETY FIRST!
- Wear Safety Glasses.
- Chock the wheels as needed.
- Disconnect the Negative battery cable from the battery (unless you have power windows, with that, be careful Sparky).
- Have a known good fire extinguisher within sight.
- Have a clean, uncluttered work area.
- Have good lighting.
OK, the gist of it is my door/window rubber goods are degrading with time resulting in water leaks and wind whistles. You can see hints of trouble from the outside. ~
The issue is more apparent looking out. Things are falling apart. ~
The replacement is pretty-much straight forward using no special tools. Patients is however a must. You'll see.
There are two tools that proved invaluable, those being: a fairly stiff, blunt putty-knife (about 2" wide worked good for me), and a small bowl of diluted, mild dish-washing liquid as a lubricant.
- Start by removing the three Phillips screws found in the inner door panel. Two at the bottom corners, and a third adjacent to the inner door latch handle. ~
- Now remove the inner door latch handle itself (I've highlighted it so you can see in there). ~
- Now remove the inner door panel by unsnapping the retainer clips found just inside the panel's perimeter. Being careful of the paint, I used my putty-knife. Setting the inner panel aside reveals the door's Water Dam. It's nothing more than a sheet of plastic glued to the door. Carefully peel it away from the door so so as to be reinstalled later. I've got 1/2" thick RubaTex rubber insulation glued to mine for additional noise control. ~
- Having exposed the door interior, you'll need to move the two water shields. I just flipped them up and stuck them to the Water Dam's glue. ~
- Remove the bolt from the window crank so you don't loose it and place the crank back on the window crankshaft. Roll the window all the way down. Those of you with power windows will most likely have to have the inner door panel hanging off to the side with the window controls connected and active.
- We'll start the task by first removing the window weatherstrips both inner and outer. I used my putty-knife and being careful of the paint, started with the end away from the vent window (at the B column). As you pry the strip up, push it toward the glass as you go. You can see the mounting clips simply snap into corresponding slots in either side of the door. ~
- Now remove Top/Rear Window Channel by starting at the vent window end pulling the channel out of it's track. ~
- As you get back toward the rear top corner of the door, the channel will most likely tear as there's a Tab that's snapped into the track. There's a second Tab just down from the corner as well.
Thread Starter
1st Generation Admin
Joined: Jan 2005
Posts: 4,601
Likes: 118
From: Buies Creek, NC
Getting past those, you should be able to simply pull up on the remaining channel and have it slide completely out. If not, rolling the window up some, you can reach in through the access hole and pull the channel out of it's track so as to help get it out the top. ~
- Now remove the remaining window channel at the vent window by first picking its top out first. ~
- And like the rear channel, pull the vent channel straight up to remove it completely from its track. ~
- If the Top/Rear Window Channel tore at the corner with removal, use some regular pliers to remove the two Tabs from the channel track.
- Clean all the now exposed areas where the weatherstripping and channels covered the door paint. It wouldn't hurt to wax those areas for additional rust protection.
The installation of the new window channels and weatherstrips is for the most part the reverse of the above though it's also here that you'll need some patients. It's no big deal.
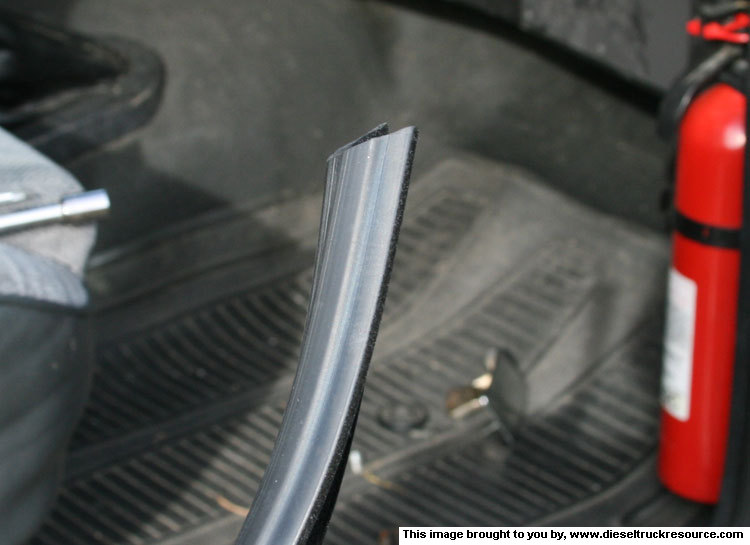
- Start by noticing the new Vent Channel is cut to a 45* angle at it's TOP as installed. ~
- Using the dish-washing liquid solution as a lubricant, slick-up the bottom of the Vent Channel (the square cut end) and force it into it's track just above the glass and slide it down. Using both hands, I gripped either side of the Channel and worked it in. It went in seemingly in 1/4" movements to start and then after a couple of inches, it went MUCH easier. Most likely because the Channel had come out of it's track inside the door and that's OK. Keep on working it in noticing the length left for the top half. Stop just short of having the right amount left for the top portion. Go ahead and lubricate the top portion of the Channel and stick the 45* cut into the top of the Channel track. After making sure it's fully seated well into the top of the track, press the rest of the Channel into the track working your way down. Any excess Channel should present as a hump at the bottom and should slide on down into the door.

- Now carefully roll the window up and reaching in through the door's access hole, finish seating the bottom portion of the Vent Channel into it's track. I found I had to pinch the Channel in my fingers so that the channel's two edges were equal (side-by-side) so that when I pushed it into the track, either side would be equal in depth. Just see to it that it's squarely seated along it's entire length.
That takes care of the Vent Channel.
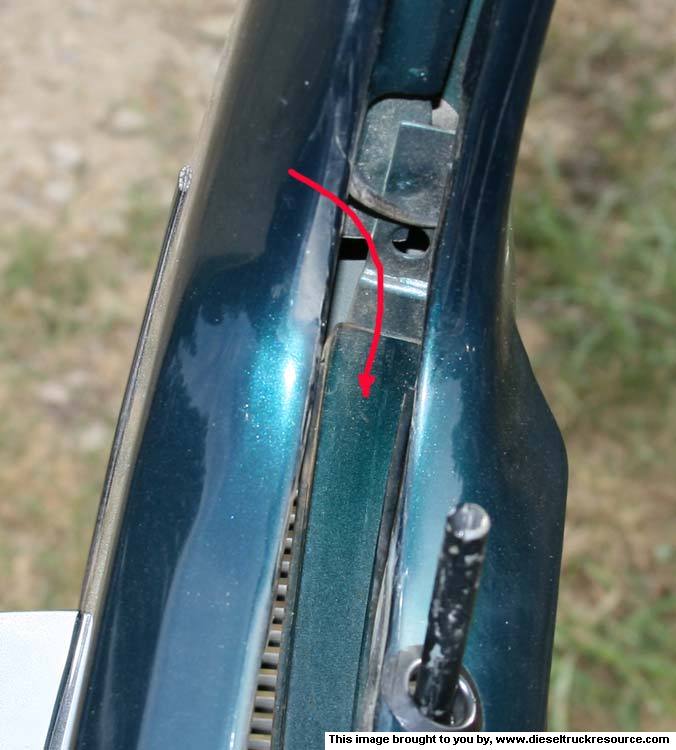
- Now begin the installation of the Top/Rear Window Channel by noticing those two Tab holes found in the top rear corner of the Channel track. ~
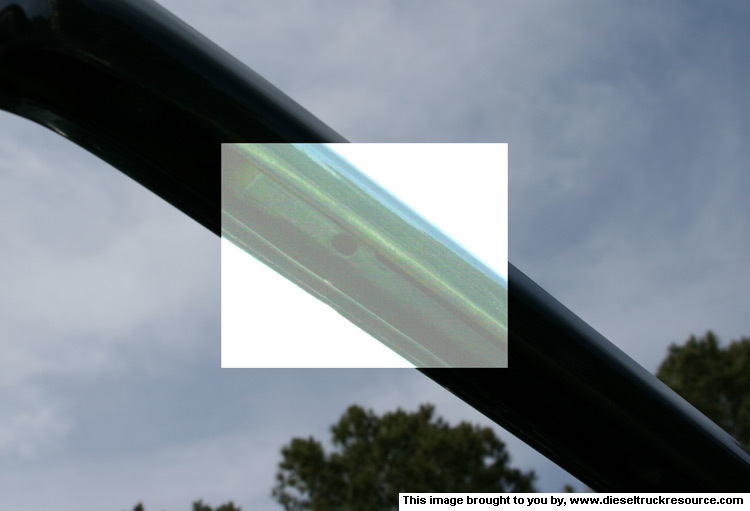
- The new Top/Rear Window Channel has the Tabs located as shown. You'll notice they are positioned toward one end of the new assembly. That Tab toward the closest end goes into the receiving hole at the top of the Channel track (across the top of the window).
- These Tabs are a pain in the butt to seat. I started with that on the top first using my putty-knife to seat the blame thing. Be careful you don't tear the new rubber!
- I then lubricated that portion going toward the front of the truck, and starting at the end that butts into the Vent Channel, pressed the new Channel in place. Notice that on each side of the new Channel there are thin rubber flanges. Installed correctly, they will lay flat against the window casing giving a nice, neat appearance.
- Going back to the Tab I just snapped into place, I then worked the Channel into the top/rear curve of the window casing down to the second Tab. You may find you need to move the rubber around so as to have the channel sit proper in the track with no bulges or wrinkles.
- Snap the second Tab into it's receiving hole.
- Now go to the remaining loose end of the new Channel and tuck it into the bottom corner of the window casing. ~
- Now remove the remaining window channel at the vent window by first picking its top out first. ~
- And like the rear channel, pull the vent channel straight up to remove it completely from its track. ~
- If the Top/Rear Window Channel tore at the corner with removal, use some regular pliers to remove the two Tabs from the channel track.
- Clean all the now exposed areas where the weatherstripping and channels covered the door paint. It wouldn't hurt to wax those areas for additional rust protection.
The installation of the new window channels and weatherstrips is for the most part the reverse of the above though it's also here that you'll need some patients. It's no big deal.
- Start by noticing the new Vent Channel is cut to a 45* angle at it's TOP as installed. ~
- Using the dish-washing liquid solution as a lubricant, slick-up the bottom of the Vent Channel (the square cut end) and force it into it's track just above the glass and slide it down. Using both hands, I gripped either side of the Channel and worked it in. It went in seemingly in 1/4" movements to start and then after a couple of inches, it went MUCH easier. Most likely because the Channel had come out of it's track inside the door and that's OK. Keep on working it in noticing the length left for the top half. Stop just short of having the right amount left for the top portion. Go ahead and lubricate the top portion of the Channel and stick the 45* cut into the top of the Channel track. After making sure it's fully seated well into the top of the track, press the rest of the Channel into the track working your way down. Any excess Channel should present as a hump at the bottom and should slide on down into the door.
- Now carefully roll the window up and reaching in through the door's access hole, finish seating the bottom portion of the Vent Channel into it's track. I found I had to pinch the Channel in my fingers so that the channel's two edges were equal (side-by-side) so that when I pushed it into the track, either side would be equal in depth. Just see to it that it's squarely seated along it's entire length.
That takes care of the Vent Channel.
- Now begin the installation of the Top/Rear Window Channel by noticing those two Tab holes found in the top rear corner of the Channel track. ~
- The new Top/Rear Window Channel has the Tabs located as shown. You'll notice they are positioned toward one end of the new assembly. That Tab toward the closest end goes into the receiving hole at the top of the Channel track (across the top of the window).
- These Tabs are a pain in the butt to seat. I started with that on the top first using my putty-knife to seat the blame thing. Be careful you don't tear the new rubber!
- I then lubricated that portion going toward the front of the truck, and starting at the end that butts into the Vent Channel, pressed the new Channel in place. Notice that on each side of the new Channel there are thin rubber flanges. Installed correctly, they will lay flat against the window casing giving a nice, neat appearance.
- Going back to the Tab I just snapped into place, I then worked the Channel into the top/rear curve of the window casing down to the second Tab. You may find you need to move the rubber around so as to have the channel sit proper in the track with no bulges or wrinkles.
- Snap the second Tab into it's receiving hole.
- Now go to the remaining loose end of the new Channel and tuck it into the bottom corner of the window casing. ~
Thread Starter
1st Generation Admin
Joined: Jan 2005
Posts: 4,601
Likes: 118
From: Buies Creek, NC
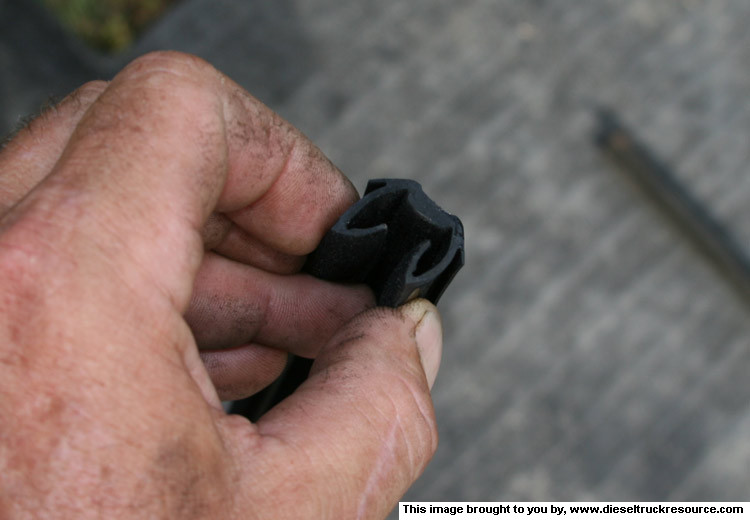
- You'll notice the Channel has barbs on each side so as to lock into the track. ~
- Stick the Channel down into the door casing so it rests on the glass with the glass just inside the channel as it should. ~
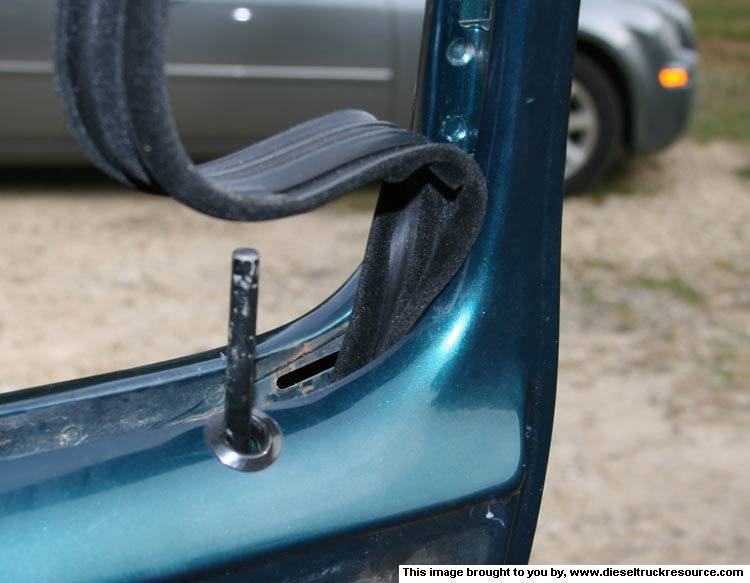
You won't be able to get the channel into the track as you can't access it. We just want to get things started. ~
- Carefully roll the window up about 10 inches.
- Now reach in through the door's access hole and pull the Channel on down into the door. As the Channel is most likely kinked-up with the glass, you may have to work the window up and down a little to aid in pulling the slack on down into the door. ~
- Go ahead and finish seating the upper portion of the Rear channel into it's track. As before, be sure the rubber flanges are so that they rest flat on the door paint. ~

- Finally, complete the Top/Rear Window Channel install by, just like with the Vent Channel, pressing the balance on into its track squarely. ~
- Roll the window up and down noting any weird binding or dragging and adjust as needed.
- To complete the work with the window, we need to install the new weatherstripping. The reverse of removal, the weatherstrip mounting clips plug into the slots of the door. I started with that end at the vent window, and worked my way back. Remember to press the strip in toward the metal of the door as you press it downward. With that, I found firmly pressing the curved end of the strip into the rear corner had it seat nicely into the rubber flange of the Rear Channel. ~

- Once again, roll the window up and down noticing any weird binding or dragging and adjust as needed.
- With that, you can reassemble the door's inner cover, etc. I used spray adhesive to reattach the Water Dam. If some of your Inner panel clips break, they are readily available in blister-packs at the local parts house.
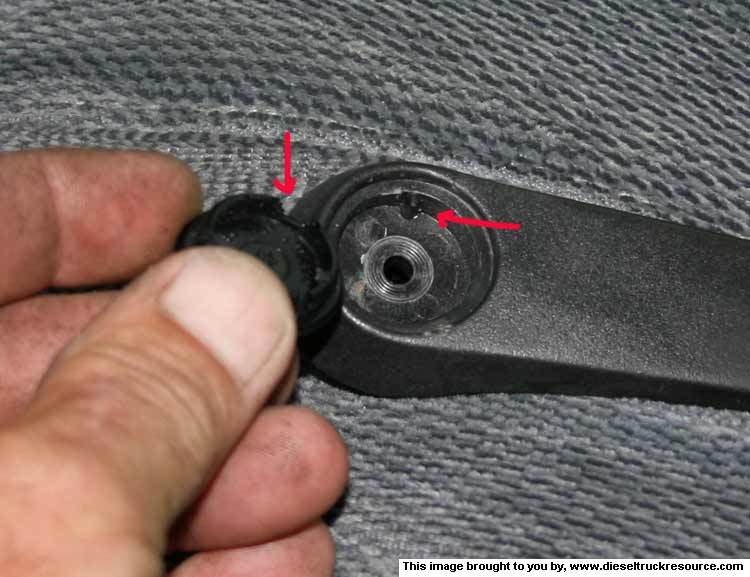
- To properly install the window crank, first roll the window up all the way. Then place the crank and beauty-ring on the crankshaft so the handle points toward the front of the truck. After setting the bolt, you'll notice the bolt cover will only go on one way due to a small key being built in. ~
That takes care of the door window. Let's now replace the door gasket itself.
- Stick the Channel down into the door casing so it rests on the glass with the glass just inside the channel as it should. ~
You won't be able to get the channel into the track as you can't access it. We just want to get things started. ~
- Carefully roll the window up about 10 inches.
- Now reach in through the door's access hole and pull the Channel on down into the door. As the Channel is most likely kinked-up with the glass, you may have to work the window up and down a little to aid in pulling the slack on down into the door. ~
- Go ahead and finish seating the upper portion of the Rear channel into it's track. As before, be sure the rubber flanges are so that they rest flat on the door paint. ~
- Finally, complete the Top/Rear Window Channel install by, just like with the Vent Channel, pressing the balance on into its track squarely. ~
- Roll the window up and down noting any weird binding or dragging and adjust as needed.
- To complete the work with the window, we need to install the new weatherstripping. The reverse of removal, the weatherstrip mounting clips plug into the slots of the door. I started with that end at the vent window, and worked my way back. Remember to press the strip in toward the metal of the door as you press it downward. With that, I found firmly pressing the curved end of the strip into the rear corner had it seat nicely into the rubber flange of the Rear Channel. ~
- Once again, roll the window up and down noticing any weird binding or dragging and adjust as needed.
- With that, you can reassemble the door's inner cover, etc. I used spray adhesive to reattach the Water Dam. If some of your Inner panel clips break, they are readily available in blister-packs at the local parts house.
- To properly install the window crank, first roll the window up all the way. Then place the crank and beauty-ring on the crankshaft so the handle points toward the front of the truck. After setting the bolt, you'll notice the bolt cover will only go on one way due to a small key being built in. ~
That takes care of the door window. Let's now replace the door gasket itself.
Thread Starter
1st Generation Admin
Joined: Jan 2005
Posts: 4,601
Likes: 118
From: Buies Creek, NC
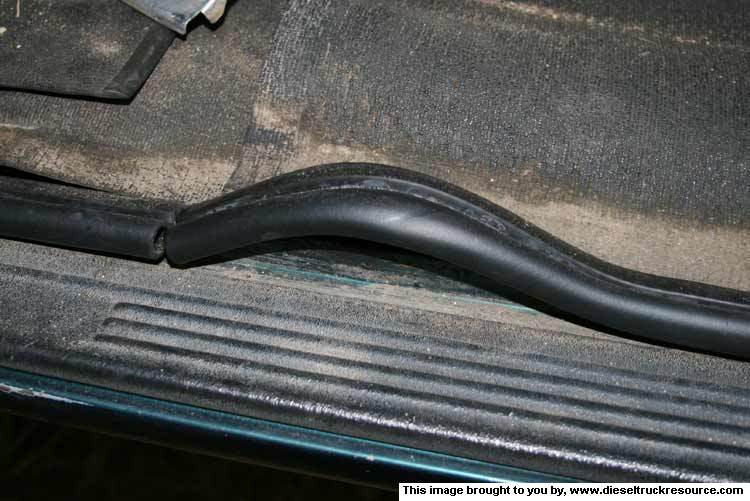
The replacement of the Door Gasket is easy. In addition to my gaskets being permanently compressed with time, the drivers side was damaged due to past door hinges allowing the door to drag and tear the OEM gasket. ~
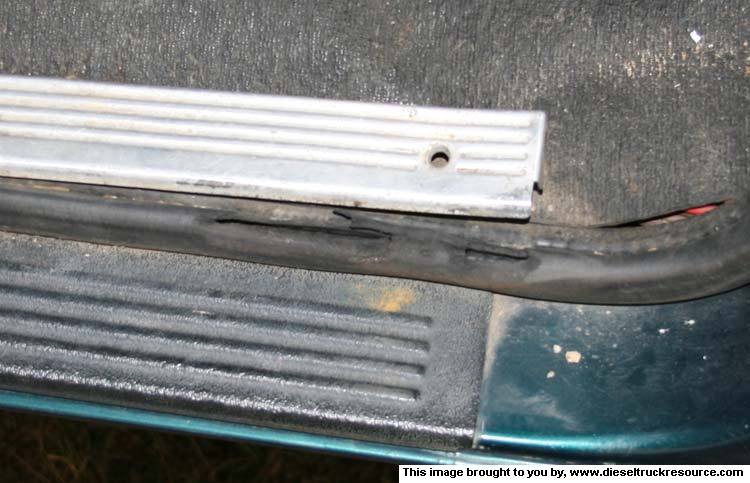
- Start by removing the doors threshold plate and setting it aside. As the door gasket is one piece, it's ends butt together at the bottom under the plate. Grab one end and gently pull it from the truck.
NOTE: The OEM gasket appears to be a 100% rubber assembly. My replacement is the same but for the addition of a metallic strip to enhance the clip of the assembly. The reason I note this is due to the fact that the 100% rubber version can be stretched on installation. If you go back with OEM gaskets, don't allow them to stretch when installing as that will result in them moving afterward possibly resulting in damage or failure to perform as expected.
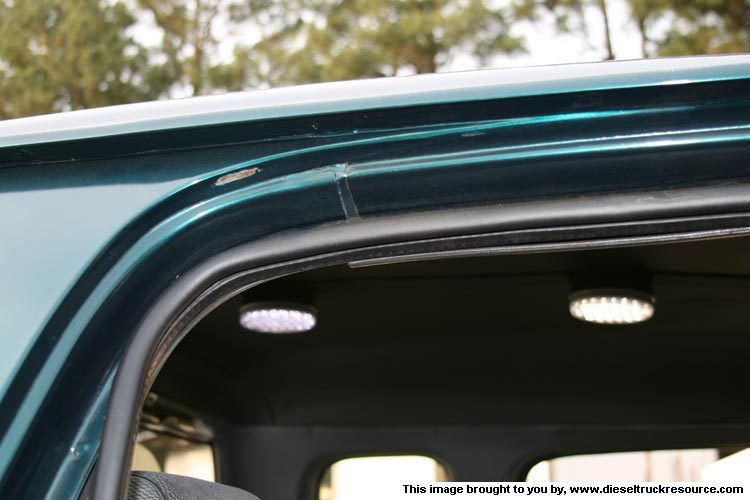
- With that I simply grabbed the new gasket at it's center in length and started installation at the top/center of the door frame. It is imperative that you firmly seat the gasket as you go. By that I mean press it firmly in place an inch at a time. Be sure it's fully seated because if it's not, it will end up bunching or stretching later as you move further down the line as it were. ~

- This is especially important with the 100% rubber variety when it comes to the corners. The FSM is very clear to make sure the corners are squarely seated with no bunching or stretching. ~
- Continue in this fashion all the way around with the loose ends presenting centered at the bottom so as to be covered by the threshold plate. ~
- Before you go to cutting things, let's do it so there's little gap at the ends. (The OEM replacement may fit perfectly and may not require trimming, I don't know. My aftermarket gasket was a bit long). I cut the end a bit long. ~

- So that I could then tuck in the loose end first. . . . ~
- And finally press in the slack. ~

- Reinstall the threshold plate.
- To complete the installation of the door gasket, I "Set" the gasket by firmly smacking it all the way around with my rubber headed mallet.
- Now, to keep the new gasket in good working order, I checked the doors alignment and adjusted as needed by loosening the hinges door mounting bolts, and positioning the door so the doors skin was flush with the body at the front, top, and bottom. ~

- After tightening the hinge bolts, I then adjusted the rear of the door so its skin was flush with the body at the back of the door by adjusting the latch bolt.
If your door hinges are severely worn, you'll need to repair or replace them so as not to damage your newly installed gasket.
OK, the first thing I noticed with shutting the door was . . . . . it's locked. DOH!
The wife's keys let me back in and the doors now shut with that "New" sound. No more slapping window glass. In fact, I have to shut the doors comparatively hard now as the new gaskets need to compress a bit to conform to the door's profile.
Riding around presents with a lot less noise as the seals are all good. I like it a lot!
I hope this proves helpful to those interested in doing such a repair.
David
- Start by removing the doors threshold plate and setting it aside. As the door gasket is one piece, it's ends butt together at the bottom under the plate. Grab one end and gently pull it from the truck.
NOTE: The OEM gasket appears to be a 100% rubber assembly. My replacement is the same but for the addition of a metallic strip to enhance the clip of the assembly. The reason I note this is due to the fact that the 100% rubber version can be stretched on installation. If you go back with OEM gaskets, don't allow them to stretch when installing as that will result in them moving afterward possibly resulting in damage or failure to perform as expected.
- With that I simply grabbed the new gasket at it's center in length and started installation at the top/center of the door frame. It is imperative that you firmly seat the gasket as you go. By that I mean press it firmly in place an inch at a time. Be sure it's fully seated because if it's not, it will end up bunching or stretching later as you move further down the line as it were. ~
- This is especially important with the 100% rubber variety when it comes to the corners. The FSM is very clear to make sure the corners are squarely seated with no bunching or stretching. ~
- Continue in this fashion all the way around with the loose ends presenting centered at the bottom so as to be covered by the threshold plate. ~
- Before you go to cutting things, let's do it so there's little gap at the ends. (The OEM replacement may fit perfectly and may not require trimming, I don't know. My aftermarket gasket was a bit long). I cut the end a bit long. ~
- So that I could then tuck in the loose end first. . . . ~
- And finally press in the slack. ~
- Reinstall the threshold plate.
- To complete the installation of the door gasket, I "Set" the gasket by firmly smacking it all the way around with my rubber headed mallet.
- Now, to keep the new gasket in good working order, I checked the doors alignment and adjusted as needed by loosening the hinges door mounting bolts, and positioning the door so the doors skin was flush with the body at the front, top, and bottom. ~
- After tightening the hinge bolts, I then adjusted the rear of the door so its skin was flush with the body at the back of the door by adjusting the latch bolt.
If your door hinges are severely worn, you'll need to repair or replace them so as not to damage your newly installed gasket.
OK, the first thing I noticed with shutting the door was . . . . . it's locked. DOH!
The wife's keys let me back in and the doors now shut with that "New" sound. No more slapping window glass. In fact, I have to shut the doors comparatively hard now as the new gaskets need to compress a bit to conform to the door's profile.
Riding around presents with a lot less noise as the seals are all good. I like it a lot!
I hope this proves helpful to those interested in doing such a repair.
David

Registered User

Joined: Sep 2004
Posts: 787
Likes: 0
From: INWOOD, West 'BY GOD' Virginia
Again Thank you, by any chance can you tell me/us where you got your gaskets? I am trying to get all my part numbers in order for a complete overhaul one of these years.
Thanks for all your detailed write ups, you make our lives alot easier.
Michael
Thanks for all your detailed write ups, you make our lives alot easier.
Michael
Trending Topics

Thread Starter
1st Generation Admin
Joined: Jan 2005
Posts: 4,601
Likes: 118
From: Buies Creek, NC
Thanks for the kind words folks. 
The kit I used for the entire work depicted above (both doors) comes from JC Whitney under the Item Number ZX267697 for $157.
David
EDITED to correct part number.
The kit I used for the entire work depicted above (both doors) comes from JC Whitney under the Item Number ZX267697 for $157.
David
EDITED to correct part number.

Registered User


Joined: Dec 2004
Posts: 4,312
Likes: 1,063
From: Commerce, OK
 Great write-up and info!
