
Crewcab update...

Registered User
Joined: Feb 2010
Posts: 68
Likes: 0
From: Pyeongtaek, South Korea
Nice work!  I have a couple questions, though. For those who have done this already, how does putting the intercooler out front affect the A/C? Does it cool down as well? Also, is there any hope this setup would fit behind a pre-first gen grille (77-78 specifically)?
I have a couple questions, though. For those who have done this already, how does putting the intercooler out front affect the A/C? Does it cool down as well? Also, is there any hope this setup would fit behind a pre-first gen grille (77-78 specifically)?
Thread Starter
Registered User


Joined: Mar 2010
Posts: 7,265
Likes: 1,346
From: Prince George, BC
As for fitting behind a 77/78 grille.....I think I remember at least one truck here on the board who's done it. Guys have done bone stock 1st gen rad supports, with OEM IC behind those grilles. So I think it's definetly doable.

Registered User
Joined: Feb 2010
Posts: 1,635
Likes: 59
From: New York
You must have a very understanding wife! I was kicked out of my basement and since the small garage doesn't have heat I don't want to work on my truck in 10F weather. Looking really nice, the NP tranny is very similar to the getrag, do they run larger/thicker gears? What makes them superior?
Thread Starter
Registered User
Joined: Mar 2010
Posts: 7,265
Likes: 1,346
From: Prince George, BC
You must have a very understanding wife! I was kicked out of my basement and since the small garage doesn't have heat I don't want to work on my truck in 10F weather. Looking really nice, the NP tranny is very similar to the getrag, do they run larger/thicker gears? What makes them superior?
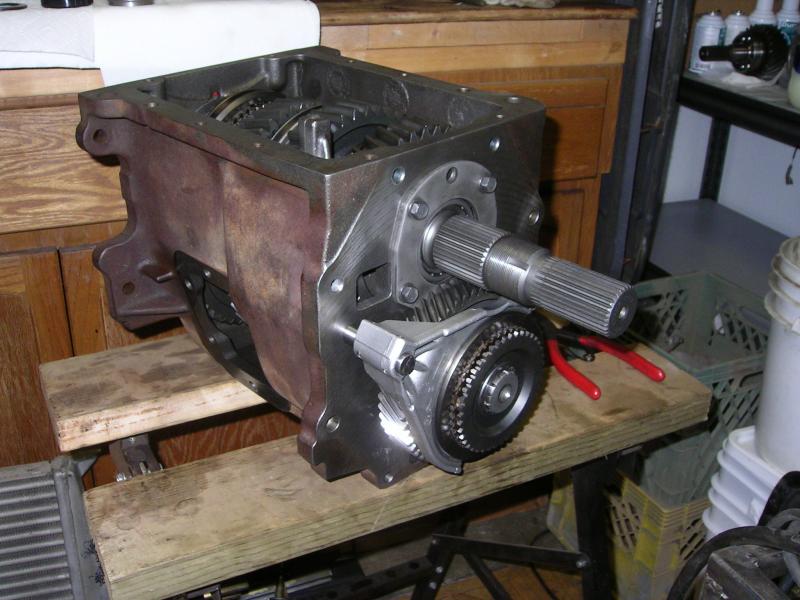
But from what I have read the NV4500 is the tranny guys want if they are pulling heavy, and hard. Supposedly the NV4500 can handle more power/torque then the Getrag.
With all the aftermarket support now for the Getrag, I don't think I would bother swapping to a NV4500 if I already had a Getrag.
Thread Starter
Registered User
Joined: Mar 2010
Posts: 7,265
Likes: 1,346
From: Prince George, BC
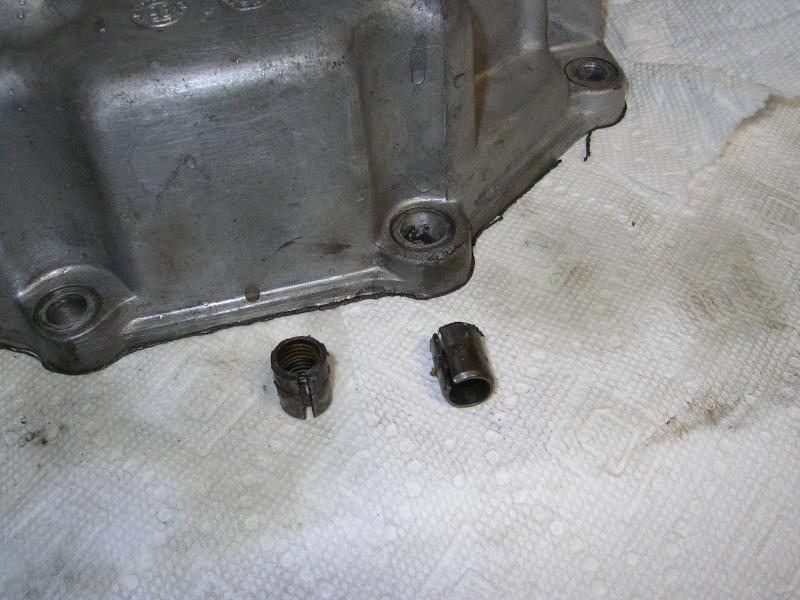
The 5th Gear shift rail came in today...Once again a great piece from Quad4x4!! Got it, and the 5th gear all installed today.
Then it was time to install the 5th gear nut. Here is the order of things that I installed.
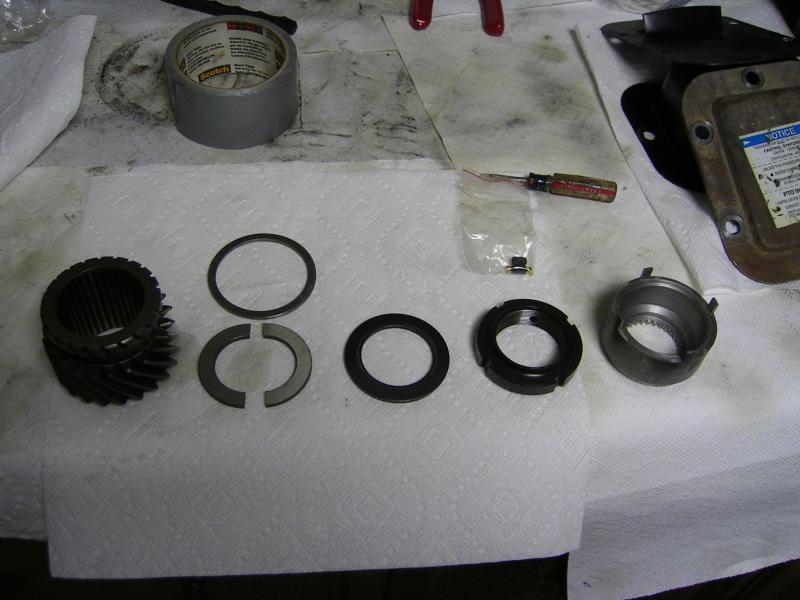
-New 5th Gear.
-Then split washer set-up to help hold 5th gear in place should nut back off.
-Concave washer
-New 5th gear nut with brass pins to torque down onto the treads to lock in place.
-Then the splined lock for the 5th gear nut.
With all of this I hope to never have any 5th gear issues...
Thread Starter
Registered User
Joined: Mar 2010
Posts: 7,265
Likes: 1,346
From: Prince George, BC
So I go ahead and install everything. Here's how the split washer looks when installed.

Used red loc-tite on threads and nut to help hold things in place. I finish torquing everything down...which is a chore if your doing it by yourself on the shop floor, and have no way to secure the tranny....
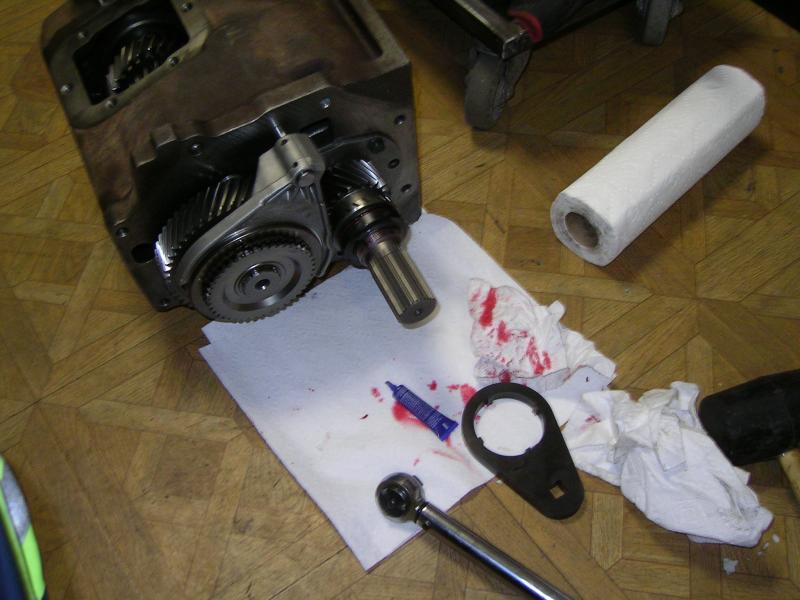
I then realize I may have an issue with the split washer set-up. And the loc-tite had got into the area where the brass pins were to sit and was not allowing them to be torqued down properly. So out comes the heat, and I have to pull everything apart again. That red Loc-tite is some evil stuff!!
Finally got it all apart, and cleaned up. That too is a chore. Once clean I did a dry trial run....got everything the way I wanted it and pulled it apart again. This time I had a friend come and help with the nut torque down. A little better...but not much.
During the assembly this time I installed some small pieces of paper towel into the bore for the brass pins. So it would soak up the loc-tite. Then once the nut was torqued down I used my small picks to pull out the paper towel and install the brass crush pins...and torqued them down.
But before you do that you need to line up the nut with the splined nut lock. I had to play with it on the splines until I found a spot where it was just a hair out of alignment. Then I used the 5th gearnut tightening tool, and a rubber mallet, to beat the nut into alignment.
Now it's all done for good!!

Used red loc-tite on threads and nut to help hold things in place. I finish torquing everything down...which is a chore if your doing it by yourself on the shop floor, and have no way to secure the tranny....

I then realize I may have an issue with the split washer set-up. And the loc-tite had got into the area where the brass pins were to sit and was not allowing them to be torqued down properly.
So out comes the heat, and I have to pull everything apart again. That red Loc-tite is some evil stuff!!Finally got it all apart, and cleaned up. That too is a chore. Once clean I did a dry trial run....got everything the way I wanted it and pulled it apart again. This time I had a friend come and help with the nut torque down. A little better...but not much.
During the assembly this time I installed some small pieces of paper towel into the bore for the brass pins. So it would soak up the loc-tite. Then once the nut was torqued down I used my small picks to pull out the paper towel and install the brass crush pins...and torqued them down.
But before you do that you need to line up the nut with the splined nut lock. I had to play with it on the splines until I found a spot where it was just a hair out of alignment. Then I used the 5th gearnut tightening tool, and a rubber mallet, to beat the nut into alignment.
Now it's all done for good!!

Thread Starter
Registered User
Joined: Mar 2010
Posts: 7,265
Likes: 1,346
From: Prince George, BC
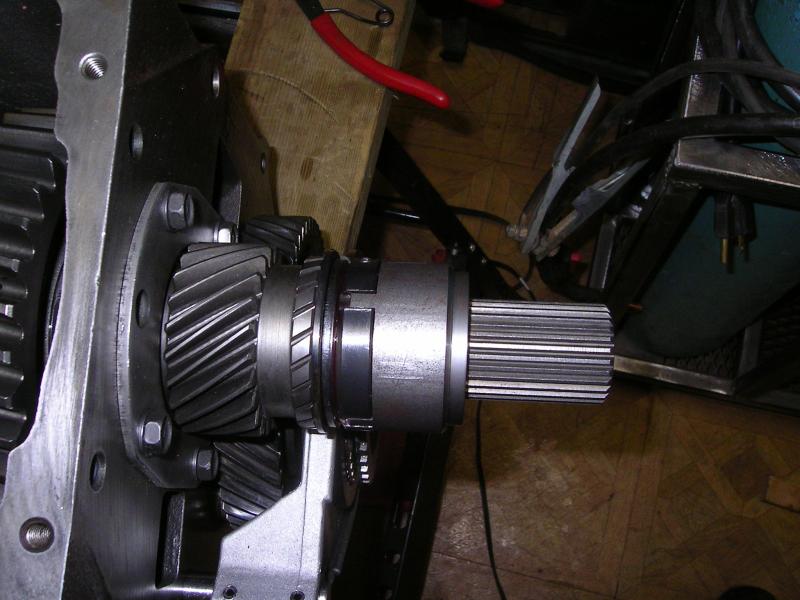
Then it was time to install the new 4wd tailhousing. I bought a new cast unit...since I couldn't find a new/used aluminum unit. I would recommend you scratch the inside of it if you end up buying one. I used a large screwdriver. I had a lot of small metal debris that was stuck in the paint. It would have eventually worked itself free and could have cause issues internally.
Once cleaned up I realized it did not come with any dowel pins. Good thing I still had the 2wd tailhousing. Few hits with hammer and punch had them out and ready to install in the 4wd housing.
It wash then time to install the top cover, and side PTO plates. Once the top was on I stalled the shifter and ran through the gears. Everything seems to shift fine.
All done.....Finally!!

Once cleaned up I realized it did not come with any dowel pins. Good thing I still had the 2wd tailhousing. Few hits with hammer and punch had them out and ready to install in the 4wd housing.

It wash then time to install the top cover, and side PTO plates. Once the top was on I stalled the shifter and ran through the gears. Everything seems to shift fine.
All done.....Finally!!

Registered User
Joined: Dec 2010
Posts: 6,838
Likes: 1,683
From: Land of the Toxic Avenger
Awesome !
What does that thing weigh ? Approximately ?
I've NEVER done any work as complicated as the internals of a transmission. You must have an intense mechanical background to take on that challenge.
What does that thing weigh ? Approximately ?
I've NEVER done any work as complicated as the internals of a transmission. You must have an intense mechanical background to take on that challenge.
Registered User
Joined: Feb 2010
Posts: 1,635
Likes: 59
From: New York
Thrashing cows, it looks like you used red silicon to seal things? Might want to be careful with that. I found out with the red silicon it actually leaves things not correctly flush. I've never worked on a NV4000 series myself so maybe it's different. I did pull apart my getrag this year and I ended up using high tack on EVERYTHING. That back portion of the getrag is shimmed.. I made the mistake of using silicon and come to find out.. I was way off and suffered a oil leak. Also high tacked the nuts and bolts 
Thread Starter
Registered User
Joined: Mar 2010
Posts: 7,265
Likes: 1,346
From: Prince George, BC

As for "intense Mechanical background"....nope I'm all self taught. And I should say that I learn lots from the people who have done these things before me....these forums are an unparalleled resource!! But I Never even took mechanical classes in school. I may be slow on the dis-assembly and reassembly...but I get it done.
Thrashing cows, it looks like you used red silicon to seal things? Might want to be careful with that. I found out with the red silicon it actually leaves things not correctly flush. I've never worked on a NV4000 series myself so maybe it's different. I did pull apart my getrag this year and I ended up using high tack on EVERYTHING. That back portion of the getrag is shimmed.. I made the mistake of using silicon and come to find out.. I was way off and suffered a oil leak. Also high tacked the nuts and bolts
But thanks for the heads up on that.

Thread Starter
Registered User
Joined: Mar 2010
Posts: 7,265
Likes: 1,346
From: Prince George, BC
Just a note on the split washer set-up. When everything is installed and torqued down, the outer ring is just a little bit loose. You can spin it a little, but there is only a bit of interference.
Thread Starter
Registered User
Joined: Mar 2010
Posts: 7,265
Likes: 1,346
From: Prince George, BC
Check out Gyman98's thread on his "Fargo" crewcab.....Sweet truck!
https://www.dieseltruckresource.com/...d-t288785.html


