
Blown Head Gasket?

Registered User
Joined: Mar 2008
Posts: 4,389
Likes: 114
From: Orange County, California
Jim,
As we discussed last night on the phone, I ran the full sequence on all of the head bolts when I replaced the head gasket in mine in 2009. I don't recall where I got the revised values. It may have been on a small pamphlet in the upper engine gasket set that I bought from Cummins. The original values in the Shop Manual are slightly lower than the revised values from Cummins. The sequence is displayed in the Shop Manual as clockwise starting from the center and working outward.
Step 1: Tighten all bolts in the pictured sequence to 29ft lbs. Verify all are at 29ft lbs.
Step 2: Tighten all bolts to 66ft lbs. Verify all are at 66ft lbs.
Step 3: Tighten all bolts to 89ft lbs. Verify all are at 89ft lbs.
Final step is to tighten all bolts an additional 90*.
It certainly makes sense to have them all at an equal value. I had no issues with it whatsoever. When that head gasket blew in January 2016, it had nothing to do with the way I torqued the bolts.

Registered User


Joined: Dec 2004
Posts: 4,312
Likes: 1,063
From: Commerce, OK

Administrator
Joined: Jan 2007
Posts: 8,372
Likes: 172
From: Streator Illinois
Jim,
As we discussed last night on the phone, I ran the full sequence on all of the head bolts when I replaced the head gasket in mine in 2009. I don't recall where I got the values. It may have been on a small pamphlet in the upper engine gasket set that I bought from Cummins. The original values in the Shop Manual are slightly lower than the revised values from Cummins. The sequence is displayed in the Shop Manual as clockwise starting from the center and working outward.
Step 1: Tighten all bolts in the pictured sequence to 29ft lbs. Verify all are at 29ft lbs.
Step 2: Tighten all bolts to 66ft lbs. Verify all are at 66ft lbs.
Step 3: Tighten all bolts to 89ft lbs. Verify all are at 89ft lbs.
Final step is to tighten all bolts an additional 90*.
It certainly makes sense to have them all at an equal value. I had no issues with it whatsoever. When that head gasket blew in January 2016, it had nothing to do with the way I torqued the bolts.
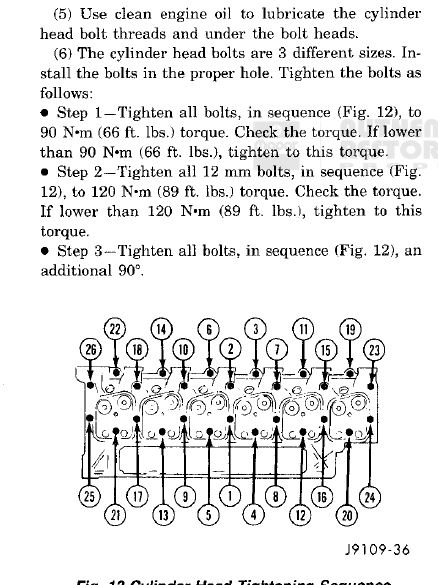
They say only the 12 MM bolts get the second 89 Lb/Ft treatment, then all get the additional 90. They are also very specific on double checking to make sure the torque hasn't let off while you were torquing the rest of the sequence, so I would run it twice to be sure before doing the 90 final pass.
Registered User
Joined: Mar 2008
Posts: 4,389
Likes: 114
From: Orange County, California
I have no clue what that's specifying. All of the 26 bolts are 12mm diameter shanks with the exception of the 8mm rocker pedestal hold down bolts which are the last to get torqued and before adjusting the valve lash. It can't be specifying the length as 12mm is right around 1\2". My Cummins Shop Manual only mentions tightening all bolts to the same values in each sequence.
Running through the sequence twice at the same value is what I meant when I mentioned "verify."
Running through the sequence twice at the same value is what I meant when I mentioned "verify."

Banned
Joined: Apr 2006
Posts: 529
Likes: 130
From: southern mn
The Chrysler manual and the same era cummins manual have the same guidelines. The newer updated cummins manual uses what I would consider "updated torque values", with a torque and then 90 degree turn. I would bet what Pat has pictured above is an updated Chrysler spec and not an original 1991 Chrysler print copy.
This has been debated heavily before. I think as long as your not running a much higher than stock HP rating any of the methods will work properly with nearly the same results.
I beleive what the manual pictured above is meant to say the shortest bolts, being the 6 closest to the exhaust manifold did not get the final torque value of 120ft lbs. This would have been listed in the original printed Chrysler and cummins manuals. In my mind to have the same size bolts and not torque them in the same amount is rediculous as no other manufacturer has done this that I am aware of.

Thread Starter
Administrator
Joined: Nov 2004
Posts: 4,084
Likes: 235
From: Southern California
Cummins Head Bolt Torque for 1991
Update.
This is the latest information as of 02-March 2015
So after being totally confused about everything I have read, I called Cummins and got connected first to tech support back in Tennessee and then I got transferred out to my local Cummins Cal Pacific in Irvine Ca.
I told him what had happened to my truck and we had quite a long conversation as I had ask him quite a lot of questions.
I ask him about the torque sequence and how many ft/lbs of torque the various length bolts got
I gave him my engine serial number so the answers were more specific and not generic.
This is straight from Cummins so I would take this as the real thing.
This is specific to my 1991


So long story short,
All of the (20) short head bolts have a final torque to 66 ft/lbs (90 n*m)
All of the (6) long head bolts get torqued to 89ft/lb (120 n*m)
And then all of them are tightened an additional 90*
So the head bolts are torqued to 2 different values.
Also I think what might be confusing some is you might be confusing newton meters with foot pounds.
I will also put this in the sticky so it will be easy to find.
Jim
Update.
This is the latest information as of 02-March 2015
So after being totally confused about everything I have read, I called Cummins and got connected first to tech support back in Tennessee and then I got transferred out to my local Cummins Cal Pacific in Irvine Ca.
I told him what had happened to my truck and we had quite a long conversation as I had ask him quite a lot of questions.
I ask him about the torque sequence and how many ft/lbs of torque the various length bolts got
I gave him my engine serial number so the answers were more specific and not generic.
This is straight from Cummins so I would take this as the real thing.
This is specific to my 1991

So long story short,
All of the (20) short head bolts have a final torque to 66 ft/lbs (90 n*m)
All of the (6) long head bolts get torqued to 89ft/lb (120 n*m)
And then all of them are tightened an additional 90*
So the head bolts are torqued to 2 different values.
Also I think what might be confusing some is you might be confusing newton meters with foot pounds.
I will also put this in the sticky so it will be easy to find.
Jim
Thread Starter
Administrator
Joined: Nov 2004
Posts: 4,084
Likes: 235
From: Southern California
It is Alive...
Part-01
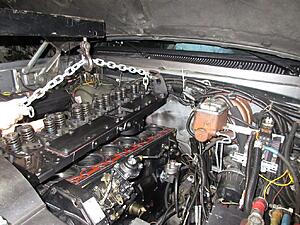
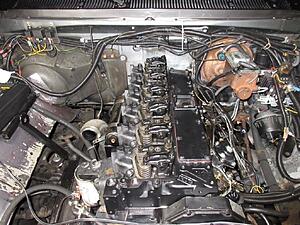
The other day my sister came over and together we got the engine taken apart, my plan was to replace the head and head gasket but later evolved into replacing the turbo, injectors tappet cover gasket.
It took awhile to find someone with an engine hoist heavy duty enough to lift the head without fear of dropping it on myself of across the front of the truck.
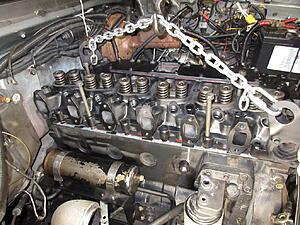
I took it apart slow and surgically I was looking to see what had failed. so after removing all of the 26 head bolts, injector lines, injectors, draining the coolant and about 500 pounds of accessories, the head was ready to lift off.
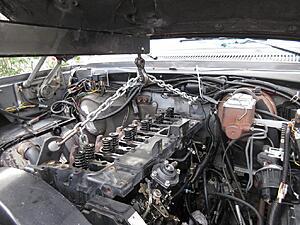
I carefully lifted it and broke the seal slowly trying to see where the mysterious oil was coming from.
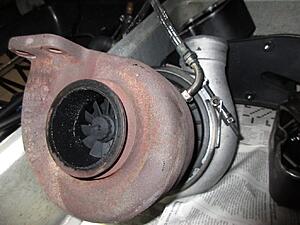
We already know the smoke was coming from the turbocharger huffing lube oil out the down pipe.
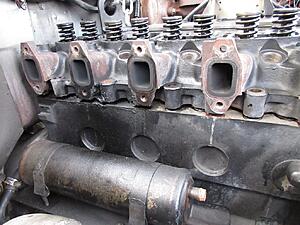
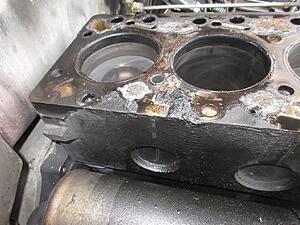
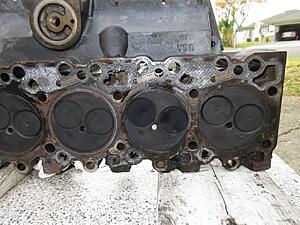
So the head gasket was blown or sort of, see how the oil has migrated all the way across the deck and leaked from the passenger's side.
The head gasket was pretty cruddy looking,
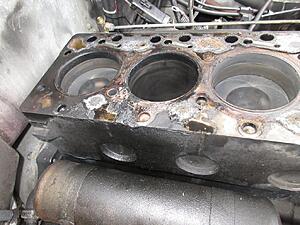
See how some of the head bolts holes are dry with rust and a couple of them were cruddy and gummed up
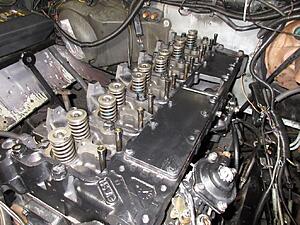
Since I was already there I decided to replace the tappet cover gasket and bolt seals, It took all of about 10 minutes to remove the injection pump, it also gave me better access to clear out the bits of head gasket that had fallen down the push rod holes.
Here is where I was afraid I was going to find some damage, #5 cylinder but I am amazed, with almost 500,000 miles there is still a cross hatch.
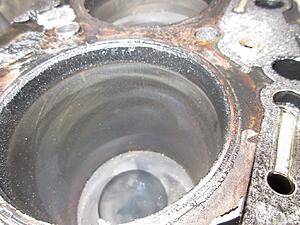
Looking at the head, there was a bit more soot on #5 which could be from a fouled injector that kept going through my mind.
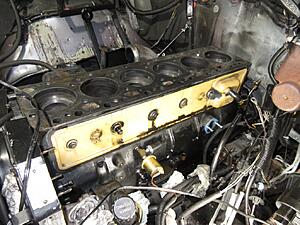
Here is where I had to spend a little time and clean up the block.
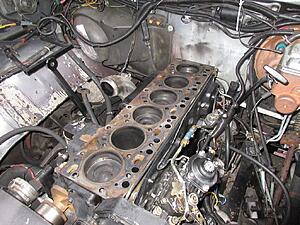
I think this might be where the smoke was coming from.
From here, I cleaned up all of the mess, washed down all of the parts, I scraped the old head gasket off the block and then when it was finally clean using acetone I cleaned the deck using a flat block of billet steel wrapped in 400 croakus cloth.
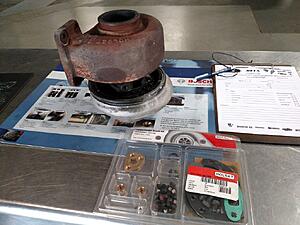
Now at this point I was going to simply replace the head, head gasket and rebuild my turbocharger myself, I had already bought the Holset rebuild kit from BECS for $85.00 so I watched a few YouTube videos on how to split the turbine housing and how it should just pop off after a few well placed blows from a sledge,
right,
about 30 minuets later and misplaced hammer blow whacked off the side of my finger and got grease on my blood, I took it to BECS and had them rebuild it for me.
The other day my sister came over and together we got the engine taken apart, my plan was to replace the head and head gasket but later evolved into replacing the turbo, injectors tappet cover gasket.
It took awhile to find someone with an engine hoist heavy duty enough to lift the head without fear of dropping it on myself of across the front of the truck.
I took it apart slow and surgically I was looking to see what had failed. so after removing all of the 26 head bolts, injector lines, injectors, draining the coolant and about 500 pounds of accessories, the head was ready to lift off.

I carefully lifted it and broke the seal slowly trying to see where the mysterious oil was coming from.
We already know the smoke was coming from the turbocharger huffing lube oil out the down pipe.

So the head gasket was blown or sort of, see how the oil has migrated all the way across the deck and leaked from the passenger's side.
The head gasket was pretty cruddy looking,

See how some of the head bolts holes are dry with rust and a couple of them were cruddy and gummed up

Since I was already there I decided to replace the tappet cover gasket and bolt seals, It took all of about 10 minutes to remove the injection pump, it also gave me better access to clear out the bits of head gasket that had fallen down the push rod holes.

Here is where I was afraid I was going to find some damage, #5 cylinder but I am amazed, with almost 500,000 miles there is still a cross hatch.

Looking at the head, there was a bit more soot on #5 which could be from a fouled injector that kept going through my mind.

Here is where I had to spend a little time and clean up the block.

I think this might be where the smoke was coming from.

From here, I cleaned up all of the mess, washed down all of the parts, I scraped the old head gasket off the block and then when it was finally clean using acetone I cleaned the deck using a flat block of billet steel wrapped in 400 croakus cloth.
Now at this point I was going to simply replace the head, head gasket and rebuild my turbocharger myself, I had already bought the Holset rebuild kit from BECS for $85.00 so I watched a few YouTube videos on how to split the turbine housing and how it should just pop off after a few well placed blows from a sledge,
right,
about 30 minuets later and misplaced hammer blow whacked off the side of my finger and got grease on my blood, I took it to BECS and had them rebuild it for me.
Thread Starter
Administrator
Joined: Nov 2004
Posts: 4,084
Likes: 235
From: Southern California
Part-2
After I scraped off all of the old gasket, I roughed up the block with a flat block of steel wrapped in croakus cloth and wiped it down using acetone, then using a tap I cleaned out all of the bolt holes in the block and cleared them using compressed air
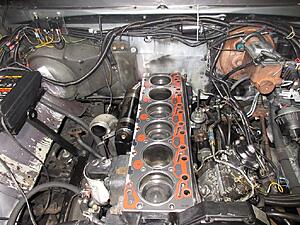
I got the new head cleaned up and made sure the face was clean and free from any dirt of grease and got a little paint on it.
After I got the new Cummins Head Gasket in place, I lowered the new head down onto the block
(When working on heads, I always like to use guide pins to align the head)
Here I used some of the head bolts as guides to help align the head as I lowered it onto the block, saves a lot of pinched fingers.
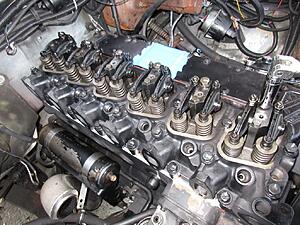
After I got the head installed, came time to get all of the head bolts installed, but first I needed to install of the pushrods back into the engine, I had them previously in a piece of corrugated with holes to identify the cylinder # and intake or exhaust.
Take care to ensure the ball side engage into the tappets or you could bend a valve first time it is turned over.
Then you need to install the rockers pedestals back onto the head, make sure you back out the adjuster a few turns so there is plenty of clearance on the valve and snug down the long head bolts.
After dipping all of the head bolts in clean oil and oiling the underside of the bolt head, you torque down all of the short head bolts to 66 ft/lbs and all of the 6 long head bolts to 89 ft/lbs in sequence.
Please follow the instructions that I posted from Cummins.
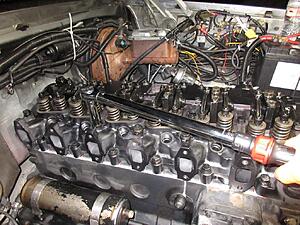
The final step is to then mark each head bolt and then turn all of them an additional 90* clockwise.
After I got the head bolts torqued down and before I installed the injectors, I adjusted the valves using a socket wrench on the harmonic balancer, it is a lot easier to turn over without compression and I like to be sure to turns over easily and nothing binds anywhere in the engine.
When I took the turbo to BECS to be rebuilt, I had also taken my injectors along to be pop tested, he said all of them, opening pressure was low, so they were rebuilt for me.
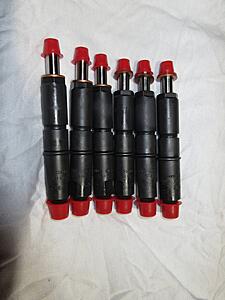
Injectors, return lines and injection lines installed.
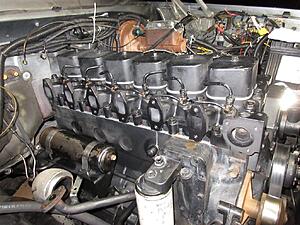
Here I am pre oiling my turbo to ensure the it will not spin up dry, that could kill it immediately
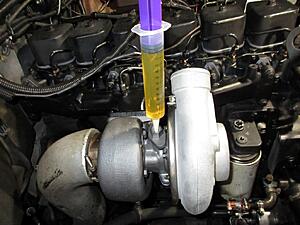
With my turbo installed, about a quart of oil drained out from my downpipe, broken downpipe hanger repaired, almost ready to start.
After I scraped off all of the old gasket, I roughed up the block with a flat block of steel wrapped in croakus cloth and wiped it down using acetone, then using a tap I cleaned out all of the bolt holes in the block and cleared them using compressed air

I got the new head cleaned up and made sure the face was clean and free from any dirt of grease and got a little paint on it.
After I got the new Cummins Head Gasket in place, I lowered the new head down onto the block

(When working on heads, I always like to use guide pins to align the head)
Here I used some of the head bolts as guides to help align the head as I lowered it onto the block, saves a lot of pinched fingers.

After I got the head installed, came time to get all of the head bolts installed, but first I needed to install of the pushrods back into the engine, I had them previously in a piece of corrugated with holes to identify the cylinder # and intake or exhaust.
Take care to ensure the ball side engage into the tappets or you could bend a valve first time it is turned over.

Then you need to install the rockers pedestals back onto the head, make sure you back out the adjuster a few turns so there is plenty of clearance on the valve and snug down the long head bolts.

After dipping all of the head bolts in clean oil and oiling the underside of the bolt head, you torque down all of the short head bolts to 66 ft/lbs and all of the 6 long head bolts to 89 ft/lbs in sequence.
Please follow the instructions that I posted from Cummins.

The final step is to then mark each head bolt and then turn all of them an additional 90* clockwise.
After I got the head bolts torqued down and before I installed the injectors, I adjusted the valves using a socket wrench on the harmonic balancer, it is a lot easier to turn over without compression and I like to be sure to turns over easily and nothing binds anywhere in the engine.

When I took the turbo to BECS to be rebuilt, I had also taken my injectors along to be pop tested, he said all of them, opening pressure was low, so they were rebuilt for me.

Injectors, return lines and injection lines installed.

Here I am pre oiling my turbo to ensure the it will not spin up dry, that could kill it immediately

With my turbo installed, about a quart of oil drained out from my downpipe, broken downpipe hanger repaired, almost ready to start.
Thread Starter
Administrator
Joined: Nov 2004
Posts: 4,084
Likes: 235
From: Southern California
Part-03
So after I got everything back together, oil, coolant I cracked all of the injector lines, and pumped the fuel primer lever until fuel was starting to leak from the injectors, I really thought I was going to have problems starting since all of the lines were dry.
All of the time it was not running I kept the battery charger connected so the battery was hot (13.8 volts)
I had the turbo inlet off and my rubber faced block of aluminum to snuff it out if needed.
I had my wife crank the starter and within 3-4 revolutions, the engine came to life, shook, coughed but was running, after about 15 seconds it was running smooth and sounded great
And best part, no smoke.
Timing marks for the balancing machine.
Sure looks pretty now, worth every penny of the $300.00.
And I got one of these.

This is the easiest way to tighten the fuel heater to the head.
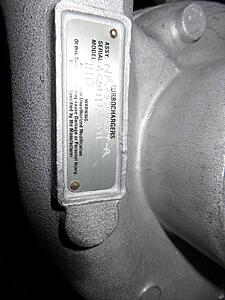
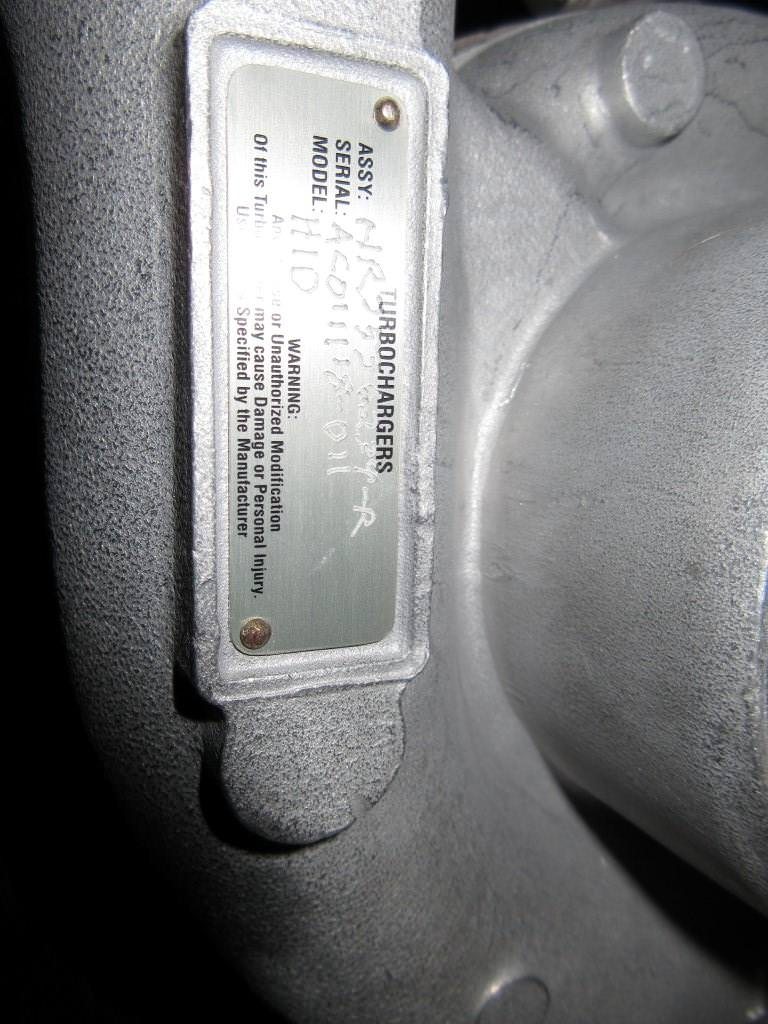
Technician at BECS said my turbo is a H1D, so what does that mean?
Today I drained the engine oil,
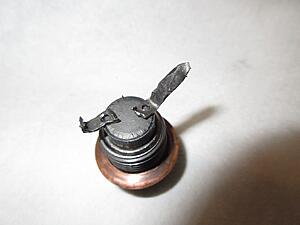
This was stuck on the drain plug magnet,
Any ideas where they might have come from?
Looks like some kind of a strap or retainer to me but I cannot imagine from where.
Maybe from a bearing cage or retainer, about 10 years ago the vacuum pump eccentric fragmented and sent ***** and parts of the ball cage through the gear case and into the oil pan.
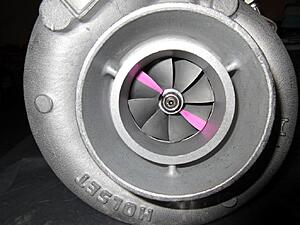
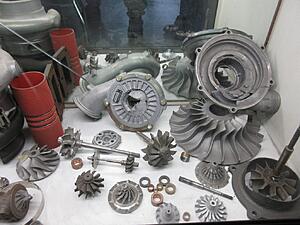
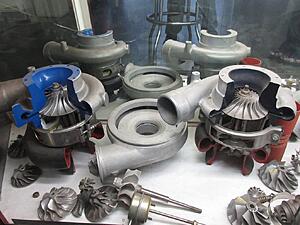
Here is a little Turbo **** you can gaze at for awhile.
Tonight I went for a run down the freeway, the truck seems to be a bit under powered from what it used to,
I can only get around 30 PSI boost and won't get much over 1000* at heavy throttle, seems like I am not getting enough fuel, ill check my AFC today, maybe I cracked the metal boost line.
Replacing the head gasket on this truck was really not a difficult job, most of the work I was by myself and taking my time, what really took the time was trying to get all of the parts together so it could happen
The biggest problem was when I tried to open the turbine housing and hit my own finger with my own sledge hammer and split it open, my finger, not the housing.
I did not mind the several trips to Cummins to pick up parts, or all of the trips to BECS.
This job was not really difficult just time consuming and expensive, next time around, I would defiantly buy the new head bolts.
This little adventure cost about $1400.00 just for parts but worth it to stop the smoke.
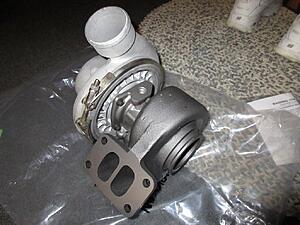
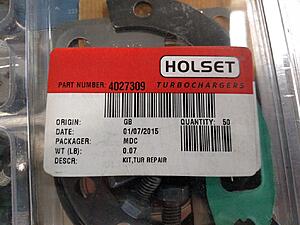
If you are looking for a rebuild kit for your Holset H1C, this is what it will look like.
I paid $95.00 for this kit, anything much less that this price and I would question its authenticity.
Jim
So after I got everything back together, oil, coolant I cracked all of the injector lines, and pumped the fuel primer lever until fuel was starting to leak from the injectors, I really thought I was going to have problems starting since all of the lines were dry.
All of the time it was not running I kept the battery charger connected so the battery was hot (13.8 volts)
I had the turbo inlet off and my rubber faced block of aluminum to snuff it out if needed.
I had my wife crank the starter and within 3-4 revolutions, the engine came to life, shook, coughed but was running, after about 15 seconds it was running smooth and sounded great
And best part, no smoke.
Timing marks for the balancing machine.

Sure looks pretty now, worth every penny of the $300.00.

And I got one of these.
This is the easiest way to tighten the fuel heater to the head.

Technician at BECS said my turbo is a H1D, so what does that mean?
Today I drained the engine oil,
This was stuck on the drain plug magnet,
Any ideas where they might have come from?
Looks like some kind of a strap or retainer to me but I cannot imagine from where.
Maybe from a bearing cage or retainer, about 10 years ago the vacuum pump eccentric fragmented and sent ***** and parts of the ball cage through the gear case and into the oil pan.

Here is a little Turbo **** you can gaze at for awhile.


Tonight I went for a run down the freeway, the truck seems to be a bit under powered from what it used to,
I can only get around 30 PSI boost and won't get much over 1000* at heavy throttle, seems like I am not getting enough fuel, ill check my AFC today, maybe I cracked the metal boost line.
Replacing the head gasket on this truck was really not a difficult job, most of the work I was by myself and taking my time, what really took the time was trying to get all of the parts together so it could happen
The biggest problem was when I tried to open the turbine housing and hit my own finger with my own sledge hammer and split it open, my finger, not the housing.
I did not mind the several trips to Cummins to pick up parts, or all of the trips to BECS.
This job was not really difficult just time consuming and expensive, next time around, I would defiantly buy the new head bolts.
This little adventure cost about $1400.00 just for parts but worth it to stop the smoke.
If you are looking for a rebuild kit for your Holset H1C, this is what it will look like.
I paid $95.00 for this kit, anything much less that this price and I would question its authenticity.


Jim


Registered User
Joined: Dec 2004
Posts: 4,312
Likes: 1,063
From: Commerce, OK
Good job Jim! The Cummins shop in Irvine is not that far from me. We could have had lunch If I had known you were coming down. My wife works literally 10 minutes from there and she goes to Joanne's across the street quite often.
The head bolt torque saga was unreal though. I've done several head jobs on gas engines but I've never had one with different torque settings for different bolts. That is a huge difference. I've never had one with the 1/4 turn AFTER torquing either. Very odd indeed.
Glad you got it back on the road. I wonder if you got the timing back the same as before and if that could explain your power loss. Or perhaps the injectors being rebuilt could be the cause.
Edwin
Administrator
Joined: Jul 2009
Posts: 5,311
Likes: 566
From: Phoenix AZ
Good job Jim! The Cummins shop in Irvine is not that far from me. We could have had lunch If I had known you were coming down. My wife works literally 10 minutes from there and she goes to Joanne's across the street quite often.
The head bolt torque saga was unreal though. I've done several head jobs on gas engines but I've never had one with different torque settings for different bolts. That is a huge difference. I've never had one with the 1/4 turn AFTER torquing either. Very odd indeed.
Glad you got it back on the road. I wonder if you got the timing back the same as before and if that could explain your power loss. Or perhaps the injectors being rebuilt could be the cause.
Edwin
The head bolt torque saga was unreal though. I've done several head jobs on gas engines but I've never had one with different torque settings for different bolts. That is a huge difference. I've never had one with the 1/4 turn AFTER torquing either. Very odd indeed.
Glad you got it back on the road. I wonder if you got the timing back the same as before and if that could explain your power loss. Or perhaps the injectors being rebuilt could be the cause.
Edwin