
BC's Transmission Overhaul (updated as it occurs)


Registered User
Joined: Jul 2003
Posts: 3,833
Likes: 2
From: Raleigh, NC
"Check clutch pack clearance with feeler gauge
(Fig. 93). Clearance between waved spring and pressure
plate should 1.78-3.28 mm (0.070-0.129 in.). If
clearance is incorrect, clutch plates, clutch discs,
snap-ring, or pressure plate may have to be changed."
Keep in mind that this is now built outside of Chrysler specs---so these numbers are meaningless----but, I like to set all of mine at or about .120

Registered User
Joined: Jul 2003
Posts: 3,833
Likes: 2
From: Raleigh, NC
You need clearance so you can keep some oil between all of these parts when they are not applied, if the clearance is too tight, you have no oil clearance and you can cause them to "drag" on each other. So the more clutches and steels that you add you need to add clearance too.
Thread Starter
1st Generation Admin
Joined: Jan 2005
Posts: 4,601
Likes: 118
From: Buies Creek, NC
The quote below is from the chrysler service manual, 47RE. That is for a stocker, with the 2 extra clutches and steels you "might" want to have a bit more clearance.
"Check clutch pack clearance with feeler gauge
(Fig. 93). Clearance between waved spring and pressure
plate should 1.78-3.28 mm (0.070-0.129 in.). If
clearance is incorrect, clutch plates, clutch discs,
snap-ring, or pressure plate may have to be changed."
Keep in mind that this is now built outside of Chrysler specs---so these numbers are meaningless----but, I like to set all of mine at or about .120
I'm stuck with a A518/4 clutch/steel drum. With that add seven of a given thickness clutch with steels that can be either .068", or .085" in any combination that will fit. It appears that in my mess, milling the reaction plate is necessary as well as a different thickness waved-snap ring.
Those I'm working (SunCoast & PATC) with are of the opinion that, in general, 0.10" per clutch disc is ample.
FWIW, in researching all this clutch-pac mess, I've learned there's an on going tussle over clutch longevity ~ A thicker clutch-disc might last longer, but it also holds heat longer. A thinner clutch will shed heat faster than that above, but may not last as long. That apparently is where the Alto folks like all the other I suppose, are working to improve the characteristics of their friction materials in an effort to have the best of both worlds hence, the general line of thinking over such, . . . . is all over the map.

materdiesel brings up a good point though, you've only got but so much piston/servo travel to work with.

Still, . . . .. I appreciate, and welcome any and all thoughts, comments, and rude remarks lest it all be going to better my slush-box.

The brown truck left me a box today. What am I gonna do tonight?


")
Thread Starter
1st Generation Admin
Joined: Jan 2005
Posts: 4,601
Likes: 118
From: Buies Creek, NC
Well I got the transfer case cleaned up and installed. Even managed to break a tab off the 4X4 indicator switch. DOH!! 

Had to stop there and wash some work uniforms.
- Still have to address the wiring harness.
- Get a new 4X4 indicator switch.
- Install the trans dip-stick tube.
- Install the shifter/kick-down linkage.
- Install the drive-shafts.
- Install the shields.
- Install the exhaust.
- Install the transmission fluid plumbing.
I reckon there's a good chance I might get to drive the heap this weekend.
Thread Starter
1st Generation Admin
Joined: Jan 2005
Posts: 4,601
Likes: 118
From: Buies Creek, NC
Tonight I got the rear driveshaft assembly installed using new universal joint straps and bolts.
Installed the speed sensor/adapter and the torque converter access cover.
Got the OEM transmission fluid plumbing removed.
I wrestled with the fittings in the heat exchanger long enough to figure out I have no wrench nor socket that fits the blame things.
I kept thinking about Mike saying . . .
Well DUHHH! In this application those 1/2" JIC fittings are interchangeable with AN-8 fittings! Maybe that's why they're fighting to come out. . . . . . I think I'll just use them as is.
I hope to get much more done tomorrow work permitting.
Thread Starter
1st Generation Admin
Joined: Jan 2005
Posts: 4,601
Likes: 118
From: Buies Creek, NC
So I got the transmission fluid plumbing 95% done tonight. I've still got to install the shift linkage torque-lever so I can nail down the fluid plumbing there. Pictures tomorrow.
The list continues to get smaller.
- Dress the wiring harness
- Install dip-stick & tube
- Install torque-lever and linkage
- Install front drive-shaft
- Install skid-plate
- Install exhaust plumbing
If I can get through tomorrow without a service call, maybe . . . . . . . . just maybe . . .
The list continues to get smaller.
- Dress the wiring harness
- Install dip-stick & tube
- Install torque-lever and linkage
- Install front drive-shaft
- Install skid-plate
- Install exhaust plumbing
If I can get through tomorrow without a service call, maybe . . . . . . . . just maybe . . .
Thread Starter
1st Generation Admin
Joined: Jan 2005
Posts: 4,601
Likes: 118
From: Buies Creek, NC
Well today is the last day of my being "On-Call" with work so no more interruptions as such for another couple of weeks. Pretty-much shot the daylight hours of both yesterday and today. 
Anyhoot, I'm off for the Labor Day holiday and hope you are too. Thanks to those who have to be on the clock. Be safe. A short four day work week then I'm off for a week's vacation.
I sure hope I don't spend it under this truck.
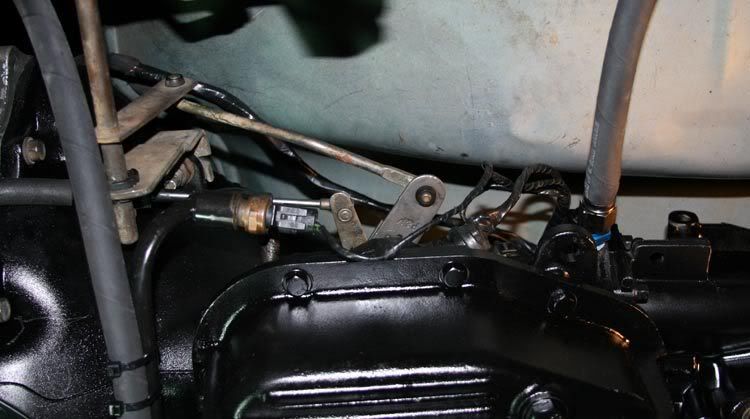
Tonight I finished the fluid plumbing. The OEM install has the fluid flowing through 1/2" steel tubing running from the front of the transmission, across and between the bell-housing and pan to the water heat exchanger. From there it goes back the same route across the bell-housing and then along the engine oil pan flange to the front of the engine. There it transitions to an odd assembly of steel and rubber tubing and ends at the air heat exchanger. It completes it's trip by then leaving the air heat exchanger, back along the engine oil pan and into the rear of the transmission.
OK, fine.
That steel tubing is clamped to itself as well as to the engine oil pan flange. In my mess, said steel clamps have with time and vibration, worried spots into the steel tubing ultimately presenting with leaks.
I replaced the damaged sections of tubing with "Socket-Less" AN-8 rubber tubing and fittings. I was able to salvage the sections of OEM steel tubing that runs to and from the water heat exchanger and that's OK in my mind as I wasn't real sure about how to adequately secure and shield the rubber hose with the exhaust down-pipe right there and all. Further, using that one section that goes from the transmission outlet to the water exchanger includes the OEM temperature sensor that works in conjunction with the PCM to control the overdrive.

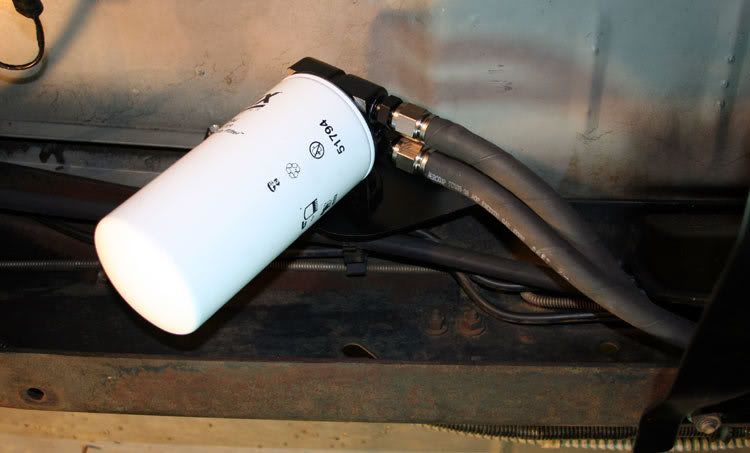
I made a little mounting plate from 1/8th inch sheet aluminum to secure an in-line filter for the transmission fluid. The assembly falls just above and forward of the aft cross-member of the skid-plate, driver's side.
The 1/2" socket-less hose fits the air heat exchanger tubes perfectly. After wiping them down, I was able to reuse the OEM hose clamps.
I got the fluid dip-stick tube installed using a new O-ring along the way. Slipped in the front drive-shaft . . . .. . . noticed there's an awful LOT of slop in the front axle steering knuckle universal joints . . . DOH!
I use danged near a half roll of Scotch 33+ electrical tape re-wrapping the wiring harness that serves the transmission and transfer case. But it's clean and purdy. I went ahead and snuck in the shifter linkage torque-lever knowing I'm fixing to replace it as it's worn substantially, but I'm ready to drive this mess.
For now, reinstalling the exhaust plumbing and filling the trans with fluid is all that's left between here and a big oily streak down Bill Avery road.
I've got to improve an exhaust plumbing mount so that will slow that a bit. Then I gotta find a funnel with a hose on it . . .. . . . . . .. . .
Anyhoot, I'm off for the Labor Day holiday and hope you are too. Thanks to those who have to be on the clock. Be safe. A short four day work week then I'm off for a week's vacation.
I sure hope I don't spend it under this truck.
Tonight I finished the fluid plumbing. The OEM install has the fluid flowing through 1/2" steel tubing running from the front of the transmission, across and between the bell-housing and pan to the water heat exchanger. From there it goes back the same route across the bell-housing and then along the engine oil pan flange to the front of the engine. There it transitions to an odd assembly of steel and rubber tubing and ends at the air heat exchanger. It completes it's trip by then leaving the air heat exchanger, back along the engine oil pan and into the rear of the transmission.
OK, fine.
That steel tubing is clamped to itself as well as to the engine oil pan flange. In my mess, said steel clamps have with time and vibration, worried spots into the steel tubing ultimately presenting with leaks.
I replaced the damaged sections of tubing with "Socket-Less" AN-8 rubber tubing and fittings. I was able to salvage the sections of OEM steel tubing that runs to and from the water heat exchanger and that's OK in my mind as I wasn't real sure about how to adequately secure and shield the rubber hose with the exhaust down-pipe right there and all. Further, using that one section that goes from the transmission outlet to the water exchanger includes the OEM temperature sensor that works in conjunction with the PCM to control the overdrive.
I made a little mounting plate from 1/8th inch sheet aluminum to secure an in-line filter for the transmission fluid. The assembly falls just above and forward of the aft cross-member of the skid-plate, driver's side.
The 1/2" socket-less hose fits the air heat exchanger tubes perfectly. After wiping them down, I was able to reuse the OEM hose clamps.
I got the fluid dip-stick tube installed using a new O-ring along the way. Slipped in the front drive-shaft . . . .. . . noticed there's an awful LOT of slop in the front axle steering knuckle universal joints . . . DOH!
I use danged near a half roll of Scotch 33+ electrical tape re-wrapping the wiring harness that serves the transmission and transfer case. But it's clean and purdy. I went ahead and snuck in the shifter linkage torque-lever knowing I'm fixing to replace it as it's worn substantially, but I'm ready to drive this mess.
For now, reinstalling the exhaust plumbing and filling the trans with fluid is all that's left between here and a big oily streak down Bill Avery road.
I've got to improve an exhaust plumbing mount so that will slow that a bit. Then I gotta find a funnel with a hose on it . . .. . . . . . .. . .
Registered User
Joined: Jan 2006
Posts: 1,237
Likes: 0
From: Raleigh, NC
Thread Starter
1st Generation Admin
Joined: Jan 2005
Posts: 4,601
Likes: 118
From: Buies Creek, NC
So today finds me reinstalling the exhaust plumbing with an improved hanger bracket just ahead of the muffler. The rubber element was being cut with the original way I did it. Once again, the "Band-Clamp" style pipe connectors are THE mess!
OK, final check . . . . . . Oops, gotta check the TV cable adjustment . . . . . . Done @ 0.180" . . . . . . .
Final check . . . . . . can't think of anything . . . . .
The wife got me a sporty little funnel that's about eight inches long. 1/2" at the small end, and about two or so inches at the big end. The big end is such that it's sorta oblong so one can easily pour into it with the funnel at a steep angle. Absolutely perfect for pouring transmission fluid into that tube back there.
How many quarts does this thing hold? DOH! So I poured in six quarts and go look it up . . . . . 10 quarts and change says the dealer service manual. Seems it holds more than that.
So I put the shifter into neutral so the converter would charge-up for sure, and cranked my heap up. I let it run a moment and shut it down. I put in another four quarts. Cranked it up for a moment and shut it down.
Checked the dip-stick . .. .. nuthin.
Put in another two quarts . . . . . nuthin.
Another two quarts . . . .. nuthin!
Folks, with an empty A518 using a 4qt over-sized pan , converter, new cooler plumbing complete with in-line filter, this thirsty turd took 20 quarts to bring the level up to the half-way mark of the dip-stick with the engine running, transmission in Neutral!
I figure initial sloshing around will consume a little more.
Looking all the while, I find no fluid leaks.
Working the shifter from Neutral to Reverse has the truck gently nudge backward as I firmly hold the brakes. Shifting to Drive has the truck nudge gently forward. Cool.
Leaving things running in Park, I raised the rear-end so as to remove one set of 6x6 cribbing (I'm still on stilts). Clear all the mess away from the truck, and slowly reverse the truck down from the remaining 6x6 blocks.
The truck's on the ground moving about under it's own power. Cool!
I back it out from under the shelter into the driveway and make a final check. No fluid leaks, no drop-cords trailing, etc. Cool!!
I go get a cool Mountain-Dew, a Goody's headache powder (just in case), the cell phone, get in the truck, . .. . . . . . . . and drive onto the paved road out front.
A swig of soda, . . . . .look both ways, . . .. and gently accelerate to 45mph or so. Nice, and smooth. No real perceptible shift stuff. I slow down to a stop and do it again for a total of four times, the third and forth time include working the overdrive control. OK, I come to a stop, and shift into reverse backing up a bit. Fine.
I put it into drive, and a little more firmly accelerate to 55mph. Very smooth shifting. Firm and noticeably quick in shifting without any hint of Banging.
I drive it like your Momma would on into Coats. Turn around in the Carlie C's parking lot, and go back toward the house. The truck handles as it 'oughta.
Turning onto Bill Avery, pausing while brining up five pounds boost, and firmly launching . . .. and . . . . it happened!
The rear tires broke traction. Oops! Hehe, . . . . . I'm not in four-wheel drive.
Hehe!
I go ahead and nail it! The truck gets right on down to business and firmly accelerates. As it goes through the gears, the shifts are quick and sure with no banging.
Turning my attention to the torque converter, . . . . I can definitely feel a firmer, increased sense of "Pull" while working the throttle be it mildly tooling around or working the Cummins.
What do I think?

"Excellent"
I see the new in-line oil filter's got a drip of fluid hanging from it's lip. I think I can fix that by tightening when it cools a moment.
I need to install the skid-plate and put away the tools.
As with any project of such magnitude, I've alway judged success by the number of parts left over.
Folks, it's not looking good . . .. . .

I'll most likely go out and play tonight, I'll post back with results.
Folks, I appreciate the input and such. It's one of the things that makes this forum a nice place.
OK, final check . . . . . . Oops, gotta check the TV cable adjustment . . . . . . Done @ 0.180" . . . . . . .
Final check . . . . . . can't think of anything . . . . .
The wife got me a sporty little funnel that's about eight inches long. 1/2" at the small end, and about two or so inches at the big end. The big end is such that it's sorta oblong so one can easily pour into it with the funnel at a steep angle. Absolutely perfect for pouring transmission fluid into that tube back there.
How many quarts does this thing hold? DOH! So I poured in six quarts and go look it up . . . . . 10 quarts and change says the dealer service manual. Seems it holds more than that.
So I put the shifter into neutral so the converter would charge-up for sure, and cranked my heap up. I let it run a moment and shut it down. I put in another four quarts. Cranked it up for a moment and shut it down.
Checked the dip-stick . .. .. nuthin.
Put in another two quarts . . . . . nuthin.
Another two quarts . . . .. nuthin!
Folks, with an empty A518 using a 4qt over-sized pan , converter, new cooler plumbing complete with in-line filter, this thirsty turd took 20 quarts to bring the level up to the half-way mark of the dip-stick with the engine running, transmission in Neutral!
I figure initial sloshing around will consume a little more.
Looking all the while, I find no fluid leaks.
Working the shifter from Neutral to Reverse has the truck gently nudge backward as I firmly hold the brakes. Shifting to Drive has the truck nudge gently forward. Cool.
Leaving things running in Park, I raised the rear-end so as to remove one set of 6x6 cribbing (I'm still on stilts). Clear all the mess away from the truck, and slowly reverse the truck down from the remaining 6x6 blocks.
The truck's on the ground moving about under it's own power. Cool!
I back it out from under the shelter into the driveway and make a final check. No fluid leaks, no drop-cords trailing, etc. Cool!!
I go get a cool Mountain-Dew, a Goody's headache powder (just in case), the cell phone, get in the truck, . .. . . . . . . . and drive onto the paved road out front.
A swig of soda, . . . . .look both ways, . . .. and gently accelerate to 45mph or so. Nice, and smooth. No real perceptible shift stuff. I slow down to a stop and do it again for a total of four times, the third and forth time include working the overdrive control. OK, I come to a stop, and shift into reverse backing up a bit. Fine.
I put it into drive, and a little more firmly accelerate to 55mph. Very smooth shifting. Firm and noticeably quick in shifting without any hint of Banging.
I drive it like your Momma would on into Coats. Turn around in the Carlie C's parking lot, and go back toward the house. The truck handles as it 'oughta.
Turning onto Bill Avery, pausing while brining up five pounds boost, and firmly launching . . .. and . . . . it happened!
The rear tires broke traction. Oops! Hehe, . . . . . I'm not in four-wheel drive.
Hehe!
I go ahead and nail it! The truck gets right on down to business and firmly accelerates. As it goes through the gears, the shifts are quick and sure with no banging.
Turning my attention to the torque converter, . . . . I can definitely feel a firmer, increased sense of "Pull" while working the throttle be it mildly tooling around or working the Cummins.
What do I think?
"Excellent"
I see the new in-line oil filter's got a drip of fluid hanging from it's lip. I think I can fix that by tightening when it cools a moment.
I need to install the skid-plate and put away the tools.
As with any project of such magnitude, I've alway judged success by the number of parts left over.
Folks, it's not looking good . . .. . .
I'll most likely go out and play tonight, I'll post back with results.
Folks, I appreciate the input and such. It's one of the things that makes this forum a nice place.
Registered User
Joined: Mar 2004
Posts: 4,767
Likes: 5
From: port crane, NY
Sounds like a winner, David! Not that I expected any less--your writeup is more thorough than when I actually do something...notice my truck doesn't run at the moment Congrats on the build--now add some more fuel and put that puppy to work!!!
greg
Congrats on the build--now add some more fuel and put that puppy to work!!!greg
