
BC's Transmission Overhaul (updated as it occurs)

Thread Starter
1st Generation Admin
Joined: Jan 2005
Posts: 4,601
Likes: 118
From: Buies Creek, NC
And there's the Overdrive Direct Clutch installed.
Flip that assembly over to install the rebuilt Governor.
Install it's associated support in the OD case.
And drop all that mess into the OD case.
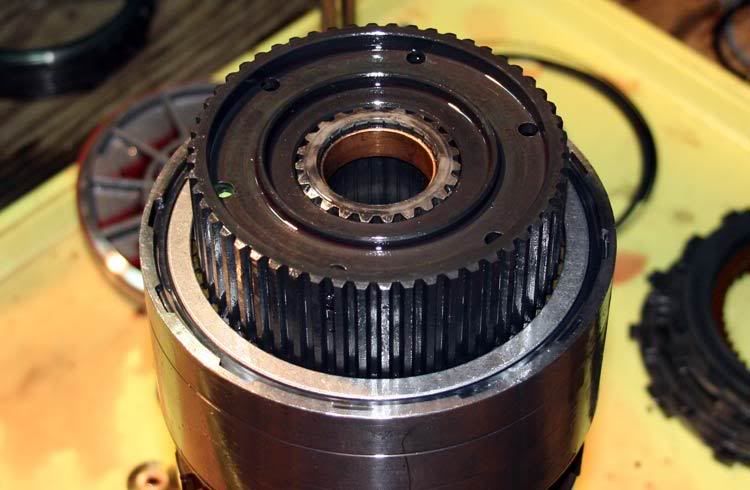
I then built up the Overdrive clutch itself. The OEM overdrive clutch in the A518 came with five clutch discs and four steels. I've upgraded mine to six clutches and six steels for a 20% increase in apply area.

I stopped there for the night. I'll need to establish the existing clearance in order to select the correct shim so it'll all fit correctly when I install the overdrive section to the main case. If the heat doesn't whoop me at work tomorrow, I'll try to get all that installed and then get on with the valve body.
Gotta go wash the work truck.
Flip that assembly over to install the rebuilt Governor.
Install it's associated support in the OD case.
And drop all that mess into the OD case.
I then built up the Overdrive clutch itself. The OEM overdrive clutch in the A518 came with five clutch discs and four steels. I've upgraded mine to six clutches and six steels for a 20% increase in apply area.
I stopped there for the night. I'll need to establish the existing clearance in order to select the correct shim so it'll all fit correctly when I install the overdrive section to the main case. If the heat doesn't whoop me at work tomorrow, I'll try to get all that installed and then get on with the valve body.
Gotta go wash the work truck.
Thread Starter
1st Generation Admin
Joined: Jan 2005
Posts: 4,601
Likes: 118
From: Buies Creek, NC
I'm using the standard Dodge Factory Service Manual (FSM). You can get one from Geno's ~ http://www.genosgarage.com/prodinfo....r=DFSM93_PRINT
My source for internal upgrades, etc has predominately been Performance Automotive & Transmission Center ~ http://www.transmissioncenter.net/dodge.htm
The balance has come from SunCoast ~ http://www.suncoastconverters.com/do..._products.html

The heat of summer and my regular work has been pressing me big-time as of late so I'm much slower at finishing this mess than I'd like.
I had to stop and get the Overdrive Clutch's pressure plate milled 0.050" to get things to fit correctly. With that, I'd like to think I'll get the OD section bolted to the main case tonight.
We'll see.

Dag'um Internet connection's been down again for the last 24 hours. 19 computers twiddling there thumbs.

Thread Starter
1st Generation Admin
Joined: Jan 2005
Posts: 4,601
Likes: 118
From: Buies Creek, NC
Well it rained on my party yesterday so nothing got done (I'm working in the back yard under a tarp if you haven't figured it out yet  )
)
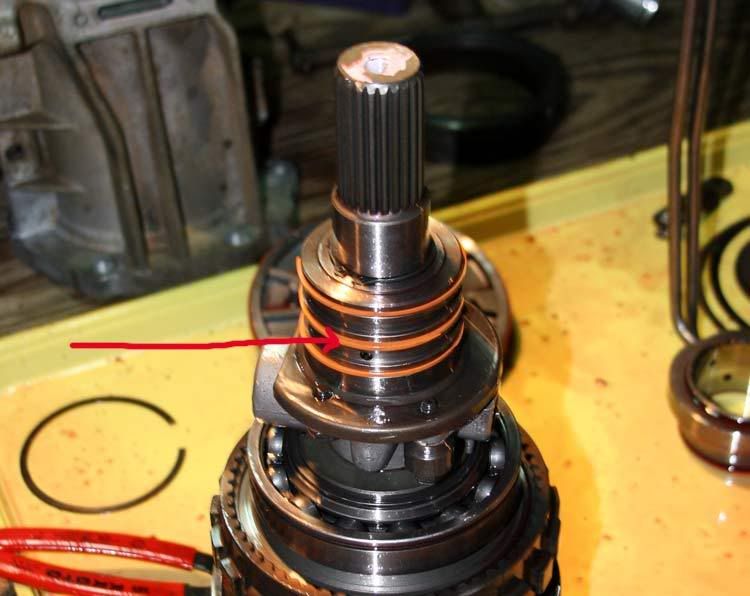
I did manage to cypher the required OD piston thrust plate thickness to get things to fit right there (.185"). The most difficult thing was to figure out the special tool dodge uses to mount the dial micrometer is .500" thick.
Having done that the next thing was to mount the OD section on the main case.
As it stands in my case, there's only one tool that has proved necessary beyond a shadow of a doubt, that being the OD direct clutch spring compressor. Just behind that is a tool that is used to keep some gear splines in alignment till you go to mount the OD section to the main case. While I was able to do it without the special tool, if I had to do it again, I suppose I would go ahead and get the tool. Those of you who have been down this road, yes, I had to disassemble and re-assemble the OD section twice to get it right.")
When I finish this mess, as a final post, I'll make a list of things I've learned as well as tools that are definitely needed including the way I went about getting around the other Special tools the FSM calls for.
Tomorrow, pending weather and personal strength, I'm gonna get the Valve Body massaged and installed.
I've still got to get the trans fluid sorted as well as some fluid cooler/heater plumbing ordered.
This thing's either gonna work really well, or . . . . .. . light up the night's sky when it ignites.
)I did manage to cypher the required OD piston thrust plate thickness to get things to fit right there (.185"). The most difficult thing was to figure out the special tool dodge uses to mount the dial micrometer is .500" thick.
Having done that the next thing was to mount the OD section on the main case.
As it stands in my case, there's only one tool that has proved necessary beyond a shadow of a doubt, that being the OD direct clutch spring compressor. Just behind that is a tool that is used to keep some gear splines in alignment till you go to mount the OD section to the main case. While I was able to do it without the special tool, if I had to do it again, I suppose I would go ahead and get the tool. Those of you who have been down this road, yes, I had to disassemble and re-assemble the OD section twice to get it right.
When I finish this mess, as a final post, I'll make a list of things I've learned as well as tools that are definitely needed including the way I went about getting around the other Special tools the FSM calls for.
Tomorrow, pending weather and personal strength, I'm gonna get the Valve Body massaged and installed.
I've still got to get the trans fluid sorted as well as some fluid cooler/heater plumbing ordered.
This thing's either gonna work really well, or . . . . .. . light up the night's sky when it ignites.
Thread Starter
1st Generation Admin
Joined: Jan 2005
Posts: 4,601
Likes: 118
From: Buies Creek, NC
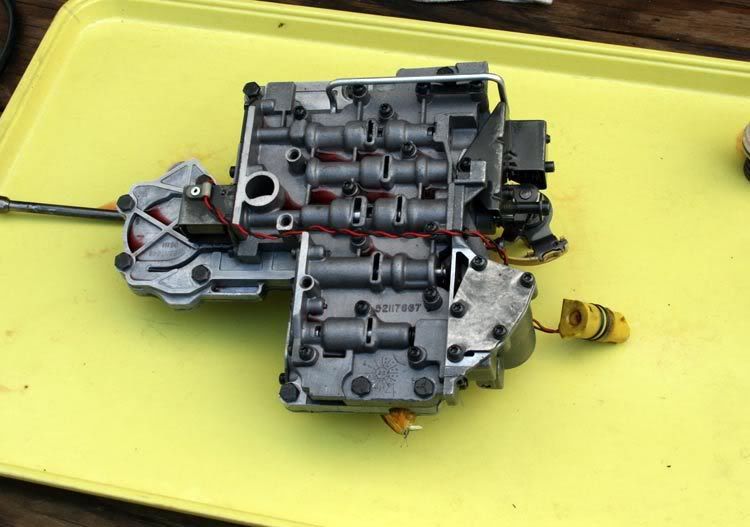
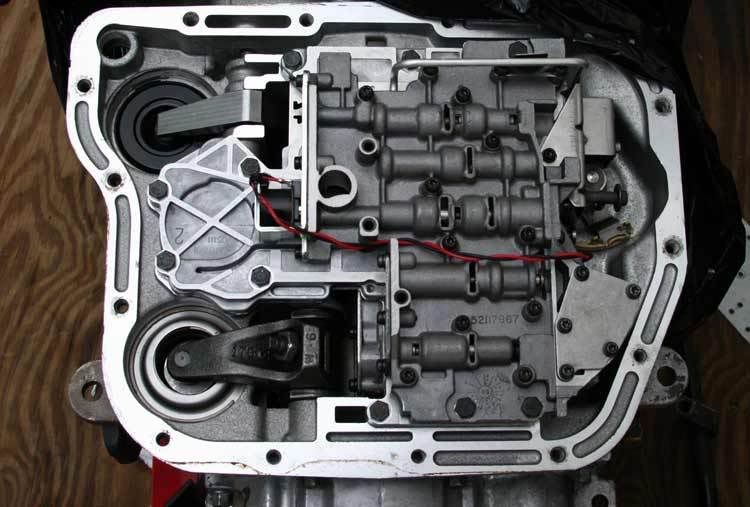
Well I got to the Valve-Body.
Having removed it from the transmission as an assembly, it was all there to see.
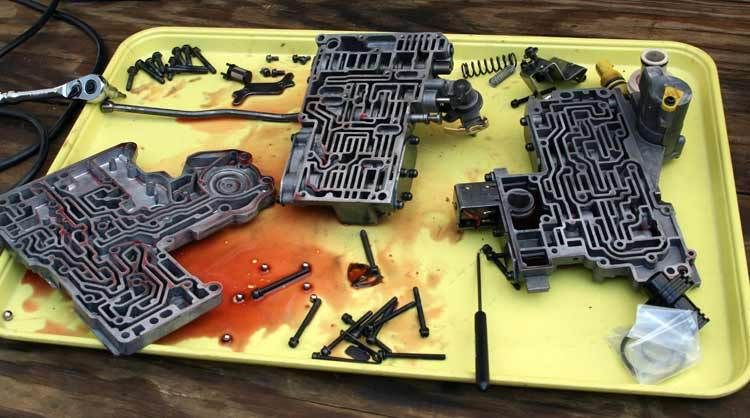
Did you know that if you tap it ever so slightly with a brass-headed 5 pound mallet, it flies apart like this. There's a couple of separator plates out in the yard somewhere.
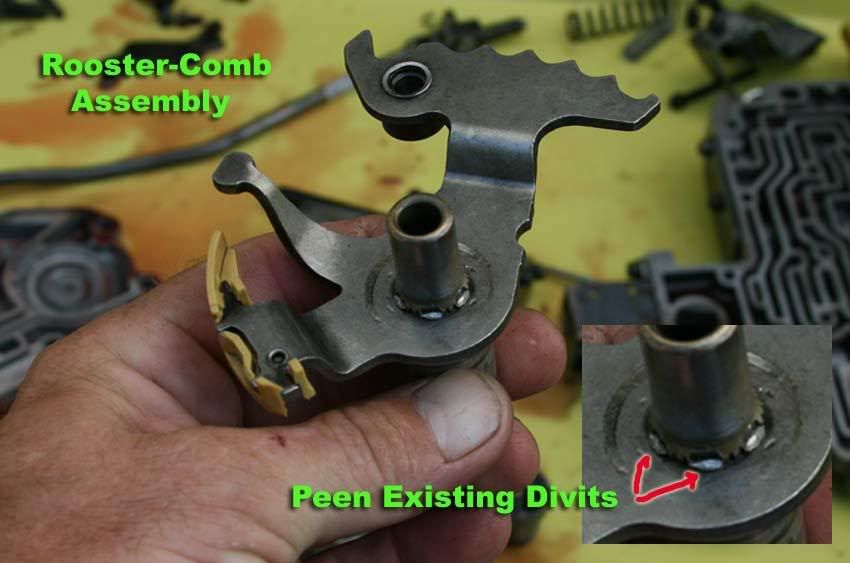
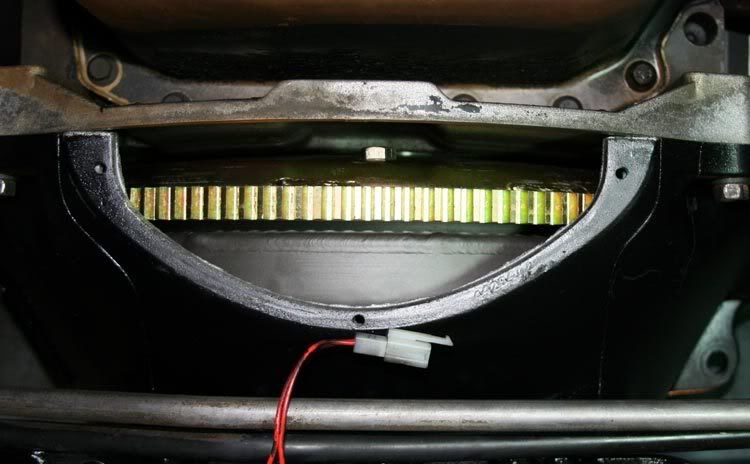
One thing I wanted to point out: A while back, starting down the road from the house, I noticed I'd all of the sudden lost the detent function of the gearshift mechanism. This may be common, and is a result of the rooster-comb loosening on the gear selector shaft of the trans itself. There's a spring loaded ball that locks into the notches seen in the image below. When the comb gets loose on the shaft enough, the ball pops out. To fix this, I re-peened the original divots where the factory staked the comb to the shaft.
That was a while ago. This time in, I found it able to wiggle just a bit. I went ahead and smacked the divots again.
I cleaned and reassembled the Valve-Body so as to include those TransGo mods associated with the mods of the rear servo that couldn't be done with the original TransGo install (Say that three times ). New seals and rings where needed, a new Over-Drive Solenoid, etc...
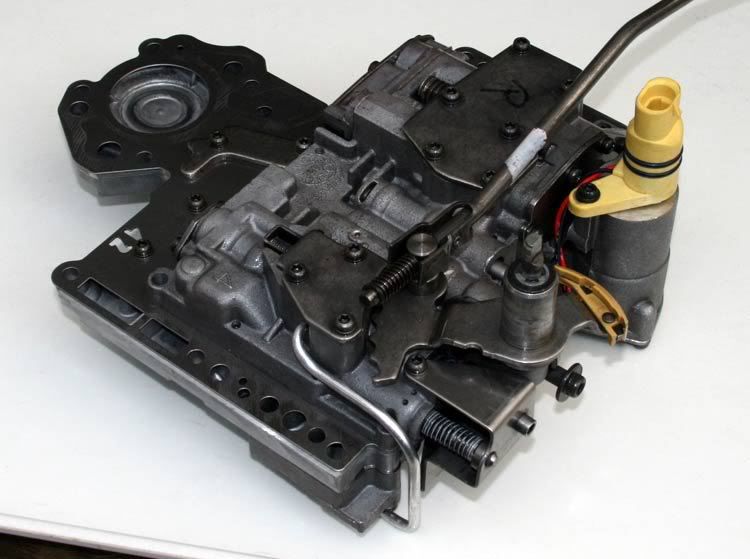
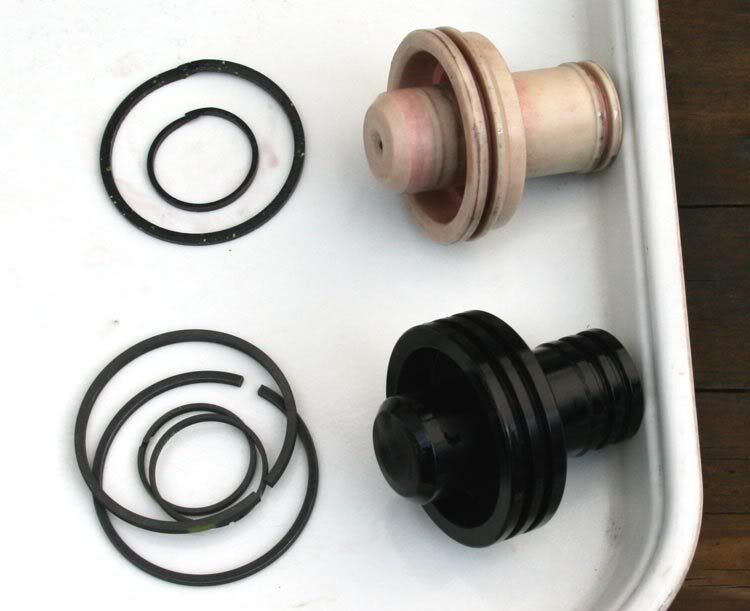
While upgrading the different servos, I also upgraded the Accumulator to one of billet material with dual sealing rings. This, as well as the servo sealing rings switch from a rubbery material to steel. Butt type joints on the larger seals, clasping type joints on the smaller. In all cases, I set the joints opposite of one another when installing.
After applying air pressure to the different ports of the case to see the clutch-packs and such work, I was able to install the Valve-Body complete with the fluid filter before I had to clean up as it's getting really dark all of the sudden with thunder and lightening.
I got my mess cleaned up just before the bottom fell out. BIG-TIME thunder and lightening! The power went out for an hour or so. Had to fire-up the JD-5210 and spin the 25KW (continuous) gen-set.
At this point, I've still got to put the pan on, install a new seal on the shifter shaft in the case, adjust the bands and paint it. Sort out what I'm gonna do with the hydraulic lines, and start putting it all back together.
The Dodge dealer who's getting me the new shifter torque-lever and bushings now says they switched parts depots so now the stuff won't be here till the 4th.
Having removed it from the transmission as an assembly, it was all there to see.
Did you know that if you tap it ever so slightly with a brass-headed 5 pound mallet, it flies apart like this. There's a couple of separator plates out in the yard somewhere.
One thing I wanted to point out: A while back, starting down the road from the house, I noticed I'd all of the sudden lost the detent function of the gearshift mechanism. This may be common, and is a result of the rooster-comb loosening on the gear selector shaft of the trans itself. There's a spring loaded ball that locks into the notches seen in the image below. When the comb gets loose on the shaft enough, the ball pops out. To fix this, I re-peened the original divots where the factory staked the comb to the shaft.
That was a while ago. This time in, I found it able to wiggle just a bit. I went ahead and smacked the divots again.
I cleaned and reassembled the Valve-Body so as to include those TransGo mods associated with the mods of the rear servo that couldn't be done with the original TransGo install (Say that three times
). New seals and rings where needed, a new Over-Drive Solenoid, etc...While upgrading the different servos, I also upgraded the Accumulator to one of billet material with dual sealing rings. This, as well as the servo sealing rings switch from a rubbery material to steel. Butt type joints on the larger seals, clasping type joints on the smaller. In all cases, I set the joints opposite of one another when installing.
After applying air pressure to the different ports of the case to see the clutch-packs and such work, I was able to install the Valve-Body complete with the fluid filter before I had to clean up as it's getting really dark all of the sudden with thunder and lightening.
I got my mess cleaned up just before the bottom fell out. BIG-TIME thunder and lightening! The power went out for an hour or so. Had to fire-up the JD-5210 and spin the 25KW (continuous) gen-set.
At this point, I've still got to put the pan on, install a new seal on the shifter shaft in the case, adjust the bands and paint it. Sort out what I'm gonna do with the hydraulic lines, and start putting it all back together.
The Dodge dealer who's getting me the new shifter torque-lever and bushings now says they switched parts depots so now the stuff won't be here till the 4th.

Thread Starter
1st Generation Admin
Joined: Jan 2005
Posts: 4,601
Likes: 118
From: Buies Creek, NC
Well, I got the front and rear bands adjusted, new seal on the trans shifter shaft, new seal on the park/neutral switch, oil pan mounted, and trans painted.
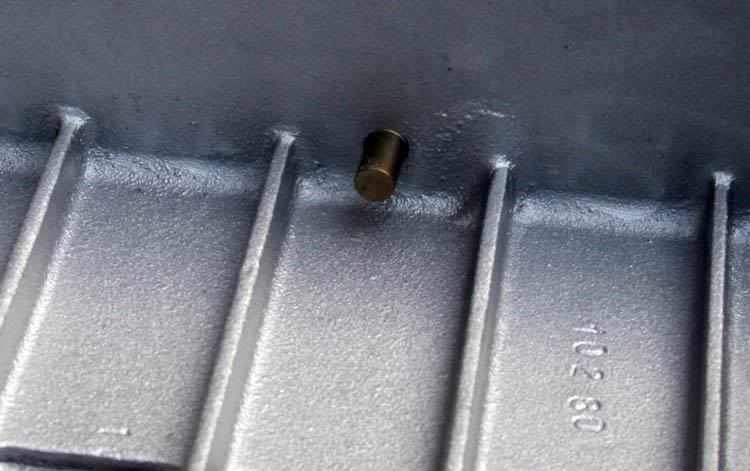
While I was dinking around with the oil pan, I went ahead and drilled and tapped a hole for the transmission oil temperature probe.
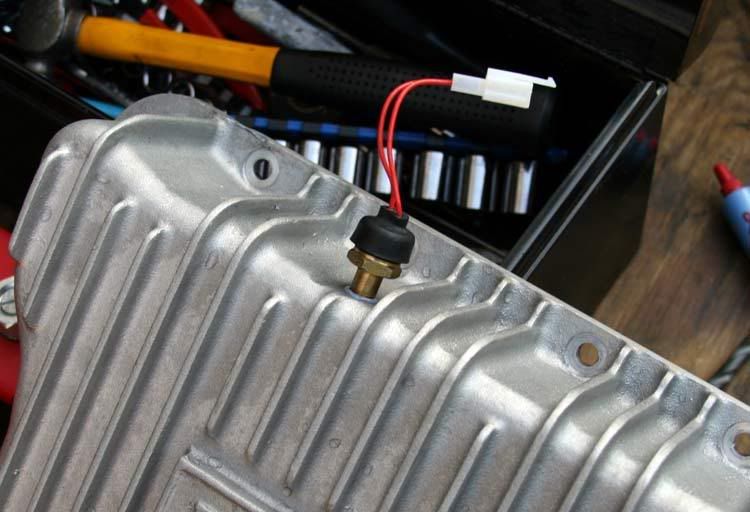
Mounted down low so as to stay in the oil.
I got the plumbing stuff ordered. Should be here by weeks end.
Still got to see about a new output shaft seal for the NP205. Gotta paint it as well.
The trans gasket kit didn't come with the gasket that goes between the transmission and transfer case. DOH!
While I was dinking around with the oil pan, I went ahead and drilled and tapped a hole for the transmission oil temperature probe.
Mounted down low so as to stay in the oil.
I got the plumbing stuff ordered. Should be here by weeks end.
Still got to see about a new output shaft seal for the NP205. Gotta paint it as well.
The trans gasket kit didn't come with the gasket that goes between the transmission and transfer case. DOH!
Thread Starter
1st Generation Admin
Joined: Jan 2005
Posts: 4,601
Likes: 118
From: Buies Creek, NC
Well I got a little bit done tonight.
Here's the mess dubbed "Fat Boy" all gussied-up and ready for the prom.
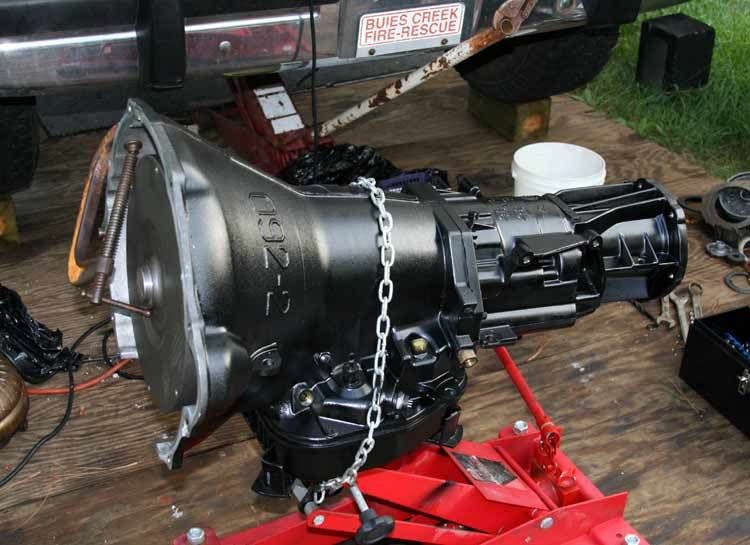
That trans-jack sure made it easy to line that boy up. Had to wiggle it around a minute or two, and then it was there.
Them bolts at the top of the bell-housing can be tough to get at.
Then it was time to slip in the cross-member. I've read here repeatedly that many have to pull the frame rails together when installing the cross-member. The truck must squat and spread the rails I guess.
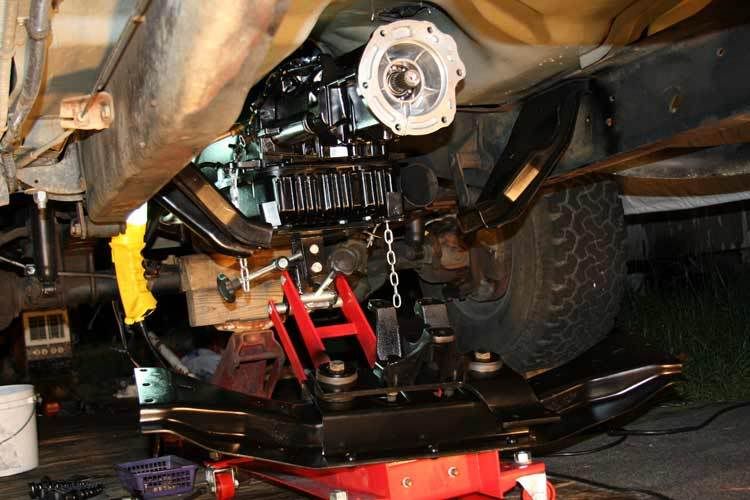
I must have done a good deed today as my mess fell right into place. So now the transmission and engine are linked and the truck is bearing their full weight.
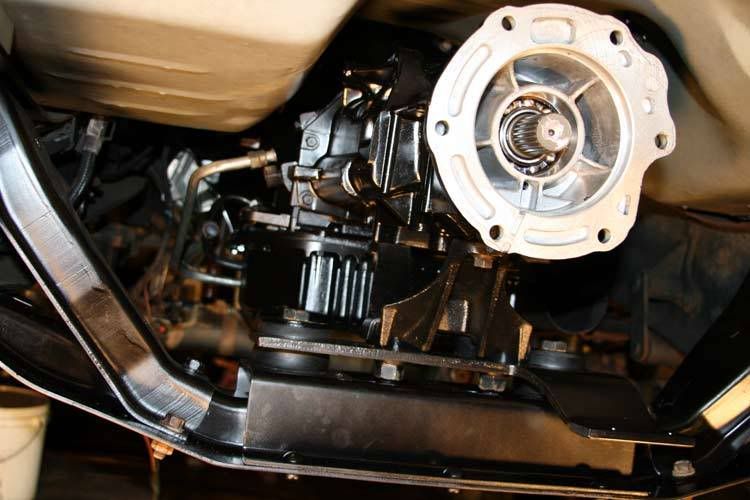
I still haven't found the fabled access hole for properly setting and torquing the torque converter bolts. I've always had to work in the recess at the bottom of the Engine/Transmission adapter plate. They're cinched-up "Goodintite".
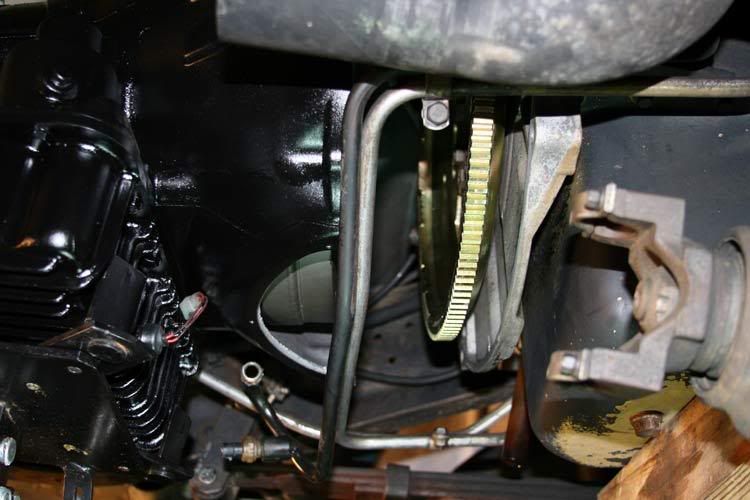
To finish tonight's work, I installed the transfer case shifter assembly.
I need to paint the transfer case and get a seal for rear output shaft. My local Dodge parts guy was able to find me the gasket that goes between the transmission and transfer case. Picked it up today while at work. If I don't get interrupted by work, I might be able to hang the transfer case tomorrow.
I still need to re-wrap the wiring harness. The plumbing stuff should be here Thursday.
Getting down to the short rows.
KEWL!
Here's the mess dubbed "Fat Boy" all gussied-up and ready for the prom.
That trans-jack sure made it easy to line that boy up. Had to wiggle it around a minute or two, and then it was there.
Them bolts at the top of the bell-housing can be tough to get at.
Then it was time to slip in the cross-member. I've read here repeatedly that many have to pull the frame rails together when installing the cross-member. The truck must squat and spread the rails I guess.
I must have done a good deed today as my mess fell right into place. So now the transmission and engine are linked and the truck is bearing their full weight.
I still haven't found the fabled access hole for properly setting and torquing the torque converter bolts. I've always had to work in the recess at the bottom of the Engine/Transmission adapter plate. They're cinched-up "Goodintite".
To finish tonight's work, I installed the transfer case shifter assembly.
I need to paint the transfer case and get a seal for rear output shaft. My local Dodge parts guy was able to find me the gasket that goes between the transmission and transfer case. Picked it up today while at work. If I don't get interrupted by work, I might be able to hang the transfer case tomorrow.
I still need to re-wrap the wiring harness. The plumbing stuff should be here Thursday.
Getting down to the short rows.
KEWL!

Registered User
Joined: May 2005
Posts: 2,510
Likes: 1
From: Belvidere, NJ
Looking good Dave, the moment of truth is quickly approaching. How much ATF did you get? My 47RH with a deep pan took almost 4 gallons to fill it from dry.

Registered User
Joined: Mar 2005
Posts: 658
Likes: 1
From: Winston Oregon
When I did my trans, there was no way those bolts were going to come out or go in from the bottom. I had no choice but to hunt that little access hole down and use it. It's much easier now without the trans cooler on the side of the block.

Registered User
Joined: Jul 2003
Posts: 3,833
Likes: 2
From: Raleigh, NC
Mike that's interesting as the Dodge FSM reads (assuming you're talking about the front clutch set-up clearance) ~
Were you still running 4 discs? In a 6 disc drum?
My front clutch (that closest to the oil pump) had 4 clutch discs and 4 steels OEM. I've upgraded it to 6 discs and 6 six steels with a new piston, a no doubt modified reaction plate, and a noticeably thicker snap ring. The correct set-up clearance for this arrangement is 0.070".
We'll see.
THANKS for the input folks!
.070 is too tight for that many clutches and steels, run it at about .120