BC's Transmission Overhaul (updated as it occurs)
 08-14-2007, 12:44 AM
#31
 08-14-2007, 12:56 AM
#32
1st Generation Admin
Thread Starter
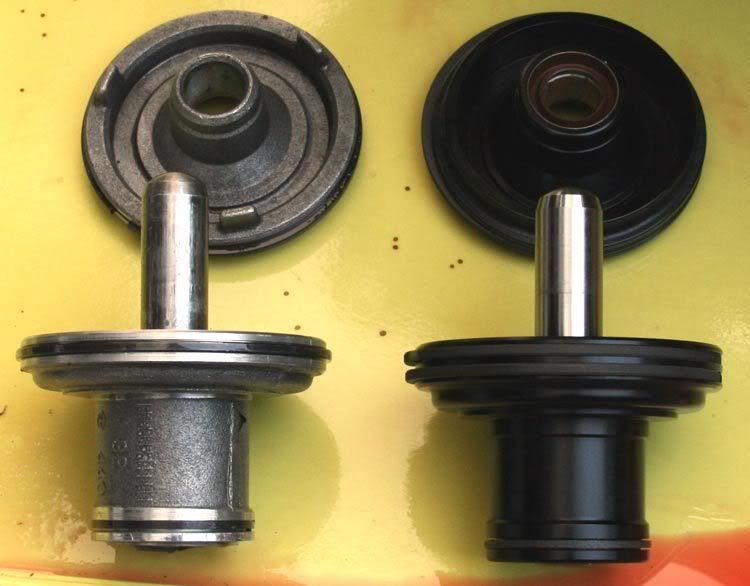
I think, . . . . your's is a lock-up converter riding a billet plate where mine is a non-lockup riding stamped steel. There's a difference in the profile of the two converters. The lock-up one is thickererer. 
08-15-2007, 10:54 PM
#34
1st Generation Admin
Thread Starter
Last night about 6:30pm I told the wife I was gonna lay down for an hour. I woke up at 1:30am. Oops.
I was a little more productive tonight.
Got the main-case planetary gear assemblies and intermediate shaft stuff rebuilt. Slipped in new thrust washers. Final assembly end-play of .024"

I didn't find any wear worth noting other than the planetary gear-set's thrust washers. (225,000 miles).

From there I moved on to the oil pump assembly. All the pump tolerances were within FSM spec. New seals on the shaft support.

The other night rebuilding/upgrading the front and rear clutches . . . ..
The rear clutches removed looked like this (typical).

The front clutches like this (typical).

HOWEVER! One of the front steels apparently wasn't getting along and seems to have run hot.

So hot, it went warppedididid . .. .

What's up with that? I couldn't see any related heating evidence on any of the clutch discs. After having to be so finicky about the final clutch-pack assembly tolerances, I can't help but think the front clutch was soon to be in need of attention.
I don't think I'm gonna be replacing the main cases over-run clutch including the related bolt-in cam. Just before drifting out the OEM cam, I noticed my case doesn't have the cam set screw mentioned in the FSM. Further poking around revealed the new bolt-in cam is of a bit smaller diameter than the OEM, meaning the new cam would not interface with the serrations in the case. It plain won't fit. Further, the new over-run clutch assembly has a different lobe count (which means the sprag's different to).
The OEM appears to be in good condition. I think leaving well enough alone is in order here.
Perhaps tomorrow the brown truck will leave me the proper reaction plate for the rear clutch upgrade. That being the deal, I should be able to begin putting the main case back together.
Which brings me to a question for you good folks.
Last year I installed the full blown TransGo kit. OK.
The transmission as removed from the truck was in good working order. Hold that thought.
With the disassembly of the transmission, I removed the valve-body as an assembly. Hold that thought.
Is there any reason to bother messing with the valve-body at this point. Shouldn't I be able to simply bolt it back on? (I'm still gonna check/adjust the line and throttle pressure adjustments).
Wha'chawl think?
Soooo farrr, sooo good.
I was a little more productive tonight.
Got the main-case planetary gear assemblies and intermediate shaft stuff rebuilt. Slipped in new thrust washers. Final assembly end-play of .024"
I didn't find any wear worth noting other than the planetary gear-set's thrust washers. (225,000 miles).
From there I moved on to the oil pump assembly. All the pump tolerances were within FSM spec. New seals on the shaft support.
The other night rebuilding/upgrading the front and rear clutches . . . ..
The rear clutches removed looked like this (typical).
The front clutches like this (typical).
HOWEVER! One of the front steels apparently wasn't getting along and seems to have run hot.
So hot, it went warppedididid
. .. . What's up with that? I couldn't see any related heating evidence on any of the clutch discs. After having to be so finicky about the final clutch-pack assembly tolerances, I can't help but think the front clutch was soon to be in need of attention.
I don't think I'm gonna be replacing the main cases over-run clutch including the related bolt-in cam. Just before drifting out the OEM cam, I noticed my case doesn't have the cam set screw mentioned in the FSM. Further poking around revealed the new bolt-in cam is of a bit smaller diameter than the OEM, meaning the new cam would not interface with the serrations in the case. It plain won't fit. Further, the new over-run clutch assembly has a different lobe count (which means the sprag's different to).
The OEM appears to be in good condition. I think leaving well enough alone is in order here.
Perhaps tomorrow the brown truck will leave me the proper reaction plate for the rear clutch upgrade. That being the deal, I should be able to begin putting the main case back together.
Which brings me to a question for you good folks.
Last year I installed the full blown TransGo kit. OK.
The transmission as removed from the truck was in good working order. Hold that thought.
With the disassembly of the transmission, I removed the valve-body as an assembly. Hold that thought.
Is there any reason to bother messing with the valve-body at this point. Shouldn't I be able to simply bolt it back on? (I'm still gonna check/adjust the line and throttle pressure adjustments).
Wha'chawl think?
Soooo farrr, sooo good.
08-16-2007, 12:08 AM
#35
Registered User
Join Date: Jul 2007
Location: FLW, MO
Posts: 191
Likes: 0
Received 0 Likes
on
0 Posts
i don't know that much about auto's except the few i rebuilt at school but sounds right i wouldn't mes with the valve body, i would clean all the old fluid out of it though blow it off "being very carefull as you know" and wash it with clean to get any old metallic resedue away from it. ide also make shure to keep it moist its been saturated in fluid its whole life becoming soaked then dry then soaked does weird things to seals.
"if ya wanna nit pic things"
Dan
great job
"if ya wanna nit pic things"
Dan
great job
08-16-2007, 06:23 AM
#36
Registered User
What would be involved in going through the VB assembly? New seals? I really am not sure, but thinking that since you've gone this far it would probably be worth disassembling and cleaning just to eliminate one more 'what-if'. JMO
08-16-2007, 06:55 AM
#37
Registered User

Dave,
How many count clutch pack is that one? And where in the pack was the steel that warped? How many miles since you put the transgo shift kit in?
Your front clutch was definitely on the way towards problems, the frictions don't show signs of problems yet, but they would have. I know I mentioned it before, but my last transmissions suffered from a front clutch failure, everything else look like brand new with the inking on the friction surface still visible on the other clutches.
I talked with Dave Goerend about how it could have happened in depth and there are several factors that can contribute to that problem. I had .100" of unit end play, which is excessive. That caused the drum's oil port to ride almost on the sealing ring. Previous builder had put a 6 element drum in there , I told him about it and even after 2 years he gave me enough parts and then some to rebuild another trans.
Another problem Dave mentioned was with the valve body(something with aftermarket manual valves) and how the front clutch can become pre-charged with oil and just drag the clutch enough to heat it up.
How many count clutch pack is that one? And where in the pack was the steel that warped? How many miles since you put the transgo shift kit in?
Your front clutch was definitely on the way towards problems, the frictions don't show signs of problems yet, but they would have. I know I mentioned it before, but my last transmissions suffered from a front clutch failure, everything else look like brand new with the inking on the friction surface still visible on the other clutches.
I talked with Dave Goerend about how it could have happened in depth and there are several factors that can contribute to that problem. I had .100" of unit end play, which is excessive. That caused the drum's oil port to ride almost on the sealing ring. Previous builder had put a 6 element drum in there
, I told him about it and even after 2 years he gave me enough parts and then some to rebuild another trans. Another problem Dave mentioned was with the valve body(something with aftermarket manual valves) and how the front clutch can become pre-charged with oil and just drag the clutch enough to heat it up.
08-16-2007, 06:39 PM
#38
1st Generation Admin
Thread Starter
Dave,
How many count clutch pack is that one? Four OEM.
And where in the pack was the steel that warped? If memory serves me correct, second from the oil pump. They came out stuck together with the trans fluid. I started to slide them apart and "Boing!" That one jumped.
How many miles since you put the transgo shift kit in? Roughly Feb of 2005, approx 15,000 miles ago.
Your front clutch was definitely on the way towards problems, the frictions don't show signs of problems yet, but they would have. I know I mentioned it before, but my last transmissions suffered from a front clutch failure, everything else look like brand new with the inking on the friction surface still visible on the other clutches.
I talked with Dave Goerend about how it could have happened in depth and there are several factors that can contribute to that problem. I had .100" of unit end play, which is excessive. That caused the drum's oil port to ride almost on the sealing ring. Previous builder had put a 6 element drum in there, I told him about it and even after 2 years he gave me enough parts and then some to rebuild another trans.
Another problem Dave mentioned was with the valve body(something with aftermarket manual valves) and how the front clutch can become pre-charged with oil and just drag the clutch enough to heat it up.
How many count clutch pack is that one? Four OEM.
And where in the pack was the steel that warped? If memory serves me correct, second from the oil pump. They came out stuck together with the trans fluid. I started to slide them apart and "Boing!" That one jumped.
How many miles since you put the transgo shift kit in? Roughly Feb of 2005, approx 15,000 miles ago.
Your front clutch was definitely on the way towards problems, the frictions don't show signs of problems yet, but they would have. I know I mentioned it before, but my last transmissions suffered from a front clutch failure, everything else look like brand new with the inking on the friction surface still visible on the other clutches.
I talked with Dave Goerend about how it could have happened in depth and there are several factors that can contribute to that problem. I had .100" of unit end play, which is excessive. That caused the drum's oil port to ride almost on the sealing ring. Previous builder had put a 6 element drum in there
, I told him about it and even after 2 years he gave me enough parts and then some to rebuild another trans. Another problem Dave mentioned was with the valve body(something with aftermarket manual valves) and how the front clutch can become pre-charged with oil and just drag the clutch enough to heat it up.
Originally Posted by FSM pg 21-295
* On 4 disc clutch, clearance between waved spring should be 2.08 to 3.83mm (0.082" to 0.151").
My front clutch (that closest to the oil pump) had 4 clutch discs and 4 steels OEM. I've upgraded it to 6 discs and 6 six steels with a new piston, a no doubt modified reaction plate, and a noticeably thicker snap ring. The correct set-up clearance for this arrangement is 0.070".
The rear clutch (that toward the rear of the main case) had four discs and steels OEM. The FSM wants it at 0.025" to 0.045". I'm upgrading it to 5 discs and steels again using a modified reaction plate. There I'm shooting for approx 0.050" (initial set-up with new components).
The TransGo kit I'm running is the p/n ~ TFOD/518.
The brown truck came today and left me the rear band my dumb self forgot as well as the reaction plate to finish that rear clutch-pack.
If I can get the OD section to accept it's upgrades, I'd like to think I can start putting this mess back in the truck this weekend.
We'll see.
THANKS for the input folks!
 08-17-2007, 05:56 AM
#39
Registered User
The current build I'm running is running 4 discs disc clutch packs in both the front and rear clutch, oem style frictions. The other one that I took apart had a 3 disc front clutch in it, which was completely smoked. That reminds me, he still owes me an input shaft.
08-17-2007, 08:29 PM
#40
1st Generation Admin
Thread Starter
I hate it when my Internet connection goes down. 19 computers doing nothing for the most part. 
I did get a few things accomplished yesterday though.
I finished setting up the rear clutch-pack (forward). Went from an OEM of four clutches and steels to five of each. 25% more apply area.

I can now slip on the front clutch-pack (direct) and call that assembly done. There I went from an OEM of four clutches and steels to six of each. 50% more apply area. That should help reduce some of that heat (assuming everything else is right).
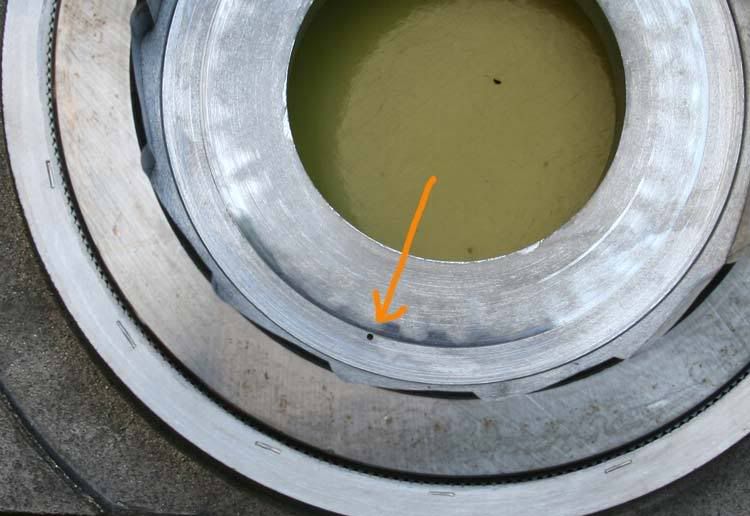
In addition to those steels found blue in the direct drum, I also noticed the front band looked a little "done". It's kinda tough to see in this image. I had noticed second gear was getting soft in engagement.

I'm slow getting started tonight. I need to get on with drilling that oil port for the main-case overrun clutch. Then I can install the overdrive piston retainer. From there it's pretty-much putting things back together. The only delay there may be taking things back apart should I find the unit end-play slack (or tight).
I did get a few things accomplished yesterday though.
I finished setting up the rear clutch-pack (forward). Went from an OEM of four clutches and steels to five of each. 25% more apply area.
I can now slip on the front clutch-pack (direct) and call that assembly done. There I went from an OEM of four clutches and steels to six of each. 50% more apply area. That should help reduce some of that heat (assuming everything else is right).
In addition to those steels found blue in the direct drum, I also noticed the front band looked a little "done". It's kinda tough to see in this image. I had noticed second gear was getting soft in engagement.
I'm slow getting started tonight. I need to get on with drilling that oil port for the main-case overrun clutch. Then I can install the overdrive piston retainer. From there it's pretty-much putting things back together. The only delay there may be taking things back apart should I find the unit end-play slack (or tight).
08-19-2007, 01:24 AM
#41
1st Generation Admin
Thread Starter
Today my local Dodge dealer was able to find me a replacement gear shift torque lever and bushings. They should be available by Thursday.
I've pretty-much completed the service/upgrading of the main-case sub-assemblies so now on to putting all this mess together!
To start with, I wasted an hour looking for the stupid wire drill index that was sitting on my desk next to the stupid keyboard!!!!

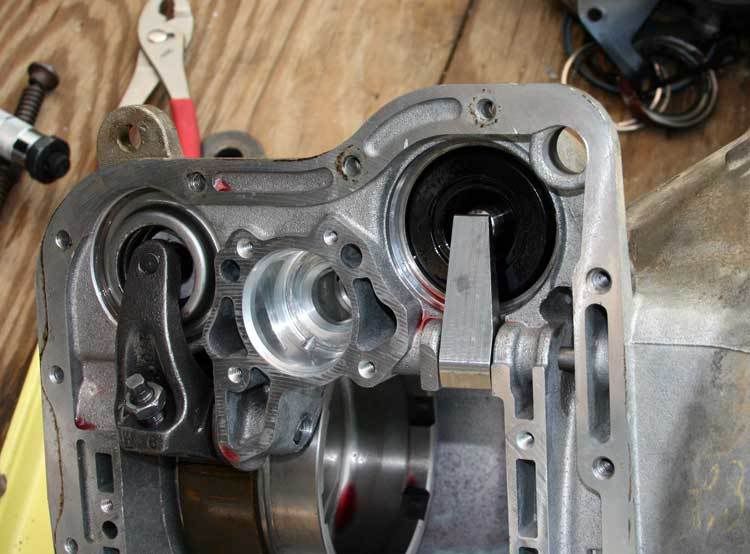
As part of an upgraded overdrive piston retainer install, they suggest I drill a 0.040" to 0.045" hole from the trans fluid cooler return channel through to the Low Roller Clutch. This will allow direct lubrication of the clutch. I went with 0.038" so as not to lose as much general oil pressure for other stuff.
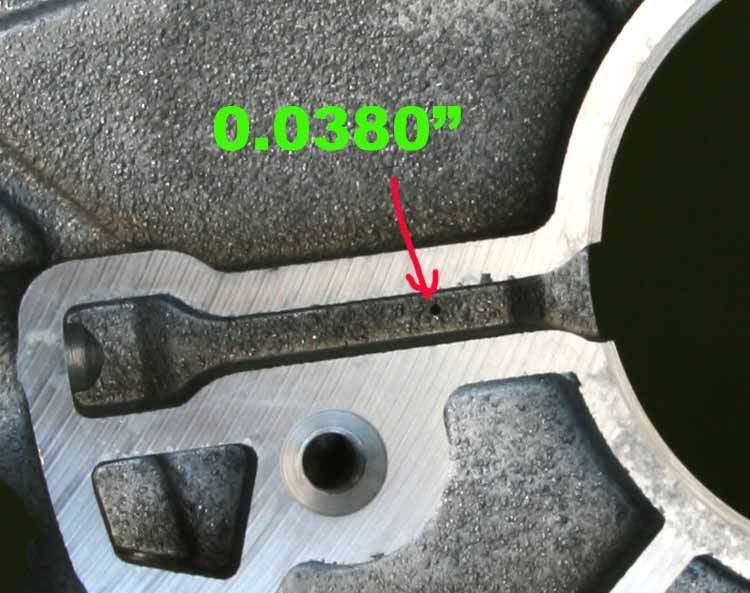
You can just see the hole from the Low Roller Clutch Cam side. Should do just fine.
With that completed, I installed the upgraded Overdrive Piston Retainer. It includes an O-ring on the hub so as to lessen fluid leakage there.
Now I can install the Low Roller clutch itself.

That in-turn allows me to install the Low/Reverse Drum, it's associated Band and Linkage.

For the Rear Band's Servo, I installed a new Piston and Seal to reduce leakage there. While I was at it, I installed the balance of the parts used in the TransGo kit's install. They include a bronze spacer to shorten the servo's stroke, as well as a different spring. I couldn't install them back when I originaly installed the TransGo kit as it requires the removal of the OD section to get to the pin that holds the apply lever in place. You can't install the parts without that mess removed. TransGo says these components coupled with mods in the valve body will give very firm 1st to 2nd shifts.

Slip that boy in there with the associated apply lever, new O-rings on the lever's pin, etc, and it's done.

I've pretty-much completed the service/upgrading of the main-case sub-assemblies so now on to putting all this mess together!
To start with, I wasted an hour looking for the stupid wire drill index that was sitting on my desk next to the stupid keyboard!!!!
As part of an upgraded overdrive piston retainer install, they suggest I drill a 0.040" to 0.045" hole from the trans fluid cooler return channel through to the Low Roller Clutch. This will allow direct lubrication of the clutch. I went with 0.038" so as not to lose as much general oil pressure for other stuff.
You can just see the hole from the Low Roller Clutch Cam side. Should do just fine.
With that completed, I installed the upgraded Overdrive Piston Retainer. It includes an O-ring on the hub so as to lessen fluid leakage there.
Now I can install the Low Roller clutch itself.
That in-turn allows me to install the Low/Reverse Drum, it's associated Band and Linkage.
For the Rear Band's Servo, I installed a new Piston and Seal to reduce leakage there. While I was at it, I installed the balance of the parts used in the TransGo kit's install. They include a bronze spacer to shorten the servo's stroke, as well as a different spring. I couldn't install them back when I originaly installed the TransGo kit as it requires the removal of the OD section to get to the pin that holds the apply lever in place. You can't install the parts without that mess removed. TransGo says these components coupled with mods in the valve body will give very firm 1st to 2nd shifts.
Slip that boy in there with the associated apply lever, new O-rings on the lever's pin, etc, and it's done.
08-19-2007, 01:25 AM
#42
1st Generation Admin
Thread Starter
I upgraded the Front Servo (second gear band) to one that's made of billet material and has multiple sealing rings. It's cover has a bronze sleeve and seal. All so as to reduce leakage.
I also upgraded the front servo's (second gear band) Apply Lever. Went from a 3.8 to 1 ratio to a 4.2 to 1 Ratio. This will provide a 10% greater mechanical clamping force.
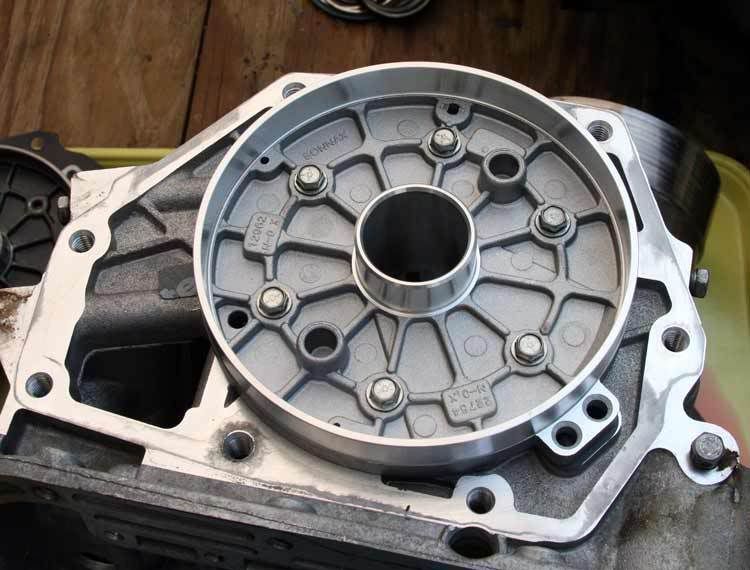
So I shoe-horn all that crap in there to see this.
Now I can install the rebuilt Intermediate Shaft/Planetary Gear-set assembly.

Then turn around and nest the upgraded Forward and Direct Clutch/Drum assemblies.

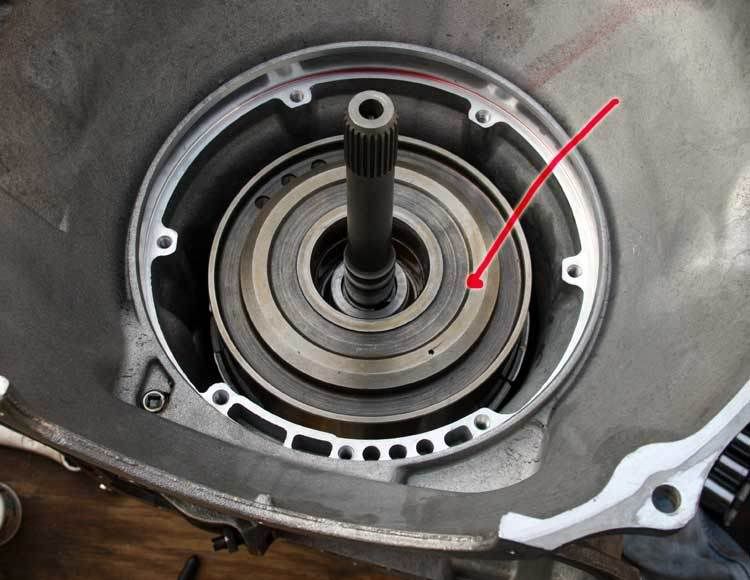
This is what we have so far looking from the bell-housing end of things.
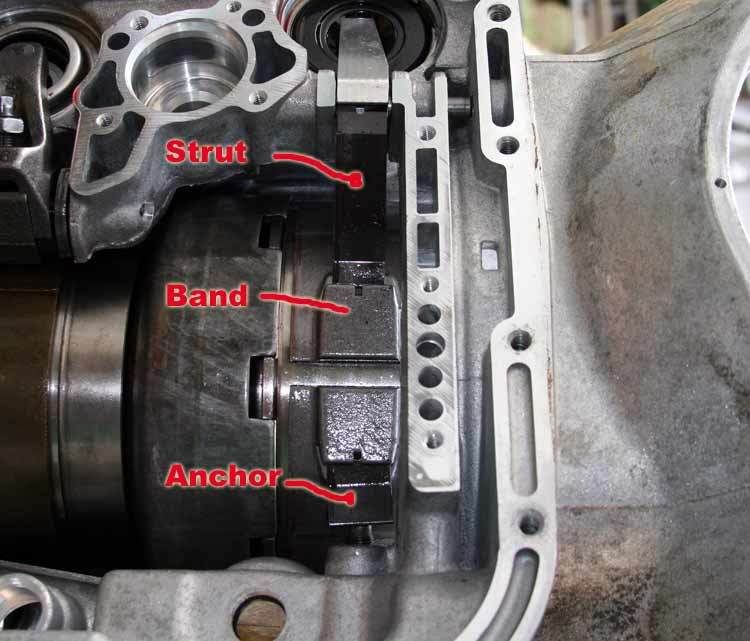
As a final upgrade for second gear, I swapped from a Flex-type Band to a Solid Band. Further, the Band Strut and Anchor were swapped for billet material.

Slide all that in there to complete the main-case clutches.
To complete the main-case hardware, I installed the rebuilt Oil Pump assembly.
With that, I went about establishing and adjusting the unit end-play. What a pain in my behind! I feel the FSM messed up as it doesn't mention that you need to have the overdrive section installed so as to give the opposite end of the intermediate shaft something to rest against. Without the OD section in place, the input shaft can push the intermediate shaft out of place, throwing the end-play measurements out the window. I bet I took the stupid thing apart and put it back together eight times trying to figure out what thick thrust bearing I inadvertently left out!
Setting up the unit end play with the OD section in place was then straight forward and I was quickly able to set it to a final figure of 0.052" clearance. The FSM wants 0.034" to 0.084".
Kewl!

I stopped there with the reassembly of the main-case as the FSM wants the OD section in place so I can install the parking pawl linkage as part of the valve body install.
OK fine, I set all that aside in a clean plastic trash bag.
I got the Overdrive section almost completely disassembled before calling it a night.
I'd like to think I'll be able to complete its overhaul/upgrade as well as waving a wrench at the valve body tomorrow.
>Yawn<
Sniff, sniff . . . . . .. I stink! See y'all in the morning.
I also upgraded the front servo's (second gear band) Apply Lever. Went from a 3.8 to 1 ratio to a 4.2 to 1 Ratio. This will provide a 10% greater mechanical clamping force.
So I shoe-horn all that crap in there to see this.
Now I can install the rebuilt Intermediate Shaft/Planetary Gear-set assembly.
Then turn around and nest the upgraded Forward and Direct Clutch/Drum assemblies.
This is what we have so far looking from the bell-housing end of things.
As a final upgrade for second gear, I swapped from a Flex-type Band to a Solid Band. Further, the Band Strut and Anchor were swapped for billet material.
Slide all that in there to complete the main-case clutches.
To complete the main-case hardware, I installed the rebuilt Oil Pump assembly.
With that, I went about establishing and adjusting the unit end-play. What a pain in my behind! I feel the FSM messed up as it doesn't mention that you need to have the overdrive section installed so as to give the opposite end of the intermediate shaft something to rest against. Without the OD section in place, the input shaft can push the intermediate shaft out of place, throwing the end-play measurements out the window. I bet I took the stupid thing apart and put it back together eight times trying to figure out what thick thrust bearing I inadvertently left out!
Setting up the unit end play with the OD section in place was then straight forward and I was quickly able to set it to a final figure of 0.052" clearance. The FSM wants 0.034" to 0.084".
Kewl!
I stopped there with the reassembly of the main-case as the FSM wants the OD section in place so I can install the parking pawl linkage as part of the valve body install.
OK fine, I set all that aside in a clean plastic trash bag.
I got the Overdrive section almost completely disassembled before calling it a night.
I'd like to think I'll be able to complete its overhaul/upgrade as well as waving a wrench at the valve body tomorrow.
>Yawn<
Sniff, sniff . . . . . .. I stink! See y'all in the morning.
 08-21-2007, 12:43 AM
#45
1st Generation Admin
Thread Starter
The other night I tore down the Overdrive section and am finally getting to putting it back together.
It's made from a bunch of stuff.

Having cleaned everything, I started by assembling the Overrunning Clutch with a new sprag, it's associated Thrust Bearing, and hub inside the Annulus Gear/Direct Clutch Drum/Output Shaft assembly.

Then slip in the Planetary Gearset.

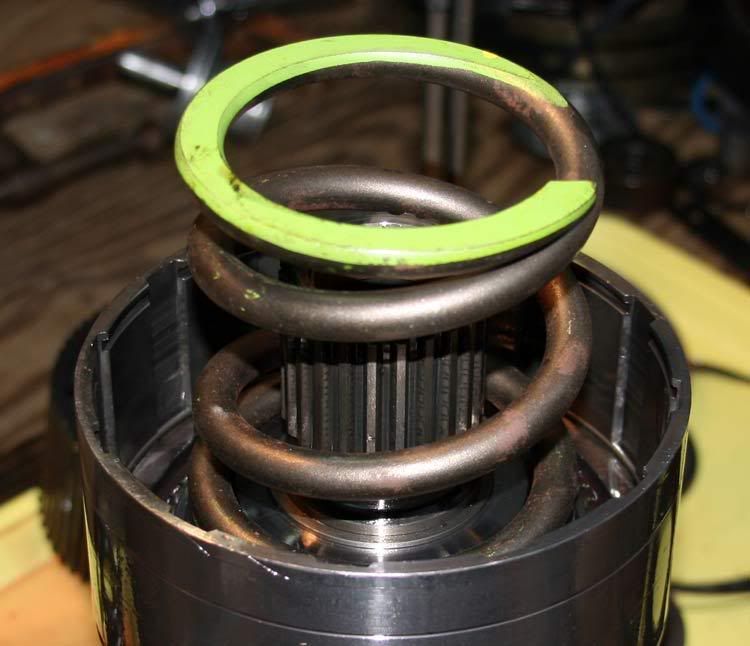
The OEM Overdrive Spring Plate was a bit scored so I replaced it with one from Sonnex that's supposedly machined so as to present with the correct profile once it's under the OEM 800 pound force of the spring.

Slip that boy on to the Sun Gear.

And then nest it in the planetary gear-set.

The OEM Overdrive Spring presents with approximately 800 pounds force in the process of doing it's job. I upgraded to one that's about 1/4" taller in height. This will help that clutch-pack hold the demands of the Cummins.
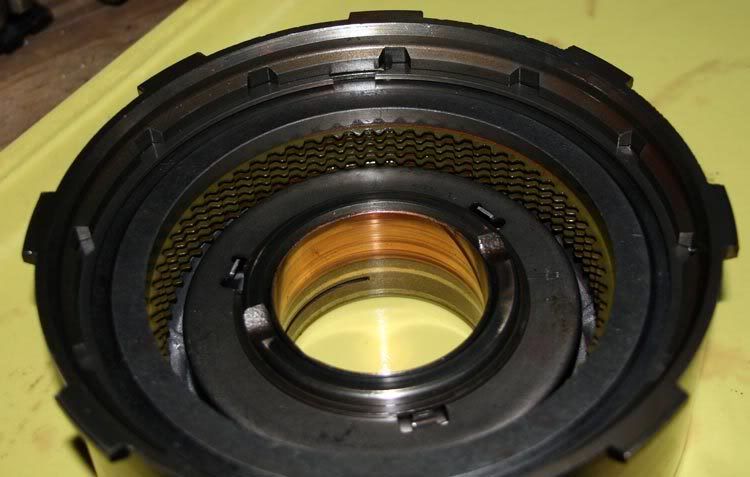
I then built the Overdrive Direct Clutch-pack. The OEM A518 (46RH) originally came with eight double-sided clutch discs and seven steels. I've upgraded it to the 48RE style which uses 23 single-sided friction elements giving me up to 44% more clutch apply area.

Set all that on top of the OD Spring.
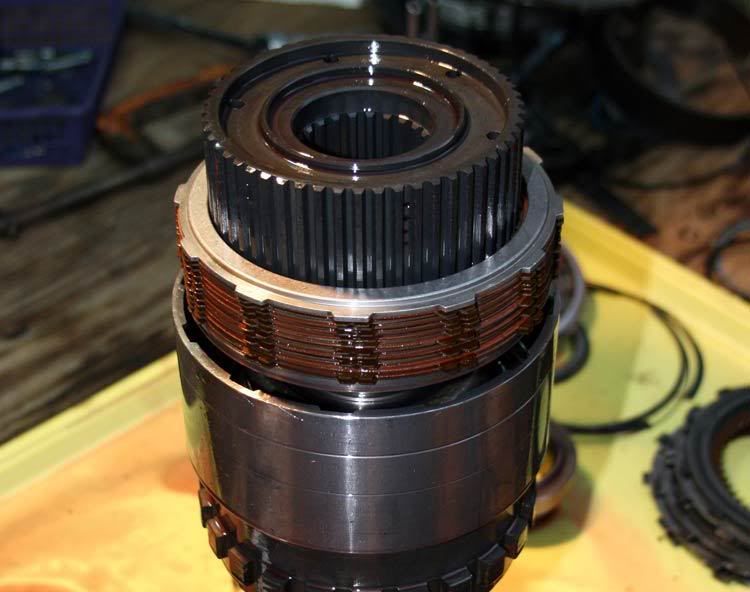
Compress it into the Annulus Gear with the one special tool I had to buy to do the job without putting my eye out and set the two snap rings. One around the tip of the Sun Gear, and the Other around the interior of the Annulus Gear.

It's made from a bunch of stuff.
Having cleaned everything, I started by assembling the Overrunning Clutch with a new sprag, it's associated Thrust Bearing, and hub inside the Annulus Gear/Direct Clutch Drum/Output Shaft assembly.
Then slip in the Planetary Gearset.
The OEM Overdrive Spring Plate was a bit scored so I replaced it with one from Sonnex that's supposedly machined so as to present with the correct profile once it's under the OEM 800 pound force of the spring.
Slip that boy on to the Sun Gear.
And then nest it in the planetary gear-set.
The OEM Overdrive Spring presents with approximately 800 pounds force in the process of doing it's job. I upgraded to one that's about 1/4" taller in height. This will help that clutch-pack hold the demands of the Cummins.
I then built the Overdrive Direct Clutch-pack. The OEM A518 (46RH) originally came with eight double-sided clutch discs and seven steels. I've upgraded it to the 48RE style which uses 23 single-sided friction elements giving me up to 44% more clutch apply area.
Set all that on top of the OD Spring.
Compress it into the Annulus Gear with the one special tool I had to buy to do the job without putting my eye out and set the two snap rings. One around the tip of the Sun Gear, and the Other around the interior of the Annulus Gear.

