
“Oil Pressure”


Thread Starter
Administrator


Joined: Nov 2004
Posts: 4,084
Likes: 235
From: Southern California
How to replace your Oil Pressure Sender
This is for a 1st. Gen. 12V but they are all basicly the same.
The other day I was cruising down the freeway about 70 MPH coming home after a long day when for some reason I glanced down at my gauges just to catch the needle of my oil pressure gauge slowly drifting down past the “L” and wondering what the heck is going on.
I was in fast moving traffic so pulling over as out of the question so I bump it up into neutral and idle it down and think what am I going to do.
Now I thought by now I should be hearing the sickening knock of spun bearings, but the truck was still running fine So it must be that darn oil pressure sender.
Here is a simple step by step on how to replace the sender.
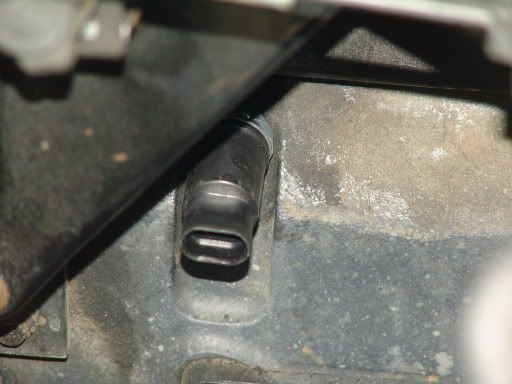
For those of you who do not know where it is, It is right in the center of the picture the one with the 2 wires coming out of it.
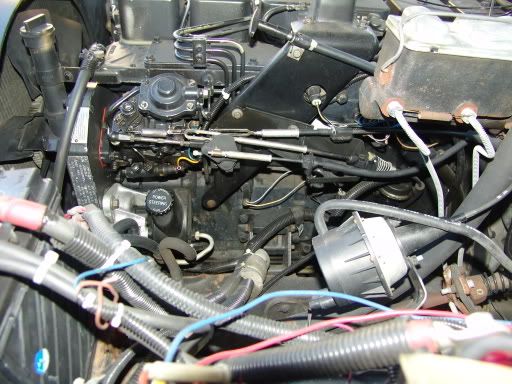
Right here under the back of the injection pump on the side of the block.
I got on the phone with my local Dodge dealer and came up with the part number #53030493 for $38.20
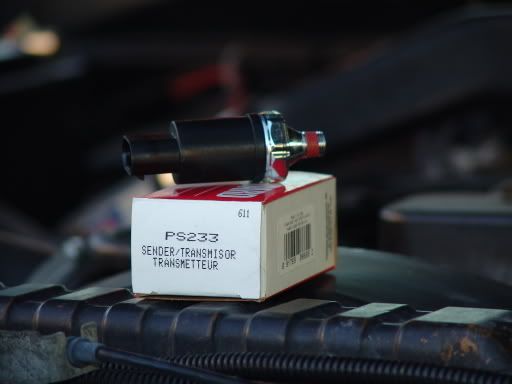
Then I called my mom & pop Ed’s Auto Parts and got “Standard” #PS233 sender for $23.00 so I got the cheaper (I mean) less expensive one.
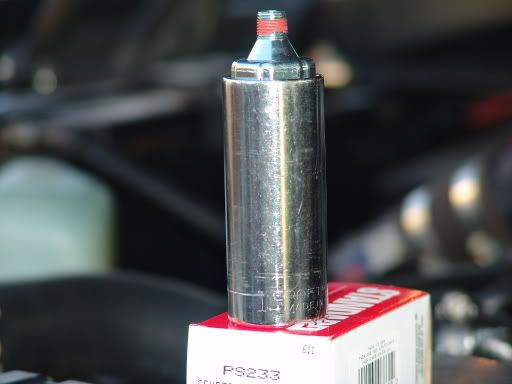
The Standard Motor Products sender uses a 1" deep socket.
The DC #53030493 sender uses 1 1/16" deep socket.
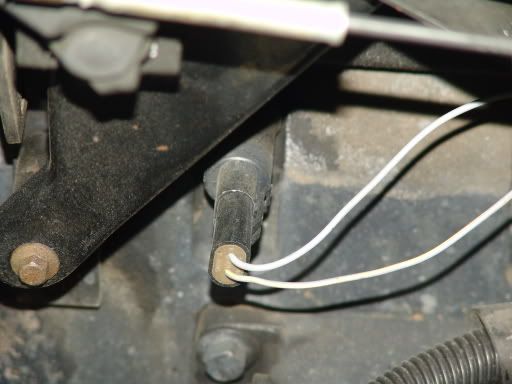
Now disconnect the connector from the sender by releasing the latch and pulling towards the fender.
Next remove the sender using a 1 1/16" {16}-point deep socket being careful not to snap it off in the block.
Then install the new sender into the block this time using a 1" {16}-point deep socket being very careful to not over tighten it.
Note, there is thread sealant already applied the threads so you don't need to apply any. And also never use Teflon tape on an electric sender or you will insulate it from the block and it will not work.
If all went well it should look like this.
Now all you need to do is to reconnect the connector onto the sender noting it will only go on 1 way and besides the latch has to line up for it to fit.
Collect up all of your tools and rags then start your engine and check for any leaks.
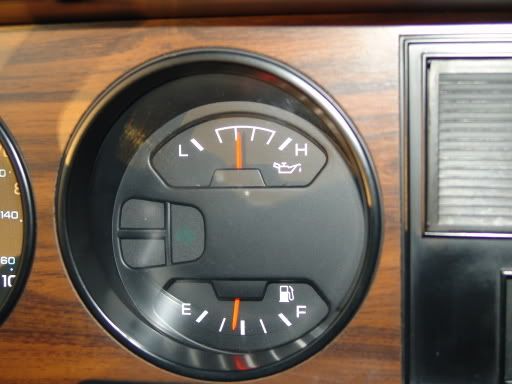
This is a shot of my now functioning oil pressure gauge.
The engine was hot, it as 100* outside and the engine was idling.
Not bad oil pressure if I say so.
I am happy...
Well congratulations, you just saved yourself some more money and replaced it yourself at the same time becoming a little more intiment with the workings of your Cummins engine.
If this is your first time then this should not take more than 20 minuets to complete the job and the difficulty rating it is easy.
The job took me less than 10 minuets including changing my latex gloves several times so I could take the pictures.
So here are the part numbers again;
Dodge dealer #53030493 $38.20 takes 1 1/16 " deep socket.
Standard MP #PS233 $23.00 takes 1" deep socket.
Tidbit: This switch actually has 2 units inside. One terminal is a switch and 1 terminal is the resistance unit for the gauge all common to ground.
Also here are some links that may be helpful:
This one is to Standard Motor Products and has access to all of their products by application and ect.
http://www.smpcorp.com/home.asp
And this one is a link to a Dodge/ Chrysler Parts Department with parts inventory and $$ List prices. Wow, kinda neat..
http://www.atascosa.com/show.cfm?inventory&st=4501
Well I want to thank you all again for letting me share a bit of my knowledge and digital expertise with you and help you save a few dollars along the way for something more important than a high priced mechanic.
I really do photograph almost everything I do.
Thanks Jim
This is for a 1st. Gen. 12V but they are all basicly the same.
The other day I was cruising down the freeway about 70 MPH coming home after a long day when for some reason I glanced down at my gauges just to catch the needle of my oil pressure gauge slowly drifting down past the “L” and wondering what the heck is going on.
I was in fast moving traffic so pulling over as out of the question so I bump it up into neutral and idle it down and think what am I going to do.
Now I thought by now I should be hearing the sickening knock of spun bearings, but the truck was still running fine So it must be that darn oil pressure sender.
Here is a simple step by step on how to replace the sender.
For those of you who do not know where it is, It is right in the center of the picture the one with the 2 wires coming out of it.
Right here under the back of the injection pump on the side of the block.
I got on the phone with my local Dodge dealer and came up with the part number #53030493 for $38.20
Then I called my mom & pop Ed’s Auto Parts and got “Standard” #PS233 sender for $23.00 so I got the cheaper (I mean) less expensive one.
The Standard Motor Products sender uses a 1" deep socket.
The DC #53030493 sender uses 1 1/16" deep socket.
Now disconnect the connector from the sender by releasing the latch and pulling towards the fender.
Next remove the sender using a 1 1/16" {16}-point deep socket being careful not to snap it off in the block.
Then install the new sender into the block this time using a 1" {16}-point deep socket being very careful to not over tighten it.
Note, there is thread sealant already applied the threads so you don't need to apply any. And also never use Teflon tape on an electric sender or you will insulate it from the block and it will not work.
If all went well it should look like this.
Now all you need to do is to reconnect the connector onto the sender noting it will only go on 1 way and besides the latch has to line up for it to fit.
Collect up all of your tools and rags then start your engine and check for any leaks.
This is a shot of my now functioning oil pressure gauge.
The engine was hot, it as 100* outside and the engine was idling.
Not bad oil pressure if I say so.
I am happy...
Well congratulations, you just saved yourself some more money and replaced it yourself at the same time becoming a little more intiment with the workings of your Cummins engine.
If this is your first time then this should not take more than 20 minuets to complete the job and the difficulty rating it is easy.
The job took me less than 10 minuets including changing my latex gloves several times so I could take the pictures.
So here are the part numbers again;
Dodge dealer #53030493 $38.20 takes 1 1/16 " deep socket.
Standard MP #PS233 $23.00 takes 1" deep socket.
Tidbit: This switch actually has 2 units inside. One terminal is a switch and 1 terminal is the resistance unit for the gauge all common to ground.
Also here are some links that may be helpful:
This one is to Standard Motor Products and has access to all of their products by application and ect.
http://www.smpcorp.com/home.asp
And this one is a link to a Dodge/ Chrysler Parts Department with parts inventory and $$ List prices. Wow, kinda neat..
http://www.atascosa.com/show.cfm?inventory&st=4501
Well I want to thank you all again for letting me share a bit of my knowledge and digital expertise with you and help you save a few dollars along the way for something more important than a high priced mechanic.
I really do photograph almost everything I do.
Thanks Jim


Thread
Thread Starter
Forum
Replies
Last Post
GlennRMK
HELP!
7
May 24, 2007 10:46 PM
Power Ram 250 C
1st Gen. Ram - All Topics
4
Feb 20, 2007 11:08 AM
streetsmoker
3rd Gen High Performance and Accessories (5.9L Only)
5
Feb 22, 2006 06:47 PM
bigragu
1st Gen. Ram - All Topics
4
Jan 24, 2006 11:16 AM
CIN'S DODGE
24 Valve Engine and Drivetrain
16
Dec 5, 2005 04:14 PM