
Installing Transgo Shift Kit in a 48RE


Registered User
Joined: May 2007
Posts: 100
Likes: 0
From: west linn OR
ya the instructions say 1 hole for firmer shifts and 2 for MUCH firmer shifts. but i think u r saying, i dont need to drill either of these because our cummins has plenty of tq and these holes dont increase pressure anyway. is this the case? srry dude, just tryin to make sure i understand completely. thx

Registered User

Joined: Nov 2013
Posts: 13
Likes: 1
Sorry to dig up a yr old thread, but I haven't seen anything about whether the increased pressures might trip a code in the computer. Was thinking about putting this in when I do yhe borg-warner gov swap this coming weekend.
Everything is stock + juice CTS. About 57k on the drivetrain.
Everything is stock + juice CTS. About 57k on the drivetrain.


Registered User
Joined: Aug 2006
Posts: 13
Likes: 0
From: southaven ms.
Here are some tips that will make this go much easier for you:
The instructions are terrible. Total time it took me: 1.5 hours the first night to drain the pan, prepare the work bench, drop the pan and loosen the VB to drain. The next day it took me from 8am to 2pm, so 6 hours. I am sure I could do one now in under 3 hours. Probably two. There's a lot of head scratching and looking that I wouldn't need to do now. Like figuring the TV motor out, and that darn e-clip on that goofy shaft. Okay, here goes:
First of all you will have to drain the trans and remove the pan. Next pull the two bolts that hold the filter on using a #25 torx head bit. Remove the filter. Remove all the 1/2" cap bolts holding the valve body except for two (to hold the valve body in place) and then loosen those last two and let the valve body drain overnight. This will make the job much less messy! Note that there are three lengths of VB bolts. The short ones go where the VB is thinner, the long ones where it is thicker and the 4 real long ones go around the solenoid housing.
Remove the TV motor: This is on the driver's side above the transmission. It has two 1/2" bolts holding it on. Pull those two bolts and the TV motor will rotate away from the trans, let it come away a bit and then lift it straight up. It has a 'D' shaped shaft it connects to in the trans. I just stuffed it above the trans instead of trying to get the electrical connection off.

Under the TV motor is the shift linkage. This comes off easily, just loosen a 1/2" clamp bolt and wiggle the connection up and off the shaft protruding up through the trans.
Now look just to the rear of the TV motor for a round black electrical plug. This connects to a stub coming up out of the transmission and needs to come off. There are two tabs that need to be pinched to remove this plug. It isn't easy. In this picture you will see the the plug wires on the right side of the picture, just to the left of where the fluid line is connected. Not the one with the red tab on it! The electrical gizmo (please excuse the high-tech terminology ) is on top of the thing with the 5 bolted black plate on the bottom.

Now here I didn't get a picture ahead of time but this will help... put the truck in low gear and look above the VB on the drivers side. You will see a rod that goes to the rear of the truck. This rod connects to something referred to as a 'rooster comb' and will hold your VB in the trans. Now I just removed the e-clip that held it on. You can reach up in there and pop that off pretty easy. In this picture you can also see the round electrical plug quite easily.

At this point you have removed the TV motor, the shift linkage, the round electrical connection and the rod thingy. Now you can drop the VB. Gently rock it back and forth and wiggle it. There are o-rings you are pulling the shift linkage shaft and the electrical plug through the trans so it will resist a bit. Carry the VB to your cleaned and covered-with-a-sheet workbench. The hard part of the whole job is done!!!
Now let's look at the instructions:
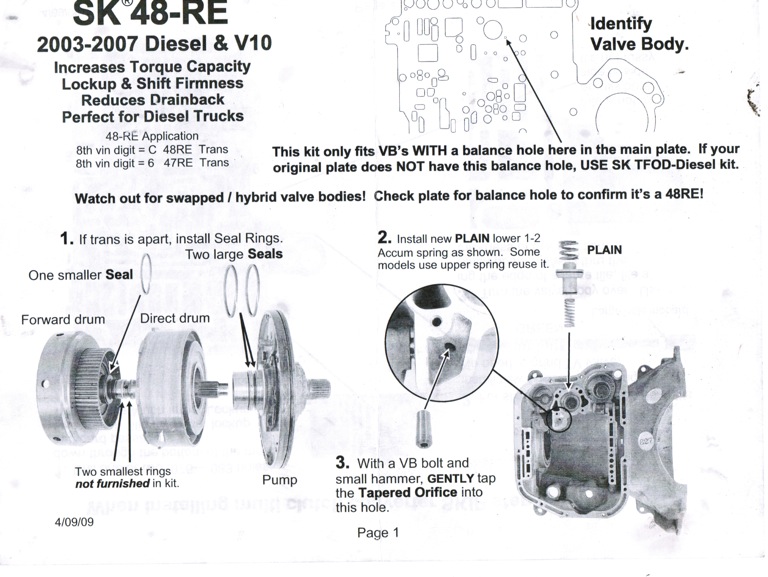
Skip step 1, we don't have the trans out. Step 2 we don't do until we put the VB back in. (again... who wrote these instructions) Step 3 is pretty simple. Gently tap the restrictor plug in the trans, big hole out. This is on the trans housing, not the VB.

Now disassemble the VB by removing all the # 25 torx bit bolts. Watch for stuff falling out. The VB will come apart in three main pieces, hard to mix them up and don't worry about ***** falling out, the instructions do show where all those go. DO watch for valves sliding out!!! I washed over a garbage can with a screen over it, and I would have lost parts if I wasn't watching carefully. There are no springs between the layers of VB.

Page 2.

Drill the hole for firmer lock-up. The instructions call out a .076 - .083 bit. They include two bits, and neither is the right size. I used a 5/64" bit which measures .077 on my micrometer. I drilled one hole and it slaps into fourth pretty firm, not so much when I am on it hard, more when I am easing on the throttle. I'm happy I didn't do two holes, your results may vary, enter at your own risk, etc. I DID NOT do step 2 for later shifts. My shifts are late enough already!
Step three was easier than I thought it would be. This is soft aluminum, just rub a file edge over it then clean all the shavings out with brake cleaner and compressed air.

The instructions are terrible. Total time it took me: 1.5 hours the first night to drain the pan, prepare the work bench, drop the pan and loosen the VB to drain. The next day it took me from 8am to 2pm, so 6 hours. I am sure I could do one now in under 3 hours. Probably two. There's a lot of head scratching and looking that I wouldn't need to do now. Like figuring the TV motor out, and that darn e-clip on that goofy shaft. Okay, here goes:
First of all you will have to drain the trans and remove the pan. Next pull the two bolts that hold the filter on using a #25 torx head bit. Remove the filter. Remove all the 1/2" cap bolts holding the valve body except for two (to hold the valve body in place) and then loosen those last two and let the valve body drain overnight. This will make the job much less messy! Note that there are three lengths of VB bolts. The short ones go where the VB is thinner, the long ones where it is thicker and the 4 real long ones go around the solenoid housing.
Remove the TV motor: This is on the driver's side above the transmission. It has two 1/2" bolts holding it on. Pull those two bolts and the TV motor will rotate away from the trans, let it come away a bit and then lift it straight up. It has a 'D' shaped shaft it connects to in the trans. I just stuffed it above the trans instead of trying to get the electrical connection off.
Under the TV motor is the shift linkage. This comes off easily, just loosen a 1/2" clamp bolt and wiggle the connection up and off the shaft protruding up through the trans.
Now look just to the rear of the TV motor for a round black electrical plug. This connects to a stub coming up out of the transmission and needs to come off. There are two tabs that need to be pinched to remove this plug. It isn't easy. In this picture you will see the the plug wires on the right side of the picture, just to the left of where the fluid line is connected. Not the one with the red tab on it! The electrical gizmo (please excuse the high-tech terminology
) is on top of the thing with the 5 bolted black plate on the bottom.Now here I didn't get a picture ahead of time but this will help... put the truck in low gear and look above the VB on the drivers side. You will see a rod that goes to the rear of the truck. This rod connects to something referred to as a 'rooster comb' and will hold your VB in the trans. Now I just removed the e-clip that held it on. You can reach up in there and pop that off pretty easy. In this picture you can also see the round electrical plug quite easily.
At this point you have removed the TV motor, the shift linkage, the round electrical connection and the rod thingy. Now you can drop the VB. Gently rock it back and forth and wiggle it. There are o-rings you are pulling the shift linkage shaft and the electrical plug through the trans so it will resist a bit. Carry the VB to your cleaned and covered-with-a-sheet workbench. The hard part of the whole job is done!!!
Now let's look at the instructions:
Skip step 1, we don't have the trans out. Step 2 we don't do until we put the VB back in. (again... who wrote these instructions) Step 3 is pretty simple. Gently tap the restrictor plug in the trans, big hole out. This is on the trans housing, not the VB.
Now disassemble the VB by removing all the # 25 torx bit bolts. Watch for stuff falling out. The VB will come apart in three main pieces, hard to mix them up and don't worry about ***** falling out, the instructions do show where all those go. DO watch for valves sliding out!!! I washed over a garbage can with a screen over it, and I would have lost parts if I wasn't watching carefully. There are no springs between the layers of VB.
Page 2.
Drill the hole for firmer lock-up. The instructions call out a .076 - .083 bit. They include two bits, and neither is the right size. I used a 5/64" bit which measures .077 on my micrometer. I drilled one hole and it slaps into fourth pretty firm, not so much when I am on it hard, more when I am easing on the throttle. I'm happy I didn't do two holes, your results may vary, enter at your own risk, etc. I DID NOT do step 2 for later shifts. My shifts are late enough already!
Step three was easier than I thought it would be. This is soft aluminum, just rub a file edge over it then clean all the shavings out with brake cleaner and compressed air.

Registered User
Joined: Jan 2010
Posts: 5
Likes: 0
From: Houston, TX
FYI, Transgo does not use this orifice plug anymore. The kit still shows it on the box but the directions have been changed (still suck) and they do NOT include this part in the kit.

Thread
Thread Starter
Forum
Replies
Last Post
shrmpboatcptn
Performance and Accessories 2nd gen only
12
Nov 16, 2010 06:46 AM
shambo
3rd Gen High Performance and Accessories (5.9L Only)
25
Jul 28, 2010 12:30 PM
dionisios
3rd Gen Engine and Drivetrain -> 2003-2007
10
Mar 11, 2010 04:20 PM
tacook
3rd Gen Engine and Drivetrain -> 2003-2007
10
Aug 14, 2007 01:48 PM