2003 cranks over but will not start


Registered User
Joined: Aug 2007
Posts: 5
Likes: 0
Do you think rasing the Lift Pump pressure to 25psi would increase the capacity of the CP3 to make it for the overflowing injectors?
or
Could you restrict the CR pressure relief valve to quickly get the rail up to pressure?
or
Could we get the injectors / ECM to fire at a lower psi (say 800 psi)?
or
Could you restrict the CR pressure relief valve to quickly get the rail up to pressure?
or
Could we get the injectors / ECM to fire at a lower psi (say 800 psi)?

Registered User
Joined: Nov 2002
Posts: 166
Likes: 0
From: Houston, Texas (Willowbrook area)
The CR Pressure Relief Valve , if operating properly, should not be passing any fuel. The CP3 has a built-in gear pump that sends fuel to the Cascading Overflow Valve and the Fuel Control Actuator (FCA). In theory, that gear pump is capable of supplying the CP3 even with a weak or failing lift pump. I think the only way to actually increase the flow/pressure output of the CP3 during cranking is to spin it faster. Now if there were a way to reprogram the ECM logic and lower the "injector firing" pressure setpoint on the CR, that might do something, but I haven't a clue if that is possible, or desireable. I mean heck, I don't mind giving a shot of ether if I get stranded, but I think it's just a matter of getting the voodoo injector out of there and getting a good one in.

DTR's 'Go to Guy'
Joined: Jan 2007
Posts: 3,811
Likes: 4
From: Indiana
You'll have a lot less headache and heartache if you do!( and a thicker wallet too! ) LOL Look for the posts where guys had bad injectors and lost then engine due to it.
Registered User
Joined: Aug 2007
Posts: 5
Likes: 0
I just don't like the idea or the cost of replacing injectors when the truck runs SOOOO good once it fires up. I placed a valve in the line coming from the pressure relief valve back to the CP3. When I close this valve I get a CR spike (Commonder reader comfirms) that will fire the engine. When it fires I must quickly but carfully reopen the valve. Open it too fast and the motor will die. Open it slowly and the FCA adjusts to the back pressure change.
This spike can also be creatated by allowing air in the lines (by taking the fuel filter out, draining fuel with the water drain or by opening and closing one of the fuel lines. I comfirmed this with the Commander too. When I'm in a No Start condition, my CR pressure peaks between 1,200 and 900 psi. Lift the fuel filter out and place it right back in and crank. At first the numbers are worse (200 to 300 psi), but after 30 sec of cranking WHAM the fuel hits and pressure reaches 1,800 to 2,200 psi and she fires right up!
I know the CP3 supplies plenty of fuel at 850rpm, but cranking at 150 rpm... dam it the Engineers cut the specifcations for operations TOO CLOSE on this 3rd Generation motor!
If the CP3 is designed to work with 3-7psi, would it be more efficient with a 25psi feed? Heck, I wish I could rasie the LP pressure to 40 psi just for start ups.
This spike can also be creatated by allowing air in the lines (by taking the fuel filter out, draining fuel with the water drain or by opening and closing one of the fuel lines. I comfirmed this with the Commander too. When I'm in a No Start condition, my CR pressure peaks between 1,200 and 900 psi. Lift the fuel filter out and place it right back in and crank. At first the numbers are worse (200 to 300 psi), but after 30 sec of cranking WHAM the fuel hits and pressure reaches 1,800 to 2,200 psi and she fires right up!
I know the CP3 supplies plenty of fuel at 850rpm, but cranking at 150 rpm... dam it the Engineers cut the specifcations for operations TOO CLOSE on this 3rd Generation motor!
If the CP3 is designed to work with 3-7psi, would it be more efficient with a 25psi feed? Heck, I wish I could rasie the LP pressure to 40 psi just for start ups.
Registered User
Joined: Nov 2002
Posts: 166
Likes: 0
From: Houston, Texas (Willowbrook area)
If I follow what you are saying, I'd venture to say that your CR Pressure Relief Valve is faulty. Starts when you block it in. It shouldn't be passing any fluid to begin with.


Registered User
Joined: Nov 2002
Posts: 166
Likes: 0
From: Houston, Texas (Willowbrook area)
The dang company I bought the injectrs from haven't delivered yet..........
I told them to have it to me by Friday regardless of the shipping method/cost........people that don't follow through make my butt bleed. Now I have to sit around and drink beer all weekend.....boo hoo
I'll keep ya posted though
I told them to have it to me by Friday regardless of the shipping method/cost........people that don't follow through make my butt bleed. Now I have to sit around and drink beer all weekend.....boo hoo
I'll keep ya posted though
Registered User
Joined: Aug 2007
Posts: 5
Likes: 0
Where can I find instructions needed for replacing an injector myself? The shop manuals at the local parts house do not cover injector replacement on the CR motors. I checked with a Dodge parts department and they said they don't sell them (???). Would anyone know where I would get a complete shop manual for my 03? I have all the tools and time that I could possibly need  and I am quit comfortable with the high pressure environment of CR. I expect this manual to be over $100.
cwoodall - Did you buy all 6 injectors? from where and how much? If you don't mind me asking. The best price I've found is $425.00. They are brand new Bosch injectors, which is the only way to go. That's what I've been told.
and I am quit comfortable with the high pressure environment of CR. I expect this manual to be over $100. cwoodall - Did you buy all 6 injectors? from where and how much? If you don't mind me asking. The best price I've found is $425.00. They are brand new Bosch injectors, which is the only way to go. That's what I've been told.
DTR's 'Go to Guy'
Joined: Jan 2007
Posts: 3,811
Likes: 4
From: Indiana
There is a special tool to pull the injectors , but with some patience and time thety can be pryed out with a couple of screwdrivers. Other than that....here is the directions. Also *** replace the connector tubes as well. They have been known to leak as well and cause leaking as well. They aren't that expensive.
REMOVAL
CAUTION: Refer to Cleaning Fuel System Parts.
Six individual, solenoid actuated high-pressure fuel injectors are used (FUEL INJECTOR - DIESEL). The injectors are vertically mounted into a bored hole in the top of the cylinder head. This bored hole is located between the intake/exhaust valves. High-pressure connectors (HIGH-PRESSURE CONNECTOR), mounted into the side of the cylinder head, connect each fuel injector to each high-pressure fuel line.
Disconnect both negative battery cables from both batteries. Cover and isolate ends of cables.
Remove breather assembly.
Remove valve cover. Refer to Engines for procedures.
Remove necessary high pressure fuel line connecting necessary fuel injector rail to high pressure connector. Refer to Fuel Line Removal for procedures.
A connector retainer (nut) (HIGH-PRESSURE CONNECTOR) is used on each connector tube. Remove this nut(s) by unthreading from cylinder head.
Using special high-pressure connector removal tool #9015 (CONNECTOR TUBE REMOVAL), or (TOOL #9015 AND CONNECTOR TUBE) remove necessary high-pressure connector(s) from cylinder head. Tool #9015 threads onto connector tube. Use tool to pry connector tube(s) from cylinder head.
Remove necessary exhaust rocker arm assembly(s).
Disconnect injector solenoid wire nuts at top of injectors (FUEL INJECTORS).
Remove 2 fuel injector hold-down clamp bolts at each injector being removed.
USING TOOL #9010:
Special Tool #9010 (FUEL INJECTOR REMOVER - #9010) is equipped with 2 clamshell clamps, a sliding retainer sleeve to retain the clamshell clamps, a 2–piece mounting stud, and a pivoting handle. Do not attempt to remove the fuel injector with any other device. Damage to injector will occur.
The rocker housing (FUEL INJECTORS) is bolted to the top of cylinder head. The mounting stud from tool #9010 was meant to temporarily replace a rocker housing mounting bolt. Remove the necessary rocker housing mounting bolt. These mounting bolts are located at the center of each of the 3 rocker housing support bridges.
Install and tighten 2–piece mounting stud to rocker housing. If removing the #6 fuel injector, separate the 2–piece mounting stud. Install lower half of mounting stud to center of rocker housing bridge. Install upper half of mounting stud to lower half.
Position tool handle to mounting stud and install handle nut. Leave handle nut loose to allow a pivoting action.
Position lower part of clamshell halves to sides of fuel injector (wider shoulder to bottom). The upper part of clamshell halves should also be positioned into machined shoulder on the handles pivoting head.
Slide the retainer sleeve over pivoting handle head to lock clamshell halves together.
Be sure handle pivot nut is loose.
Depress handle downward to remove fuel injector straight up from cylinder head bore.
Remove and discard injector sealing washer. This should be located on tip of injector (FUEL INJECTOR SEALING WASHER (SHIM) LOCATION) or (MEASURING INJECTOR SEALING WASHER (SHIM)).
INSTALLATION
Inspect fuel injector:
Look for burrs on injector inlet.
Check nozzle holes for hole erosion or plugging.
Inspect end of nozzle for burrs or rough machine marks.
Look for cracks at nozzle end.
Check nozzle color for signs of overheating. Overheating will cause nozzle to turn a dark yellow/tan or blue (depending on overheating temperature).
If any of these conditions occur, replace injector.
Thoroughly clean fuel injector cylinder head bore with special Cummins wire brush tool or equivalent (CLEANING CYLINDER HEAD INJECTOR BORE - TYPICAL BORE). Blow out bore hole with compressed air.
The bottom of fuel injector is sealed to cylinder head bore with a copper sealing washer (shim) of a certain thickness (FUEL INJECTOR SEALING WASHER (SHIM) LOCATION). A new shim with correct thickness must always be re-installed after removing injector. Measure thickness of injector shim (MEASURING INJECTOR SEALING WASHER (SHIM)). Shim Thickness: 1.5 mm (.060”)
Install new shim (washer) to bottom of injector. Apply light coating of clean engine oil to washer. This will keep washer in place during installation.
Install new o-ring to fuel injector. Apply small amount of clean engine oil to o-ring.
Install injector into cylinder head with male connector port facing the intake manifold. Push down on fuel injector mounting flange to engage o-ring and seat injector.
Install fuel injector holdown clamp (mounting flange) bolts. Do a preliminary tightening of these bolts to 5 N·m (44 in. lbs.) torque. This preliminary tightening insures the fuel injector is seated and centered. After tightening, relieve bolt torque, but leave both bolts threaded in place.
If required, assemble o-ring to injector fuel supply connector. Lubricate connector bore and threads. Install fuel supply connector into cylinder head by engaging locator into groove and push to engage o-ring. Install fuel supply connector nut (fitting) into cylinder head. Do a preliminary tightening of this nut to 15 N·m (11 ft. lbs.) torque.
Perform final tightening of fuel injector mounting clamp bolts to 10 N·m (89 in. lbs.) torque.
Perform final tightening of fuel connector nut to 50 N·m (37 ft. lbs.) torque.
Connect injector solenoid wires and nuts to top of injectors (FUEL INJECTORS). Tighten connector nuts to 1.25 N·m (11 in. lbs.). Be very careful not to overtighten these nuts as damage to fuel injector will occur.
Install exhaust rocker arm assembly.
Set exhaust valve lash. Refer to Engine.
Install high pressure fuel line. Tighten to 30 N·m (22 ft. lbs.) torque. Be sure to use a secondary back-up wrench on the connector nut (fitting) while torquing fuel line fitting. Refer to Fuel Line Installation for additional information.
Install valve cover. Refer to Engine.
Install breather assembly.
Connect negative battery cables to both batteries.
REMOVAL
CAUTION: Refer to Cleaning Fuel System Parts.
Six individual, solenoid actuated high-pressure fuel injectors are used (FUEL INJECTOR - DIESEL). The injectors are vertically mounted into a bored hole in the top of the cylinder head. This bored hole is located between the intake/exhaust valves. High-pressure connectors (HIGH-PRESSURE CONNECTOR), mounted into the side of the cylinder head, connect each fuel injector to each high-pressure fuel line.
Disconnect both negative battery cables from both batteries. Cover and isolate ends of cables.
Remove breather assembly.
Remove valve cover. Refer to Engines for procedures.
Remove necessary high pressure fuel line connecting necessary fuel injector rail to high pressure connector. Refer to Fuel Line Removal for procedures.
A connector retainer (nut) (HIGH-PRESSURE CONNECTOR) is used on each connector tube. Remove this nut(s) by unthreading from cylinder head.
Using special high-pressure connector removal tool #9015 (CONNECTOR TUBE REMOVAL), or (TOOL #9015 AND CONNECTOR TUBE) remove necessary high-pressure connector(s) from cylinder head. Tool #9015 threads onto connector tube. Use tool to pry connector tube(s) from cylinder head.
Remove necessary exhaust rocker arm assembly(s).
Disconnect injector solenoid wire nuts at top of injectors (FUEL INJECTORS).
Remove 2 fuel injector hold-down clamp bolts at each injector being removed.
USING TOOL #9010:
Special Tool #9010 (FUEL INJECTOR REMOVER - #9010) is equipped with 2 clamshell clamps, a sliding retainer sleeve to retain the clamshell clamps, a 2–piece mounting stud, and a pivoting handle. Do not attempt to remove the fuel injector with any other device. Damage to injector will occur.
The rocker housing (FUEL INJECTORS) is bolted to the top of cylinder head. The mounting stud from tool #9010 was meant to temporarily replace a rocker housing mounting bolt. Remove the necessary rocker housing mounting bolt. These mounting bolts are located at the center of each of the 3 rocker housing support bridges.
Install and tighten 2–piece mounting stud to rocker housing. If removing the #6 fuel injector, separate the 2–piece mounting stud. Install lower half of mounting stud to center of rocker housing bridge. Install upper half of mounting stud to lower half.
Position tool handle to mounting stud and install handle nut. Leave handle nut loose to allow a pivoting action.
Position lower part of clamshell halves to sides of fuel injector (wider shoulder to bottom). The upper part of clamshell halves should also be positioned into machined shoulder on the handles pivoting head.
Slide the retainer sleeve over pivoting handle head to lock clamshell halves together.
Be sure handle pivot nut is loose.
Depress handle downward to remove fuel injector straight up from cylinder head bore.
Remove and discard injector sealing washer. This should be located on tip of injector (FUEL INJECTOR SEALING WASHER (SHIM) LOCATION) or (MEASURING INJECTOR SEALING WASHER (SHIM)).
INSTALLATION
Inspect fuel injector:
Look for burrs on injector inlet.
Check nozzle holes for hole erosion or plugging.
Inspect end of nozzle for burrs or rough machine marks.
Look for cracks at nozzle end.
Check nozzle color for signs of overheating. Overheating will cause nozzle to turn a dark yellow/tan or blue (depending on overheating temperature).
If any of these conditions occur, replace injector.
Thoroughly clean fuel injector cylinder head bore with special Cummins wire brush tool or equivalent (CLEANING CYLINDER HEAD INJECTOR BORE - TYPICAL BORE). Blow out bore hole with compressed air.
The bottom of fuel injector is sealed to cylinder head bore with a copper sealing washer (shim) of a certain thickness (FUEL INJECTOR SEALING WASHER (SHIM) LOCATION). A new shim with correct thickness must always be re-installed after removing injector. Measure thickness of injector shim (MEASURING INJECTOR SEALING WASHER (SHIM)). Shim Thickness: 1.5 mm (.060”)
Install new shim (washer) to bottom of injector. Apply light coating of clean engine oil to washer. This will keep washer in place during installation.
Install new o-ring to fuel injector. Apply small amount of clean engine oil to o-ring.
Install injector into cylinder head with male connector port facing the intake manifold. Push down on fuel injector mounting flange to engage o-ring and seat injector.
Install fuel injector holdown clamp (mounting flange) bolts. Do a preliminary tightening of these bolts to 5 N·m (44 in. lbs.) torque. This preliminary tightening insures the fuel injector is seated and centered. After tightening, relieve bolt torque, but leave both bolts threaded in place.
If required, assemble o-ring to injector fuel supply connector. Lubricate connector bore and threads. Install fuel supply connector into cylinder head by engaging locator into groove and push to engage o-ring. Install fuel supply connector nut (fitting) into cylinder head. Do a preliminary tightening of this nut to 15 N·m (11 ft. lbs.) torque.
Perform final tightening of fuel injector mounting clamp bolts to 10 N·m (89 in. lbs.) torque.
Perform final tightening of fuel connector nut to 50 N·m (37 ft. lbs.) torque.
Connect injector solenoid wires and nuts to top of injectors (FUEL INJECTORS). Tighten connector nuts to 1.25 N·m (11 in. lbs.). Be very careful not to overtighten these nuts as damage to fuel injector will occur.
Install exhaust rocker arm assembly.
Set exhaust valve lash. Refer to Engine.
Install high pressure fuel line. Tighten to 30 N·m (22 ft. lbs.) torque. Be sure to use a secondary back-up wrench on the connector nut (fitting) while torquing fuel line fitting. Refer to Fuel Line Installation for additional information.
Install valve cover. Refer to Engine.
Install breather assembly.
Connect negative battery cables to both batteries.

Registered User
Joined: Aug 2007
Posts: 5
Likes: 0
vzdude - thank you for the detailed instructions and the insight on special tools and connector tubes.
I plan on doing this next week after have the opportunity to block off the injectors one at a time to identify the out of spec injector. I hope its just one.
I plan on doing this next week after have the opportunity to block off the injectors one at a time to identify the out of spec injector. I hope its just one.

Thread Starter
Registered User
Joined: Aug 2007
Posts: 38
Likes: 0
From: NH
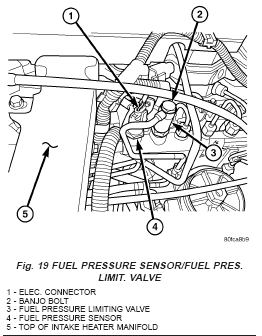
Can someone describe to me where the Fuel Pressure Relief Valve is? Or better yet take a picture, put an arrow to the valve and post it? I know it is there, but I guess I am blind because I can't find it, and I can't find any websites with diagrams that show it...

 If you PM me, I will tell you how