
2wd front brake basics - and a tip on preventing brake noise.

Thread Starter
Adminstrator-ess

Joined: Mar 2003
Posts: 22,594
Likes: 19
From: New Holland, PA
Since I had to do front brakes yesterday I thought I'd take a few pics and explain how the job is done on a 2wd. 4x4's are similar but use a different caliper retaining system. There's also a tip on brake noise that applies to all our trucks.
Gather your tools. In addition to whatever you need to get the wheels off, you will need a 1/2" wrench, a wire brush, a large "C" clamp, channellock pliers, and a big hammer. For supplies you will need brake pads (duh), brake kleen spray, and anti-seize compound.
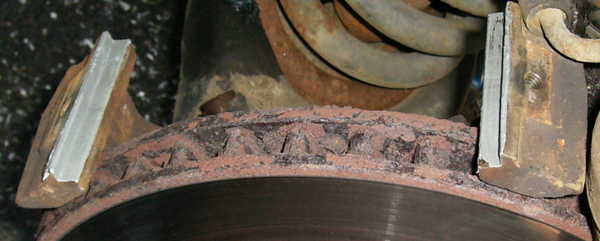
After raising and supporting the vehicle safely (I use 10 ton jack stands under the frame), remove the front wheels. You'll now be looking at something like this:
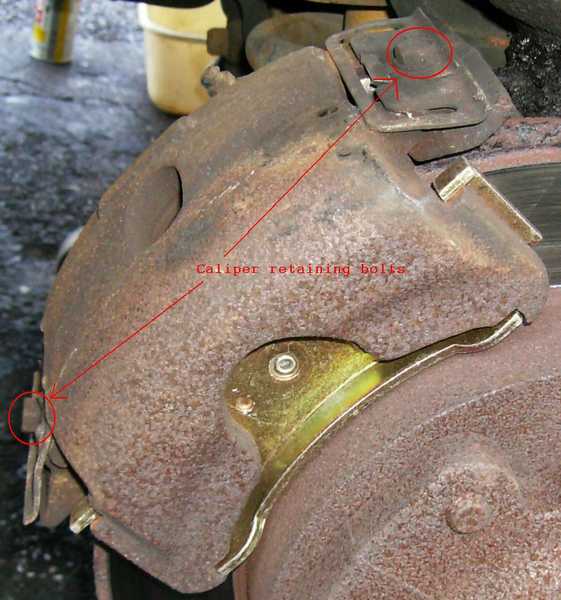
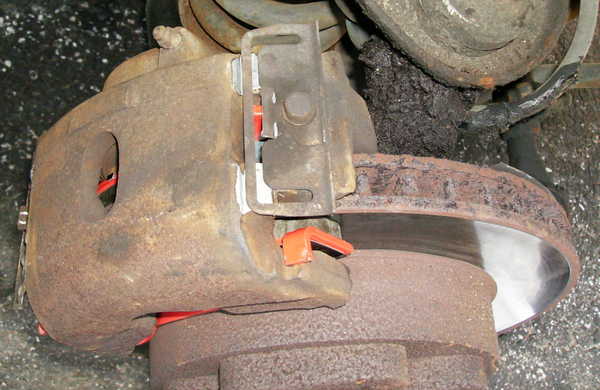
Don't take those bolts out yet! First grab your big "C" clamp and compress the caliper.
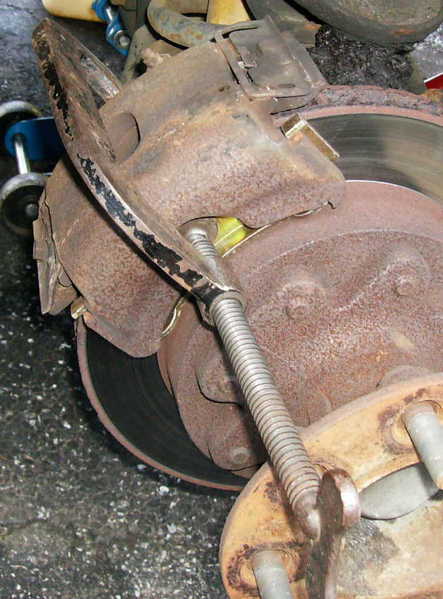
This step makes it easier to put the caliper back on with the new pads. If you don't have a "C" clamp that's big enough, you can use a smaller clamp and one of the old brake pads to push the piston in once the caliper is removed.
OK, now that the caliper is compressed, remove the two retaining bolts and the hold-down clips and set them aside. Now you can lift the caliper out and hang it up or if you are lazy like me set it on the upper ball joint (being careful not to knock it off). Get the old pads out of the way. Now pick up that wire brush and go after all the sliding surfaces, both on the caliper mount and the caliper itself.
I want them shiny! OK, smooth and free of loose rust and crud is acceptable.
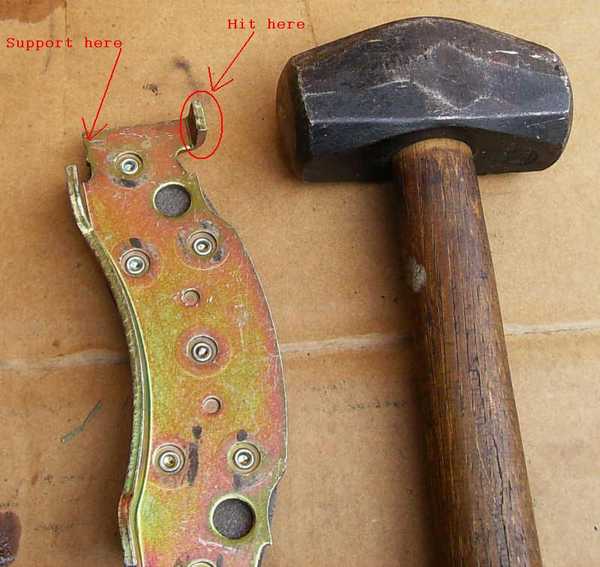
Here's the brake noise tip I mentioned. The outer pad has "ears" at each end and a flange in the middle. When you pull them out of the box, they are a very loose fit on the caliper. This can cause rattles while rolling down the road, as well a squeaks and squeals when stopping. So we need to fit them to the caliper. It's hammer time!
Support the pad on edge using a solid surface and hammer each "ear" down. Give it a whack and try it on the caliper. When it just barely DOESN'T fit anymore, it's right. We want an interference fit here.
Using your channellocks and an old brake pad, press the new pad onto the caliper. Sorry for no pic of this, but I only have two hands and was working alone.
Hose the rotor down with brake kleen and don't get it messy again.
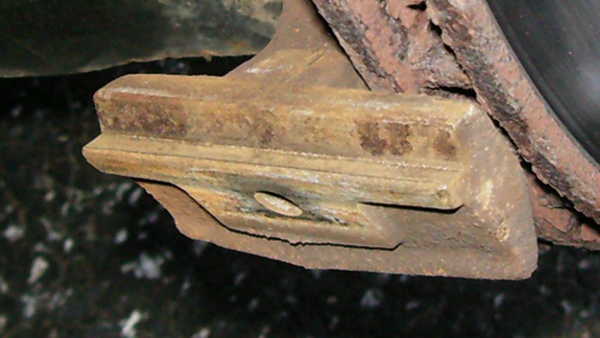
Now take your anti-seize and butter up the caliper mount as shown:
Drop the inner pad into place, then set the caliper on the mount and slide it back and forth to distribute the anti-seize compound. Daub a little anti-seize where the retainer clips rub on the caliper, then install the retainers and bolts. Pump the pedal a few times to push the pads against the rotor and you are done.
Gather your tools. In addition to whatever you need to get the wheels off, you will need a 1/2" wrench, a wire brush, a large "C" clamp, channellock pliers, and a big hammer. For supplies you will need brake pads (duh), brake kleen spray, and anti-seize compound.
After raising and supporting the vehicle safely (I use 10 ton jack stands under the frame), remove the front wheels. You'll now be looking at something like this:
Don't take those bolts out yet! First grab your big "C" clamp and compress the caliper.
This step makes it easier to put the caliper back on with the new pads. If you don't have a "C" clamp that's big enough, you can use a smaller clamp and one of the old brake pads to push the piston in once the caliper is removed.
OK, now that the caliper is compressed, remove the two retaining bolts and the hold-down clips and set them aside. Now you can lift the caliper out and hang it up or if you are lazy like me set it on the upper ball joint (being careful not to knock it off). Get the old pads out of the way. Now pick up that wire brush and go after all the sliding surfaces, both on the caliper mount and the caliper itself.
I want them shiny! OK, smooth and free of loose rust and crud is acceptable.
Here's the brake noise tip I mentioned. The outer pad has "ears" at each end and a flange in the middle. When you pull them out of the box, they are a very loose fit on the caliper. This can cause rattles while rolling down the road, as well a squeaks and squeals when stopping. So we need to fit them to the caliper. It's hammer time!
Support the pad on edge using a solid surface and hammer each "ear" down. Give it a whack and try it on the caliper. When it just barely DOESN'T fit anymore, it's right. We want an interference fit here.
Using your channellocks and an old brake pad, press the new pad onto the caliper. Sorry for no pic of this, but I only have two hands and was working alone.
Hose the rotor down with brake kleen and don't get it messy again.
Now take your anti-seize and butter up the caliper mount as shown:
Drop the inner pad into place, then set the caliper on the mount and slide it back and forth to distribute the anti-seize compound. Daub a little anti-seize where the retainer clips rub on the caliper, then install the retainers and bolts. Pump the pedal a few times to push the pads against the rotor and you are done.


Thread Starter
Adminstrator-ess
Joined: Mar 2003
Posts: 22,594
Likes: 19
From: New Holland, PA
Trending Topics
Thread Starter
Adminstrator-ess
Joined: Mar 2003
Posts: 22,594
Likes: 19
From: New Holland, PA
They wrap around the caliper and caliper mount where the two come together and are supposed to protect the surfaces from contamination. As you can imagine, they do not last long due to the heat in that area. Use 'em if you got 'em, but don't expect them to be there when you take it apart next time.
Registered User
Joined: Nov 2006
Posts: 807
Likes: 41
From: Englewood, TN
Thread Starter
Adminstrator-ess
Joined: Mar 2003
Posts: 22,594
Likes: 19
From: New Holland, PA
BC847 did an awesome writeup that covers 4X4 front brakes.
https://www.dieseltruckresource.com/....html?t=143024
You don't need to remove the rotor to maintain the caliper slides.
It's in the sticky.
https://www.dieseltruckresource.com/....html?t=143024
You don't need to remove the rotor to maintain the caliper slides.
It's in the sticky.
Registered User
Joined: May 2004
Posts: 2,867
Likes: 0
From: Golden, Colorado
Another thing I would do in addition is when compressing the caliper, I would put a hose on the bleeder to a bottle, and crack the bleeder while compressing. This way you don't shove the old cruddy fluid back into the system and possibly overflow the reservoir. Then when finished fill reservoir back up with new fluid.
Aaron
Aaron

Registered User


Joined: Oct 2005
Posts: 6,457
Likes: 95
From: KENTUCKY
Many different vehicles have those "tabs" on the brake-pads, the ones Faith shows being re-shaped with a hammer.
What I have always done is to put the pad onto the caliper where it goes, then CLINCH the tabs tightly onto the caliper with a large pair of Channel-Locks, just like clinching horse-shoe nails.
Nobody ever told me to do this, it just sort of looked like that might be what was meant.
What I have always done is to put the pad onto the caliper where it goes, then CLINCH the tabs tightly onto the caliper with a large pair of Channel-Locks, just like clinching horse-shoe nails.
Nobody ever told me to do this, it just sort of looked like that might be what was meant.
Registered User
Joined: Sep 2009
Posts: 109
Likes: 0
From: North Zulch, TX
Every thread needs at least one 'dumb' question, so I'll step up to the plate and ask one...
Is there a spring or something that pushes the brake pads away from the rotor when you take your foot off the brake pedal? It seems there should be, but I don't see anything like that.
Is there a spring or something that pushes the brake pads away from the rotor when you take your foot off the brake pedal? It seems there should be, but I don't see anything like that.
Registered User
Joined: Nov 2007
Posts: 1,816
Likes: 0
From: Maine
Nope, they just ride lightly on the rotor it seems instead of pinching them like when the brake is applied. Fluid pressure goes away when you release the pedal and they no longer push on the rotor, they sort of just ride there.
Registered User
Joined: Feb 2007
Posts: 1,958
Likes: 1
From: Dixon, IL
Dave, another thing I would caution people to do, for cheap insurance ($7-$10), is replace the retainer clips. Mine had broken, giving me a thump while applying brakes in reverse and a loud clunking noise when hitting ANY imperfection on the road. Drove me NUTS! I thought it was the bad shocks. Turned out the part of the clip that is thin and goes over the caliper should be ON IT! Both side they were broken right where it met with the bigger part on the clip. The tops of the calipers and the inside of the wheels now have about 1/16" less material...
Just my $.02...
Just my $.02...