What did you do to your Gen 1 today?
 09-29-2015, 07:37 PM
#1381
Registered User
Today, I did what I've done for the last 6 years... every two years.
Replaced Crappy chinese parts on my truck. This time, I got smart (or so I hope).
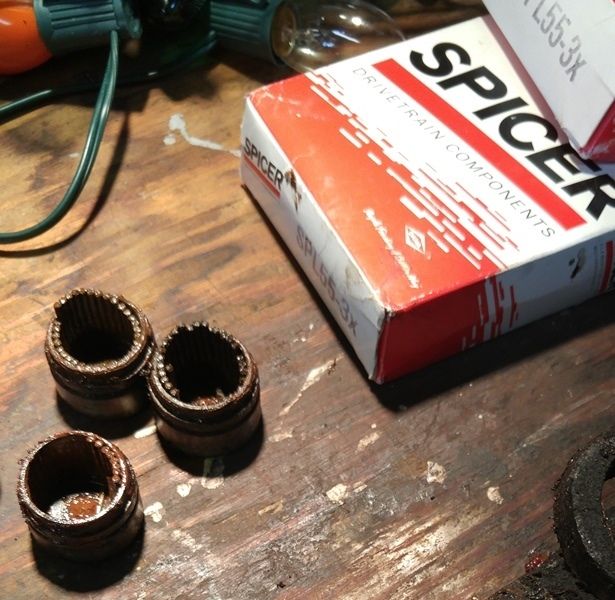
Replacing it with spicer parts. We'll see.
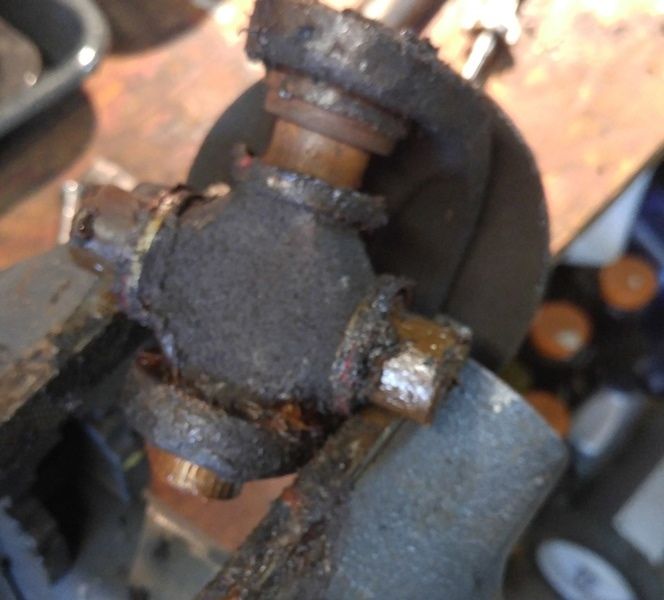
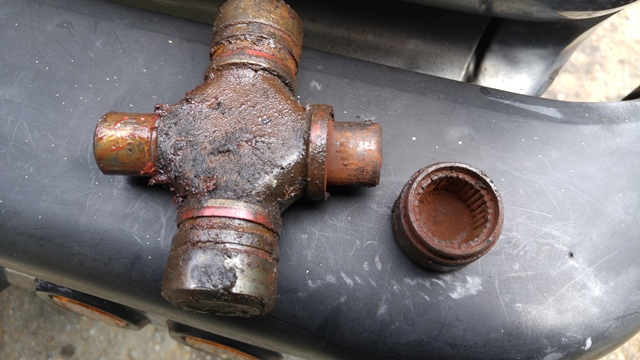
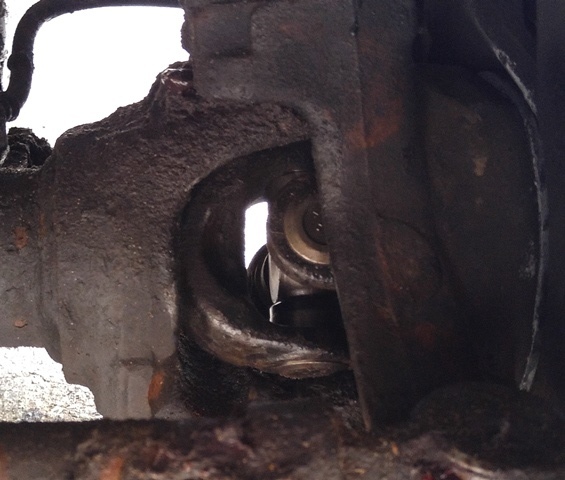
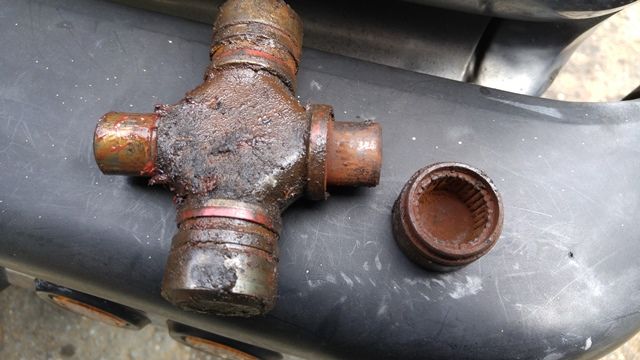
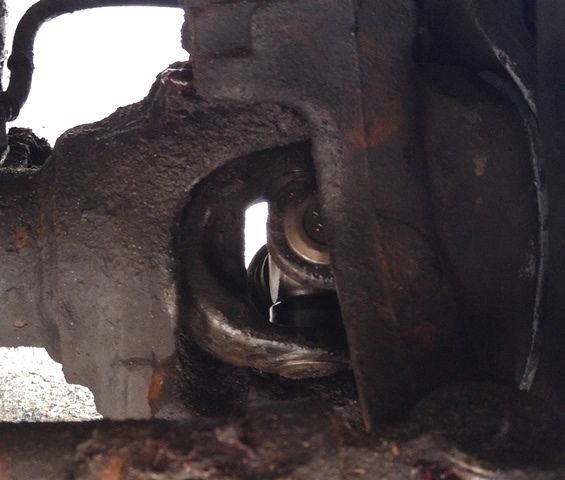
Funny thing... I greased the daylights out of those joints, and each time, it always failed on two opposing caps, usually one with zero grease in it. Leads me to believe that there is no passageway through the center of the cross to the one cap, inevitably causing it to fail. I didn't pay for them the last time, as Autozone warranteed it (2 year warranty on U joints), and gave me new ones for free. Still a huge waste of time, IMO.
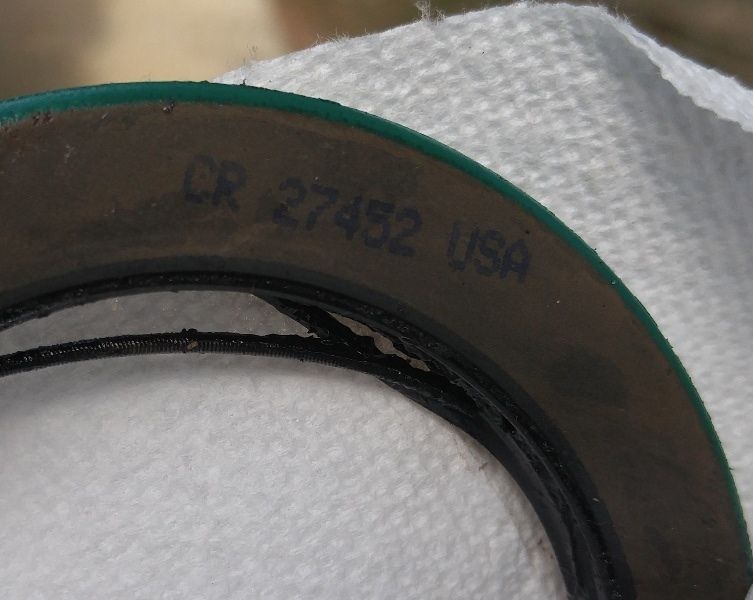
Non greaseable. The seals are really stout though, and everthing feels extremely precise. Time will tell, eh ? Either way, never again will I buy autozone U joints. They're simply Crap.
Replaced Crappy chinese parts on my truck. This time, I got smart (or so I hope).
Replacing it with spicer parts. We'll see.
Funny thing... I greased the daylights out of those joints, and each time, it always failed on two opposing caps, usually one with zero grease in it. Leads me to believe that there is no passageway through the center of the cross to the one cap, inevitably causing it to fail. I didn't pay for them the last time, as Autozone warranteed it (2 year warranty on U joints), and gave me new ones for free. Still a huge waste of time, IMO.
Non greaseable. The seals are really stout though, and everthing feels extremely precise. Time will tell, eh ? Either way, never again will I buy autozone U joints. They're simply Crap.


 09-29-2015, 07:37 PM
#1382
Registered User
Join Date: Dec 2010
Location: Land of the Toxic Avenger
Posts: 6,770
Received 1,637 Likes
on
1,112 Posts
Nice radiator....
Looks like a keeper...
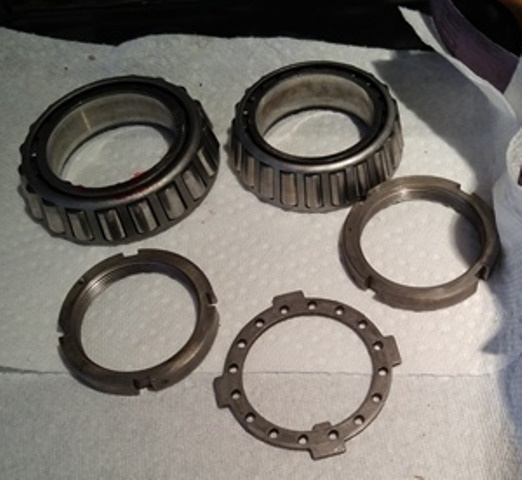
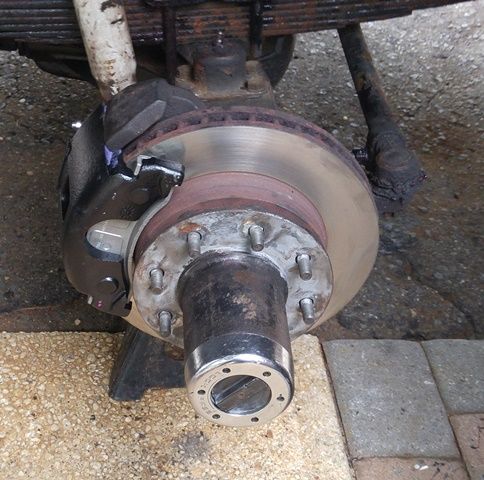
Today, I finished the brake job / axle bearing replacement on the doodge. Glad I did, as that one bearing was toast. I tried pushing a rod through the cross, but something was blocking it. I guess that's why these junk U joints are worthless.
So I cleaned the bearings first in mineral spirits, then brake cleaner. They're in good shape, as I only put them in about 4 years ago. This was the first time I "cleaned" them. Usually, I just repack them and put new seals in. Grease doesn't get very dirty, but I figured... what the hay...
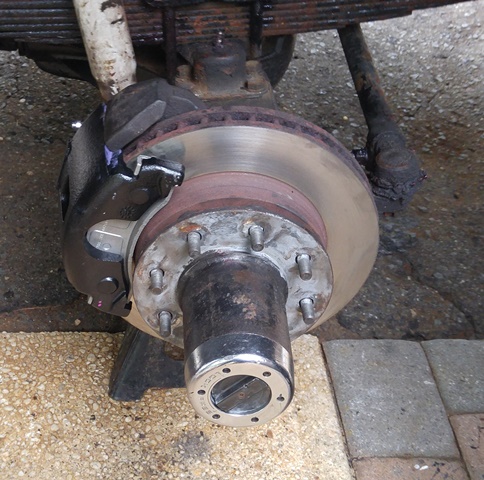
New calipers and pads, after having the rotors machined. They didn't pulsate, but I figured it was time. The guy at the parts store, wasn't your normal "pimple faced kid". 25 years behind the counter, and it was very useful. He told me that a rep from Wagner showed up, and they went over issues people have with new brakes. He said the number one problem when someone resurfaces rotors is their failure to "clean them". He said that brake cleaner isn't enough. He wanted me to "wash the rotor surface with a scrub pad with dishsoap and water. Then use brake cleaner. He said this prevents metal dust from being embedded in the new pad, as it interferes with proper break in .
The new spicer U joints are far superior, quality wise, than those junkers from autozone..
Looks like a keeper...
Today, I finished the brake job / axle bearing replacement on the doodge. Glad I did, as that one bearing was toast. I tried pushing a rod through the cross, but something was blocking it. I guess that's why these junk U joints are worthless.

So I cleaned the bearings first in mineral spirits, then brake cleaner. They're in good shape, as I only put them in about 4 years ago. This was the first time I "cleaned" them. Usually, I just repack them and put new seals in. Grease doesn't get very dirty, but I figured... what the hay...

New calipers and pads, after having the rotors machined. They didn't pulsate, but I figured it was time. The guy at the parts store, wasn't your normal "pimple faced kid". 25 years behind the counter, and it was very useful. He told me that a rep from Wagner showed up, and they went over issues people have with new brakes. He said the number one problem when someone resurfaces rotors is their failure to "clean them". He said that brake cleaner isn't enough. He wanted me to "wash the rotor surface with a scrub pad with dishsoap and water. Then use brake cleaner. He said this prevents metal dust from being embedded in the new pad, as it interferes with proper break in .

The new spicer U joints are far superior, quality wise, than those junkers from autozone..
 09-29-2015, 07:41 PM
#1383
Registered User
Spicer Life u-joints are most definitely the way to go.
Nice radiator....
Looks like a keeper...
Today, I finished the brake job / axle bearing replacement on the doodge. Glad I did, as that one bearing was toast. I tried pushing a rod through the cross, but something was blocking it. I guess that's why these junk U joints are worthless.
So I cleaned the bearings first in mineral spirits, then brake cleaner. They're in good shape, as I only put them in about 4 years ago. This was the first time I "cleaned" them. Usually, I just repack them and put new seals in. Grease doesn't get very dirty, but I figured... what the hay...

New calipers and pads, after having the rotors machined. They didn't pulsate, but I figured it was time.
The new spicer U joints are far superior, quality wise, than those junkers from autozone..
Looks like a keeper...
Today, I finished the brake job / axle bearing replacement on the doodge. Glad I did, as that one bearing was toast. I tried pushing a rod through the cross, but something was blocking it. I guess that's why these junk U joints are worthless.
So I cleaned the bearings first in mineral spirits, then brake cleaner. They're in good shape, as I only put them in about 4 years ago. This was the first time I "cleaned" them. Usually, I just repack them and put new seals in. Grease doesn't get very dirty, but I figured... what the hay...
New calipers and pads, after having the rotors machined. They didn't pulsate, but I figured it was time.
The new spicer U joints are far superior, quality wise, than those junkers from autozone..
09-29-2015, 07:44 PM
#1384
Registered User
Join Date: Dec 2010
Location: Land of the Toxic Avenger
Posts: 6,770
Received 1,637 Likes
on
1,112 Posts
From now on, I'm only using spicer. It was amazing the quality difference in the unit, vs the ones I've used in the past.
BTW.... if anyone cares to know..
Put the bearings in the rotor / hub, with the new seal. Install the first (inner) nut on the spindle and tighten it to 50 Ft lbs. Spin the rotor a few times to push the grease around.
Back the nut off, and re tighten to 39 Ft lbs. Take your torque wrench, and spin the nut loose 135* from that point. This sets the proper freeplay of the bearings.
Install the locking ring to the nearest hole. I usually move it to the closest hole that makes the internal nut a smidge tighter, as the pin never meets the hole the first time installed.
Install the outer nut and tighten it to 160 ft lbs or so. This locks the two nuts to the alignment locking ring. This completes the install of the bearings.
09-30-2015, 01:50 PM
#1385
Banned

From now on, I'm only using spicer. It was amazing the quality difference in the unit, vs the ones I've used in the past.
BTW.... if anyone cares to know..
Put the bearings in the rotor / hub, with the new seal. Install the first (inner) nut on the spindle and tighten it to 50 Ft lbs. Spin the rotor a few times to push the grease around.
Back the nut off, and re tighten to 39 Ft lbs. Take your torque wrench, and spin the nut loose 135* from that point. This sets the proper freeplay of the bearings.
Install the locking ring to the nearest hole. I usually move it to the closest hole that makes the internal nut a smidge tighter, as the pin never meets the hole the first time installed.
Install the outer nut and tighten it to 160 ft lbs or so. This locks the two nuts to the alignment locking ring. This completes the install of the bearings.
i've been slowly replacing U-joints in my truck with he non-greaseable spicer life joints. they're a **** fine product!
09-30-2015, 01:51 PM
#1386
Hey, T, with my current goals of chiseling away at my to do list on my truck, I'm looking at doing this u joints at the axles soon. Would you, and others that have done this, agree that the ball joints would also be the time to do this? If so, about how long would you allow in time frame to do the axle u joints and ball joints? I would of course tackle the front brakes and rotors while I was there also. Last time I did my front brakes grease bearings was in early 2012
09-30-2015, 01:56 PM
#1387
Banned
Hey, T, with my current goals of chiseling away at my to do list on my truck, I'm looking at doing this u joints at the axles soon. Would you, and others that have done this, agree that the ball joints would also be the time to do this? If so, about how long would you allow in time frame to do the axle u joints and ball joints? I would of course tackle the front brakes and rotors while I was there also. Last time I did my front brakes grease bearings was in early 2012
if that is the case, then the biggest pain is just getting the kingpin out. if you have a 7/8" allen key and a REALLY BIG BREAKER BAR, you can rebuild king pins in about an hour each side. eat your wheaties too!
09-30-2015, 05:50 PM
#1388
Registered User
Join Date: Dec 2010
Location: Land of the Toxic Avenger
Posts: 6,770
Received 1,637 Likes
on
1,112 Posts
09-30-2015, 05:51 PM
#1389
Registered User
Join Date: Dec 2010
Location: Land of the Toxic Avenger
Posts: 6,770
Received 1,637 Likes
on
1,112 Posts
i think you mean king pins as our front axles don't have ball joints.
if that is the case, then the biggest pain is just getting the kingpin out. if you have a 7/8" allen key and a REALLY BIG BREAKER BAR, you can rebuild king pins in about an hour each side. eat your wheaties too!
if that is the case, then the biggest pain is just getting the kingpin out. if you have a 7/8" allen key and a REALLY BIG BREAKER BAR, you can rebuild king pins in about an hour each side. eat your wheaties too!
It took me an hour just to clean the hub, flush the Bearings, repack and install new seals.
09-30-2015, 07:01 PM
#1390
Banned
In theory, I'm sure an hour is possible. If you like things clean, neat, and are changing axle joints, repacking bearings, doing everthong per torque specs, painting things, give yourself the weekend, as it can take a while based upon your skilset, and your access to tools.
It took me an hour just to clean the hub, flush the Bearings, repack and install new seals.
It took me an hour just to clean the hub, flush the Bearings, repack and install new seals.
edit: this is also coming from the guy that could turn an oil change into an entire weekend project.
 09-30-2015, 08:51 PM
#1391
Registered User
Join Date: Dec 2010
Location: Land of the Toxic Avenger
Posts: 6,770
Received 1,637 Likes
on
1,112 Posts
I agree whole heartedly with this statement. an 8 hour day start to finish I would say for everything. I was just referring to rebuilding the upper and lower kingpins, 1 hour per side, with tools and knowing the procedure before you start.
edit: this is also coming from the guy that could turn an oil change into an entire weekend project.
edit: this is also coming from the guy that could turn an oil change into an entire weekend project.
. Unfortunately, due to a Napa warehouse closing, I wasn't able to finish in one day. They decided to purposefully "delay my caliper delivery" so I had to search elsewhere. The rotors being cut took 3 hours, from the time I got there, till the time I was home again. Finding parts can increase the time to finish, no doubt.
Yes, the king pins can take an hour each side, barring everything else I did.
You will need this:
And a 3/4" breaker bar
09-30-2015, 09:07 PM
#1392
Banned
Minus the king pins, I did everything above, as my KP's were changed last year or two years ago. God it seems like I do this dance every couple of years or so.
. Unfortunately, due to a Napa warehouse closing, I wasn't able to finish in one day. They decided to purposefully "delay my caliper delivery" so I had to search elsewhere. The rotors being cut took 3 hours, from the time I got there, till the time I was home again. Finding parts can increase the time to finish, no doubt.
Yes, the king pins can take an hour each side, barring everything else I did.
You will need this:
Sunex 45062 3/4-Inch Drive 7/8-Inch Hex Driver Impact Socket - - Amazon.com
And a 3/4" breaker bar
09-30-2015, 09:14 PM
#1393
Registered User
Join Date: Dec 2010
Location: Land of the Toxic Avenger
Posts: 6,770
Received 1,637 Likes
on
1,112 Posts
if you don't want to buy the spendy socket and a 3/4" drive breaker bar(because i don't have either of these), go to harbor freight, find the pry bars, one will be 7/8" hex, buy it for $8, take it home, cut a 4" piece off of it, then just use a 7/8" socket and 1/2" breaker bar(more common items). I'm a poor old sailor, have to cut corners where I can. got this idea from another forum member
600 ft lbs (the torque spec on the upper king pin) was too great, and I snapped that 1/2" breaker bar in the first pull.
I had to go to 3/4". Besides, my torque wrench is a 3/4" four foot long torque wrench that goes over 600 ft lbs, and I wanted to torque it to spec.
(yeah, I'm weird like that)
 09-30-2015, 09:43 PM
#1394
Banned
I tried that route..
600 ft lbs (the torque spec on the upper king pin) was too great, and I snapped that 1/2" breaker bar in the first pull.
I had to go to 3/4". Besides, my torque wrench is a 3/4" four foot long torque wrench that goes over 600 ft lbs, and I wanted to torque it to spec.
(yeah, I'm weird like that)
600 ft lbs (the torque spec on the upper king pin) was too great, and I snapped that 1/2" breaker bar in the first pull.
I had to go to 3/4". Besides, my torque wrench is a 3/4" four foot long torque wrench that goes over 600 ft lbs, and I wanted to torque it to spec.
(yeah, I'm weird like that)
09-30-2015, 10:07 PM
#1395
Registered User
Hey, T, with my current goals of chiseling away at my to do list on my truck, I'm looking at doing this u joints at the axles soon. Would you, and others that have done this, agree that the ball joints would also be the time to do this? If so, about how long would you allow in time frame to do the axle u joints and ball joints? I would of course tackle the front brakes and rotors while I was there also. Last time I did my front brakes grease bearings was in early 2012

I would give it a few days for sure. Especially if you are going to be doing the inner axle seals....which I would recommend since you have it torn down that far already. The whole front carrier has to come out to get access to the seals...major PITA!
The rest will also depend on how clean, or rusty your equipment is, and how easily it comes apart. And you may find other issues while your in there....which will require more time.
I bought a big 7/8 drive hex for my 50 year old 3/4" drive Craftsman socket and ratchet set...was my grandfathers.
 This ratchet is more stout then most 3/4" breaker bars! Anyway I use the hex socket, 3/4 ratchet, and about a 15' pipe....could not break the OEM king pins loose! Tried heat...still nothing. Eventually I had to cut almost all the way around the king pin, about 1/8" or less above the mating surface....popped out easily after that.
Going back in I used the same set-up with the big bar, tightened it by hand as tight as I could, and then gave it a good 3-5' crank with the long bar.