


>>> trapdoor fuel tank access <<<


Thread Starter
Registered User


Joined: Oct 2005
Posts: 6,457
Likes: 95
From: KENTUCKY
>>> trapdoor fuel tank access <<<
 Please excuse the absence of photographic evidence.
I highly recommend that anyone with a factory sheet-metal bed on their truck to cut themselves a trap-door in the bed-floor for fuel-tank access at the soonest convenience.
Had the recent fuel-line episode with the son's truck happened anywhere other than the driveway,it would have been stranded and a wrecker or a log-chain would have been involved, depending on how far from home it happened; because, the shoulder of the road or the K-Mart parking-lot is NO PLACE to be draining/dropping fuel-tanks or removing pick-up beds.
Now, since we have this nice access hole cut above the fuel bulkhead, addressing any issues in that sector will be a much simpler task.
Now, don't get all
 about it; if the engineers who designed these trucks had to work on them later, there would have been a trapdoor put there from the factory already.
This need not be some elaborate hinged/latched affair; a simple neat plate held in place with quality screws will work nicely.
Here is how I went about it :
Looking up at the bottom of the bed-floor from underneath the truck, I drilled two 1/4" locater-holes up through the bed-floor on the inboard side of the fuel-tank.
I drilled these two holes as close to straight above the inboard side of the tank as I could eyeball, using one of the seams as a guide to keep them straight in line; one hole just almost against the forward bed-member and another just ahead of the bed-member that is just behind the bulk-head.
No bed cross-members need be cut, just sheet-metal.
Now, with our two locater-holes drilled and a good pair of knee-pads strapped on, the rest of the work can be accomplished from above.
Using an iron square (or a steel, aluminum, plastic, or styrofoam one), mark a straight line that connects the two locater-holes.
Depending on how particular you need be with the bed finish, you can draw directly on the sheet-metal with a white-out pen, or first put down a strip of masking-tape and do your drawing on that with whatever writing instrument may be at hand.
With one leg of the square against this line, mark a perpendicular line toward the larboard bed-side at the front and another likewise at the rear.
Measure over 14-inches on these two lines and mark a line through these points that is parallel to the first line.
You should now have a nice rectangle that is roughly 15-inches long and 14-inches wide.
With some sort of depth-limiting device on the drill-bit, drill two more holes at the corners that don't already have holes.
Now, working across the rear line that parallels the tail-gate, drill holes along the length of that line no farther than 1/2-inch apart; closer is even better.
Be careful, there is a fuel-tank, two lines, and some wires under there.
Now, using a very short-bladed sawzall, a nibbler, strong shears, or one of those ribbon-cutting bits in an air-chisel ( which would probably be the best choice), cut the remaining three lines that have not been perforated.
Depending on the chosen cutting tool, you may need to whack a starter slot at each corner with a sharp chisel.
Although it would seem to be the instrument of choice, I recommend against using any sort of abrasive wheel cutting tool; as, these cut-off wheel type devices will throw a stream of very HOT ground metal that will melt itself into any painted surface and then make big rust specks as soon as they get damp; no amount of blowing, washing, or sweeping will get rid of these embedded bits of fine metal.
That last remaining perforated line is best not cut with a saw-blade, as the fuel-lines and wires are right under there.
I recommend that you now put a couple good magnets across the cut lines to prevent the cut out plate from falling down on top of the tank and possibly damaging the wires or lines.
A sharp chisel makes quick work of connecting the dots.
Using one of the magnets, lift out the cut-out and you should now be able to see and EASILY ACCESS almost the entire top of the fuel-tank.
You can make as elaborate or as simple a cover for this hole as desired.
The cut-out could be used in making a cover or a larger piece could be cut from a junker bed and used to overlap.
Just like having a transmission access hole in the floor-board, now you are ready if and when something goes haywire that would otherwise require draining and dropping the fuel-tank.
If you fool around and saw a hole in the fuel-tank, you have been fore-warned.


Administrator
Joined: Jul 2009
Posts: 5,311
Likes: 566
From: Phoenix AZ
I have an old Range Rover that I putz around town in. I have always marveled at the Rube Goldberg engineering style of the Brits, but one thing that I give them is access ports. They have one ,as you describe, that made changing the fuel pump a 1 hour job, with most of that being removing and replacing the cover. This is a very good idea, good job...Mark

Registered User
Joined: Feb 2007
Posts: 703
Likes: 1
From: MyTrailer, Canada
Good heads-up BK, .... fuel leaks there are just about inevitable in our two-decades old trucks. I recommend this be a sticky since it applies to all of us. I'll heed most of this although my steel deck, while being thick as a battle-tank hull, is about 8" above the fuel tank so my sawzall should have plenty of room. I'll ponder my later cover plate, but first thing that comes to mind is a pair of bars attached to my cut-out and screwed to the deck outside my cut lines. Thanks for drawing my attention to this potential trouble spot ... 

Registered User
Joined: Aug 2011
Posts: 128
Likes: 0
From: Kamloops
That's a pretty cool idea. My bed is so roughed up as it is that no one would know the difference. Being relatively ignorant about the fuel system as a whole, what exactly is under there that you would need access to? The lift pump?

Thread Starter
Registered User
Joined: Oct 2005
Posts: 6,457
Likes: 95
From: KENTUCKY
I plan on doing the same to the wife's truck at my soonest convenience.Maybe I can bribe her into documenting it on film, or whatever it is inside those mysterious cameras.
When I was under her truck a few days ago, routing big battery-cables, I noticed a slight wetness down the side of the tank; so, I figure it is just a matter of time before it gets serious.
Thread Starter
Registered User
Joined: Oct 2005
Posts: 6,457
Likes: 95
From: KENTUCKY
This is what is under there :
I/C version :
https://www.dieseltruckresource.com/...d.php?t=151190
non-I/C version :
https://www.dieseltruckresource.com/...d.php?t=174241
 You should find the lift-pump down low and aft on the larboard side of the engine, sort of under the fuel-filter.
It is mechanical.
Trending Topics

Banned
Joined: Oct 2003
Posts: 885
Likes: 3
From: Western PA
The trap door thing is a good idea, as I would be able to hide it under my bedliner. Although they are a PITA to remove (bedliner), it sure would be quicker than pulling the tank to get to the goodies. Good Job BK 

Registered User
Joined: Nov 2007
Posts: 1,816
Likes: 0
From: Maine

Thread Starter
Registered User
Joined: Oct 2005
Posts: 6,457
Likes: 95
From: KENTUCKY
There is also a bed-liner in the son's truck, one of those thick rigid plastic ones with the big raised ribs.I just sawed through the bed-liner as well.
I figured that I would have enough to deal with should something under there go amiss, let alone fighting with that stiff liner.
They must not be too hard to get out, though, as I was following a Dodge dually up the road when I saw his bed-liner sort of puff up a foot or so and lay back down.
That got me to keeping a weather eye on it and good thing, as he/we then met a big reefer truck and here came that bed-liner up out of there and straight for my truck.
Thread Starter
Registered User
Joined: Oct 2005
Posts: 6,457
Likes: 95
From: KENTUCKY
 So you call the side abeam of the steerboard "port" instead of larboard; interesting.
On the Ford board that I frequent, there were a few guys having issues with their fuel-tank bulkheads and were debating the pros and cons of whether to drain/drop the tanks or un-bolt and remove the bed.
It was a no-brainer for me; I suggested cutting a hole.
You would have thought I tossed a grenade in their fox-hole; they were like
 and then and some of them were even
Then there were about three pages of postings like "no way am I gonna be sawing holes in my truck."
I am just waiting for them to get themselves stranded somewhere and then them see the wisdom of such a hole.
Of course, then, they will cut the hole and post back about how brilliant they were to think of it.
Thread Starter
Registered User
Joined: Oct 2005
Posts: 6,457
Likes: 95
From: KENTUCKY
 >>> cut another access hole today <<<
I finally got an opportunity to cut the access hole in the bed-floor of the wife's truck today.
>>> cut another access hole today <<<
I finally got an opportunity to cut the access hole in the bed-floor of the wife's truck today.As it does not have one of those rigid bed-liners in the way, I was able to get some more scientific measurements as to locating the perimeters of said hole.
I outlined the intended perimeter with masking-tape and then did all of my marking and drawing on that.
Measuring back from the sheet-metal of the bed-front, the front edge of the hole is 8-1/4"; this should get it kissing-close to the forward bed-member, without sawing into it.
The rear edge is at 22-1/4" (I am going on memory and kinda want to say 22-3/4, but I had better go with 22-1/4 just to be safe); this will just clear the second bed-member.
The bed floor is composed of ribs(R) and valleys(V).
Starting at the larboard bed-wall, first is a V; count over three Vs and two Rs and next is a wide R that runs parallel to the wheel-house, then count two more Vs and two Rs and the larboard cut will be centered on this second R(rib) from the wheel-house.
Then, count across four Vs and four Rs and the steer-board cut will be centered on top of this fourth R(rib).
This will yield a hole that is just barely wider than the fuel-tank on each side and that closely follows the edges of the bed-cross-members, yielding easy access to the fuel-tank bulk-head and all it's connections.
It got dark on me and getting the hole cut was as far as I got today.
Plans are to clean the rough cut edges, then prime and paint to prevent rust.
The cut-out will get a strip of 1-1/2" wide x 1/8 attached around it's perimeter, such that the cut-out drops back in the hole it came from and the flat stock covers the gap.
A few holes will be drilled around the perimeter of the flat-stock for sheet-metal screws to hold the cover in place.
I suggest anyone reading this should do likewise at the soonest convenience, as these old twenty-some-odd-year-old steel fuel-lines are about rusted through.


Administrator

Joined: Nov 2004
Posts: 4,084
Likes: 235
From: Southern California
As soon as I can find that part of the bed I am going to open mine up so I can replace the lines, I also have an axillary transmission cooler outboard of the tank.
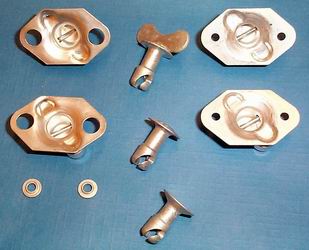
My intentions are to after I cutout the opening I will attach metal to the underside of the opening to stop the cutout piece from falling through and to install 1/4 turn Dzus (commonly pronounced Zeus) fasteners.
http://www.dfcis.com/index.html
http://milspecproducts.com/
I have always wanted to install trapdoors to access multiple battery banks mounted between the frame rails.
On the transit coaches I have worked on the floor has multiple access panels over major components, easy to adjust the transmission while lying on the floor, or my favorite replacing the starter lying under the back seat while hanging half your body into the engine compartment then dead lifting out the 80 pound defective starter, on a Detroit 8V-92 engine that has been running already for 20 hours non-stop.
Jim
My intentions are to after I cutout the opening I will attach metal to the underside of the opening to stop the cutout piece from falling through and to install 1/4 turn Dzus (commonly pronounced Zeus) fasteners.
http://www.dfcis.com/index.html
http://milspecproducts.com/
I have always wanted to install trapdoors to access multiple battery banks mounted between the frame rails.
On the transit coaches I have worked on the floor has multiple access panels over major components, easy to adjust the transmission while lying on the floor, or my favorite replacing the starter lying under the back seat while hanging half your body into the engine compartment then dead lifting out the 80 pound defective starter, on a Detroit 8V-92 engine that has been running already for 20 hours non-stop.
Jim

