Is there
 03-15-2009, 08:14 PM
#1
Registered User
Thread Starter
Is there
any thread in the sticky or the other wiki library on this forum explaining the procedure to replace head gaskets on this engines? I have a haynes manual for the 94-98 model engines is this the same? I have read most articles on the sticky and never found one explaining this and sooner or later we all have to do it I guess.
Thank You.
Thank You.
 03-15-2009, 08:41 PM
#2
Registered User

Join Date: Jan 2009
Location: H'ville Tx.
Posts: 936
Likes: 0
Received 0 Likes
on
0 Posts
I'm not sure if there is a sticky, I should know if there was because I read thru them all time. If you have the money or if you have to save your money go to Genos Garage website and buy the factory service manual for your year model engine you swapped in. $95 bucks. It's about 3 1/2'' thick and full of great info on engines, bodies, wiring, transmissions, ect.. It's pricey but cheap, moreso when you have problems. Unlike the Chiltons and Haynes book that only give 1/3 of the info.. Check the stickies first. Good Luck
03-16-2009, 06:29 AM
#3
Registered User
Thread Starter
Thank You, I just want to be ready since I read this is a weak point on some 89's so it wont hurt to have some parts ready. $95 for a manual is really high for Me right now, maybe if I can't gather good info I'll get Myself one, but I'm sure more than a few here have done it so I can get the spec's here first.
Thank You.
Thank You.
03-16-2009, 09:48 AM
#5
Registered User
Thank You, I just want to be ready since I read this is a weak point on some 89's so it wont hurt to have some parts ready. $95 for a manual is really high for Me right now, maybe if I can't gather good info I'll get Myself one, but I'm sure more than a few here have done it so I can get the spec's here first.
Thank You.
Thank You.
Trending Topics
03-18-2009, 08:50 PM
#8
1st Generation Admin
I'm working on it.
Here's a teaser . . . .
I'll post the complete thread in the next day or so. Bear with me please.
Here's a teaser . . . .
Originally Posted by BC847
Folks, this is another attempt to repay the vast knowledge afforded me by the DTR community.
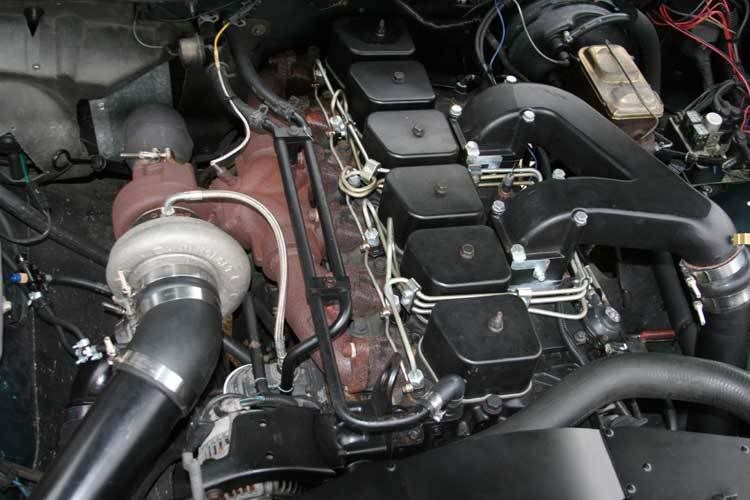
Today, we're gonna replace the head-gasket on my 1993 Dodge/Cummins 5.9ltr intercooled 12 valve engine. Perhaps you're making general repairs such as an antifreeze leak. Such is the case with me, or at least it started that way. On that note, be aware that my images used in this thread cover a number of years, involving a number of different projects. You may see some goofy valve-covers and such work their way in.
As always ~ SAFETY FIRST!!
- Disconnect the Negative cable of your battery system.
- Chock the wheels and set the parking brake.
- Have a known good fire extinguisher close by.
- Have good lighting.
- Have a clean and orderly work area.
- Always exercise good working practice with your tools.
- Use safety goggles, gloves, masks, etc where appropriate.
- RTFM!
- I always clean the area I plan on working in the night before. Use the engine cleaner of your choice (follow the directions) and forcefully flush everything with a strong garden hose.
Finally know that I'm using the Chrysler Corporation 1993 Service Manual for the D&W 150-350 Ramcharger RWD truck as my guide in ensuring I hit all the bases.
OK, fine . . . . .
- Spray the turbocharger and exhaust manifold bolts with your favorite penetrating oil. While you're at it, hit the turbochargers oil feed-line fittings where they enter the turbocharger.
- With the help of friends, remove the hood of the truck. Careful of the windshield!
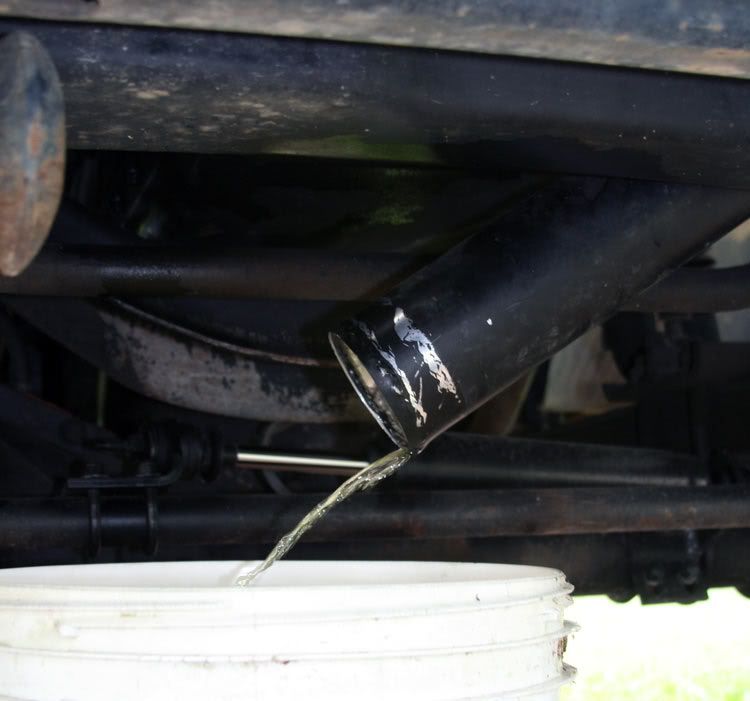
- Drain the engine coolant. Always catch and contain the mess as it's poison never mind expensive. I end up using the turbocharger to intercooler pipe to get from the radiator's petcock to my bucket. I strain it if needed and put it right back in when complete.
- Drain the engine oil. I've found that most all restaurants use frying oil that comes as a five gallon plastic jug in a cardboard box. They won't mind you getting the empty containers out of their way. Makes it easy to take it to the local Auto-Zone or such that have the used oil recycling drums. It's free.
-Disconnect and remove the top radiator hose as well as the two cab heater hoses. Be careful tugging on the cab heat water valve and heater core connections. I've found it helpful to pinch the rubber hose here and there where it engages the connectors so as to first break the bond. Then pull them free.
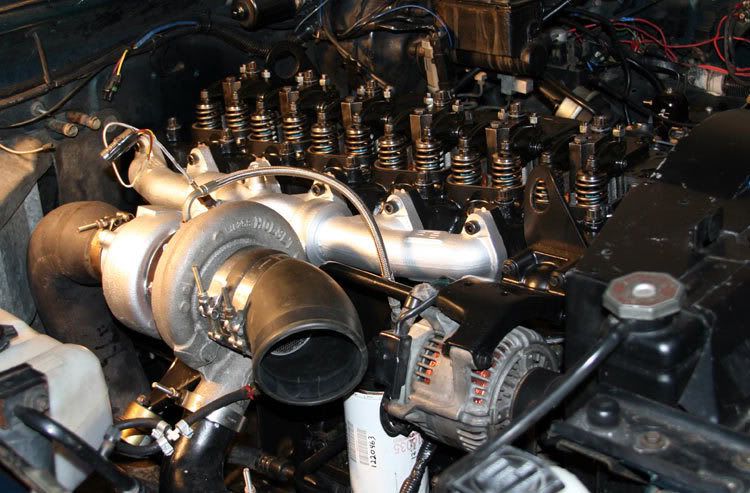
- Remove the turbocharger assembly. The intake and exhaust plumbing first, then the oil feed-line. BE SURE to use a back-up wrench on the feed-line fittings. Be prepared for the actual oil tube to stick to it's fitting. You don't want it to turn with the fitting as you may wring the tube off so be patient with it. Follow that with disconnecting the oil drain line. As you remove the turbo, you'll find a single metal gasket between the turbo and exhaust manifold. I temporarily put the gasket, nuts and washers back on the manifold studs so I won't loose them.
With removal of the turbo, be sure to plug all the oil openings so as to ensure no trash gets in there. If you think you might not be able to stay off the oil supply tube where it connects to the engine oil filter assembly, go ahead and remove it using the same methods and precautions.
- Remove the exhaust manifold. I usually leave a bolt loose at each end till all the others are removed. Here again, to help keep trash out of things, stuff some paper towels into the head's exhaust ports.
- Now rest your back a bit and slip the serpentine belt off the alternator pulley.
- Disconnect the wires from the alternator being sure not to allow the studs to turn while you loosen things.
- Remove the alternator's top mounting bracket and swing the alternator down some so as to help clear the thermostat housing.
- Go pee and freshen-up your tea.
- Now switch to the driver's side of the engine and remove your charge-air plumbing if your truck's intercooled. No need in removing the intake feed-horn, etc.
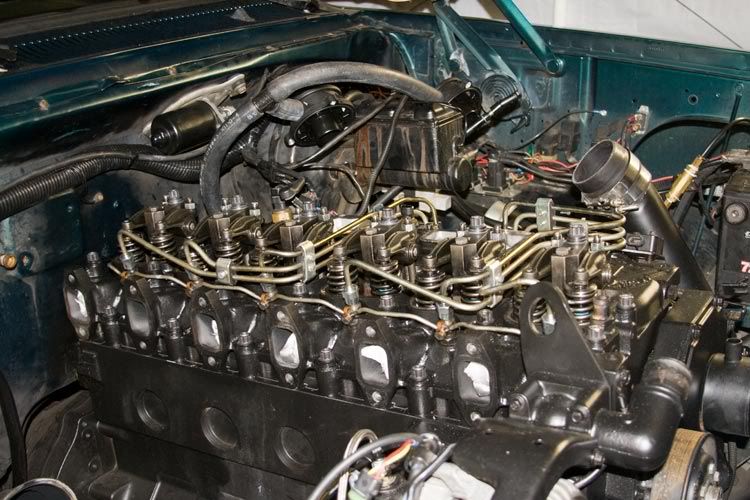
- Disconnect the throttle rod from the injection pump along with the springs. Be sure to note where the springs go.
- Disconnect the AFC's boost reference tube from the injection pump and then remove the tube assembly from the head. You just as well go ahead and temporarily reinstall the mess on the IP so as not to lose anything.
- Remove the throttle bell-crank's bracket assembly with the cables intact and set aside.

- Remove the fuel filter along with the two fuel lines that connect to the head just above the fuel filter. Tape them up or something to keep out the trash.
- Remove the High pressure fuel injection lines. It'll be fun working around the butt of the injection pump so get use to the notion. You'll find removing this one first will help getting to the next etc. Pay attention and use a back-up wrench on the delivery valves if needed (that which the lines connect to at the IP's butt).
- Remove the injector fuel return line. It connects to the IP's return line with a T fitting at the rear of the head, driver's side.
- Remove the injectors being sure to keep up with the copper spacers between the injectors and the bottom of the bores. (See the DTR 1st Gen Sticky for helpful hints and tools for removing stubborn injectors).
- Remove all the electrical lines starting at the front of the engine ~
* Crankshaft position sensor plug.
* Throttle position sensor plug (automatic transmission only).
* KSB switch plug.
* Fuel cut-off solenoid connections.
Moving back toward the cab a little .. .
* On the intake log cover-plate, unplug the KSB air temperature sensor
* Unplug the charge-air heater air temperature sensor.
* Disconnect the power lines to the charge-air heaters.
* On the cab end/bottom of the intake log, disconnect the fuel heater.
* Disconnect the engine coolant temperature switch (automatic transmission only).
* And finally disconnect the engine temperature sending unit.
- Remove the valve-covers.
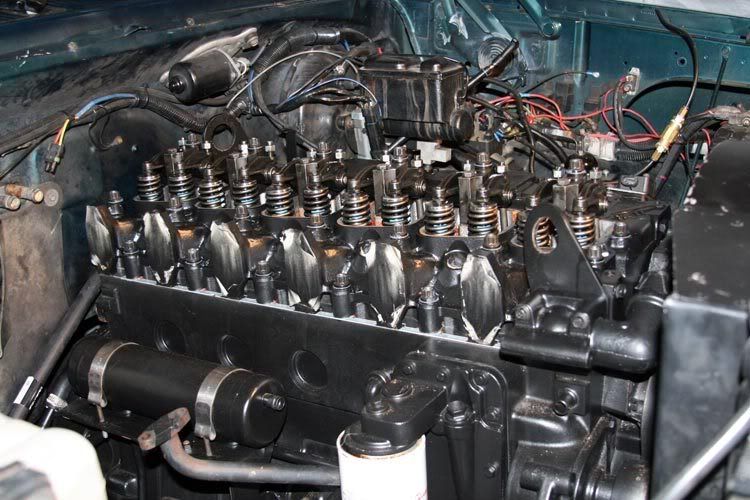
- Loosen all the valve-lash adjustment nuts and screws. Go ahead and loosen them to the point any valve-spring pressure is relieved.

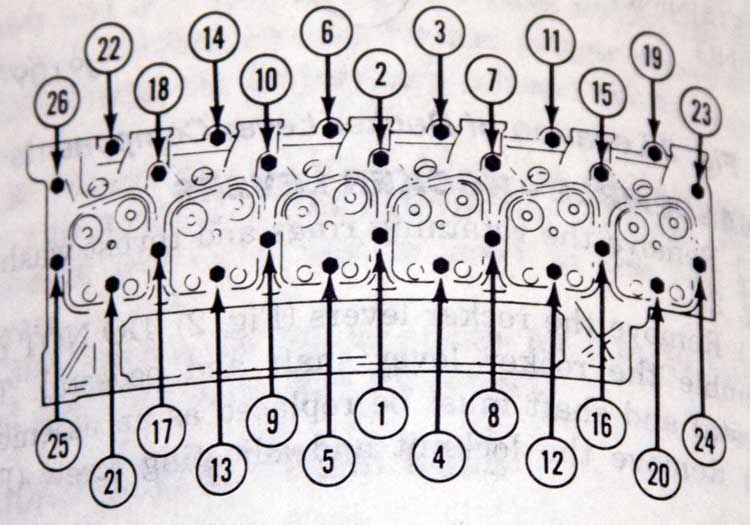
- Loosen and remove all the cylinder head bolts starting in the center, and work your way out in a circular pattern. Here's a diagram as to how I'm talking about . . .
Today, we're gonna replace the head-gasket on my 1993 Dodge/Cummins 5.9ltr intercooled 12 valve engine. Perhaps you're making general repairs such as an antifreeze leak. Such is the case with me, or at least it started that way. On that note, be aware that my images used in this thread cover a number of years, involving a number of different projects. You may see some goofy valve-covers and such work their way in.
As always ~ SAFETY FIRST!!
- Disconnect the Negative cable of your battery system.
- Chock the wheels and set the parking brake.
- Have a known good fire extinguisher close by.
- Have good lighting.
- Have a clean and orderly work area.
- Always exercise good working practice with your tools.
- Use safety goggles, gloves, masks, etc where appropriate.
- RTFM!
- I always clean the area I plan on working in the night before. Use the engine cleaner of your choice (follow the directions) and forcefully flush everything with a strong garden hose.
Finally know that I'm using the Chrysler Corporation 1993 Service Manual for the D&W 150-350 Ramcharger RWD truck as my guide in ensuring I hit all the bases.
OK, fine . . . . .
- Spray the turbocharger and exhaust manifold bolts with your favorite penetrating oil. While you're at it, hit the turbochargers oil feed-line fittings where they enter the turbocharger.
- With the help of friends, remove the hood of the truck. Careful of the windshield!
- Drain the engine coolant. Always catch and contain the mess as it's poison never mind expensive. I end up using the turbocharger to intercooler pipe to get from the radiator's petcock to my bucket. I strain it if needed and put it right back in when complete.
- Drain the engine oil. I've found that most all restaurants use frying oil that comes as a five gallon plastic jug in a cardboard box. They won't mind you getting the empty containers out of their way. Makes it easy to take it to the local Auto-Zone or such that have the used oil recycling drums. It's free.
-Disconnect and remove the top radiator hose as well as the two cab heater hoses. Be careful tugging on the cab heat water valve and heater core connections. I've found it helpful to pinch the rubber hose here and there where it engages the connectors so as to first break the bond. Then pull them free.
- Remove the turbocharger assembly. The intake and exhaust plumbing first, then the oil feed-line. BE SURE to use a back-up wrench on the feed-line fittings. Be prepared for the actual oil tube to stick to it's fitting. You don't want it to turn with the fitting as you may wring the tube off so be patient with it. Follow that with disconnecting the oil drain line. As you remove the turbo, you'll find a single metal gasket between the turbo and exhaust manifold. I temporarily put the gasket, nuts and washers back on the manifold studs so I won't loose them.
With removal of the turbo, be sure to plug all the oil openings so as to ensure no trash gets in there. If you think you might not be able to stay off the oil supply tube where it connects to the engine oil filter assembly, go ahead and remove it using the same methods and precautions.
- Remove the exhaust manifold. I usually leave a bolt loose at each end till all the others are removed. Here again, to help keep trash out of things, stuff some paper towels into the head's exhaust ports.
- Now rest your back a bit and slip the serpentine belt off the alternator pulley.
- Disconnect the wires from the alternator being sure not to allow the studs to turn while you loosen things.
- Remove the alternator's top mounting bracket and swing the alternator down some so as to help clear the thermostat housing.
- Go pee and freshen-up your tea.
- Now switch to the driver's side of the engine and remove your charge-air plumbing if your truck's intercooled. No need in removing the intake feed-horn, etc.
- Disconnect the throttle rod from the injection pump along with the springs. Be sure to note where the springs go.
- Disconnect the AFC's boost reference tube from the injection pump and then remove the tube assembly from the head. You just as well go ahead and temporarily reinstall the mess on the IP so as not to lose anything.
- Remove the throttle bell-crank's bracket assembly with the cables intact and set aside.
- Remove the fuel filter along with the two fuel lines that connect to the head just above the fuel filter. Tape them up or something to keep out the trash.
- Remove the High pressure fuel injection lines. It'll be fun working around the butt of the injection pump so get use to the notion. You'll find removing this one first will help getting to the next etc. Pay attention and use a back-up wrench on the delivery valves if needed (that which the lines connect to at the IP's butt).
- Remove the injector fuel return line. It connects to the IP's return line with a T fitting at the rear of the head, driver's side.
- Remove the injectors being sure to keep up with the copper spacers between the injectors and the bottom of the bores. (See the DTR 1st Gen Sticky for helpful hints and tools for removing stubborn injectors).
- Remove all the electrical lines starting at the front of the engine ~
* Crankshaft position sensor plug.
* Throttle position sensor plug (automatic transmission only).
* KSB switch plug.
* Fuel cut-off solenoid connections.
Moving back toward the cab a little .. .
* On the intake log cover-plate, unplug the KSB air temperature sensor
* Unplug the charge-air heater air temperature sensor.
* Disconnect the power lines to the charge-air heaters.
* On the cab end/bottom of the intake log, disconnect the fuel heater.
* Disconnect the engine coolant temperature switch (automatic transmission only).
* And finally disconnect the engine temperature sending unit.
- Remove the valve-covers.
- Loosen all the valve-lash adjustment nuts and screws. Go ahead and loosen them to the point any valve-spring pressure is relieved.
- Loosen and remove all the cylinder head bolts starting in the center, and work your way out in a circular pattern. Here's a diagram as to how I'm talking about . . .
I'll post the complete thread in the next day or so. Bear with me please.

 03-19-2009, 08:01 PM
#11
1st Generation Admin
Thanks guys. 
Ace, I don't remember the term for casting your reel, goofing-up, and having the spool burst as one big heaving knot . . . . . that's my truck's wiring at the moment.
It carries all the way into the cab. What a mess of temporary stuff. One day . . ..
Ace, I don't remember the term for casting your reel, goofing-up, and having the spool burst as one big heaving knot . . . . . that's my truck's wiring at the moment.
It carries all the way into the cab. What a mess of temporary stuff. One day . . ..
03-19-2009, 08:07 PM
#12
Registered User
David,
Those aren't stock injector lines are they?? If not, where can I get a set like that.. I like them.. They look bigger!!
03-19-2009, 08:21 PM
#13
1st Generation Admin
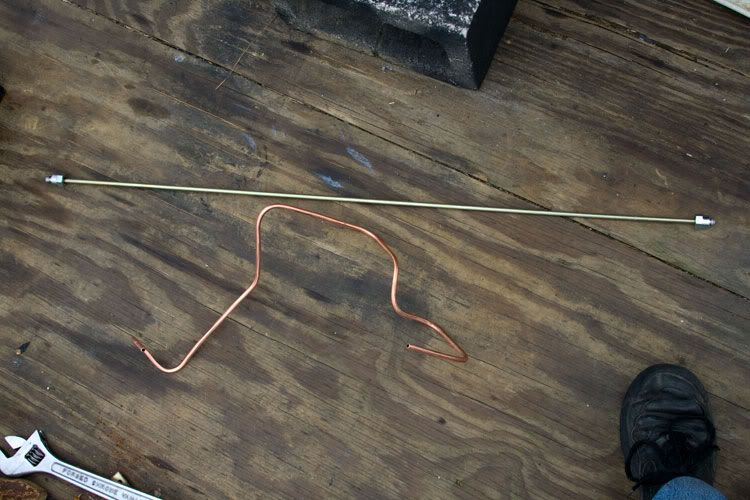
I've just recently removed those and folded my own set that looks much better IMO . . .
I put all the slack down at the IP. And made it such that twisting the IP won't be as much of a job . . . .
I made prototype lines using 1/4" soft copper tubing so I could tweak as needed for the best fit before committing it to the hard-pipe . . .
But that's another thread.
Oh, It's my understanding that the OEM injector high pressure line sizes are 1.8 and 2mm or .071" and .079" (IC engine / non-IC engine). Not sure of the stock/OEM length.
My newest lines are .078" ID x 35".
03-19-2009, 08:58 PM
#14
Registered User
Hmm.. So you custom did your lines then... Did somebody put the correct flares for you then... I just like the way they look!! I always thought there was some scientific deal that all the lines had to be the same length.. Let me know if your looking for a side job!!
03-19-2009, 11:54 PM
#15
1st Generation Admin
And while you're at it, they need to be small enough in internal diameter so that the ballooning effect of the pipe is minimized thus further reducing the impact on the injection event timing. All while passing the required volume of fuel without undue restriction to said fuel flow.
I've read where folks went to larger internal diameter injection lines and many report a "Lope" at idle. No doubt a result of injection timing off a bit.
Most all diesel injection shops can make lines to suit. Some use pressed on fittings where others may braise them on. The pipe apparently comes in 20' or so lengths.
. . . . or so I'm told.