
Finally initiated into the group @ 177K miles. !!!

Thread Starter
Registered User


Joined: Dec 2010
Posts: 6,838
Likes: 1,683
From: Land of the Toxic Avenger
Finally initiated into the group @ 177K miles. !!!
Well, it only took 21 years and 177,000 miles, but I'm in there.... My cowl finally cracked to the point, I'm a creaking and a squeaking like no tomorrow ! So far, I fixed it by turning my radio up really loud !
Yippie !!!!! I'm just so excited
Oh well, I guess I'll be pulling my fenders off this summer and welding up my cowl...... Did anyone here ever do the procedure in the sticky ??? Epoxy ?
http://wiki.dieseltruckresource.com/wiki/Cowl_Fix
Can you believe how many threads there are about Cowl Cracks ????
https://www.dieseltruckresource.com/...archid=5409151
I didn't want to count.... but here's one more thread !
Thread Starter
Registered User
Joined: Dec 2010
Posts: 6,838
Likes: 1,683
From: Land of the Toxic Avenger
Yeah, I will weld them up, but I haven't done enough reading to see if there is anything "flammable" behind the cowl that can catch fire while welding the patch in.
I guess my truck needs cab bushings as well.....since the threads mention replacing them after / before welding the patches in.
I guess my truck needs cab bushings as well.....since the threads mention replacing them after / before welding the patches in.

Registered User
Joined: Feb 2010
Posts: 1,635
Likes: 59
From: New York
You'll be okay, I've done a few and haven't had a fire yet. I crank my mig welder up to the highest setting. Then I drill small holes where the crack begins and ends. Then I just spot weld really fast but put the heat on. Spot the top, spot the bottom, top, bottom. That way one side can cool and doesn't look like bubble gum 
Thread Starter
Registered User
Joined: Dec 2010
Posts: 6,838
Likes: 1,683
From: Land of the Toxic Avenger
I guess I have no life, huh ????
Cool,
I'm not looking forwards to removing the fender to access the cowl.
Do I have to remove the bumper and grille, or can it be left in place ????
You'll be okay, I've done a few and haven't had a fire yet. I crank my mig welder up to the highest setting. Then I drill small holes where the crack begins and ends. Then I just spot weld really fast but put the heat on. Spot the top, spot the bottom, top, bottom. That way one side can cool and doesn't look like bubble gum
I'm not looking forwards to removing the fender to access the cowl.
Do I have to remove the bumper and grille, or can it be left in place ????
Registered User
Joined: Feb 2010
Posts: 1,635
Likes: 59
From: New York
Bumper has to go, it's to hard to slide them around when it's on and remove bolts. There is only a few bolts, three on top, two on the bottom and one near the front. If I remember correctly. It's not a bad job, before you remove the panels just mark them with a paint marker so it lines back up.
Registered User

Joined: Dec 2008
Posts: 7,300
Likes: 2,886
From: vermont
Save the factory washers stacked under your fenders, where they rest on the cowl.
Remember how many washers, and where they came from to easy lining things up when you put them back on.
You can pull the fenders with the bumper still on but it is tight and you might scratch the paint on the fenders.
I welded my cracks on the cowl on my '85 crew.
I also welded and patched where they where cracking at the corners of the window posts.
I cut out cowl patch panels from another 1st gen, I had that had rotten cab mounts and floor.
I welded the cracks up on the cowl patch, then I used the two part body panel epoxy to glue the patch panels on.
I used a few rivets to hold it all in place and tight as the epoxy dried.
I let it dry/cure for several days in my heated garage before driving it.
I have the cowl wiper cover off right now, changing the wiper motor out.
The work looks like it is holding up great, and I did the fix last summer
It made the cab quieter and it felt "stiffer' going down the road.
Trending Topics
Thread Starter
Registered User
Joined: Dec 2010
Posts: 6,838
Likes: 1,683
From: Land of the Toxic Avenger
Nice post Oliver...
BTW, I had a 68 cuda from the age of 15 to 38. I sold it as I wanted the new space for my trailer and trucks......
I know... I'm a dumbass, but I figure if I ever strike it rich, I can go to arizona and buy one of off some unsuspecting owner who never saw snow before......
BTW, I had a 68 cuda from the age of 15 to 38. I sold it as I wanted the new space for my trailer and trucks......
I know... I'm a dumbass, but I figure if I ever strike it rich, I can go to arizona and buy one of off some unsuspecting owner who never saw snow before......
Thread Starter
Registered User
Joined: Dec 2010
Posts: 6,838
Likes: 1,683
From: Land of the Toxic Avenger
Bumper has to go, it's to hard to slide them around when it's on and remove bolts. There is only a few bolts, three on top, two on the bottom and one near the front. If I remember correctly. It's not a bad job, before you remove the panels just mark them with a paint marker so it lines back up.
Doesn't the grille attach itself to the fender ? or is it mounted in some other fashion ?
Registered User
Joined: Feb 2010
Posts: 1,635
Likes: 59
From: New York
Some of them just have a shell that wraps around a a bar. I'm not sure if Chrysler was getting cheap on these ones. Those have two bolts on the bottom, one near the front and a few up top. Those ones you can just pull off.
really isn't a bad job, what takes the most time is getting it to line back up. Paint markers work well for this.
Torque Spec is 200 inch pounds(15ft-lbs)
Registered User
Joined: Nov 2006
Posts: 807
Likes: 41
From: Englewood, TN
Exactly where would I use the paint marker on the fender before pulling it (in order to facilitate an easy reinstallation)?
Also, is the cracking normally worse on the driver's side or is it prudent to simply repair both sides of the cowl at the same time?
Thread Starter
Registered User
Joined: Dec 2010
Posts: 6,838
Likes: 1,683
From: Land of the Toxic Avenger
With reference to the cracking.... it happens on both sides. Since you have to take the bumper and grille off, might as well do one side.... reinstall and align, then remove the other. This will allow you to use the hood as a "guide" for final gap touchups.
Thread Starter
Registered User
Joined: Dec 2010
Posts: 6,838
Likes: 1,683
From: Land of the Toxic Avenger
I picked a nice couple of days to do this.....
5 hours start to "finished the patch". I assume the other side will take less time now that I've done one..
The crack wasn't terrible, but still needed to be addressed, as my radio just didn't go up high enough for me to not hear it squeaking...
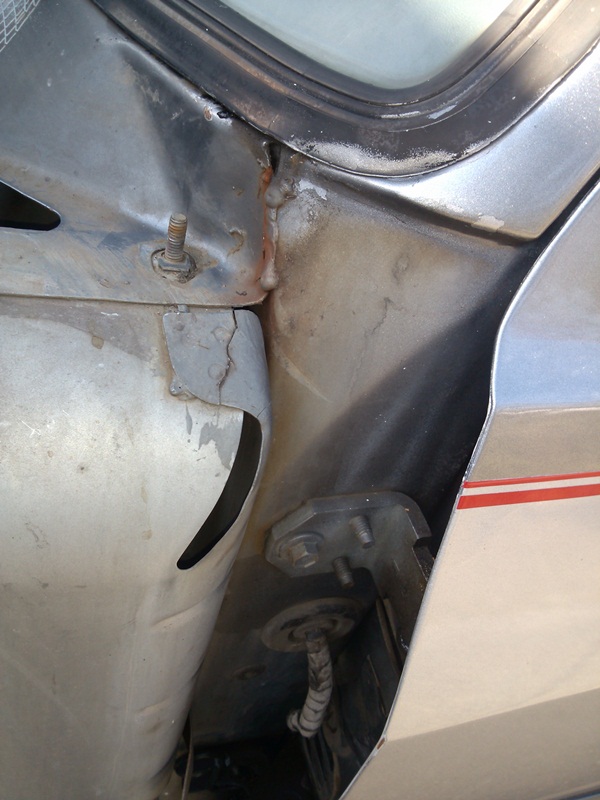
So I had some 16Ga metal around to do the job.... and did my preliminary bending by hammer and vise...

Ground off the original paint and weld..

Finished fabricating my "patch".

Installed the patch.... no I'm not a welder by trade.....

Registered User
Joined: Dec 2008
Posts: 7,300
Likes: 2,886
From: vermont
Nice looking work NJT.
There was a cowl crack fix bracket from Dodge back in the day that is now not available anymore.
I have seen pictures of them, and it looks similar in shape to your "custom" patch.
My cowl cracks where much worse on my '85 crew.
They extended out from the open "loop" in the metal in several directions for a few inches.
My cowl patch I used over it, cut off another [very rusty] 1st gen, and was about as big as a football.
I then used another roughly a 6 inch by 2 inch strap across the strip that runs directly under the windshield.
NJT - My old '69 Cuda is a "rat rod" style project for me and my daughter to work on one of these days...
I saved it from a junkyard in NH in '99 and drove it for a few years, I wish it was from AZ...
Thread Starter
Registered User
Joined: Dec 2010
Posts: 6,838
Likes: 1,683
From: Land of the Toxic Avenger
Nice looking work NJT.
There was a cowl crack fix bracket from Dodge back in the day that is now not available anymore.
I have seen pictures of them, and it looks similar in shape to your "custom" patch.
My cowl cracks where much worse on my '85 crew.
NJT - My old '69 Cuda is a "rat rod" style project for me and my daughter to work on one of these days...
I saved it from a junkyard in NH in '99 and drove it for a few years, I wish it was from AZ...
4797018 left
4797019 right
4746924 rivets
Here's what they looked like from the dealer
http://wiki.dieseltruckresource.com/wiki/Cowl_Fix
The other side was a little worse, although instead of the pieces of metal touching one another and causing that rotten noise in the cab, the metal pulled apart and continued the crack down the side as you had mentioned.

IMO the reason these things crack is also due to the "vented top" of the box that allows it to flex much more than if it wasn't vented. When I closed up the top of the box, it became much more rigid. Let's hope I'm right and I haven't caused more problems than before.

I used a cold galvanization spray on the inner panels as well as a "rubber sealant" on the patch and the cab bottom below.


