


Crewcab update...


Thread Starter
Registered User


Joined: Mar 2010
Posts: 7,265
Likes: 1,346
From: Prince George, BC
Alright I figure I better update. Been puttering on the donor 93, trying to fix things so when I go to do the swap the parts will be good to go.
I mentioned earlier that I did a service. Here is a pic of the nasty K&N I pulled out. When do you think it was last cleaned....

The pass door would not open. Door handle assemble would move, but the latch wasn't moving. I had to crawl across the pass side and wrestle the inner door panel off so I could get access to inside of the door. Once I got into it I found that the linkage was all good, no broken clips. So I pulled out the door handle...well there was my problem!

The mechanism for the button was rusted solid. And it was stuck part way between open and closed so the inner door handle wouldn't work either. I dipped into my spare parts and had this all fixed and back together in no time. Door works great now!
I mentioned earlier that I did a service. Here is a pic of the nasty K&N I pulled out. When do you think it was last cleaned....

The pass door would not open. Door handle assemble would move, but the latch wasn't moving. I had to crawl across the pass side and wrestle the inner door panel off so I could get access to inside of the door. Once I got into it I found that the linkage was all good, no broken clips. So I pulled out the door handle...well there was my problem!

The mechanism for the button was rusted solid. And it was stuck part way between open and closed so the inner door handle wouldn't work either. I dipped into my spare parts and had this all fixed and back together in no time. Door works great now!
Thread Starter
Registered User
Joined: Mar 2010
Posts: 7,265
Likes: 1,346
From: Prince George, BC
What else...well I had to rebuild the steering coupler. Here's the original. had about 180* slop in the steering wheel!!

Took me about a week to get the shaft out of the truck. The 12 point 3/8 bolts that hold the rag joint to the steering column, and steering shaft were so rusty that I could not get any type of socket to grab. I eventually had to cut them all off. Here is the shaft out, and all apart...not looking too good.

I picked up a Dorman 425-253 steering coupler rebuild kit. Cleaned everything and installed it.

Good thing I'm such a parts horder...I had to dip into my spare parts again for another good rag joint and fasteners.

Took me about a week to get the shaft out of the truck. The 12 point 3/8 bolts that hold the rag joint to the steering column, and steering shaft were so rusty that I could not get any type of socket to grab. I eventually had to cut them all off. Here is the shaft out, and all apart...not looking too good.

I picked up a Dorman 425-253 steering coupler rebuild kit. Cleaned everything and installed it.

Good thing I'm such a parts horder...I had to dip into my spare parts again for another good rag joint and fasteners.
Thread Starter
Registered User
Joined: Mar 2010
Posts: 7,265
Likes: 1,346
From: Prince George, BC
I drained the cooling system, pulled the rad and cleaned it, and flushed the motor. I then re-installed everything and ran a rad flush through the system. Made a visible difference in the amount of build up on the cross flow cores. But mad do these IC motor hold a lot of coolant...over 4 gallons!!


Thread Starter
Registered User
Joined: Mar 2010
Posts: 7,265
Likes: 1,346
From: Prince George, BC
And most recently I've been working on the rear brakes on the Dana 70. I had a visible brake fluid leak from the pass. side rear brake. Thought I might get lucky and only have to replace a couple wheel cylinders. Well here's what greeted me when I got it all apart.


Well everything was toast! So I ordered up all new stuff. I did the 1.125" wheel cylinder upgrade as well, and 3" shoes. But it was wearing 3" shoes.
Just finished the pass. side this evening. Will start of the drivers side tomorrow. Here's how things look now.
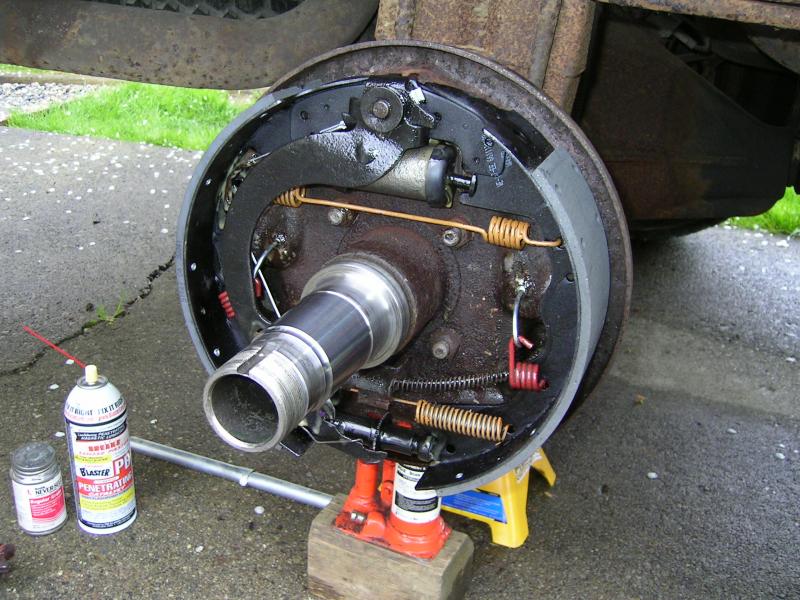


Well everything was toast! So I ordered up all new stuff. I did the 1.125" wheel cylinder upgrade as well, and 3" shoes. But it was wearing 3" shoes.
Just finished the pass. side this evening. Will start of the drivers side tomorrow. Here's how things look now.

Thread Starter
Registered User
Joined: Mar 2010
Posts: 7,265
Likes: 1,346
From: Prince George, BC
 ....
....
Thread Starter
Registered User
Joined: Mar 2010
Posts: 7,265
Likes: 1,346
From: Prince George, BC
Alright time for an update on the crewcab. I have been working on the donor 93. Insured it for a couple days and drove it around....drove pretty well. I fixed a bunch of things. Got the cruise working. Turned out it was unplugged in behind the steering wheel, and one of the wires for the cruise got pinched when the steering wheel cover was screwed on. So fixed the wore, plugged it back in and viola!! Cruise works!! The A/C was not working. So I played around with a few things...jumped the low pressure switch and nothing. Did a bit of diagnosis and found out that it was the WOT (Wide Open Throttle) relay. Had a bit of a time finding the correct molded relay...but finally got the right one and all works great now.
Thread Starter
Registered User
Joined: Mar 2010
Posts: 7,265
Likes: 1,346
From: Prince George, BC
Then it was front end rebuild time on the Donor 93. Want everything to be new for when I swap the diff into the crewcab.. I have been buying all the parts needed to do a complete rebuild for a while now. I got everything from tie rods, to king pins, to rotors and calipers.
Here's my pile of new junk.

Here's my pile of new junk.

Thread Starter
Registered User
Joined: Mar 2010
Posts: 7,265
Likes: 1,346
From: Prince George, BC
So here are some before pics. This front end, and pretty much every drive train and suspension part on this truck is rusty and crusty....almost would think this thing was a East coast rust belt truck...but the body is in great shape!
Anyway crusty pics....

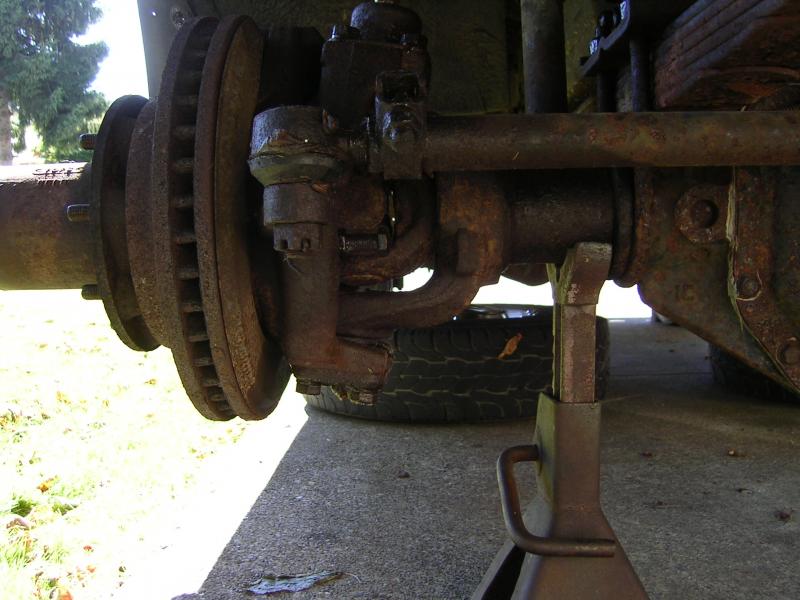

Anyway crusty pics....


Thread Starter
Registered User
Joined: Mar 2010
Posts: 7,265
Likes: 1,346
From: Prince George, BC
I had been soaking all the nuts, bolts and fasteners I could find with PB Blaster since I bought the truck back in March. Gone through several cans so far. But pretty much every thing I've had to put a wrench on has required heat and more PB Blaster.
Got the front calipers off and found the rear pads, on both sides, in rough shape.....
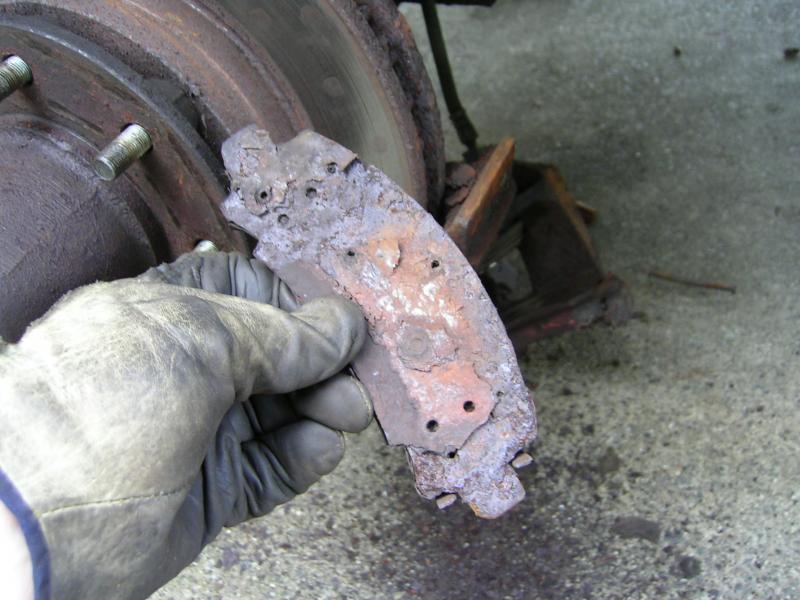

I actually drove 2 days with front brakes in that condition...Dooohhh!!
Got the front calipers off and found the rear pads, on both sides, in rough shape.....


I actually drove 2 days with front brakes in that condition...Dooohhh!!
Thread Starter
Registered User
Joined: Mar 2010
Posts: 7,265
Likes: 1,346
From: Prince George, BC
The the tear down started. Again much heat and PB Blaster was used.

Found the front splash shields were toast so had to order a new set.


I could go into crazy detail about pulling the front end apart...but instead I will just do a quick overview.

Found the front splash shields were toast so had to order a new set.


I could go into crazy detail about pulling the front end apart...but instead I will just do a quick overview.
Thread Starter
Registered User
Joined: Mar 2010
Posts: 7,265
Likes: 1,346
From: Prince George, BC
Thank goodness I had headed someones advice and bought a 2lb brass hammer, and brass drifts....they have been a life saver!!
The lower bearing plate on both sides was pretty much rusted in place. I removed the 4 bolts and had to beat on them mercilessly. Had to beat them 90 degrees so I could pound them out on the sides. Here's what they looked like.

Here you can see how crusty things were.

Tie rods...

The lower bearing plate on both sides was pretty much rusted in place. I removed the 4 bolts and had to beat on them mercilessly. Had to beat them 90 degrees so I could pound them out on the sides. Here's what they looked like.

Here you can see how crusty things were.

Tie rods...

Thread Starter
Registered User
Joined: Mar 2010
Posts: 7,265
Likes: 1,346
From: Prince George, BC
Had a bit of a fight getting the king pin stub out. Tried lots of heat and the 3/4 drive socket with 7/8 hex head, and my big 3/4 drive craftsman ratchet and a big 10ft bar.....and it would not move. And I'm no light weight either...6'8" and 275lbs.
I finally remembered someone posting up that they cut around the diameter of the stub. So I decided to give this a try. Worked great! After cutting it required just a little extra heat, and a slight pull with the big bar and they were free.


Here you can see the condition of the upper king pin set-up...lots of rust in those bearings. Most of the grease in the front end looked like chunky peanut butter.

I finally remembered someone posting up that they cut around the diameter of the stub. So I decided to give this a try. Worked great! After cutting it required just a little extra heat, and a slight pull with the big bar and they were free.


Here you can see the condition of the upper king pin set-up...lots of rust in those bearings. Most of the grease in the front end looked like chunky peanut butter.

Thread Starter
Registered User
Joined: Mar 2010
Posts: 7,265
Likes: 1,346
From: Prince George, BC
The front axle shaft U-joints were another treat. You couldn't even see the clips on the U-joint cups they were so rusted up.

Again much heat and PB Blaster later I was able to get things apart. You can see the U-joint was in rough shape to say the least.

Got everything cleaned up and new Spicer U-joints...with grease nipples..installed.


Again much heat and PB Blaster later I was able to get things apart. You can see the U-joint was in rough shape to say the least.

Got everything cleaned up and new Spicer U-joints...with grease nipples..installed.

Thread Starter
Registered User
Joined: Mar 2010
Posts: 7,265
Likes: 1,346
From: Prince George, BC
Then came the fun of removing the front gear carrier so I could replace the front axle seals. With some great advice I was able to get it out with the help of a ratchet strap and a pieces of 2x2.

Then I had to beat the old seals back into the housing. Tried a few things but nothing was working...so I had to get out my backyard engineering cap. Here's what I came up with. A piece of 6ft 2x2 with a big washer that was just slightly smaller in diameter then the inside of the axle tube. The a couple washers and a wood screw. Worked like a charm!

Getting the new seals in place was a lot of fun too... Big socket and my brass hammer. Then slowly beat them into place. And the nice thing with the brass hammer is that if you miss...and you will...you won't hurt anything.

Then I had to beat the old seals back into the housing. Tried a few things but nothing was working...so I had to get out my backyard engineering cap. Here's what I came up with. A piece of 6ft 2x2 with a big washer that was just slightly smaller in diameter then the inside of the axle tube. The a couple washers and a wood screw. Worked like a charm!

Getting the new seals in place was a lot of fun too...
Big socket and my brass hammer. Then slowly beat them into place. And the nice thing with the brass hammer is that if you miss...and you will...you won't hurt anything.