Chas'in Leaks . . .
 02-18-2008, 10:03 PM
#1
1st Generation Admin
Thread Starter
Chas'in Leaks . . .
Been rootin around looking for an antifreeze leak. 
Did you know there's only 23 bolts and a couple of hose clamps that holds the left side of the engine on?

The right side's not as complicated (to remove).

I guess there's no way around removing the hood to get the head off with a boom on a tractor.
Otherwise, I think this is gonna be fun.
- Hot-rod high-boost mega-ported O-Ringed head.
- 12mm studs.
- Predictive maintenance replacement of the engine oil cooler.
- Bunch of gaskets and seals.
- Stripping and repainting all the stuff.
I'll most likely drag it out over a week or so. Should be able to come up with a couple or four of "How-To's" along the way.
Did you know there's only 23 bolts and a couple of hose clamps that holds the left side of the engine on?
The right side's not as complicated (to remove).
I guess there's no way around removing the hood to get the head off with a boom on a tractor.
Otherwise, I think this is gonna be fun.
- Hot-rod high-boost mega-ported O-Ringed head.
- 12mm studs.
- Predictive maintenance replacement of the engine oil cooler.
- Bunch of gaskets and seals.
- Stripping and repainting all the stuff.
I'll most likely drag it out over a week or so. Should be able to come up with a couple or four of "How-To's" along the way.
 02-19-2008, 12:00 AM
#2
Registered User
Join Date: Feb 2007
Location: Pen Argyl Pennsylvania
Posts: 1,540
Likes: 0
Received 0 Likes
on
0 Posts
 Good luck man. Keep us posted and I'm looking forward to reading your next how-to. They have gave me good insite and idea's, keep up the good work
 02-19-2008, 11:49 PM
#7
Registered User
Join Date: Feb 2007
Location: Pen Argyl Pennsylvania
Posts: 1,540
Likes: 0
Received 0 Likes
on
0 Posts
David, not to get off subject but do you have any pics of that dp with the head on. I have a Rip Rook waiting for install and was wondering how close everything is with the frame and the trans heater. (I'm calling it a trans heater because thats all it's good for IMO)
Thanks
Thanks
Trending Topics
02-20-2008, 11:46 AM
#8
Registered User
Join Date: Apr 2007
Location: Stephenville / Harlingen Texas
Posts: 1,096
Likes: 0
Received 0 Likes
on
0 Posts
Wow. your going all out with this little project.
and writing "how-to'" for the sticky also?
Looks like the sticky will soon all be blessed with a plethora of new information.
Keep up the good work!
and writing "how-to'" for the sticky also?
Looks like the sticky will soon all be blessed with a plethora of new information.
Keep up the good work!
02-20-2008, 04:00 PM
#9
Registered User
David, not to get off subject but do you have any pics of that dp with the head on. I have a Rip Rook waiting for install and was wondering how close everything is with the frame and the trans heater. (I'm calling it a trans heater because thats all it's good for IMO)
Thanks
Thanks
 02-20-2008, 07:54 PM
#10
1st Generation Admin
Thread Starter
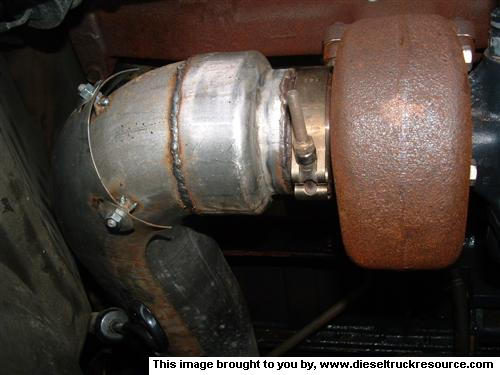
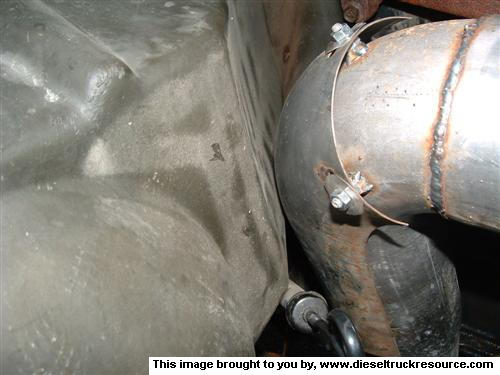
Notice the above is not wastegated. The following is. There's an inch or so difference (W/G is longer).
I cut out the noise blanket and slipped in a small sheet of 24ga metal as a shield. ~
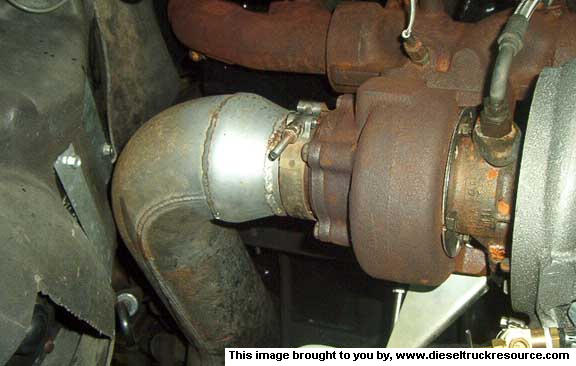
I couldn't get the OEM exhaust pipe mount on the auto trans to reach the DP. Further, I did "Ding" the DP maybe a quarter of an inch at the top of that frame rail.
Else, it's snug but fits just fine.
I cut out the noise blanket and slipped in a small sheet of 24ga metal as a shield. ~
I couldn't get the OEM exhaust pipe mount on the auto trans to reach the DP. Further, I did "Ding" the DP maybe a quarter of an inch at the top of that frame rail.
Else, it's snug but fits just fine.
02-23-2008, 09:41 PM
#11
1st Generation Admin
Thread Starter
A little update ~
The weather's been less than helpful and the wife and I've been swapping bugs.
Still though I've managed to clean and paint most of the stuff removed from the block thus far. I'm including the engine coolant pipes that conduct water to and from the cab heater and transmission heat exchanger. My concern is having them spring a leak due to corrosion. Stripping them to bare metal presents the exterior as sound. I'm gonna have to un-do part of the trans exchanger to get that final coolant line.

Removing the OEM engine oil heat exchanger has the block's interior coolant passages present in very good condition. No apparent heavy pitting/corrosion, etc. That brown film is just that, and wipes away easily.
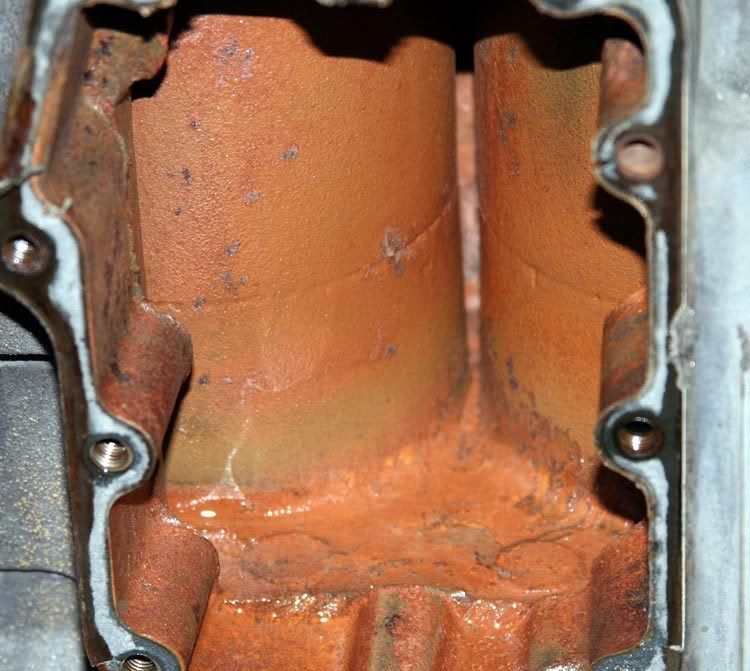
I think I found one of the numerous antifreeze leaks at the block's water inlet/bracket interface. It's pretty-much a square-cut rubber seal that's sandwiched between the block and the bracket/hose connector. Things were kinda crunchy upon removal.
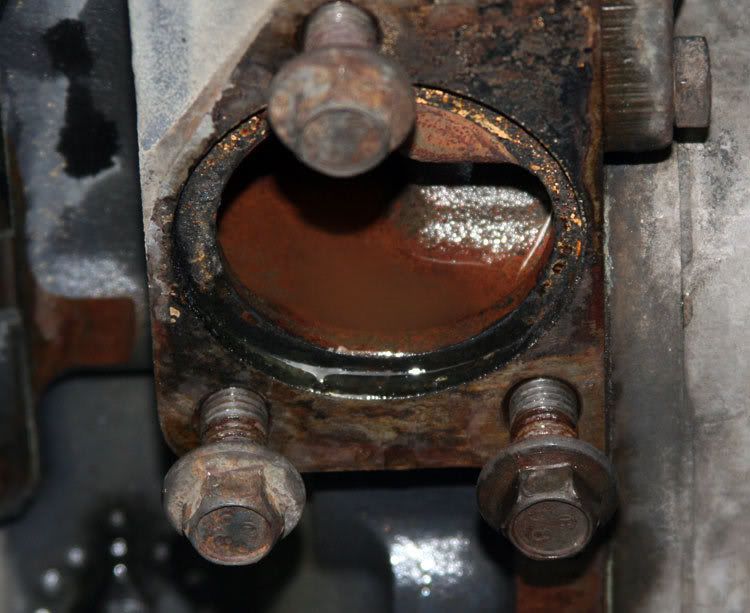
I got the engine oil heat exchanger replaced as well as a new seal there for the water inlet. Re-installed the lower radiator hose and the accessory drive belt tensioner.
Granny's cooking lunch next-door tomorrow so there'll be a bunch of folk milling about. Perhaps I'll see if I can't have a few give me a hand and remove the hood.
Then it's head-time!
Still gotta get that dag-gum trans water pipe.
The weather's been less than helpful and the wife and I've been swapping bugs.
Still though I've managed to clean and paint most of the stuff removed from the block thus far. I'm including the engine coolant pipes that conduct water to and from the cab heater and transmission heat exchanger. My concern is having them spring a leak due to corrosion. Stripping them to bare metal presents the exterior as sound. I'm gonna have to un-do part of the trans exchanger to get that final coolant line.
Removing the OEM engine oil heat exchanger has the block's interior coolant passages present in very good condition. No apparent heavy pitting/corrosion, etc. That brown film is just that, and wipes away easily.
I think I found one of the numerous antifreeze leaks at the block's water inlet/bracket interface. It's pretty-much a square-cut rubber seal that's sandwiched between the block and the bracket/hose connector. Things were kinda crunchy upon removal.
I got the engine oil heat exchanger replaced as well as a new seal there for the water inlet. Re-installed the lower radiator hose and the accessory drive belt tensioner.
Granny's cooking lunch next-door tomorrow so there'll be a bunch of folk milling about. Perhaps I'll see if I can't have a few give me a hand and remove the hood.
Then it's head-time!
Still gotta get that dag-gum trans water pipe.
02-26-2008, 10:33 PM
#13
Registered User

You can sit in the engine comparment and remove the head on your own. All you need is a helper to grab the head from you.
Just to warn you before hand, it is a mean 200 lbs and all upper body strength.
I suggest at least a real good breakfast and a lower back belt.
Been there done that.
Have fun!!!
Just to warn you before hand, it is a mean 200 lbs and all upper body strength.
I suggest at least a real good breakfast and a lower back belt.
Been there done that.
Have fun!!!
02-27-2008, 05:21 AM
#14
Administrator

Rust never sleeps.
Has anyone ever considered installing a couple of Sacrificial Anodes in the cooling system to keep it from eating itself from the inside out.
With the size of the freeze plugs it would be easy to use a brass plug and braze a bung in the center and then screw in a Anode Pencil like they use on marine engines or an RV water heater.
Now it can be replaced from the outside.
How much room is there behind the plugs? Are they between the cylinders?
Just a thought.
Jim
A little update ~
The weather's been less than helpful and the wife and I've been swapping bugs.
Still though I've managed to clean and paint most of the stuff removed from the block thus far. I'm including the engine coolant pipes that conduct water to and from the cab heater and transmission heat exchanger. My concern is having them spring a leak due to corrosion. Stripping them to bare metal presents the exterior as sound. I'm gonna have to un-do part of the trans exchanger to get that final coolant line.
Removing the OEM engine oil heat exchanger has the block's interior coolant passages present in very good condition. No apparent heavy pitting/corrosion, etc. That brown film is just that, and wipes away easily.
I think I found one of the numerous antifreeze leaks at the block's water inlet/bracket interface. It's pretty-much a square-cut rubber seal that's sandwiched between the block and the bracket/hose connector. Things were kinda crunchy upon removal.
I got the engine oil heat exchanger replaced as well as a new seal there for the water inlet. Re-installed the lower radiator hose and the accessory drive belt tensioner.
Granny's cooking lunch next-door tomorrow so there'll be a bunch of folk milling about. Perhaps I'll see if I can't have a few give me a hand and remove the hood.
Then it's head-time!
Still gotta get that dag-gum trans water pipe.
02-27-2008, 07:56 PM
#15
1st Generation Admin
Thread Starter
I'm not sure about the anode thing Jim.
I do know that one of the best thing's you can do for most any water cooled engine as such is to be sure you run the correct radiator cap as well as a working overflow tank.
We need to be sure the radiator cap is the type that not only burps any trapped air on heating the fluid (expansion), but also allows siphoning fluid back into the system upon cooling (contraction). The goal being that ALL gases are disassociated and expelled from the system. No oxygen in the circuit, no common corrosion.
Further, keeping tabs on the antifreeze is a good idea. In addition to the freeze thing, there's a bunch of additives that control foaming, keep dirt in solution, lubricate, and those associated with controlling corrosion itself. They include chemicals that form protective films on the components further isolating them from free oxygen as well as that dissolved. It goes on.
RuralCruiser007, I'm gonna wimp-out and use the boom on the tractor. I can set the draft control such that if it begins to lift the front wheels, it'll back off automatically.

I've been slow in getting to it what with work, and windy-cold.
I have completed the task of removing and stripping both paint and any rust from all the hard-pipe associated with the cab heater and transmission heat exchanger. I had to remove the turbo down-pipe to allow the one coolant pipe to get around the trans exchanger's mounting bracket. I then had to remove the heat exchanger itself to get that pipe out from behind the same bracket.
I chemically stripped the pipes then scrubbed them with a stainless scouring pad. Got the rust off what little there was and struck them with two coats of paint. The heat exchanger has a very thick coating of paint. It is in good shape though there was a little corrosion of the tank adjacent to the water nipples. I got those spots down to clean metal and repainted as well.
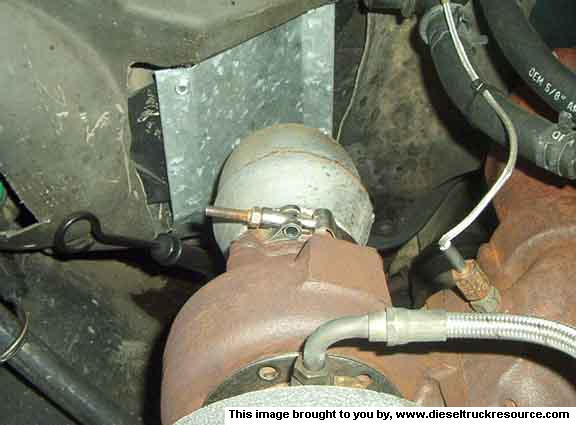
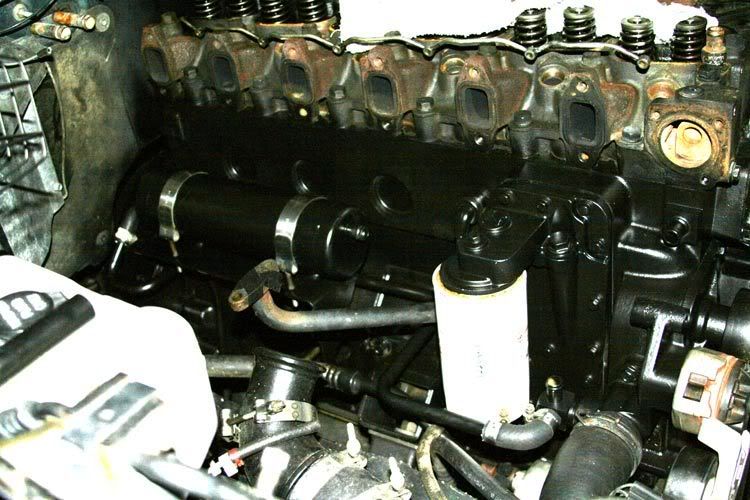
It was a pain for sure what with using the installed valve springs as a place to kneel while you're dinking around with the exchanger fittings for example. Still though, that and replacing those little 90* x 5/8" rubber hoses should go well toward keeping the green in. The new engine oil cooler will help ensure the green and black don't go to making a funky soup.
Pardon the weird picture. With everything painted satin black, I had to alter it quite a bit so one can see at least some of the stuff.
I do know that one of the best thing's you can do for most any water cooled engine as such is to be sure you run the correct radiator cap as well as a working overflow tank.
We need to be sure the radiator cap is the type that not only burps any trapped air on heating the fluid (expansion), but also allows siphoning fluid back into the system upon cooling (contraction). The goal being that ALL gases are disassociated and expelled from the system. No oxygen in the circuit, no common corrosion.
Further, keeping tabs on the antifreeze is a good idea. In addition to the freeze thing, there's a bunch of additives that control foaming, keep dirt in solution, lubricate, and those associated with controlling corrosion itself. They include chemicals that form protective films on the components further isolating them from free oxygen as well as that dissolved. It goes on.
RuralCruiser007, I'm gonna wimp-out and use the boom on the tractor. I can set the draft control such that if it begins to lift the front wheels, it'll back off automatically.
I've been slow in getting to it what with work, and windy-cold.
I have completed the task of removing and stripping both paint and any rust from all the hard-pipe associated with the cab heater and transmission heat exchanger. I had to remove the turbo down-pipe to allow the one coolant pipe to get around the trans exchanger's mounting bracket. I then had to remove the heat exchanger itself to get that pipe out from behind the same bracket.
I chemically stripped the pipes then scrubbed them with a stainless scouring pad. Got the rust off what little there was and struck them with two coats of paint. The heat exchanger has a very thick coating of paint. It is in good shape though there was a little corrosion of the tank adjacent to the water nipples. I got those spots down to clean metal and repainted as well.
It was a pain for sure what with using the installed valve springs as a place to kneel while you're dinking around with the exchanger fittings for example.
Still though, that and replacing those little 90* x 5/8" rubber hoses should go well toward keeping the green in. The new engine oil cooler will help ensure the green and black don't go to making a funky soup. Pardon the weird picture. With everything painted satin black, I had to alter it quite a bit so one can see at least some of the stuff.