What did you do to your Gen 1 today?
 07-30-2015, 06:36 PM
#1201
Registered User
Join Date: Dec 2010
Location: Land of the Toxic Avenger
Posts: 6,770
Received 1,637 Likes
on
1,112 Posts
Elbow to a downward spout... Mucho better-o....
 07-30-2015, 08:56 PM
#1203
Registered User
I never use the petcock. Most of the time they are clogged anyway. I usually just put a bucket or pan under the vehicle and pull the lower radiator hose from the rad then take the cap off. I try to do this near vegetation I don't care about. Drains WAY quicker!
07-30-2015, 10:35 PM
#1204
How are you guys removing the petcock? I twisted off the turn tabs awhile back and had to tighten up the threads sticking out w/ v- grips and have a dorman replacement. But it looks like my OEM petcock was brazed on! My future plan was to yank out the radiator at next coolant change and figure something out like drill out and re braze a threaded portion to accept the dorman replacement. Honestly, I can't tell because the oem pc is painted black...so is it really truly a threaded on piece?
07-30-2015, 10:40 PM
#1205
Registered User
I wanted to replace the plug in my Mishimoto radiator with a ball valve. Of course, the bung has metric threads. Any idea how hard it is to find a metric to NPT adapter?? Nearly impossible. Unless I didn't look hard enough but I scoured the internet and found not much that wouldn't cost me too much just for shipping. I ended up just using the plug they supplied with it. I can still use an old lower radiator hose to direct the coolant into a 5gal bucket, I suppose. We'll see how that goes when the time comes.
07-31-2015, 03:55 AM
#1206
Registered User
That is so simple I'm almost ashamed I never thought of it....good thing I don't feel shame though.

T-Man....thank you for posting up on how to clean the rad out. I'm still using the original unit from 1993 in the crewcab....and it could use a freshening up.
07-31-2015, 06:58 AM
#1207
Registered User
Join Date: Dec 2010
Location: Land of the Toxic Avenger
Posts: 6,770
Received 1,637 Likes
on
1,112 Posts
That's why I brought it there in the first place. The guys at the rad shop said they never use the petcock, but they pull the lower hose off. Has to do with the speed of which getting the cars back out of the shop.
07-31-2015, 07:09 AM
#1208
Registered User
I wanted to replace the plug in my Mishimoto radiator with a ball valve. Of course, the bung has metric threads. Any idea how hard it is to find a metric to NPT adapter?? Nearly impossible. Unless I didn't look hard enough but I scoured the internet and found not much that wouldn't cost me too much just for shipping. I ended up just using the plug they supplied with it. I can still use an old lower radiator hose to direct the coolant into a 5gal bucket, I suppose. We'll see how that goes when the time comes.
I've had my M radiator out several times for various reasons. I just stick about a 1/2 inch siphon hose in the right tank through the neck and dump it into a 5 gallon bucket. It's both faster and neater than using a petcock you can barely reach.
07-31-2015, 07:12 AM
#1209
Registered User
Pulling the lower rad. hose off sure gets thing flowing quickly!
I have even used a knife to pop a small cut/hole into the lower rad hose.
I then stick a few inches of metal brake line or the like in there, to get it sending the stream right into a clean 5 gallon bucket.
It doesn't do the lower rad hose any favors, but if done right, it can be a pretty clean way to drain the rad as well.
 07-31-2015, 10:46 AM
#1210
Registered User
Join Date: Dec 2010
Location: Land of the Toxic Avenger
Posts: 6,770
Received 1,637 Likes
on
1,112 Posts
decided to follow J's lead.
I removed the petcock, and it's amazing how small the diameter of the exit is. So I just put in a plug, and I'm good to go. To drain it will be very easy, as a 9/16 shortie rachet or wrench, and it's pouring out.
Back up and running, and now I get to go test it out..
I removed the petcock, and it's amazing how small the diameter of the exit is. So I just put in a plug, and I'm good to go. To drain it will be very easy, as a 9/16 shortie rachet or wrench, and it's pouring out.
Back up and running, and now I get to go test it out..
08-04-2015, 03:05 PM
#1211
Registered User
Back to the front fender marker/turn signal lamp.
Replacing it with an LED lamp and the resulting problems have been discussed at length. Proposed has been re-wiring, relays, bridge diodes, etc to solve the problem.
This outfit (M4) specializes in LEDs for RV's. where half the fixtures are wired backwards. Thus, if possible, they build the diode steering circuit into the lamps, eliminating the problem.
The closest lamp they have to a 168 size is this one. It's a little bit smaller than a 912 lamp, puts out 360 lumens, and draws .13A. I plan to re-lamp my entire camper with them.
Elite Series Wedge Base Retrofit Bulb
08-06-2015, 07:51 AM
#1212
Registered User

anyone know where to find collar (ball socket) and snap ring for shifter stub on 93 getrag, bought a truck in pieces, and this is a couple pieces i need. or dimensions would help also.. I ,m also looking for pics of the underside of 2WD with getrag to figure out this box of brackets an supports i have. Its a 93 extended cab thanks
08-06-2015, 09:02 PM
#1213
Administrator

Here is how I drain mine, installed it when the radiator was new and it is still working fine.
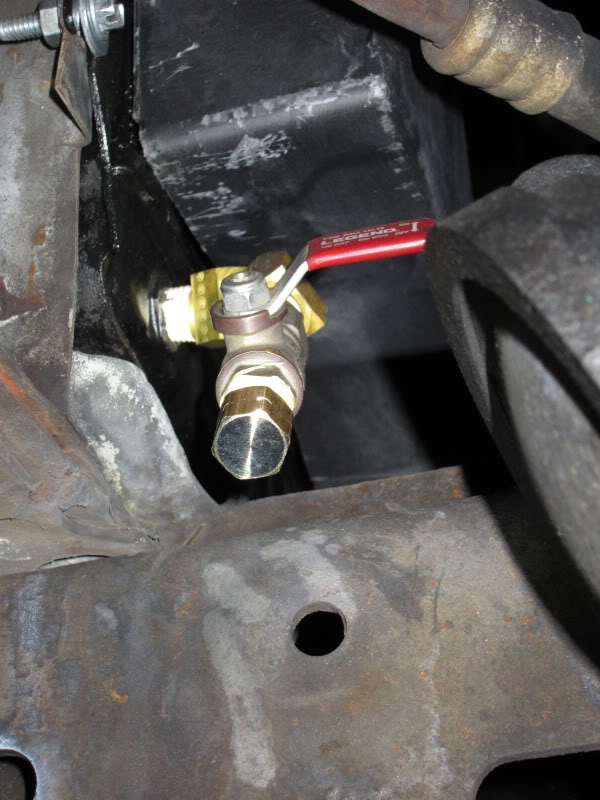
There are 2) 45*'s,
2) close nipples,
1/4" NPT ball valve
And a cap.
Jim

There are 2) 45*'s,
2) close nipples,
1/4" NPT ball valve
And a cap.
Jim
08-09-2015, 10:43 AM
#1214
Registered User
Back to the front fender marker/turn signal lamp.
Replacing it with an LED lamp and the resulting problems have been discussed at length. Proposed has been re-wiring, relays, bridge diodes, etc to solve the problem.
This outfit (M4) specializes in LEDs for RV's. where half the fixtures are wired backwards. Thus, if possible, they build the diode steering circuit into the lamps, eliminating the problem.
The closest lamp they have to a 168 size is this one. It's a little bit smaller than a 912 lamp, puts out 360 lumens, and draws .13A. I plan to re-lamp my entire camper with them.
Elite Series Wedge Base Retrofit Bulb
Replacing it with an LED lamp and the resulting problems have been discussed at length. Proposed has been re-wiring, relays, bridge diodes, etc to solve the problem.
This outfit (M4) specializes in LEDs for RV's. where half the fixtures are wired backwards. Thus, if possible, they build the diode steering circuit into the lamps, eliminating the problem.
The closest lamp they have to a 168 size is this one. It's a little bit smaller than a 912 lamp, puts out 360 lumens, and draws .13A. I plan to re-lamp my entire camper with them.
Elite Series Wedge Base Retrofit Bulb
My truck didn't have a 4-way connector to disassemble and tap like Jim Lane's does. So I rewired the front lighting with a 4-way square Weatherpack connector.
When it came to a flasher for the turn signal and hazards, I picked up 2 flasher from VLEDS. These flashers simply have an electronic timer in them, no coil or circuit breaker as any ordinary flasher would have. With LEDs front and rear, it remedies all issues you encounter with LEDs; hyperflashing, no flashing and bulb out indicators. It did just what it says it does. Mine had no hyperflashing but it did have bulb out indicators and would only flash intermittently. Now, it works flawlessly. The one for our trucks can be found here... 2 PIN ELECTRONIC LED FLASHER BLINKER FIX 1157 3157 7443 EFL2 - Flashers.
I also installed some brighter LEDs in my reverse lights. Also from VLEDS. Said to be rated at 1000 lumens. 6K WHITE HIGH OUTPUT 21 LED BACK-UP LIGHT 1156 1000LM | 1 PAIR - 1156 - Reverse Back-Up - Shop Bulb Type
08-10-2015, 07:56 AM
#1215
Registered User

I've run across some 194 LED replacements recently that, in diagrams, pointed to bridge rectifiers built into the assembly. Tiny little things! I was going to buy a couple to wire up to my side markers and tried for the life of me to find your post about how to wire one of those things yet, I couldn't find it for some reason. I searched for diagrams and couldn't quite get a definitive answer so I scrapped the idea and wired them solely as running lights.
My truck didn't have a 4-way connector to disassemble and tap like Jim Lane's does. So I rewired the front lighting with a 4-way square Weatherpack connector.
When it came to a flasher for the turn signal and hazards, I picked up 2 flasher from VLEDS. These flashers simply have an electronic timer in them, no coil or circuit breaker as any ordinary flasher would have. With LEDs front and rear, it remedies all issues you encounter with LEDs; hyperflashing, no flashing and bulb out indicators. It did just what it says it does. Mine had no hyperflashing but it did have bulb out indicators and would only flash intermittently. Now, it works flawlessly. The one for our trucks can be found here... 2 PIN ELECTRONIC LED FLASHER BLINKER FIX 1157 3157 7443 EFL2 - Flashers.
I also installed some brighter LEDs in my reverse lights. Also from VLEDS. Said to be rated at 1000 lumens. 6K WHITE HIGH OUTPUT 21 LED BACK-UP LIGHT 1156 1000LM | 1 PAIR - 1156 - Reverse Back-Up - Shop Bulb Type
 Those backup lights are brighter than my headlights. Now I really feel bad about having to strike a match to check if my headlights are on.