rebuilding camper questions?
 01-02-2009, 05:01 PM
#1
Registered User
Thread Starter
Join Date: Dec 2006
Location: Surrey BC
Posts: 742
Likes: 0
Received 0 Likes
on
0 Posts
rebuilding camper questions?
Has anyone one here rebuilt the inside of a camper? I found a used 9.5 foot bigfoot camper for $750 obo the inside needs to be redone becouse the floor had gotten rotted, so the guy pulled it apart to do it, he has fixed the floor but now the rest needs to be put back together. It is a full fiberglass camper and in good shape they seem to sell for like 5-10 grand. Any advice? Is it worht doing or should I save up for one that dosent need work? Thanks in advance, Frank
 01-02-2009, 05:28 PM
#2
Registered User

I used to buy insurance write offs, interior fire damage. They are very easy to re-do if you are a home handyman kind of guy. Don't bother too much with making it look exactly like factory, instead use more from Home Depot kind of stores and try to keep the weight down. You will be super impressed with the results.
01-02-2009, 05:36 PM
#3
Registered User
Thread Starter
Join Date: Dec 2006
Location: Surrey BC
Posts: 742
Likes: 0
Received 0 Likes
on
0 Posts
Im a carpenter so i think I should be able to do it, the only thing that bothers me as its allready apart so I have to figure out how to do it but I guess Ill just learn as I go. One other reason it is taken apart is that it didn't fit in newer truck boxes so they cut they fiberglass and narrowed it so it will fit in the newer boxes that arn't as wide at the tailgate.
The one reason that I am interested in this is I would be able to build it how I want it to be.
The one reason that I am interested in this is I would be able to build it how I want it to be.
01-02-2009, 11:00 PM
#4
Banned

Join Date: May 2008
Location: Oklahoma City
Posts: 306
Likes: 0
Received 0 Likes
on
0 Posts
Helped my dad convert an old Grayhound bus into a motorhome. The job never got completely finished because Dad got into an accident and got disabled, had to sell it because he couldnt drive it. Here is what the inside looked like at one point towards the end (stuff kinda thrown everywhere because we were measuring for carpet and such.

I wont lie to ya, it ain't easy but its worth doing if you have the tools, a place to work and the skills. Is just like remolding a house, only for studs you use 2x2s instead of 2x4s and stuff can get mighty tricky with curved walls and ceilings. If you notice in the picture, our bus had no straight walls and that made things really complicated.
We got all the RV stuff from RV surplus places. 90% of the RV manufacturing in this country is done in and around Goshen, IN and Mishawaka, IN and there are a bunch of scratch and dent RV outlets around there that have popped up to dump the crap that the manufactures get. Its worth taking a trip (take your shopping list and your cash -- most of them don't take credit cards) if you are redoing one of 'em.
01-02-2009, 11:04 PM
#5
Registered User
Join Date: Nov 2004
Location: redford michigan
Posts: 225
Likes: 0
Received 0 Likes
on
0 Posts
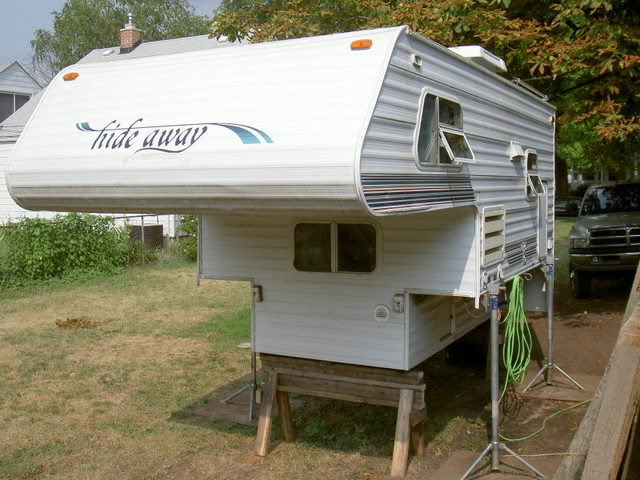
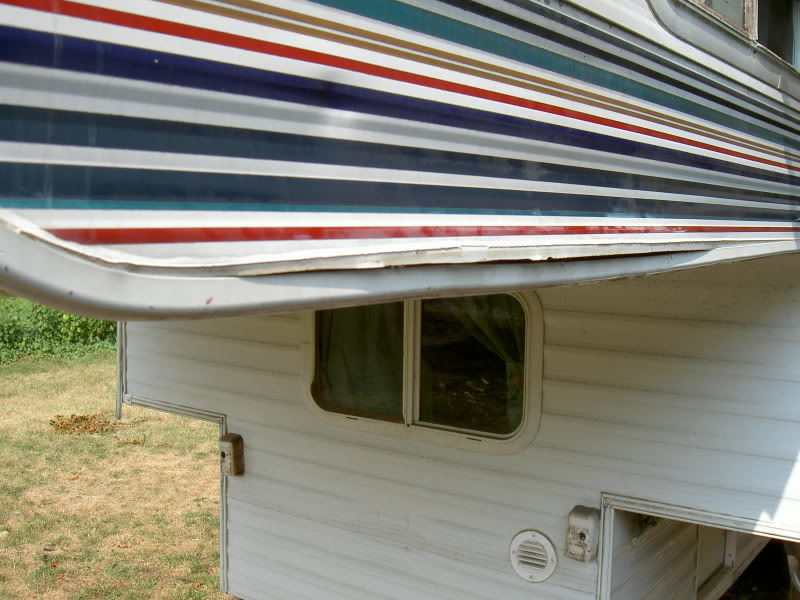
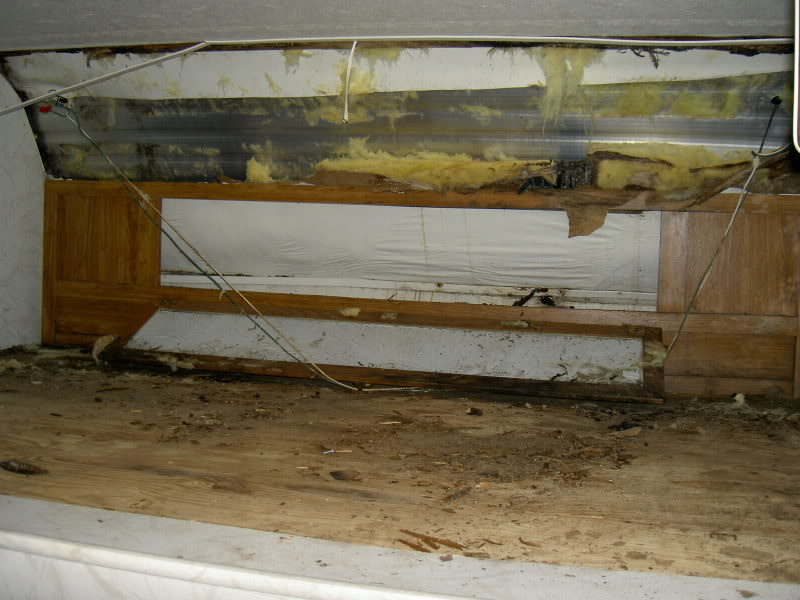
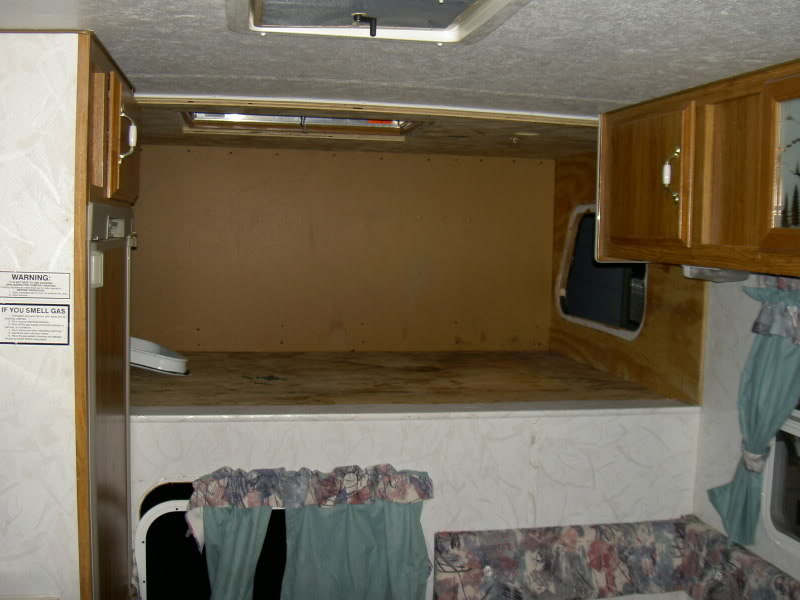
Here are a couple of pics of a rebuild we did this summer on our truck camper. Water damage can be pretty bad.

We got it all back together now. I need to do a little more work to finish the inside and some new caulk on the outside. Not to had but it took some time. Good luck and take some pics to post.
We got it all back together now. I need to do a little more work to finish the inside and some new caulk on the outside. Not to had but it took some time. Good luck and take some pics to post.
01-02-2009, 11:36 PM
#6
Registered User
Thread Starter
Join Date: Dec 2006
Location: Surrey BC
Posts: 742
Likes: 0
Received 0 Likes
on
0 Posts
You guys do some nice work, looks great. I think Ill give the guy a call in couple days, right now there's too much snow to go get it. He says it also has a new cook top and grey water tank, aswell as some other odds and ends. I will definatly take pics and post updates as I go. Thanks for the advice and the pics, any more pics or advice would be great. Thanks again, Frank
Trending Topics
01-04-2009, 08:56 PM
#9
Registered User
Join Date: Nov 2004
Location: redford michigan
Posts: 225
Likes: 0
Received 0 Likes
on
0 Posts
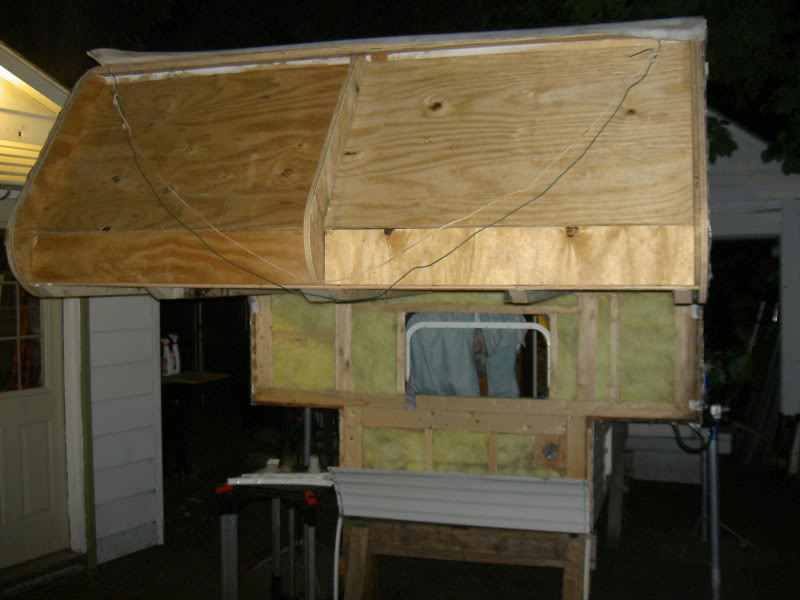
here is what I started with.
here is the seam along the bottom of the bed area.
here is a pic of the inside with some paneling removed.
here it is opened up.
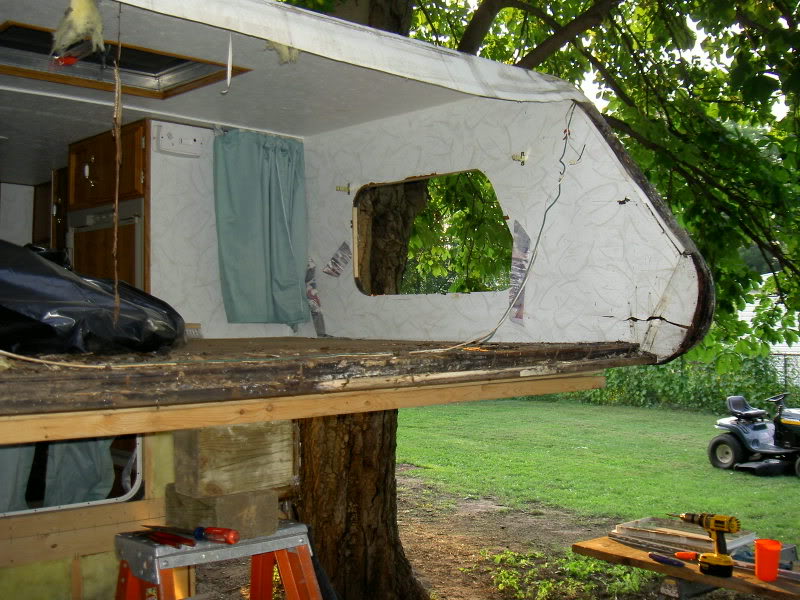
here is a pic of the inside. The front panel has two 16"x24" holes cut in it for storage. there used to be a cabinet there in the nose. The ceiling, side walls and bed floor are all tied together. Glued, screwed, and nailed. I even used some bubble gum and duct tape. lol... I think it is pretty solid. We still have a few cosmetic things to do inside and a couple of pieces of trim on the outside. Pretty excited to get to use it. Can't wait.
here is the seam along the bottom of the bed area.
here is a pic of the inside with some paneling removed.
here it is opened up.
here is a pic of the inside. The front panel has two 16"x24" holes cut in it for storage. there used to be a cabinet there in the nose. The ceiling, side walls and bed floor are all tied together. Glued, screwed, and nailed. I even used some bubble gum and duct tape. lol... I think it is pretty solid. We still have a few cosmetic things to do inside and a couple of pieces of trim on the outside. Pretty excited to get to use it. Can't wait.
01-05-2009, 03:04 PM
#12
Registered User
Thread Starter
Join Date: Dec 2006
Location: Surrey BC
Posts: 742
Likes: 0
Received 0 Likes
on
0 Posts
Thanks for the pics and advice, looks like you guys do really nice work. Hopefully I can get the camper later this week if some snow melts. Im pretty excited Ive been wanting a camper for a few years now, this will be my first one and hopefully I'll be able to use it this summer. Im not to worried about builing it same as original, I think I'll custumize it a little bit.
Keith1992, did you build those cabinets or did you buy ones that fit?
Keith1992, did you build those cabinets or did you buy ones that fit?
01-05-2009, 10:40 PM
#13
Banned
Join Date: May 2008
Location: Oklahoma City
Posts: 306
Likes: 0
Received 0 Likes
on
0 Posts
Keep in mind that its just like a house, only smaller and remember to measure three times, cut once. And run all your wires and pipes and tubing before you seal the walls up cause unlike a house it can be a real pain to add stuff later on without tearing 3-4 other things up to get to it. Make sure stuff is really where you want it before you plant it and waste no space. There shouldn't be a single cubic foot of void behind walls or cuboards or whatever, make every nook and cranny count. Have fun!
01-05-2009, 10:47 PM
#14
Registered User
Outdoorsman,
I've got to say I'm really impressed. I would not have had the fortitude to tear a camper apart like that, nor the skills to bring it back to a structurally sound and useable condition...
I've got to say I'm really impressed. I would not have had the fortitude to tear a camper apart like that, nor the skills to bring it back to a structurally sound and useable condition...
01-05-2009, 11:55 PM
#15
Registered User

Join Date: Mar 2003
Location: Northwest, Minnesota USA
Posts: 1,629
Likes: 0
Received 0 Likes
on
0 Posts
When we were RV shopping I stopped at a consignment lot to check out a nice trailer. It looked great until I got to the bedroom that smelled ... funny. My finger went through the interior wall on the first probe.
Can you guess the response when I offered 10k less than the offered price?
Can you guess the response when I offered 10k less than the offered price?