
Steering Gear Retrofit in my 92

Thread Starter
Registered User


Joined: Dec 2010
Posts: 6,841
Likes: 1,683
From: Land of the Toxic Avenger
Steering Gear Retrofit in my 92
This thread is dedicated to BobVA in Washington, as he's the inspiration for changing my truck's steering gear mounting system to the 1972-1977 Dodge 4x4 steering gear mounting setup to eliminate the forever breaking steering gear plates that our trucks came with from the factory. He's done all of the legwork for this project with reference to figuring out what was needed to to the job, here:
https://www.dieseltruckresource.com/...d.php?t=299031
I'm documenting my install in my 1992 w250 and providing photos of the work as it's completed. As of right now, I'm about 1/2 way through the process, and I will update the pictures as I do the work. Removing all the parts is easy, so I don't have to show here, although any "oops" I come across I'll go into detail how I addressed them, when necessary.
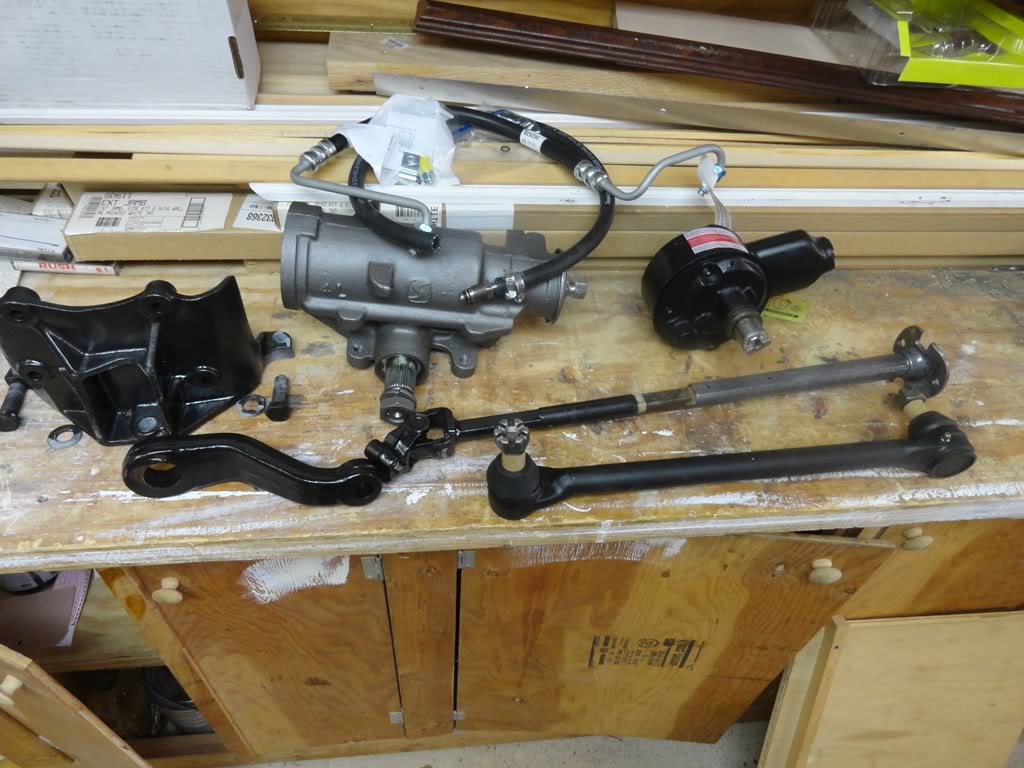
To start with, I placed my order with Power Steering Service, Inc. of Springfield MO http://www.powersteering.com/products.htm. I had "Chip" make me a specially adapted gear made up for me for what I wanted to give the truck a more responsive feel to the wheel while driving. I kept the metric cummins pump, as I wanted to keep it as simple as possible for installation. I then found the necessary parts I needed to complete the job which were cleaned, modified where required and installed
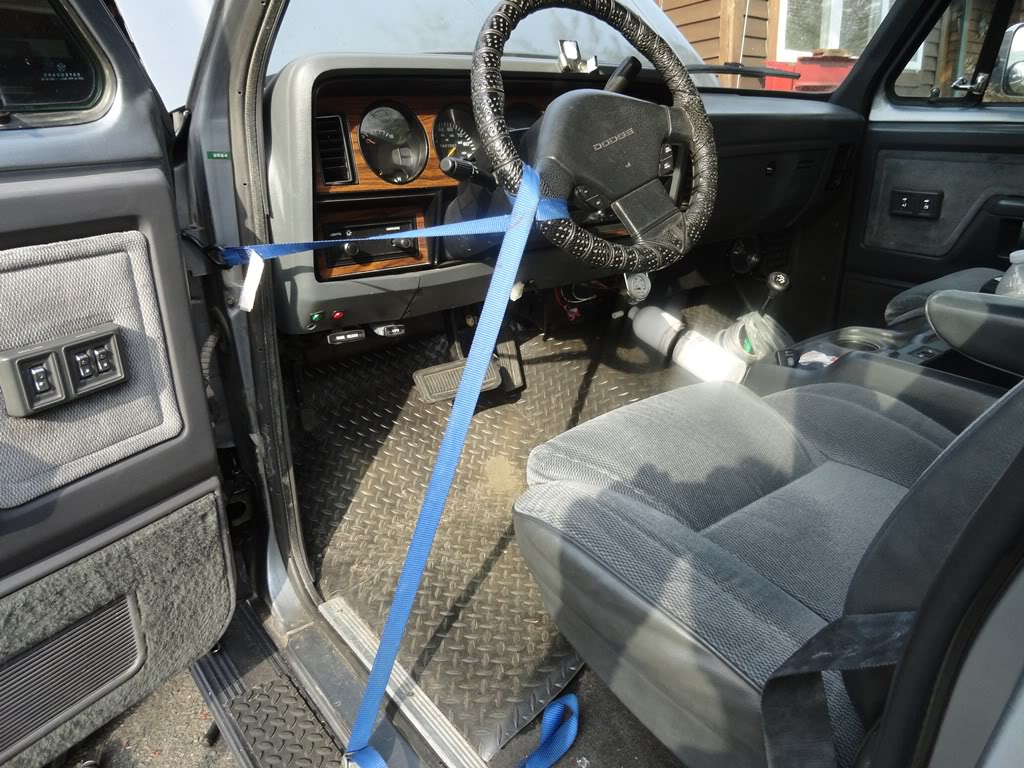
Lock up your steering wheel, so you don't ruin your clockspring in the column.
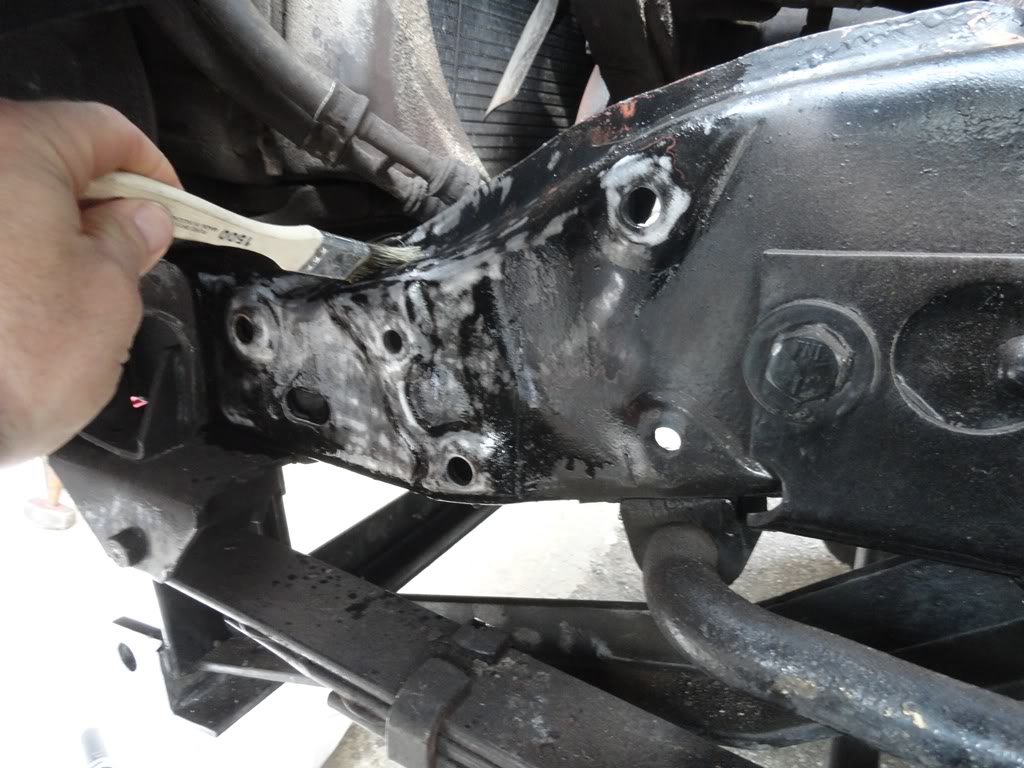
The gear came fully adjusted and ready for installation, but I had to accomplish a few other things I wanted to do in the interim. Took about 2 hours to get everything apart, including removing the draglink, steering gear, intermediate shaft, pressure and return hose, pump and rubber shielding between the inner fender and frame. The battery, intercooler tube, and a few other misc. items were removed for ease of working in there. Here is the frame, cleaned and in the process of rust conversion.
Easy stuff first.
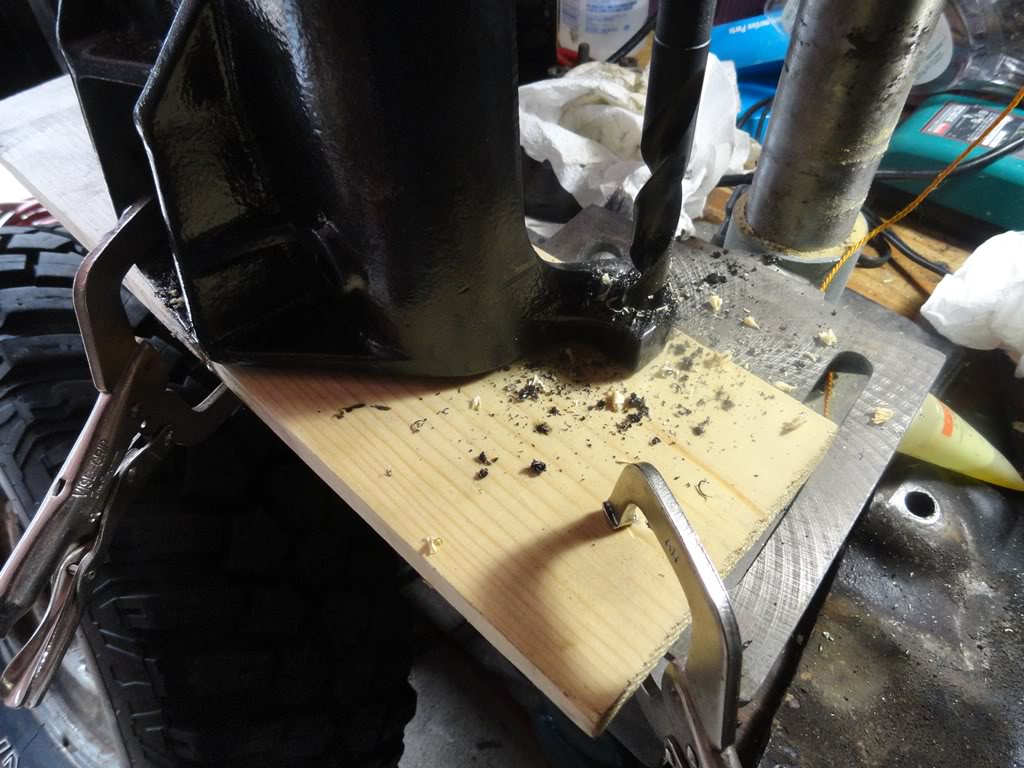
The new mounting bracket has 1/2" mounting holes in it, whereas in my truck the mounting holes require 9/16 bolts. If you have the later dodge pickup, you'll need to enlargen these holes to 9/16 to get the bolts to fit. The earlier dodges might not need this step, as the holes are smaller 1/2" diameter that bolt to the frame. I used a cheapo mini drill press to do this as seen here, by going slow in the drilling, using oil as a lubricant, and a brand new 9/16 bit.
The bottom bolt won't work, as it's knurled with splines (red arrow) and I'll be replacing that with a new grade 8 bolt before I'm done. I ground down the washers on one side (red arrow) to get them to sit flat against the bracket's side casing, then I primed and painted them so that the wouldn't rust after installation.

No cracks in my frame..... (what a relief)
Continued on Post #2
https://www.dieseltruckresource.com/...d.php?t=299031
I'm documenting my install in my 1992 w250 and providing photos of the work as it's completed. As of right now, I'm about 1/2 way through the process, and I will update the pictures as I do the work. Removing all the parts is easy, so I don't have to show here, although any "oops" I come across I'll go into detail how I addressed them, when necessary.
To start with, I placed my order with Power Steering Service, Inc. of Springfield MO http://www.powersteering.com/products.htm. I had "Chip" make me a specially adapted gear made up for me for what I wanted to give the truck a more responsive feel to the wheel while driving. I kept the metric cummins pump, as I wanted to keep it as simple as possible for installation. I then found the necessary parts I needed to complete the job which were cleaned, modified where required and installed
- Steering gear from PSS with a 3/4" input spline, 16/13 variable ratio, reverse rotation, non internal stops, metric case (for hoses input and output), return hose with adapter and new o-rings $350.00 (PLUS initial shipping & returning core shipping $90)
- Rebuilt PS pump (81-8552f) and hose (7-2390) from Napa $95
- Gear box mount (junk yard 1977 w150) $15
- Steering 1/2 shaft for lower section (1989 Jeep Cherokee) $10
- Steering 1/2 shaft for upper section (1975 Chevy C-10 pickup) $10
- Draglink with the 4500# axle TRW DS869 (1972 w200) $75
- PS inline filter Wix #58964 but will eventually put a magnefine in there $15
- Pitman arm out of a 72-77 w200 from a Junkyard (thanks Papecat) $75
- New Rag Joint (I replaced it previously) $20
- GR 8 Bolts where necessary $5-$15
- Primer, rust converter, paint $20
Lock up your steering wheel, so you don't ruin your clockspring in the column.
The gear came fully adjusted and ready for installation, but I had to accomplish a few other things I wanted to do in the interim. Took about 2 hours to get everything apart, including removing the draglink, steering gear, intermediate shaft, pressure and return hose, pump and rubber shielding between the inner fender and frame. The battery, intercooler tube, and a few other misc. items were removed for ease of working in there. Here is the frame, cleaned and in the process of rust conversion.
Easy stuff first.
The new mounting bracket has 1/2" mounting holes in it, whereas in my truck the mounting holes require 9/16 bolts. If you have the later dodge pickup, you'll need to enlargen these holes to 9/16 to get the bolts to fit. The earlier dodges might not need this step, as the holes are smaller 1/2" diameter that bolt to the frame. I used a cheapo mini drill press to do this as seen here, by going slow in the drilling, using oil as a lubricant, and a brand new 9/16 bit.
The bottom bolt won't work, as it's knurled with splines (red arrow) and I'll be replacing that with a new grade 8 bolt before I'm done. I ground down the washers on one side (red arrow) to get them to sit flat against the bracket's side casing, then I primed and painted them so that the wouldn't rust after installation.
No cracks in my frame..... (what a relief)
Continued on Post #2
Thread Starter
Registered User
Joined: Dec 2010
Posts: 6,841
Likes: 1,683
From: Land of the Toxic Avenger
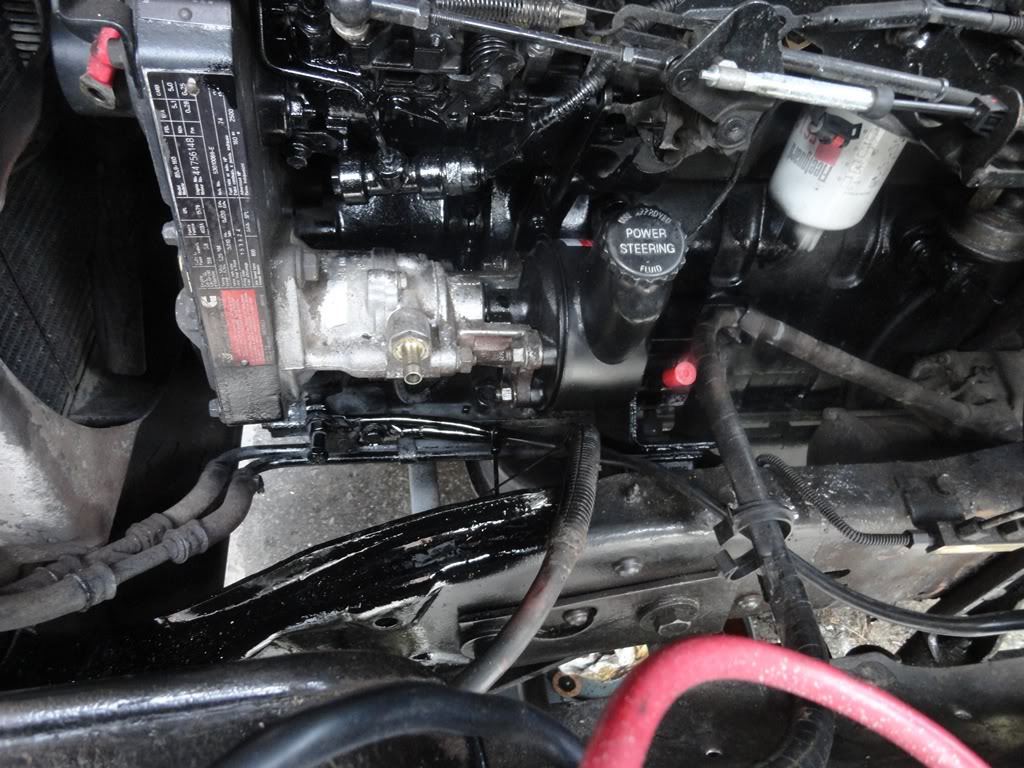
Next step for me was to remove the PS pump assembly.
You'll need one of those "15 mm bendy wrenches" to get the rear nuts off of the stud as seen here:
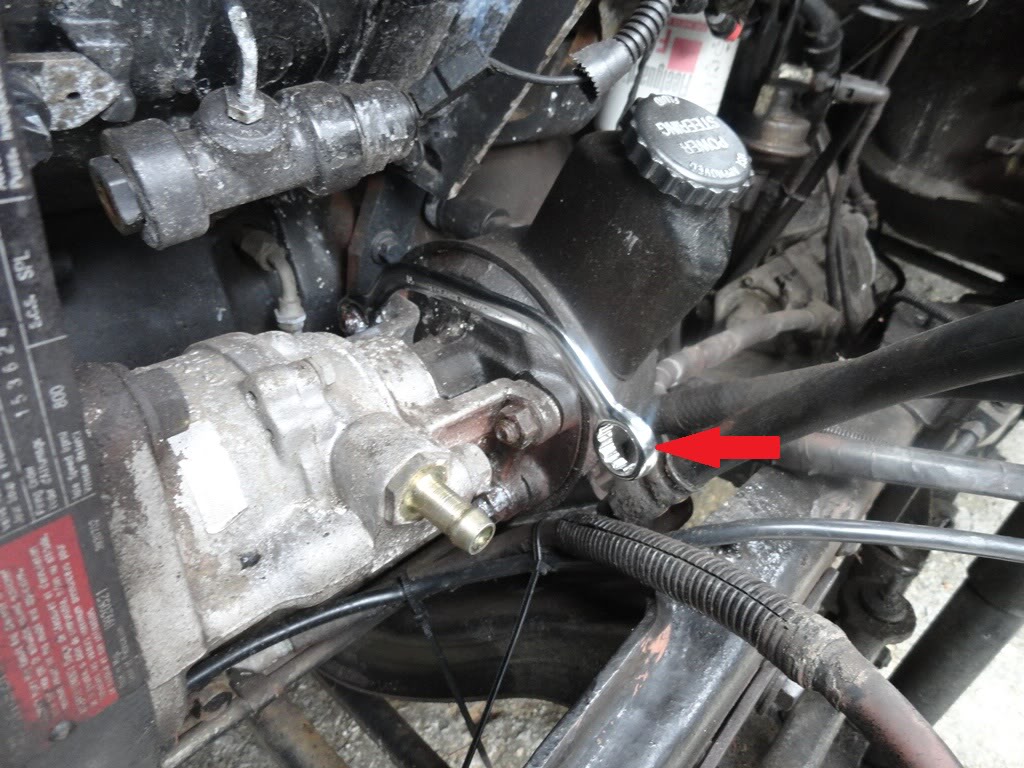
The PS pump hits the OP sensor in the rear, so you have to be careful to get the studs out of the housing, otherwise you have to remove the sender instead. I double nutted the studs, and pulled them out before removing the pump. This allows the pump to move towards the drivers side tire, and bypass hitting the end of the sensor.
Be careful to catch the two washers (spacers) on the rearward studs, as you'll need them to install the new pump.
New PS pump goes in like the old one came out, but you should lubricate the nose with engine oil prior to installing it, as it's sealed internally between the air pump and the shaft itself in the previous pic. I put the studs back into the pump, after it was in there, as to again not have to remove the sender. here's the new pump installed.
Now I wait for a day or so to finish the installation, as the paint on the frame needed to dry, thanks to my portable electric heater.
In the meantime, I worked on the intermediate shaft as the bolts were different sized than my OE rag joint had in it. I opened up the mounting holes, and resealed the metal. The chevy shaft now fits my OE rag joint on my truck.
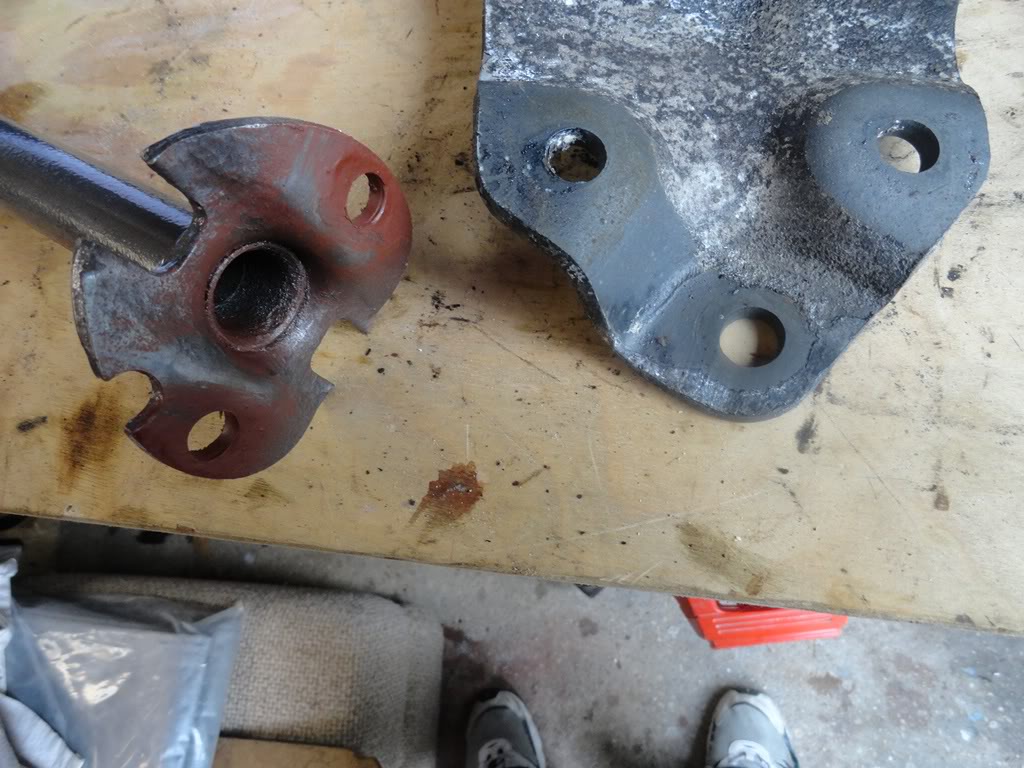

I won't be needing these any longer, so I put them up in the classifieds. The one on the left is the boneyard one I had kept as a spare, and the one on the right is from my 92. Mounting holes are different between the years, but they're interchangeable if you ream out the holes to 9/16

Will continue to post as I work through this process.
You'll need one of those "15 mm bendy wrenches" to get the rear nuts off of the stud as seen here:
The PS pump hits the OP sensor in the rear, so you have to be careful to get the studs out of the housing, otherwise you have to remove the sender instead. I double nutted the studs, and pulled them out before removing the pump. This allows the pump to move towards the drivers side tire, and bypass hitting the end of the sensor.
Be careful to catch the two washers (spacers) on the rearward studs, as you'll need them to install the new pump.
New PS pump goes in like the old one came out, but you should lubricate the nose with engine oil prior to installing it, as it's sealed internally between the air pump and the shaft itself in the previous pic. I put the studs back into the pump, after it was in there, as to again not have to remove the sender. here's the new pump installed.
Now I wait for a day or so to finish the installation, as the paint on the frame needed to dry, thanks to my portable electric heater.
In the meantime, I worked on the intermediate shaft as the bolts were different sized than my OE rag joint had in it. I opened up the mounting holes, and resealed the metal. The chevy shaft now fits my OE rag joint on my truck.
I won't be needing these any longer, so I put them up in the classifieds. The one on the left is the boneyard one I had kept as a spare, and the one on the right is from my 92. Mounting holes are different between the years, but they're interchangeable if you ream out the holes to 9/16
Will continue to post as I work through this process.

Thread Starter
Registered User
Joined: Dec 2010
Posts: 6,841
Likes: 1,683
From: Land of the Toxic Avenger
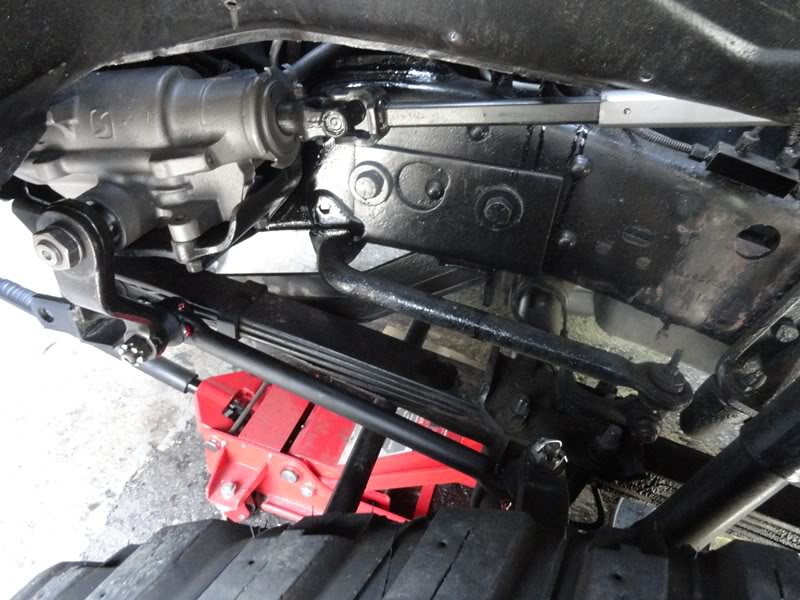
ISSUES FOUND:
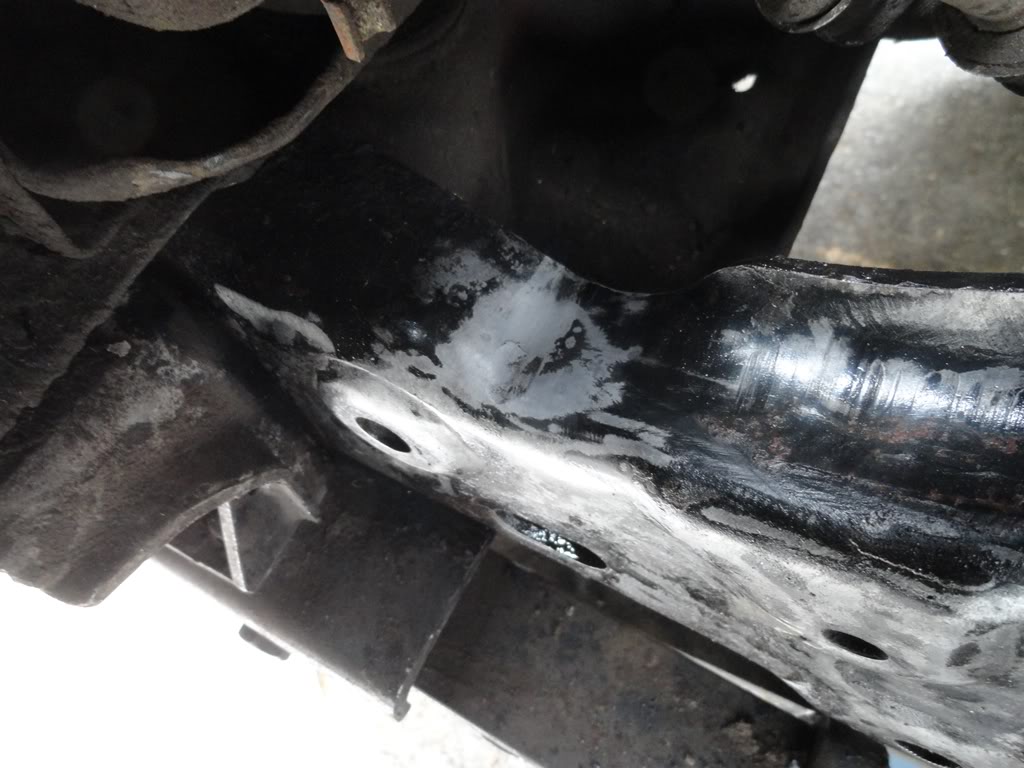
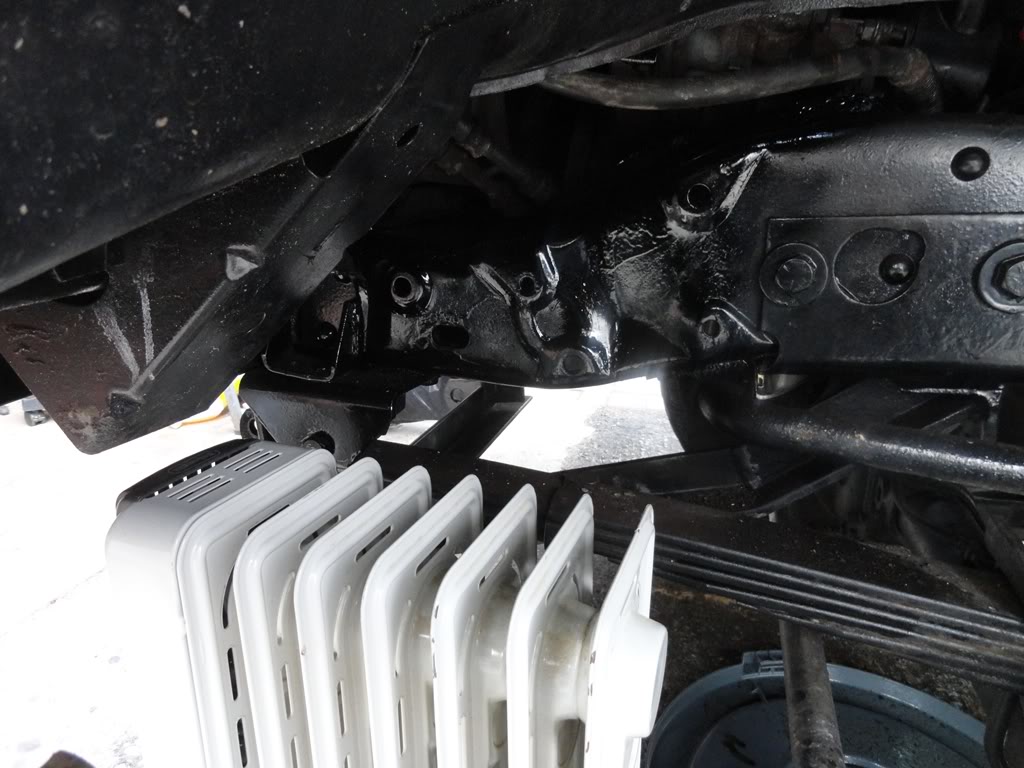
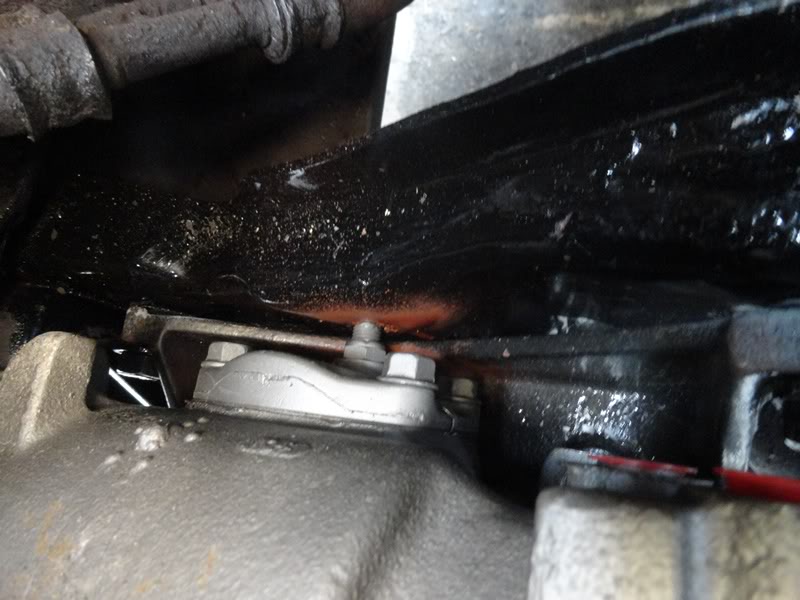
The gear is a tight squeeze between the mount and the inner fender. I simply dented the inner fender upwards with a mallet, and the gear slid right in. You can also just loosen the gear bracket that is mounted to the frame, and it will slide in as well. I already had the bolts torqued to 160 ft lbs, so I didn't want to torque it all over again, as the front bolt is a PITA. The FSM States that these bolts that bracket attached to the frame are required to be 165 FT LBS.
Second issue was that the new gear was originally designed for the older truck frame which differs just slightly, as the gear adjusting screw was accessed through a hole in the frame. The 92 frame has the hole, but it's smaller than it needs to actually be. You should test fit the gear to make sure the bolts align in the steering bracket upon install, as mine didn't quite work out due to the adjusting screw hitting the frame. I simply opened up the existing adjusting hole (using a 9/16 drill bit) to allow the nose of the adjusting screw to penetrate through the frame about 1/8". All aligned well after that fix.
You can see which hole I'm referencing in this pic.
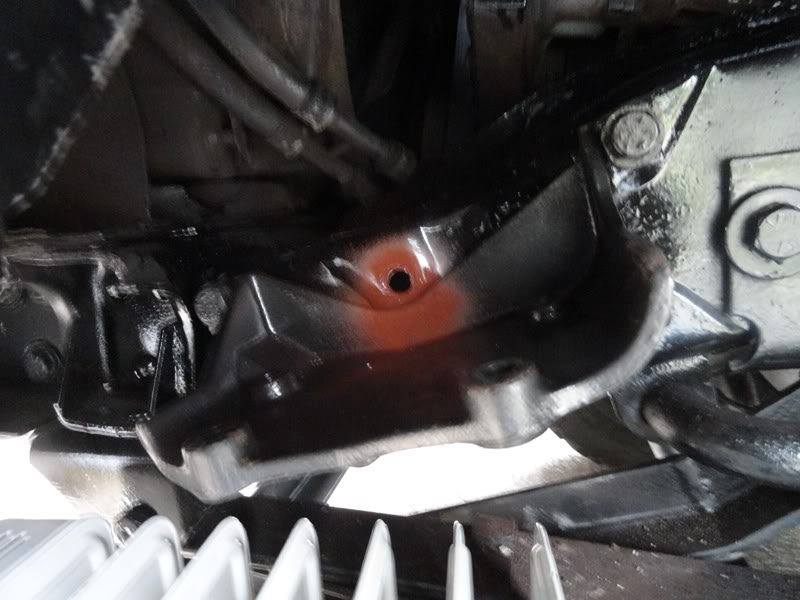
Now that the hole allows the tip of the gear adjusting screw to pass into the frame, all fits perfectly.
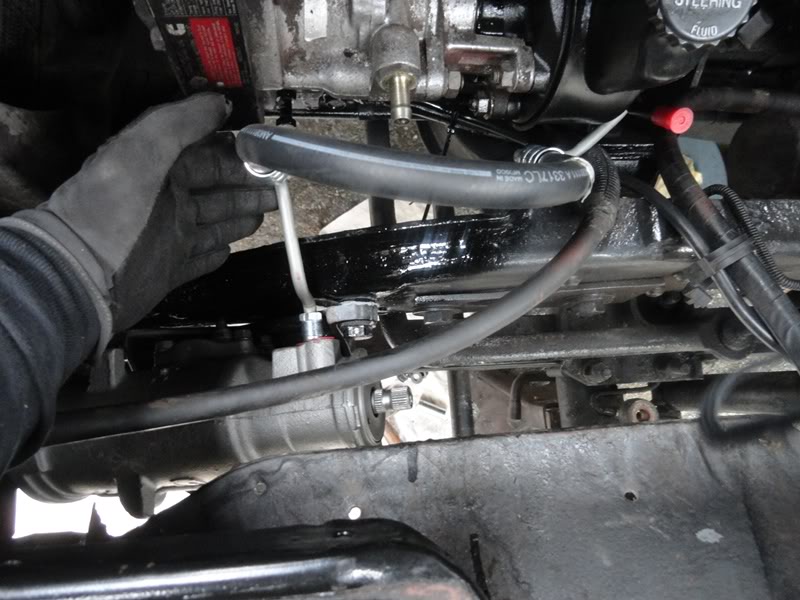
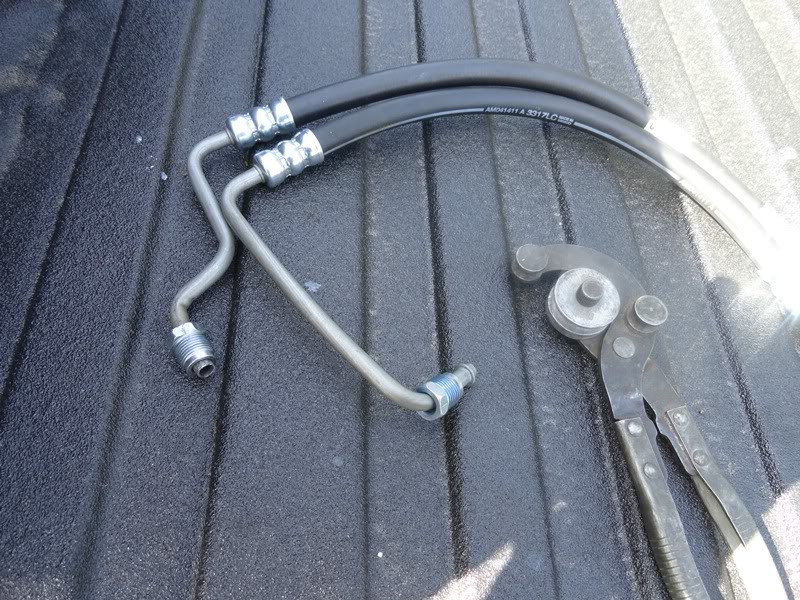
Next was the steering pressure hose and return hoses. Since the OE pressure hose is formed for a different orientation to the gear housing, you either have to modify the pressure hose, or make some changes to an SAE fitting on pump and gear. Either way works, as explained below.
At first I modified mine, instead of taking a little more prep work on the hose fitment. I didn't get it right the first time, and even with my tubing bender, I kinked the steel line. I then used the damaged pressure hose as a "template", which I'll explain further on.
The template hose fits perfect (pic below), orientation wise. BobVA and Papecat changed their pump innards to accommodate a dodge hose from an older truck, but I decided to modifiy the OE hose, and keep the pump and housing metric. I didn't want to modify a rebuilt pump, as it voids the warranty on the pump. Again, either way works.
Chip @ PSS mentioned that the old pump, and hoses should be changed in order not to contaminate the new gear. You can keep both gear and pump metric, as I did, and modify the OE hose, or you can change the inner spring / pump guts to a SAE pump and use a stock pressure hose out of a 72-77 dodge. I don't know which one works, but I'm sure you can contact them and find out. You will have to remember to get a matching SAE gear housing so that the older truck hose works with both the pump and gear. Your choice on how to deal with the hose, but remember to match the gear / pump together so that the hose fits either way.
The gear is a tight squeeze between the mount and the inner fender. I simply dented the inner fender upwards with a mallet, and the gear slid right in. You can also just loosen the gear bracket that is mounted to the frame, and it will slide in as well. I already had the bolts torqued to 160 ft lbs, so I didn't want to torque it all over again, as the front bolt is a PITA. The FSM States that these bolts that bracket attached to the frame are required to be 165 FT LBS.
Second issue was that the new gear was originally designed for the older truck frame which differs just slightly, as the gear adjusting screw was accessed through a hole in the frame. The 92 frame has the hole, but it's smaller than it needs to actually be. You should test fit the gear to make sure the bolts align in the steering bracket upon install, as mine didn't quite work out due to the adjusting screw hitting the frame. I simply opened up the existing adjusting hole (using a 9/16 drill bit) to allow the nose of the adjusting screw to penetrate through the frame about 1/8". All aligned well after that fix.
You can see which hole I'm referencing in this pic.
Now that the hole allows the tip of the gear adjusting screw to pass into the frame, all fits perfectly.
Next was the steering pressure hose and return hoses. Since the OE pressure hose is formed for a different orientation to the gear housing, you either have to modify the pressure hose, or make some changes to an SAE fitting on pump and gear. Either way works, as explained below.
At first I modified mine, instead of taking a little more prep work on the hose fitment. I didn't get it right the first time, and even with my tubing bender, I kinked the steel line. I then used the damaged pressure hose as a "template", which I'll explain further on.
The template hose fits perfect (pic below), orientation wise. BobVA and Papecat changed their pump innards to accommodate a dodge hose from an older truck, but I decided to modifiy the OE hose, and keep the pump and housing metric. I didn't want to modify a rebuilt pump, as it voids the warranty on the pump. Again, either way works.
Chip @ PSS mentioned that the old pump, and hoses should be changed in order not to contaminate the new gear. You can keep both gear and pump metric, as I did, and modify the OE hose, or you can change the inner spring / pump guts to a SAE pump and use a stock pressure hose out of a 72-77 dodge. I don't know which one works, but I'm sure you can contact them and find out. You will have to remember to get a matching SAE gear housing so that the older truck hose works with both the pump and gear. Your choice on how to deal with the hose, but remember to match the gear / pump together so that the hose fits either way.
Thread Starter
Registered User
Joined: Dec 2010
Posts: 6,841
Likes: 1,683
From: Land of the Toxic Avenger
Hose Fabrication
PRESSURE HOSE FABRICATON:
I purchased the OE hose for my truck and this is it compared to my "templated" hose I bought, modified, and can't use. Since I cut it short, I can't get anyone to reflare the end, I had to buy another. No problem, as I figured out how to make the OE work.
The hose on top is how it's supposed to fit. The hose on the bottom is the OE
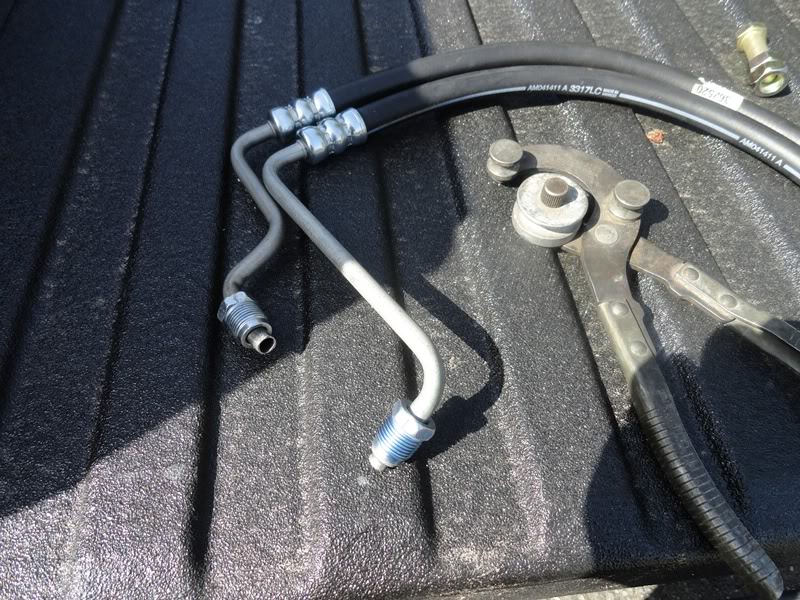
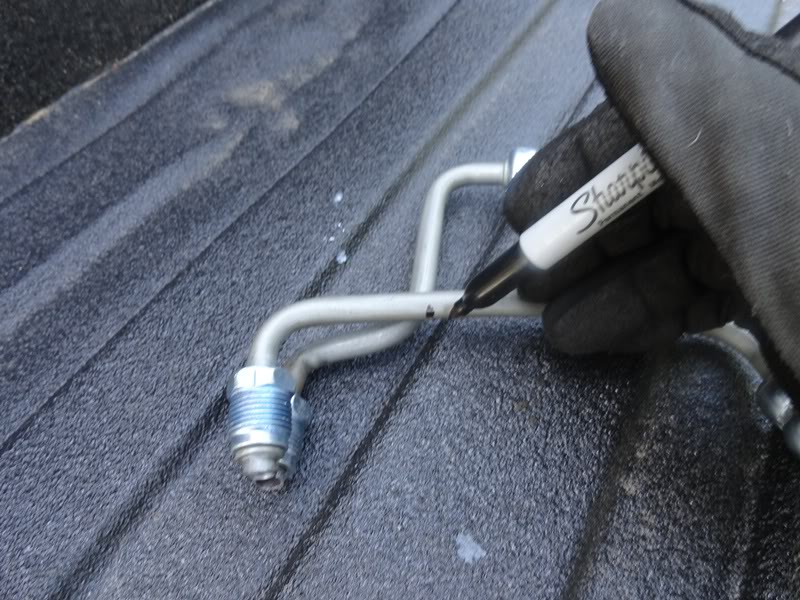
I first re-oriented the end of the steel part of the hose by installing it in a vise and twisting it in a counterclockwise direction until the fitting faced the direction I wanted it to.
This is how it should look when in the correct orientation. This points the hose fitting towards the gear, as after being bent another time, the tube directs itself back towards the engine, vs towards the drivers side inner fender. This was the easy part, as there's pretty much no chance of kinking the tube in this step.
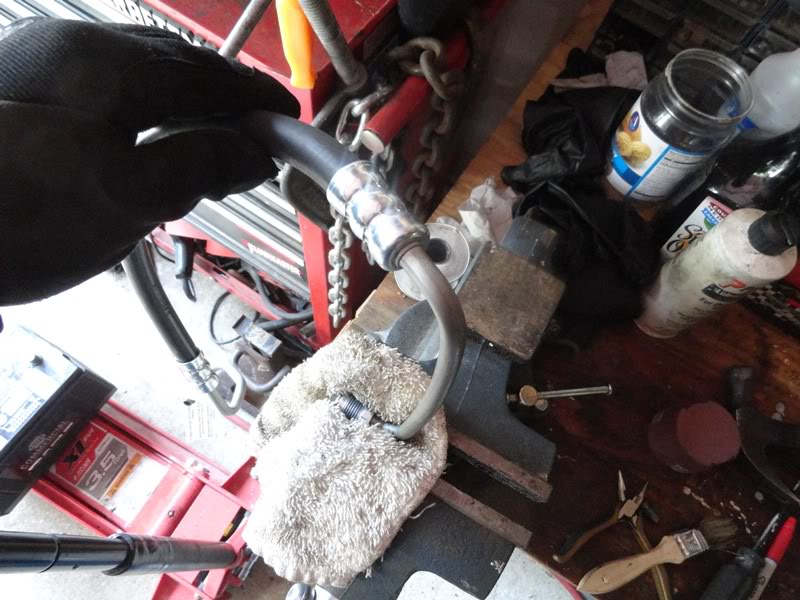
I marked where I wanted the next bend, and then I bent the tube in that direction with my tubing bender. By bending the tube opposite my mark, you get the tube to come outwards towards the engine, after it gets screwed into the gear. I actually kinked this tube using a tubing bender, so the tube you see in the pic was replaced with another new hose that I had to do a 3rd time. I freehanded the 3rd one, as my tubing bender wasn't doing what I wanted it to.
From what I was told by Chip @ PSS, if the kink reduces the volume of flow by 25% or more, you will run the risk of damaging the pump and or gear. It's critical that the bends you make don't hinder flow, otherwise you'll be back rebuilding your pump, as it could overheat and cause failure of the system. If something lets loose in the pump, and travels to the gear, you'll be doing this all over again.
After the bend, it should look somewhat like this
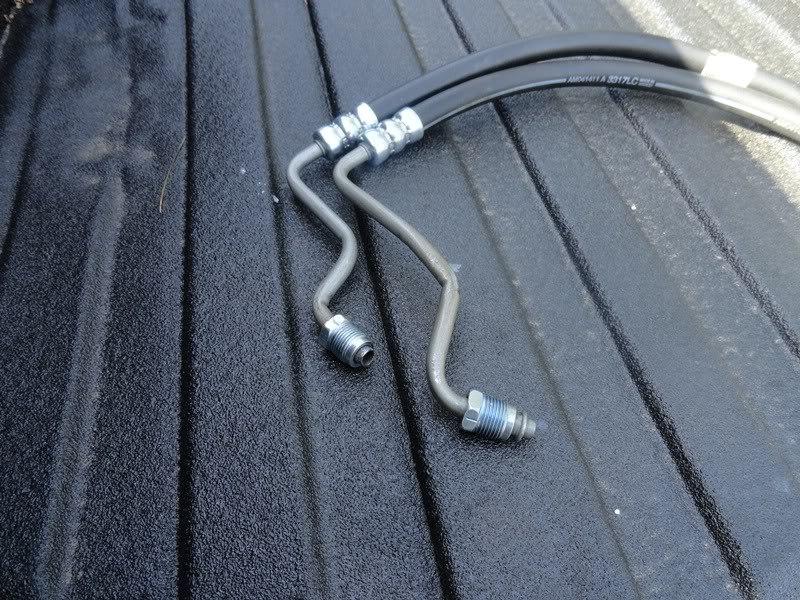
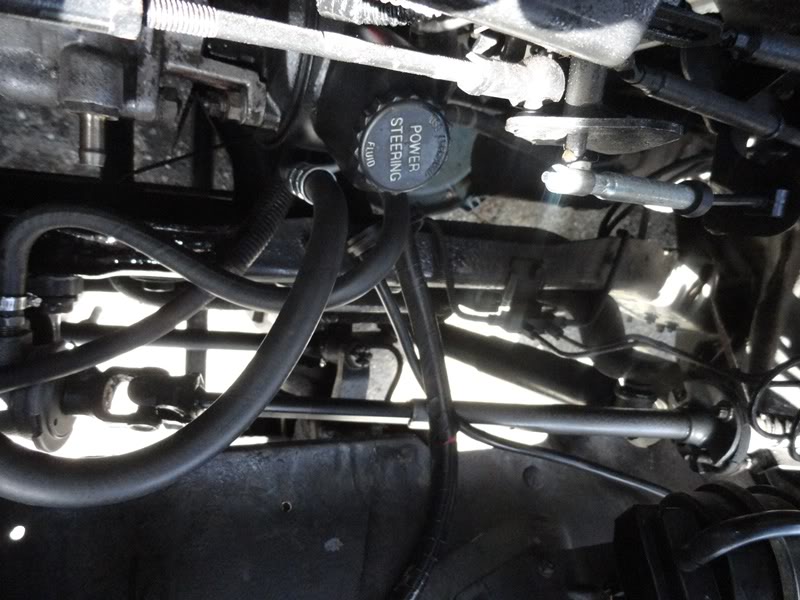
Hose fabrication is done, and it's now installed. I also installed the return line and clamps as well. I filled the PS pump with fluid.
STEERING SHAFT INSTALL
After assembling my jeep and chevy steering parts (Jeep lower with U-joint and Chevy upper with flange), I bolted it in. This will take a few installs, and removals in order to get the correct length in assembly.
The jeep shaft slides inside the chevy shaft, and it's a tight squeeze. I needed to tap the chevy shaft onto the jeep shaft, as I couldn't compress it otherwise. I like that there is no slop, and I attribute that to the jeep shaft still having it's polyethylene spacers still in tact on it. Here's the shaft bolted into the truck.
Make sure you install the shaft where you do little or no movement to the steering column that's strapped in position. It helps if you have already assembled the Pitman arm / steering gear /draglink assembly, and your wheels are straight forwards during this process. This way, the gear is directing you where to connect the chevy end to the rag joint.
Only thing left to do was install the pitman, draglink and torque them down, then grease everything up.
Per the FSM: Make sure you check your FSM to confirm these numbers as they may have changed from year to year.
The pitman arm needs to be torqued to 185 ft lbs at the nut that secures it to the gear. The bolts that hold the bracket to the frame are torqued to 165 FT lbs The draglink nuts were installed the old fashioned way where when they're seated, and you really can't tighten it any longer, you line up the hole for the cotterpin in the castle nut.
BLEEDING THE PUMP:
The last thing I did today, was to purge the PS steering for air. I jacked both wheels up in the air to do this, as I didn't want the tires on the ground during this process.
Chip from PSS gave me an outline for how to do it right, according to his history of doing installs. The idea is that you start then stop the truck for really short periods of time (about a second or so) and fill fluid in between.
My problem, and the same issue was found on Papecat and Bobva's trucks, was the pump wasn't draining. This required me to start the truck, rev the engine to about 1500 RPM and then shut it down. This sucked the fluid out of the pump and sent it to the gear. Make sure you do NOT turn the steering wheel until you get the fluid into the system. Once the reservoir has been filled a few times, and shut down in between, you slowly turn the steering wheels right, then left, shut down the truck in between. It's a good idea to have someone in the cab, while another person fills the reservoir as it's depleted. I had lots of foam in there, so I turned off the truck for a while, let the foam dissipate, then filled it up again. Next time I ever do this process, I will borrow a human to do the starting and revving the engine, while I refill the reservoir at the same time.
After the pump was full, the steering worked well, I took it down off of the jack stands, and took it for a ride. it's truly a different vehicle.... similar to driving a much "newer" truck. Will update my thoughts on this somewhere down the line when I can give you some real world feedback on how it all goes.
BTW.... I need to remove and re-align my steering wheel, as it's off quite a bit....
I purchased the OE hose for my truck and this is it compared to my "templated" hose I bought, modified, and can't use. Since I cut it short, I can't get anyone to reflare the end, I had to buy another. No problem, as I figured out how to make the OE work.
The hose on top is how it's supposed to fit. The hose on the bottom is the OE
I first re-oriented the end of the steel part of the hose by installing it in a vise and twisting it in a counterclockwise direction until the fitting faced the direction I wanted it to.
This is how it should look when in the correct orientation. This points the hose fitting towards the gear, as after being bent another time, the tube directs itself back towards the engine, vs towards the drivers side inner fender. This was the easy part, as there's pretty much no chance of kinking the tube in this step.
I marked where I wanted the next bend, and then I bent the tube in that direction with my tubing bender. By bending the tube opposite my mark, you get the tube to come outwards towards the engine, after it gets screwed into the gear. I actually kinked this tube using a tubing bender, so the tube you see in the pic was replaced with another new hose that I had to do a 3rd time. I freehanded the 3rd one, as my tubing bender wasn't doing what I wanted it to.
From what I was told by Chip @ PSS, if the kink reduces the volume of flow by 25% or more, you will run the risk of damaging the pump and or gear. It's critical that the bends you make don't hinder flow, otherwise you'll be back rebuilding your pump, as it could overheat and cause failure of the system. If something lets loose in the pump, and travels to the gear, you'll be doing this all over again.
After the bend, it should look somewhat like this
Hose fabrication is done, and it's now installed. I also installed the return line and clamps as well. I filled the PS pump with fluid.
STEERING SHAFT INSTALL
After assembling my jeep and chevy steering parts (Jeep lower with U-joint and Chevy upper with flange), I bolted it in. This will take a few installs, and removals in order to get the correct length in assembly.
The jeep shaft slides inside the chevy shaft, and it's a tight squeeze. I needed to tap the chevy shaft onto the jeep shaft, as I couldn't compress it otherwise. I like that there is no slop, and I attribute that to the jeep shaft still having it's polyethylene spacers still in tact on it. Here's the shaft bolted into the truck.
Make sure you install the shaft where you do little or no movement to the steering column that's strapped in position. It helps if you have already assembled the Pitman arm / steering gear /draglink assembly, and your wheels are straight forwards during this process. This way, the gear is directing you where to connect the chevy end to the rag joint.
Only thing left to do was install the pitman, draglink and torque them down, then grease everything up.
Per the FSM: Make sure you check your FSM to confirm these numbers as they may have changed from year to year.
The pitman arm needs to be torqued to 185 ft lbs at the nut that secures it to the gear. The bolts that hold the bracket to the frame are torqued to 165 FT lbs The draglink nuts were installed the old fashioned way where when they're seated, and you really can't tighten it any longer, you line up the hole for the cotterpin in the castle nut.
BLEEDING THE PUMP:
The last thing I did today, was to purge the PS steering for air. I jacked both wheels up in the air to do this, as I didn't want the tires on the ground during this process.
Chip from PSS gave me an outline for how to do it right, according to his history of doing installs. The idea is that you start then stop the truck for really short periods of time (about a second or so) and fill fluid in between.
My problem, and the same issue was found on Papecat and Bobva's trucks, was the pump wasn't draining. This required me to start the truck, rev the engine to about 1500 RPM and then shut it down. This sucked the fluid out of the pump and sent it to the gear. Make sure you do NOT turn the steering wheel until you get the fluid into the system. Once the reservoir has been filled a few times, and shut down in between, you slowly turn the steering wheels right, then left, shut down the truck in between. It's a good idea to have someone in the cab, while another person fills the reservoir as it's depleted. I had lots of foam in there, so I turned off the truck for a while, let the foam dissipate, then filled it up again. Next time I ever do this process, I will borrow a human to do the starting and revving the engine, while I refill the reservoir at the same time.
After the pump was full, the steering worked well, I took it down off of the jack stands, and took it for a ride. it's truly a different vehicle.... similar to driving a much "newer" truck. Will update my thoughts on this somewhere down the line when I can give you some real world feedback on how it all goes.
BTW.... I need to remove and re-align my steering wheel, as it's off quite a bit....
Trending Topics


 I have work to do !


Thread Starter
Registered User
Joined: Dec 2010
Posts: 6,841
Likes: 1,683
From: Land of the Toxic Avenger
Thanks Guys.. It's Bob and Papecat's fault ! 
Bob,
This thread is your and Papecat's doing, as without you guys doing all the research and leading me on this ride, I would have never even thought of it.
Thank you for making my truck perform like new. Most appreciated.
One imaginary beer heading your way !
Bob,
This thread is your and Papecat's doing, as without you guys doing all the research and leading me on this ride, I would have never even thought of it.
Thank you for making my truck perform like new. Most appreciated.
One imaginary beer heading your way !
Thread Starter
Registered User
Joined: Dec 2010
Posts: 6,841
Likes: 1,683
From: Land of the Toxic Avenger
Thanks for the Pitman arm. I guess I wouldn't have done it without you finding me one...
Btw,
How close does your pitman put your draglink to your spring pack ? 1/2" - 3/4"
Couldn't get the draglink in without removing the pitman. You ?
EDIT:
Bob's draglink picture attached.
Registered User
Joined: Feb 2005
Posts: 2,658
Likes: 85
Mine

I have to turn the wheel all the way to full right turn to get the DL off. Haven't needed to remove the pitman.
Here is another pic (guy has a lift):
revstockparm.jpg?t=1323017638
I have to turn the wheel all the way to full right turn to get the DL off. Haven't needed to remove the pitman.
Here is another pic (guy has a lift):
revstockparm.jpg?t=1323017638