
Instrument Panel repair

Thread Starter
Registered User
Joined: Jan 2005
Posts: 3,899
Likes: 3
From: Yuba city Kalifornia
Instrument Panel repair
Well I have been driving around now with half my dash lights out (left side ) so to day I decided to dig in to it .maybe this can help somebody too
.when pulling out the panel the heater control needs to be unscrewed, it makes it a lot easier to pull out the gauges

at first glance everything looked normal and I could not see the problem, so I pulled out my test light to find the issue.a multimeter is just as good too!
when looking at all the gold power pathways( for lack of real term) it looked good no apparent brake in the path.
next I found the the pin that carries power when lights are on
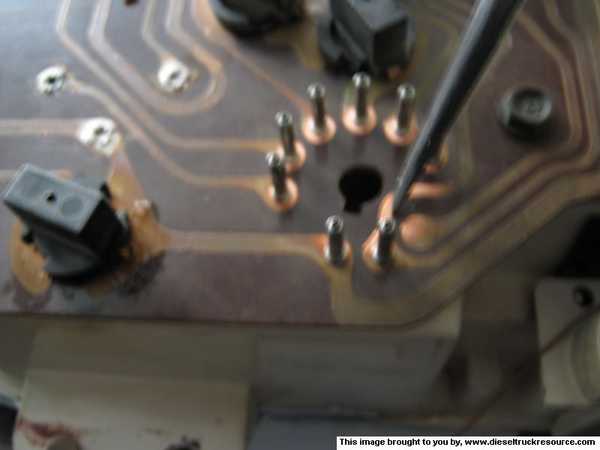
its the one with the probe bottom right. then I used a wire with clips and added 12volts to it and grounded my test light.being careful not to gouge the path
slowly moving the point up the path until the light went out (ohms ) meter would go to zero.

after finding the dead spot I used some rosin core solder that was real thin and repaired the path way

if you have a gauge that quit it might be from this too. the gold pathway is so thin that I think the wires behind the panel rubbing is all that it took to lose the connection.
I now have all light working again . If you try this repair its real easy just don't use excessive heat with the soldering iron. Hope this might help someone out
Robert
.when pulling out the panel the heater control needs to be unscrewed, it makes it a lot easier to pull out the gauges
at first glance everything looked normal and I could not see the problem, so I pulled out my test light to find the issue.a multimeter is just as good too!
when looking at all the gold power pathways( for lack of real term) it looked good no apparent brake in the path.
next I found the the pin that carries power when lights are on
its the one with the probe bottom right. then I used a wire with clips and added 12volts to it and grounded my test light.being careful not to gouge the path
slowly moving the point up the path until the light went out (ohms ) meter would go to zero.
after finding the dead spot I used some rosin core solder that was real thin and repaired the path way
if you have a gauge that quit it might be from this too. the gold pathway is so thin that I think the wires behind the panel rubbing is all that it took to lose the connection.
I now have all light working again .
If you try this repair its real easy just don't use excessive heat with the soldering iron. Hope this might help someone outRobert


Administrator


Joined: Nov 2004
Posts: 4,084
Likes: 235
From: Southern California
Hey Robert,
Good work, those things on a circuit board are called a TRACE, was something rubbing on it or was it burned out, if there is a short somewhere usually the narrowest part of the trace will burn and open the circuit.
On circuit boards I have sometimes had to solder or jumper 6-8 of them to get it working again.
There is another trick to repairing a burned circuit board; you can restore the trace by using a conductive liquid for repairing heated rear windows.
Thread Starter
Registered User
Joined: Jan 2005
Posts: 3,899
Likes: 3
From: Yuba city Kalifornia
Hey Robert,
Good work, those things on a circuit board are called a TRACE, was something rubbing on it or was it burned out, if there is a short somewhere usually the narrowest part of the trace will burn and open the circuit.
On circuit boards I have sometimes had to solder or jumper 6-8 of them to get it working again.
There is another trick to repairing a burned circuit board; you can restore the trace by using a conductive liquid for repairing heated rear windows.
Good work, those things on a circuit board are called a TRACE, was something rubbing on it or was it burned out, if there is a short somewhere usually the narrowest part of the trace will burn and open the circuit.
On circuit boards I have sometimes had to solder or jumper 6-8 of them to get it working again.
There is another trick to repairing a burned circuit board; you can restore the trace by using a conductive liquid for repairing heated rear windows.
Thanks ,I could see no sign of it being burned out it looked just like the rest of the trace , only thing I could tell was that a wire bundle behind it was pushed up against it in that spot .
Also whats the name of the liquid used to repair the defrost lines ?
Administrator
Joined: Nov 2004
Posts: 4,084
Likes: 235
From: Southern California
Robert,
You should be able to get this repair kit from most any auto parts like Auto Zone; I think I have even seen it at Wal Mart in the automotive section; it is just a conductive paint.
http://rds.yahoo.com/_ylt=A0oGkkqTKZ....com/index.htm
If you need to repair a long section of the trace you can get a roll of copper foil tape with an adhesive on the back at Home Depot where the pesticides are sold as a deterrent for snails, they won't cross this strip because they give themselves a mild electrical shock of sorts when they slime over it.
You can repair the trace and then carefully bond the ends with a bead of solder to the good ends.
Before you solder on the trace, clean it real good till it is shiny with a pencil eraser from the good side to the broken end.
I have been repairing circuit boards since back around 1970.
Jim


Trending Topics
Thread Starter
Registered User
Joined: Jan 2005
Posts: 3,899
Likes: 3
From: Yuba city Kalifornia
Robert,
You should be able to get this repair kit from most any auto parts like Auto Zone; I think I have even seen it at Wal Mart in the automotive section; it is just a conductive paint.
http://rds.yahoo.com/_ylt=A0oGkkqTKZ....com/index.htm
If you need to repair a long section of the trace you can get a roll of copper foil tape with an adhesive on the back at Home Depot where the pesticides are sold as a deterrent for snails, they won't cross this strip because they give themselves a mild electrical shock of sorts when they slime over it.
You can repair the trace and then carefully bond the ends with a bead of solder to the good ends.
Before you solder on the trace, clean it real good till it is shiny with a pencil eraser from the good side to the broken end.
I have been repairing circuit boards since back around 1970.
Jim


Registered User
Joined: Sep 2003
Posts: 4,449
Likes: 47
From: Calgary, Alberta
I've done that many times too, when the break is too big to bridge with solder. I just lay a couple strands of wire over the break and solder it together. Works every time.

Thread
Thread Starter
Forum
Replies
Last Post
Commatoze
2nd Gen. Dodge Ram - No Drivetrain
13
Nov 25, 2004 07:47 AM
Jmac
3rd Generation Ram - Non Drivetrain - All Years
1
Oct 7, 2004 10:57 PM