
Simple fix to try if you have the bad master window switch....

Thread Starter
Registered User
Joined: Aug 2002
Posts: 8,803
Likes: 0
From: Northern Virginia
Simple fix to try if you have the bad master window switch....
My switch has been hit or miss since I got my truck two years ago. 99% of the time the driver was the only one who could control any of the other windows or door locks. I simply unplugged the plugs from the switch a couple weeks ago and then plugged them back in and it has been working perfectly ever since. Just something to try if you have been dealing with this issue.......
Registered User
Joined: Apr 2003
Posts: 626
Likes: 0
From: Orlando, Fl.
My switch has been hit or miss since I got my truck two years ago. 99% of the time the driver was the only one who could control any of the other windows or door locks. I simply unplugged the plugs from the switch a couple weeks ago and then plugged them back in and it has been working perfectly ever since. Just something to try if you have been dealing with this issue.......
Registered User
Joined: Jan 2008
Posts: 524
Likes: 1
From: Utah
Look for Dodgezilla's same post on that other Forum.... CF
Mine work better then they ever have...
Thread Starter
Registered User
Joined: Aug 2002
Posts: 8,803
Likes: 0
From: Northern Virginia
Well, my truck has been at the dealership for two days getting all new ball joints and control arms (under warranty  ) and I asked them to check the switch and replace it. Of course it is still working perfectly so they won't do it. Kind of stinks but I got another good switch with my Laramie door panels I just got so I guess I will be good for a while...
I still have a week and a half of warranty left so maybe it will crap out by then.
) and I asked them to check the switch and replace it. Of course it is still working perfectly so they won't do it. Kind of stinks but I got another good switch with my Laramie door panels I just got so I guess I will be good for a while...I still have a week and a half of warranty left so maybe it will crap out by then.
Chapter President
Joined: May 2004
Posts: 3,539
Likes: 7
From: Caistor Centre, ON, Canada
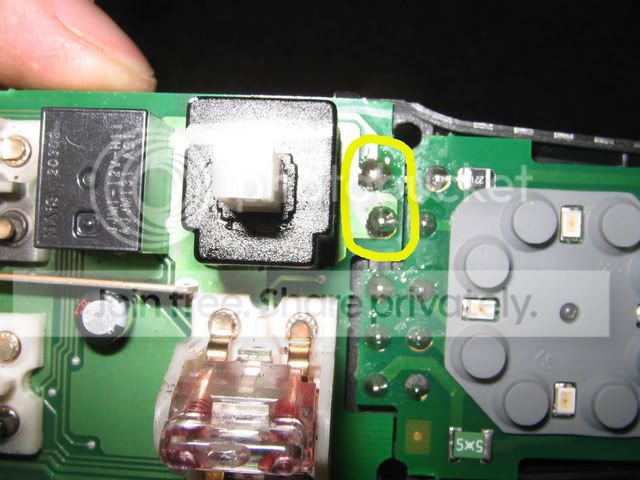
I just wanted to post up that I successfully disassembled my drivers door switch assembly and found the same two broken solder joints on the PC board that power up the other three doors. Like pretty much everyone else, I too had the intermittent window operation of the other three door window switches. I soldered them up and put the switch assembly back together and sure enough, all of the door window switches work now.
tryNto, thank you for bringing this to my attention.
Link for the lazy: Window switch problem
tryNto, thank you for bringing this to my attention.
Link for the lazy: Window switch problem
Trending Topics
Chapter President
Joined: May 2004
Posts: 3,539
Likes: 7
From: Caistor Centre, ON, Canada
^ Just did this after dinner last night. It literally took me all of a 1/2 hour to do. About half that time was spent trying to pry all of the switch covers off so that the plastic housing can be separated to access the PC board. Those little buggers are really on there. Thought for sure I'd be breaking something but I didn't. Persistence and patience are important here!.
As a side note, neither of the mirror switches need to be touched to separate the housing so don't monkey with trying to take them off.....ask me how I know. lol
As a side note, neither of the mirror switches need to be touched to separate the housing so don't monkey with trying to take them off.....ask me how I know. lol

Just a plain ole guy
Joined: Jun 2006
Posts: 2,537
Likes: 11
From: Carlos, Texas
I got a chance to peel the switch out last night. Here's what I found:
1-It is a bear to get the ***** plucked off. You have to pry to the point where you feel like your gonna break them, but don't give up. They'll eventually pop off and fly way across the room.
1a-You only have to take the window ***** off. Leave the two mirror ***** as they are. There are a couple of parts under them that will fly across the room to, and it's not necessary to disturb them.
2-Once you get the ***** off, you'll see how nasty dirty the top of the switch is. I'm surprised it wasn't totally full of gunk inside the switch, so have some industrial cleaning supplies ready.
3-Once I got the ***** off, and the switch body open, like a goober, I looked at the wrong solder joints, but now that I've been this far, I can look at them again today.
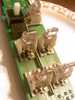
4-I found on mine, the contacts on the switches themselves to be about as dirty of a contact as you can get. I would expect them not to work looking like this:

After some time with some fine sandpaper and a can of spray contact cleaner, I got them to look like this:
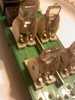
There is still some black soot looking stuff, I guess from arcing that is still there, but if the pics turn out, it's a ton better.
Once I got it put back in, I could understand what was going on. When the master switch is in the at rest position, one set of contacts acts as a pass thru, sending power on to the other single window switches. If that contact is dirty, as in my case, it won't send that power to those switches. On the first test run, the other windows would go down only but not up, so i went back and operated the master switch to all of the other windows about 50 times. i could watch them arc at first, but in time the arcs got smaller then wouldn't arc anymore. Once they wouldn't arc anymore, all of the windows started acting right.
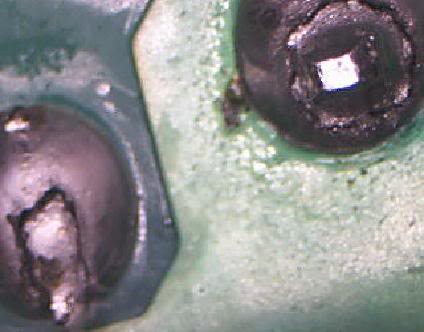
This has been an issue since I've owned this truck. A year ago I took the switch body out and since I had never seen the insides before, and guessed it may have some small parts that I'll never get back into place, I opted to wash out what I could with a spray contact cleaner. I remember a ton of brown liquid coming out, and it smelled sweet like soda, so I'm pretty sure something was spilled into this switch long before I owned it. I do know that once a contact starts arcing due to whatever is causing it to do so, that it's not going to magically heal itself. As you can see in one pic, the arcing was bad enough that it built up what looks like soot all around each switch contact. You can even see a fingerprint imagine in one picture from someone in the mfg process.
So far this morning, they are all still working. I'll give the solder joints another looking at today.
1-It is a bear to get the ***** plucked off. You have to pry to the point where you feel like your gonna break them, but don't give up. They'll eventually pop off and fly way across the room.
1a-You only have to take the window ***** off. Leave the two mirror ***** as they are. There are a couple of parts under them that will fly across the room to, and it's not necessary to disturb them.
2-Once you get the ***** off, you'll see how nasty dirty the top of the switch is. I'm surprised it wasn't totally full of gunk inside the switch, so have some industrial cleaning supplies ready.
3-Once I got the ***** off, and the switch body open, like a goober, I looked at the wrong solder joints, but now that I've been this far, I can look at them again today.
4-I found on mine, the contacts on the switches themselves to be about as dirty of a contact as you can get. I would expect them not to work looking like this:
After some time with some fine sandpaper and a can of spray contact cleaner, I got them to look like this:
There is still some black soot looking stuff, I guess from arcing that is still there, but if the pics turn out, it's a ton better.
Once I got it put back in, I could understand what was going on. When the master switch is in the at rest position, one set of contacts acts as a pass thru, sending power on to the other single window switches. If that contact is dirty, as in my case, it won't send that power to those switches. On the first test run, the other windows would go down only but not up, so i went back and operated the master switch to all of the other windows about 50 times. i could watch them arc at first, but in time the arcs got smaller then wouldn't arc anymore. Once they wouldn't arc anymore, all of the windows started acting right.
This has been an issue since I've owned this truck. A year ago I took the switch body out and since I had never seen the insides before, and guessed it may have some small parts that I'll never get back into place, I opted to wash out what I could with a spray contact cleaner. I remember a ton of brown liquid coming out, and it smelled sweet like soda, so I'm pretty sure something was spilled into this switch long before I owned it. I do know that once a contact starts arcing due to whatever is causing it to do so, that it's not going to magically heal itself. As you can see in one pic, the arcing was bad enough that it built up what looks like soot all around each switch contact. You can even see a fingerprint imagine in one picture from someone in the mfg process.
So far this morning, they are all still working. I'll give the solder joints another looking at today.
Just a plain ole guy
Joined: Jun 2006
Posts: 2,537
Likes: 11
From: Carlos, Texas
I just went back in and looked, and I did have the bad solder joint like what was shown. Good news is I got those fixed. bad news is the two clear posts for the back windows busted off when snapping it back together. They're loosely held in place with the faceplate and you can operated the widows but it's gimpy and I'm not happy about it.
Registered User
Joined: Mar 2007
Posts: 264
Likes: 1
From: San Antonio

