
How To: Multifunction Switch Remove/Clean/Install

Registered User
Joined: Feb 2007
Posts: 275
Likes: 3
From: Corpus Christi TX
Went to the dealer today about this issue. I got the letter about this a few years ago. Told them my blinkers blink right, when I try to go left. Trouble is, they want to do the work, but I'll never let these bunch of retarded monkeys touch my truck again (they screwed up a bunch of stuff trying to fix the a/c problem a few years ago, while I was still under warranty)! I said the only way I'll let you do this, is to let me watch, and the only thing your technicians (lol, right) do, will be the MFS exchange, nothing else, and if I see them plugging anything into the "port", I'd go bat poop crazy! They said no, and they can't even sell me there recalled part for me to exchange on my own---has to be a "technician"! If I wanted to do it on my own, only the full $114 something part! Tomorrow will be the day I try Shorts fix, and if that doesn't work, I've already found suppliers for this part for a whole lot less! They also wanted to go look at my front end, but I told them no thanks...I'm rounding up all the receipts on all the front end work/after market parts I used to make it all safe...years ago! I didn't expect much from the dealership today, but it brightened my heart when I made that service/flunky squirm, when I knew more things about recalls/TSB's/anything about my truck! lol

Registered User
Joined: Jan 2005
Posts: 123
Likes: 3
From: Florida
Just wanted to thank Shorts for the switch cleaning procedure and post my results. 
Wipers originally lost the intermittent part, gradually lost power, stopped a few times and finally stopped and didn't restart! After the procedure, I got the low and high back operating at normal speeds. But I still don't have the intermittent feature. I guess I'll have to look into a motor replacement. But at least I can drive in the rain for now, if needed.
* My tilt wheel lever does not have a screw holding it in place. It's simply a molded piece that pulls off towards the driver's eat and leaves a little metal lever that's small enough to get the lower cover out from around it.
Thread Starter
There is no G. There is no G. Repeat after me, THERE IS NO G!
Joined: Jan 2006
Posts: 1,688
Likes: 4
From: Texas
Myron, you're welcome, glad it helped a little bit. Too bad it didn't get all your functions back though. Least you've got something for the sporadic FL rain until you can get the MFS swapped out.
Take care
Take care


Registered User
Joined: Jun 2010
Posts: 9
Likes: 0
From: Melbourne, FL
I've been putting off this repair for months...too hot work on it, just didn't feel like getting into it, etc. Finally decided that I had had enough of trying to make it work while driving down the road. Took me 15 minutes to swap it out!!! Thanks for the detailed instructions!!!
Now on to the rear sliding window that snapped a cable
Now on to the rear sliding window that snapped a cable
Thread Starter
There is no G. There is no G. Repeat after me, THERE IS NO G!
Joined: Jan 2006
Posts: 1,688
Likes: 4
From: Texas
Be advised, pictures don't work. Had to take them all down from image shack as they want a subscription now. I've got them downloaded and going to find another photo host. Then I can put them back up if I'm allowed to edit the original post so everything stays in line.
Ok, just wanted to let yall know what's going on.
Ok, just wanted to let yall know what's going on.
Registered User
Joined: Jul 2007
Posts: 419
Likes: 0
From: West Linn, Oregon
Be advised, pictures don't work. Had to take them all down from image shack as they want a subscription now. I've got them downloaded and going to find another photo host. Then I can put them back up if I'm allowed to edit the original post so everything stays in line.
Ok, just wanted to let yall know what's going on.
Ok, just wanted to let yall know what's going on.
Thread Starter
There is no G. There is no G. Repeat after me, THERE IS NO G!
Joined: Jan 2006
Posts: 1,688
Likes: 4
From: Texas
Reposting pics to the original quotes - see if this works
How to remove your multifunction switch. It's easy, just take your time and don't break plastic parts and you'll be fine.
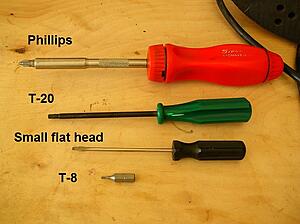
1. Grab your tools. Here s what you need:
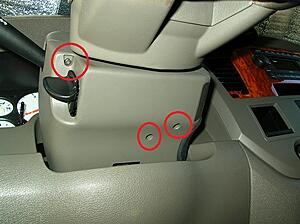
2. Go to your truck and tilt the steering wheel all the way up to expose these three screws. You will use the T-20 driver. ATTENTION: the hole on the very right (I think that was it) will not yield a screw. It only loosens a very long screw that hold the upper steering column cover on. So don't freak out when it doesn't fall out. Set aside your 2 screws.
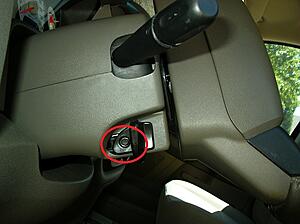
3. Tilt the steering wheel all the way down to pull out the top bezel, then tilt the wheel up again. Unscrew the screw (T20) on the wheel tilt handle and remove. You might need to tilt the wheel to center but the bezel will come out now.
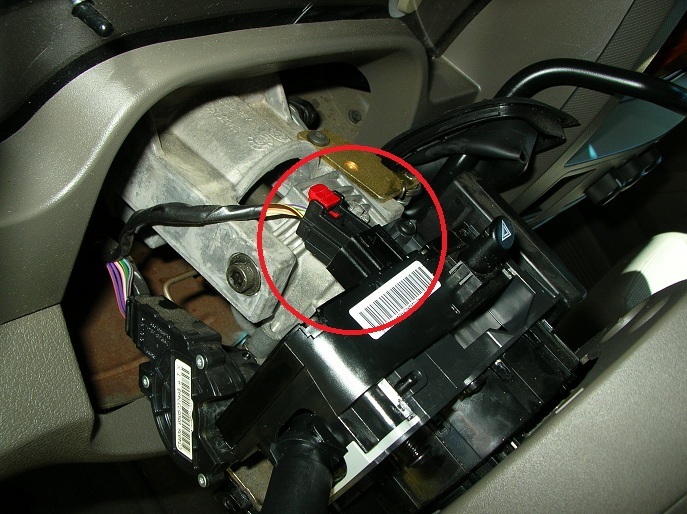
4. With the plastic covers out of the way you can now unplug the MFS harness. GENTLY slide the red tab towards the front of the truck. Now GENTLY press the end of the red tab and GENTLY pull the harness to release it from the MFS. DON'T BREAK THE TAB!

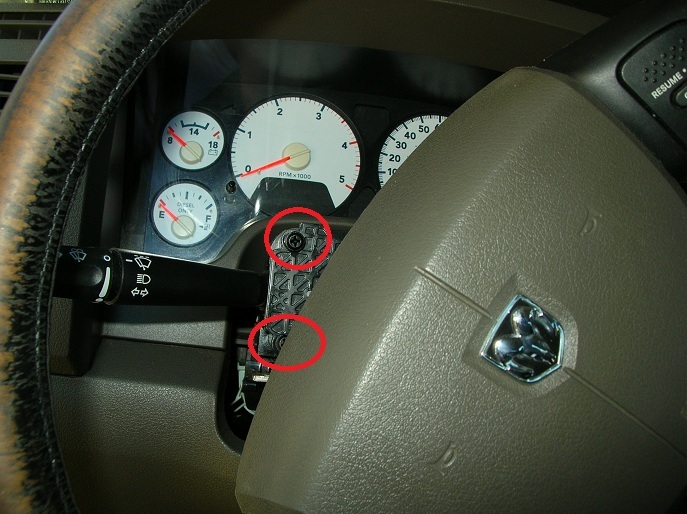
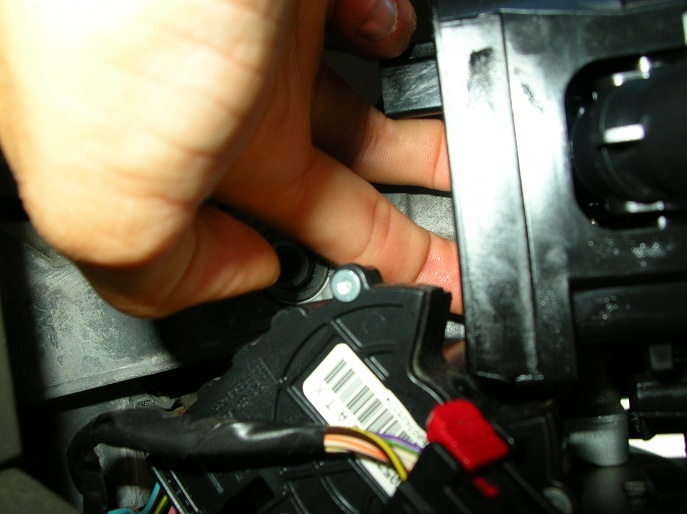
5. Next remove the two screws (phillips). You will need to turn the wheel to the left enough that your screwdriver has clearance. Set the screws aside and don't lose them.

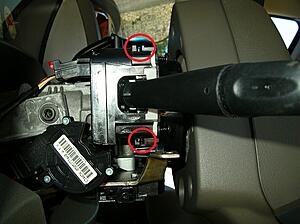
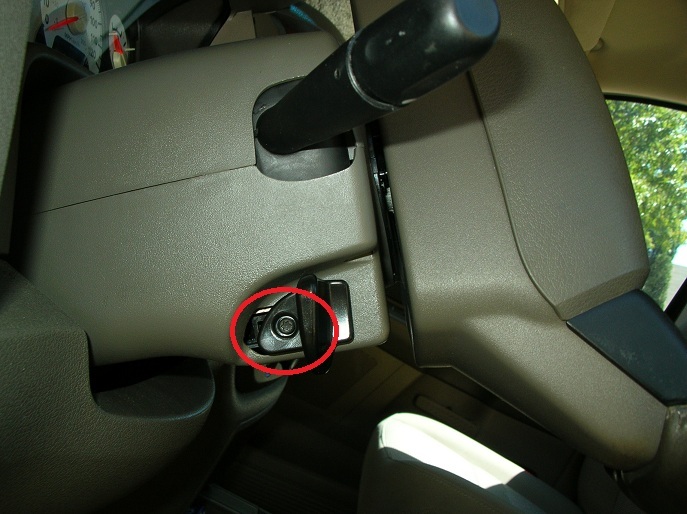
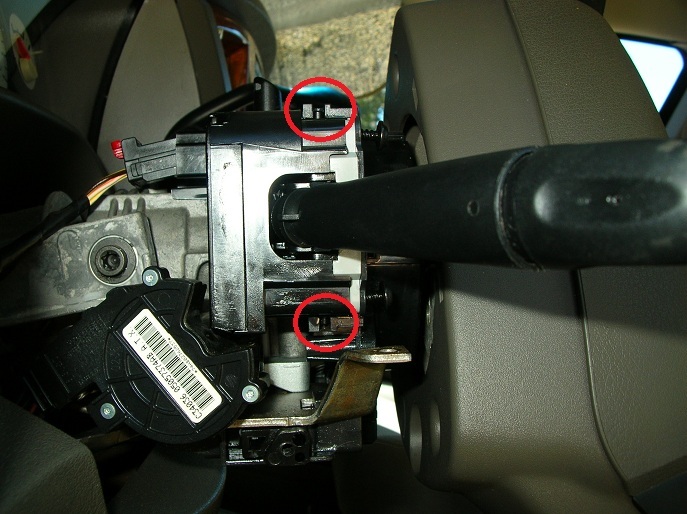
6. With that done you are ready to remove the MFS. First this note. Look at the tabs circled in red. You see how the little pin can only escape if the MFS is pulled towards the driver's door? Ok. Comprende? Comprende! That's the way it slides. Not up. Not Back. Not angled. Towards the drivers door.
7. I have girl medium hands and I was able to place my fingers in the little nook of the MFS and pull straight out towards the driver's door. It takes a little force. Think wrist tight force when you install spark plus. You do kinda remember spark plugs, right? Be ready for it to pop out. When I did this it fell on the driveway. I am excellent.

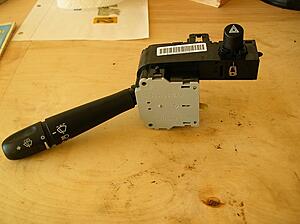
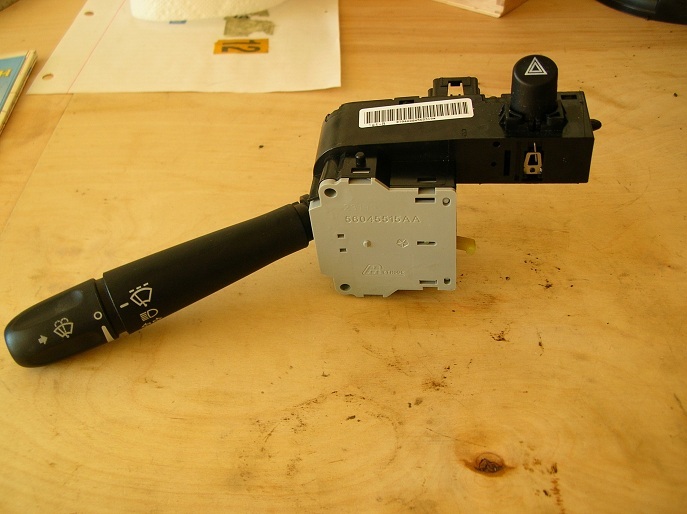
8. Now that you have the MFS pulled out take it to your workbench. It looks like this. DO NOT REMOVE THE GRAY COVER! You don't need to and it is a pain in the rear to put back together. Ask me how I know. Just don't. But if you need to, don't come crying to me on how to put to back together. I got lucky.
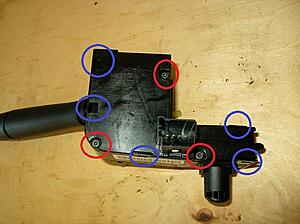
9. Flip the MFS to the back and you will see three(3) small torx screws (circled in red). Mine are T-8 and not security. (I have read other threads that say they had security torx. I don't know why mine are different). Unscrew those three screws and set them aside in a safe place.
Now you take your small flathead and GENTLY lift the tabs (circled in blue) around the cover and GENTLY pry the cover up and off. BUT WAIT! Before you lift off the cover be certain that the switch is in the appropriate position or you'll spill all the little sliders out. The blinker stalk goes on the bottom. The torx screw cover is on top. Just like in the picture. Now gently lift the cover up.
How to remove your multifunction switch. It's easy, just take your time and don't break plastic parts and you'll be fine.
1. Grab your tools. Here s what you need:
- Phillips screwdriver
- T-20 Driver
- Small electronics flat head
- T-8

2. Go to your truck and tilt the steering wheel all the way up to expose these three screws. You will use the T-20 driver. ATTENTION: the hole on the very right (I think that was it) will not yield a screw. It only loosens a very long screw that hold the upper steering column cover on. So don't freak out when it doesn't fall out. Set aside your 2 screws.

3. Tilt the steering wheel all the way down to pull out the top bezel, then tilt the wheel up again. Unscrew the screw (T20) on the wheel tilt handle and remove. You might need to tilt the wheel to center but the bezel will come out now.
4. With the plastic covers out of the way you can now unplug the MFS harness. GENTLY slide the red tab towards the front of the truck. Now GENTLY press the end of the red tab and GENTLY pull the harness to release it from the MFS. DON'T BREAK THE TAB!
5. Next remove the two screws (phillips). You will need to turn the wheel to the left enough that your screwdriver has clearance. Set the screws aside and don't lose them.
6. With that done you are ready to remove the MFS. First this note. Look at the tabs circled in red. You see how the little pin can only escape if the MFS is pulled towards the driver's door? Ok. Comprende? Comprende! That's the way it slides. Not up. Not Back. Not angled. Towards the drivers door.
7. I have girl medium hands and I was able to place my fingers in the little nook of the MFS and pull straight out towards the driver's door. It takes a little force. Think wrist tight force when you install spark plus. You do kinda remember spark plugs, right? Be ready for it to pop out. When I did this it fell on the driveway. I am excellent.
8. Now that you have the MFS pulled out take it to your workbench. It looks like this. DO NOT REMOVE THE GRAY COVER! You don't need to and it is a pain in the rear to put back together. Ask me how I know. Just don't. But if you need to, don't come crying to me on how to put to back together. I got lucky.
9. Flip the MFS to the back and you will see three(3) small torx screws (circled in red). Mine are T-8 and not security. (I have read other threads that say they had security torx. I don't know why mine are different). Unscrew those three screws and set them aside in a safe place.
Now you take your small flathead and GENTLY lift the tabs (circled in blue) around the cover and GENTLY pry the cover up and off. BUT WAIT! Before you lift off the cover be certain that the switch is in the appropriate position or you'll spill all the little sliders out. The blinker stalk goes on the bottom. The torx screw cover is on top. Just like in the picture. Now gently lift the cover up.

Thread Starter
There is no G. There is no G. Repeat after me, THERE IS NO G!
Joined: Jan 2006
Posts: 1,688
Likes: 4
From: Texas
10. This is what you see
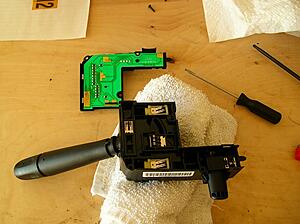
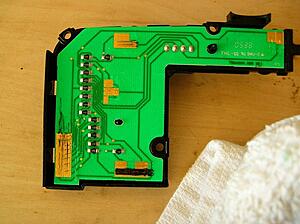
11. Dirty circuit board. The entire board was covered in a uniform layer of di-eletric grease. You can see the dark discolored grease from use. Clean the surface with rubbing alcohol and a qtip or soft napkin. I went to squeaky clean.
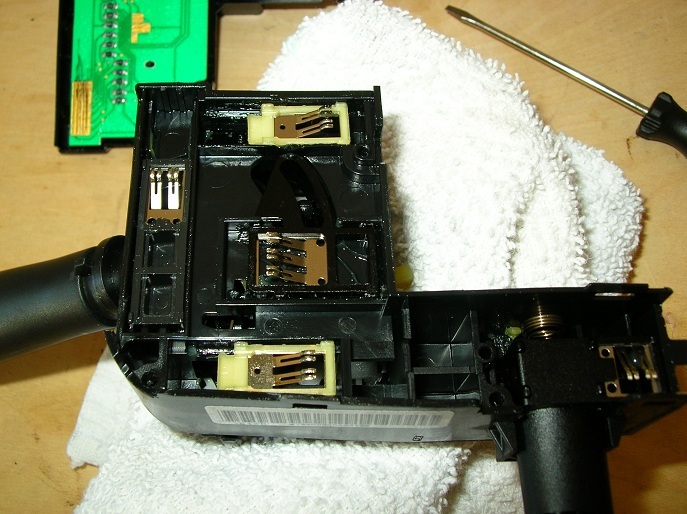
12. Next is the stalk slider doohickey. Clean these little prongs with a qtip and rubbing alcohol. Also for your consideration, consider adjusting the tension on these by GENTLY pulling them up a little so to create better contact with the circuit board. I did some trouble shooting on my intermittent wiper speeds and saw the prongs weren't even making consistent contact! No wonder the speed settings never worked when I really needed them

13. The two pieces are now all clean. I LIGHTLY retouched the prongs and the copper contacts with fresh di-electric grease. It is hot here and I figured less will be more in this case considering what I just cleaned off. Now you may put the cover back together. DO NOT INSTALL THE SCREWS YET. You're going to test the switch in place on the truck. Slide the MFS in position and hook up the harness. Turn the key on (engine running not necessary) and go through each and every function on the MFS. Be certain that all functions work as they should. If something does not come on, pull the switch out, open it up again and set the sliders. If you applied a little grease you should be able to tell the contact points and adjust accordingly.
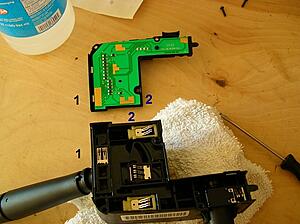
Notice the numbers.
1. The intermittent wiper speed slider and contact. Have a look at yours and see if yours is making good contact. If not, it might be why your speeds don't work. Adjust the tension on the prongs. Also, the slider is all the way in the down position of the slot when the wiper stalk is on OFF. So, get it in the right position or you'll pull it off and open it up a few times before you get it right.
2. Blinkers. The slider goes in the middle of the slot. If the slider is to the right or to the left when the stalk is at neutral the blinkers will not work. Again, ask me how I know.
The remaining sliders are your brights, windshield squirter and emergency flashers.
14. Now that you've function tested the switch and are satisfied install the switch take it back to the table and install the three torx screws. Take it back to the truck and slide it into place. Hook up the harness and slide the tab back in. Install the two phillips screws. Now get your top and bottom covers on. Takes some thinking on this, like a puzzle to get the pieces in just right and tilting the wheel and yaddayaddayadda. Hopefully you don't have any screws left. You got this far, I believe in you.
Now, go enjoy a fresh MFS. If it craps out now you know how to replace it.

11. Dirty circuit board. The entire board was covered in a uniform layer of di-eletric grease. You can see the dark discolored grease from use. Clean the surface with rubbing alcohol and a qtip or soft napkin. I went to squeaky clean.

12. Next is the stalk slider doohickey. Clean these little prongs with a qtip and rubbing alcohol. Also for your consideration, consider adjusting the tension on these by GENTLY pulling them up a little so to create better contact with the circuit board. I did some trouble shooting on my intermittent wiper speeds and saw the prongs weren't even making consistent contact! No wonder the speed settings never worked when I really needed them
13. The two pieces are now all clean. I LIGHTLY retouched the prongs and the copper contacts with fresh di-electric grease. It is hot here and I figured less will be more in this case considering what I just cleaned off. Now you may put the cover back together. DO NOT INSTALL THE SCREWS YET. You're going to test the switch in place on the truck. Slide the MFS in position and hook up the harness. Turn the key on (engine running not necessary) and go through each and every function on the MFS. Be certain that all functions work as they should. If something does not come on, pull the switch out, open it up again and set the sliders. If you applied a little grease you should be able to tell the contact points and adjust accordingly.

Notice the numbers.
1. The intermittent wiper speed slider and contact. Have a look at yours and see if yours is making good contact. If not, it might be why your speeds don't work. Adjust the tension on the prongs. Also, the slider is all the way in the down position of the slot when the wiper stalk is on OFF. So, get it in the right position or you'll pull it off and open it up a few times before you get it right.
2. Blinkers. The slider goes in the middle of the slot. If the slider is to the right or to the left when the stalk is at neutral the blinkers will not work. Again, ask me how I know.
The remaining sliders are your brights, windshield squirter and emergency flashers.
14. Now that you've function tested the switch and are satisfied install the switch take it back to the table and install the three torx screws. Take it back to the truck and slide it into place. Hook up the harness and slide the tab back in. Install the two phillips screws. Now get your top and bottom covers on. Takes some thinking on this, like a puzzle to get the pieces in just right and tilting the wheel and yaddayaddayadda. Hopefully you don't have any screws left. You got this far, I believe in you.
Now, go enjoy a fresh MFS. If it craps out now you know how to replace it.


