Did the drivers seat mod
 08-01-2007, 09:11 AM
#16
Registered User

Join Date: Jul 2007
Posts: 142
Likes: 0
Received 0 Likes
on
0 Posts
That was the first thing I noticed on my truck when I traded my F150 in. I really like the F150 seat. I was thinkin it was just me as I'm a big guy. I was just telling my wife I was going to take it to a uphol. shop to have some more padding put in.haha
Thanks
Thanks
 08-01-2007, 09:29 AM
#17
Registered User
Thread Starter
Join Date: Dec 2003
Location: San Diego, CA
Posts: 1,119
Likes: 0
Received 0 Likes
on
0 Posts
This site is worth the price of admission.
08-01-2007, 11:52 AM
#18
Registered User
Join Date: Jul 2003
Location: Lloydminster, Alberta, Canada
Posts: 2,066
Likes: 0
Received 0 Likes
on
0 Posts
 Of course I drove to the hospital. Right after I wrapped the cut with a clean shop towel, filled three nitrile gloves with blood putting the seat back together and in, and cleaning the blood off the garage floor. Of course I had to attempt this on the driver's side seat first.
Now I just gotta figure a way to shave and shower without undoing all the nurse's wrapping.......a nitirile glove won't fit over top (she went a little extreme I think), so, I think it's coming off and I'll re-wrap it after. My wrapping should free up some movement to try again this afternoon.

 08-01-2007, 12:05 PM
#19
Registered User
Join Date: Jan 2007
Location: My head lays down in Murrieta, but the day light hours are spent in San Diego, Ca.
Posts: 1,820
Likes: 0
Received 1 Like
on
1 Post
I'm fine - I've had worse. Of course I drove to the hospital. Right after I wrapped the cut with a clean shop towel, filled three nitrile gloves with blood putting the seat back together and in, and cleaning the blood off the garage floor. Of course I had to attempt this on the driver's side seat first.
Now I just gotta figure a way to shave and shower without undoing all the nurses wrapping.......a nitirile glove won't fit over top (she went a little extreme I think), so, I think it's coming off and I'll re-wrap it after. My wrapping should free up some movement to try again this afternoon.
Of course I drove to the hospital. Right after I wrapped the cut with a clean shop towel, filled three nitrile gloves with blood putting the seat back together and in, and cleaning the blood off the garage floor. Of course I had to attempt this on the driver's side seat first.Now I just gotta figure a way to shave and shower without undoing all the nurses wrapping.......a nitirile glove won't fit over top (she went a little extreme I think), so, I think it's coming off and I'll re-wrap it after. My wrapping should free up some movement to try again this afternoon.
08-01-2007, 12:08 PM
#20
Registered User
Join Date: Jul 2003
Location: Lloydminster, Alberta, Canada
Posts: 2,066
Likes: 0
Received 0 Likes
on
0 Posts
08-01-2007, 12:12 PM
#21
Registered User
Join Date: Jul 2003
Location: Lloydminster, Alberta, Canada
Posts: 2,066
Likes: 0
Received 0 Likes
on
0 Posts
Now, before someone says "this thread means nothing without pics" or something of that nature, here ya are (DO NOT USE PLIERS!):
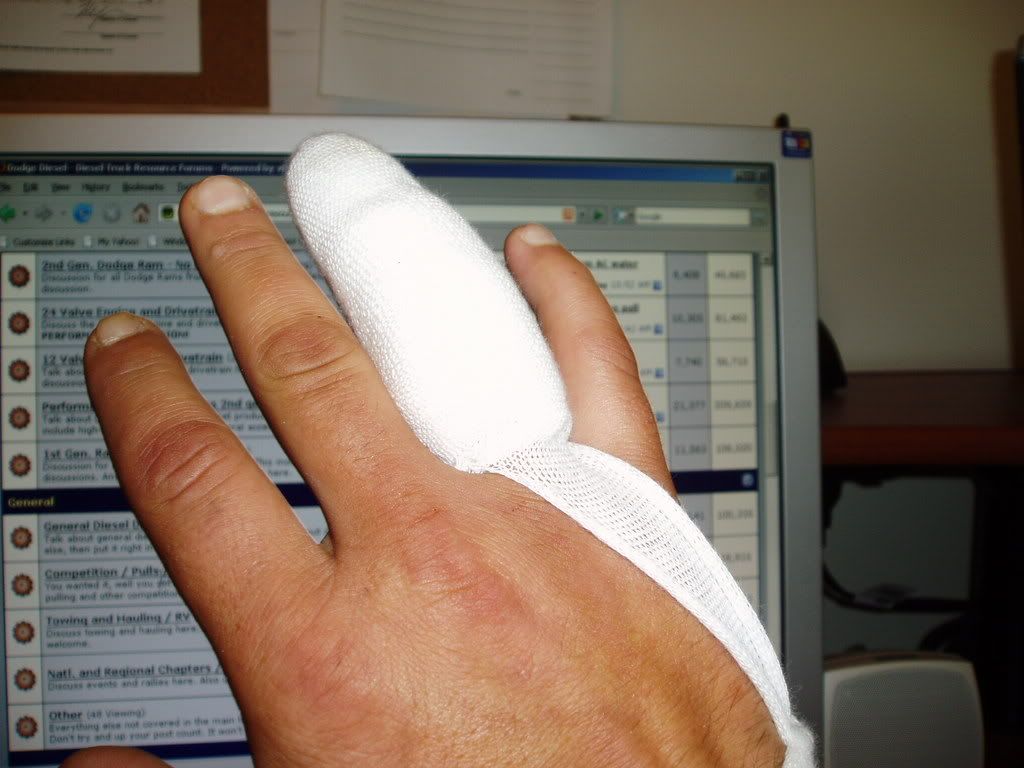

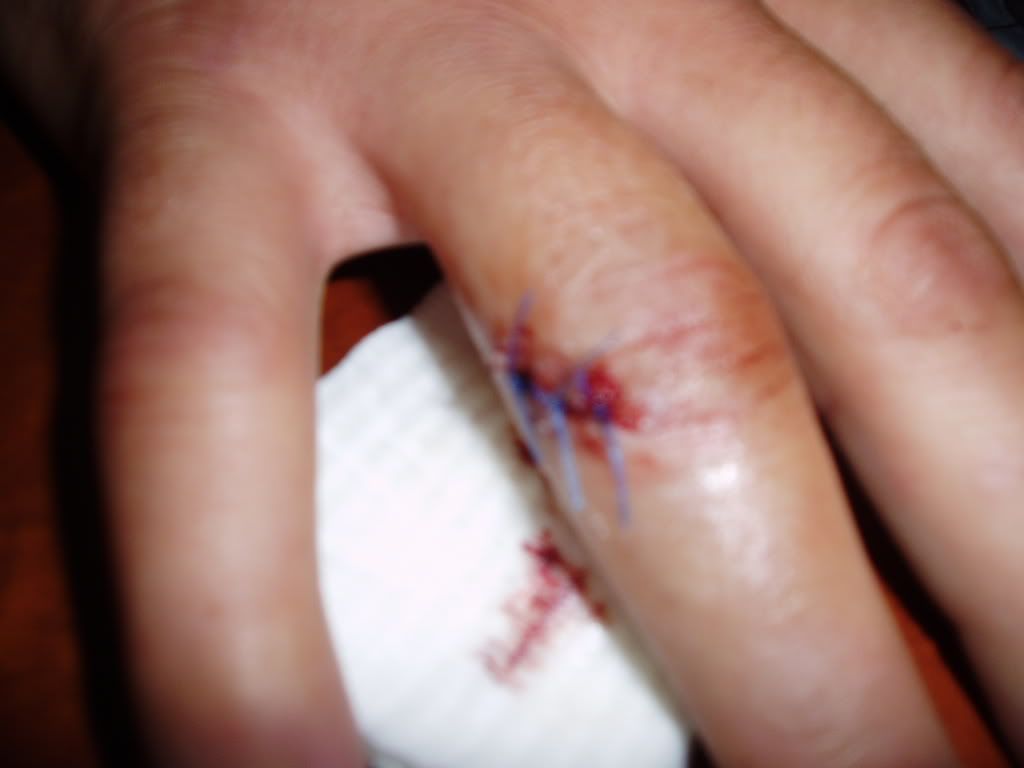
Doc says with the 1/4" piece of tendon I tore out it'll be stiff for about a month or longer, but will eventually heal.
Maybe I'll try the passenger seat, first, later.
I'm willing to entertain this idea. How do you remove from the top??
Doc says with the 1/4" piece of tendon I tore out it'll be stiff for about a month or longer, but will eventually heal.
Maybe I'll try the passenger seat, first, later.
Guys, forget unbolting the seat and just remove the fabric! No sliced fingers that way
08-01-2007, 02:27 PM
#22
Registered User

Join Date: Mar 2004
Location: Denver
Posts: 367
Likes: 0
Received 0 Likes
on
0 Posts
Has anyone ever heard of a spring hook? I made one out of a piece of lawn edging stake down wire, heavy guage. Unbend it to make it straight, it will be aprox. 18" long, then bend a hook on one end and a pulling loop on the other. Use it to reach under the bar and hook the end of the spring and pull it back to hook over the bar.Vary easy. Maby wear some leather gloves for exta safty and leverage.
08-01-2007, 02:40 PM
#23
Registered User

Join Date: Mar 2004
Location: Ovilla, TX
Posts: 46
Likes: 0
Received 0 Likes
on
0 Posts
I used a 3/8" box wrench to pull the spring around the seat frame. Someone else came up with that idea and posted it prior to my attempting the mod. a while back. It worked VERY well.
08-01-2007, 03:56 PM
#24
Registered User
Join Date: Jan 2007
Location: My head lays down in Murrieta, but the day light hours are spent in San Diego, Ca.
Posts: 1,820
Likes: 0
Received 1 Like
on
1 Post
Yeah a spring tool would work perfect. I use them for mounting expansion/exhaust pipes on two-stroke dirt bikes. Would work excellent on seat springs also.
08-01-2007, 05:37 PM
#25
Registered User

Join Date: Nov 2004
Posts: 176
Likes: 0
Received 0 Likes
on
0 Posts
To remove fabric:
1 - Unbolt the corners of the seat pan from the brackets attached to the rails.
2 - Remove seat.
3 - Remove tilt levers and power controls from outside of lower cushion.
4 - Flip the seat over, and unhook the fabric channel retainers from the seat frame.
5 - Remove fabric, lift seat cushion out, add carpet and foam
6 - Assemble in reverse order.
Takes about 20 minutes per seat to do this, and you don't have to touch the springs.
08-01-2007, 08:15 PM
#26
Registered User
Join Date: Jul 2003
Location: Lloydminster, Alberta, Canada
Posts: 2,066
Likes: 0
Received 0 Likes
on
0 Posts
1 - Unbolt the corners of the seat pan from the brackets attached to the rails.
2 - Remove seat.
3 - Remove tilt levers and power controls from outside of lower cushion.
4 - Flip the seat over, and unhook the fabric channel retainers from the seat frame.
5 - Remove fabric, lift seat cushion out, add carpet and foam
6 - Assemble in reverse order.
Takes about 20 minutes per seat to do this, and you don't have to touch the springs.
2 - Remove seat.
3 - Remove tilt levers and power controls from outside of lower cushion.
4 - Flip the seat over, and unhook the fabric channel retainers from the seat frame.
5 - Remove fabric, lift seat cushion out, add carpet and foam
6 - Assemble in reverse order.
Takes about 20 minutes per seat to do this, and you don't have to touch the springs.
I'm going to go give this a shot -- thanks JIMCTD!
08-02-2007, 01:31 AM
#27
Registered User

Join Date: Jul 2006
Posts: 30
Likes: 0
Received 0 Likes
on
0 Posts
I highly recommend the screwdriver trick or vise grips only - NO PLIERS. I had to use the screwdriver thing right in the middle of doing this mod to put the springs back on and bolt the seat in so I could drive to emergency.
I just got back with three stitches, a 1/4" piece of tendon removed, and a tetanus shot -- pliers slipped off one of the springs and the force rammed my right ring finger into the back of the seat base. I cut it to the bone near the knuckle, tore out a little bit of tendon, and had to control bleeding while trying to put it back together to go for stitches.


Needless to say the mod is not complete. I will attempt again tomorrow depending on how the finger feels.
I just got back with three stitches, a 1/4" piece of tendon removed, and a tetanus shot -- pliers slipped off one of the springs and the force rammed my right ring finger into the back of the seat base. I cut it to the bone near the knuckle, tore out a little bit of tendon, and had to control bleeding while trying to put it back together to go for stitches.
Needless to say the mod is not complete. I will attempt again tomorrow depending on how the finger feels.
Anyway, take one end of the rope and feed it through the spring hook, pull about a foot or more of it through, then grasp both parts of the rope and pull the spring with the rope. You can use this trick to put them on or off, it will never slip and it’s very easy and simple (and safe!). You can use your spare hand to guide the spring on if you like. To install them: loop the rope, put the spring on the rope, install the spring, pull the rope out of the spring loop.
If the distance is too short to pull (ie. You are in a situation where you can’t really pull), you can also loop the rope around your thumb, holding it with one hand and push with your thumb.
It’s so simple, if I had a picture I would show ya. You will never do it any other way again. Never use pliers.
To the guy that got hurt: I feel for you buddy. Before I knew the rope trick I skinned my fair share of knuckles, but not that bad. Ouch.
08-02-2007, 03:10 AM
#28
Registered User
Join Date: Jul 2003
Location: Lloydminster, Alberta, Canada
Posts: 2,066
Likes: 0
Received 0 Likes
on
0 Posts
Well, got it done! Both driver and passenger seats. I didn't know about the rope trick, but removing the upholstery from the top was way easier than unbolting the seat and turning over - just getting at the front bolts on the driver's side was a major pain in the butt.
I actually skipped steps 1 & 2 and did it with the seats in place. The longest time was spent on removing my seat cover off the base and cutting the carpet and foam - I cut both carpet and foam 15.5"x14" - 1" thick upholstery foam.
Skipping steps 1 & 2 actually cuts time down to about 10 minutes on the actual seat itself - add 15 more for seat cover and cutting.
As far as step #5 goes, no need to unclip the fabric on the back of the seat. There is plenty of room to work just by lifting the front up toward the seatback - just unclip the front and sides - the front clip is a bit of a bugger until you figure out how it comes undone.
Definitely more comfortable and no trips to emergency......this time around!
Thanks, but not necessary. As long as I can share a safer way, learned from my mishap so that it doesn't happen to anyone else, all is good.

1 - Unbolt the corners of the seat pan from the brackets attached to the rails.
2 - Remove seat.
3 - Remove tilt levers and power controls from outside of lower cushion.
4 - Flip the seat over, and unhook the fabric channel retainers from the seat frame.
5 - Remove fabric, lift seat cushion out, add carpet and foam
6 - Assemble in reverse order.
Takes about 20 minutes per seat to do this, and you don't have to touch the springs.
2 - Remove seat.
3 - Remove tilt levers and power controls from outside of lower cushion.
4 - Flip the seat over, and unhook the fabric channel retainers from the seat frame.
5 - Remove fabric, lift seat cushion out, add carpet and foam
6 - Assemble in reverse order.
Takes about 20 minutes per seat to do this, and you don't have to touch the springs.
Skipping steps 1 & 2 actually cuts time down to about 10 minutes on the actual seat itself - add 15 more for seat cover and cutting.
As far as step #5 goes, no need to unclip the fabric on the back of the seat. There is plenty of room to work just by lifting the front up toward the seatback - just unclip the front and sides - the front clip is a bit of a bugger until you figure out how it comes undone.
Definitely more comfortable and no trips to emergency......this time around!
To the guy that got hurt: I feel for you buddy. Before I knew the rope trick I skinned my fair share of knuckles, but not that bad. Ouch.
08-04-2007, 01:32 PM
#29
Banned

Join Date: Mar 2006
Posts: 235
Likes: 0
Received 0 Likes
on
0 Posts
Festus, thanks for the good chuckle ... not at your injury but more the way u worded it and the fact that even though we know (someone else told us!) what is about to happen we still continue ... like cutting with a knife while pulling towards your other hand ... sooner or later blood will roll ...
I have ripped off a few ounces of knuckle-skin trying to remove snowmobile exhaust springs ... hence the laughter lol Finally made a spring puller and no scars since. ... thanks again for the story !!
btw, seems my seats don't have this problem ... I guess the leather seats are made differently? mine are great anyhow.
... not at your injury but more the way u worded it and the fact that even though we know (someone else told us!) what is about to happen we still continue ... like cutting with a knife while pulling towards your other hand ... sooner or later blood will roll ... I have ripped off a few ounces of knuckle-skin trying to remove snowmobile exhaust springs ... hence the laughter lol Finally made a spring puller and no scars since. ... thanks again for the story !!
btw, seems my seats don't have this problem ... I guess the leather seats are made differently? mine are great anyhow.
08-04-2007, 02:40 PM
#30
Registered User
Thread Starter
Join Date: Dec 2003
Location: San Diego, CA
Posts: 1,119
Likes: 0
Received 0 Likes
on
0 Posts
Festus, thanks for the good chuckle ... not at your injury but more the way u worded it and the fact that even though we know (someone else told us!) what is about to happen we still continue ... like cutting with a knife while pulling towards your other hand ... sooner or later blood will roll ...
I have ripped off a few ounces of knuckle-skin trying to remove snowmobile exhaust springs ... hence the laughter lol Finally made a spring puller and no scars since. ... thanks again for the story !!
btw, seems my seats don't have this problem ... I guess the leather seats are made differently? mine are great anyhow.
... not at your injury but more the way u worded it and the fact that even though we know (someone else told us!) what is about to happen we still continue ... like cutting with a knife while pulling towards your other hand ... sooner or later blood will roll ... I have ripped off a few ounces of knuckle-skin trying to remove snowmobile exhaust springs ... hence the laughter lol Finally made a spring puller and no scars since. ... thanks again for the story !!
btw, seems my seats don't have this problem ... I guess the leather seats are made differently? mine are great anyhow.
They are made the same. I didn't feel the side support bar that others report, but my right leg was hurting at times while driving. It seems to be better now that I have added the padding. If your right leg starts to hurt at any time while driving, that's the time to do the mod.