
How to ( BALL JOINTS )

Registered User


Joined: May 2007
Posts: 2,160
Likes: 10
From: Sarasota, FL
I placed loctite on the 4 bolts that hold on the bearing/rotor assembly however somehow three of them have worked themselves loose and fallen out on the driverside. %$^&*@!
Does anyone have the bolt/thread size...I need 2 of them asap. Thank you!
Does anyone have the bolt/thread size...I need 2 of them asap. Thank you!
Registered User
Joined: Apr 2007
Posts: 78
Likes: 0
From: Fairbanks, Alaska
Great write up and thread. It's nice to hear from the various folks on how this procedure worked. At 50,000 miles I finally have a drive axle U-joint clicking. Dealer replaced both my front tube seals at about 20,000 miles (under warranty) so I'm anticipating my hub assemblies will come off without much of a fight. Is this procedure the same for most of the Gen 3's? I have a 2009 and noticed most of the discussion in the thread is on rigs a little older.
I watch wind blow...
Joined: Dec 2006
Posts: 1,390
Likes: 0
From: Red Dirt territory of TEXAS
Mr. Gadget,
thank you!
my new to me rig has 173K miles and I don't know its previous service history so I am preparing myself for all the things that should fail.
here is a question though, I've used slide hammers on old bearings that I had intentions of replacing so I could get wild but never really needed to.
it seems to me that going down the road at 70mph and hitting one of those great big unavoidable pot holes would do more damage than a slide hammer, or trying to corner hard with these taller 35" tires.
I could be wrong, and in the future will only use the slide hammer on trashed bearings.
thx again.

Registered User
Joined: Aug 2006
Posts: 221
Likes: 0
From: Northern Virginia
Resurrecting an old thread.....
My '06 unit bearings are not coming out at all and I have worked on it all weekend long.
Have tried:
Socket/extension method using the power steering - no luck
BFH with sockets on the bolt heads - no luck
Slidehammer on the hub assembly - no luck
6 ton hydraulic bottle jack against the upper control arm frame mount to the bolt head - no luck
Combination of the above while heating the knuckle with a torch - no luck
Driven around my neighborhood with the four bolts loose to get the weight of the truck to loosen the unit bearings - no luck
I am at a loss on next steps to get these things out!
Suggestions appreciated.....
My '06 unit bearings are not coming out at all and I have worked on it all weekend long.
Have tried:
Socket/extension method using the power steering - no luck
BFH with sockets on the bolt heads - no luck
Slidehammer on the hub assembly - no luck
6 ton hydraulic bottle jack against the upper control arm frame mount to the bolt head - no luck
Combination of the above while heating the knuckle with a torch - no luck
Driven around my neighborhood with the four bolts loose
to get the weight of the truck to loosen the unit bearings - no luckI am at a loss on next steps to get these things out!
Suggestions appreciated.....

Registered User

Joined: Jan 2006
Posts: 230
Likes: 0
From: Northern VA
On my Dad's truck (lives in Vermont), we cut the ball joints with a torch to get the knuckle off. We then burned out the hub with a torch and used a large sledge to drive out what was left. It was a brute force method. Very time consuming and very tiring.

Registered User
Joined: Jan 2008
Posts: 150
Likes: 1
I went through the same problems with getting my Unit Bearings out of my 05'. I tried everything you did. It slowed my install down by like two weeks.
The only thing that worked was my mechanic buddy that was really good with a 12# sledge hammer. He got along side and just brutally beat them out. It took about 15 minutes on each side. The unit bearings are not going to be salvageable. They may break though too, mine did not.
This may work.
I was amazed at how hard they had to be beaten out. I was amazed that no body damage was done by an errant swing too.

Registered User
Joined: Jan 2008
Posts: 18
Likes: 0
Yeah, they are a huge pain. I went through a couple cans of PB Blaster and beat them for days with a small sledge hammer. Also used the socket/power steering technique. They eventually gave way. Sounds like yours are stuck on even tighter than mine. Some good advice above. I'll just add that when you do finally get them off and go to reassemble everything..... use anti-seize everywhere. I used Dynatrac BJs, and while I don't plan on having to take it all apart again, you just never know.
Registered User
Joined: Nov 2003
Posts: 526
Likes: 10
From: Arizona
Thank you for the write up.
I wonder if a person with the Harbor Freight ball joint press has to buy the kit of extra cups?
The other tool I don't have in my garage I suppose would be 3/4 drive ratchet set and a torque wrench that goes high enough for the axle nut...
Anyhow thanks for the great write up. I will book mark it.
I wonder if a person with the Harbor Freight ball joint press has to buy the kit of extra cups?
The other tool I don't have in my garage I suppose would be 3/4 drive ratchet set and a torque wrench that goes high enough for the axle nut...
Anyhow thanks for the great write up. I will book mark it.
I think I can... I think...
Joined: Aug 2004
Posts: 2,264
Likes: 0
From: Texas (DFW area)
Well Crapola!! Photobucket broke the links to these pics. it's a 3rd party hosting issue!!
This is a big write up with a lot of pictures but I thought it would help some people.
I know a lot of people have been having problems with ball joints so when I did mine I took pictures and used only hand tools because a lot of people talk about how hard it is and what tools you must have. The ball joints were about $75-$80 or so each. The job took about 3 hrs or so on each side for me doing it with hand tools and not having help. The press with with cups for many axles was $250 and the other tools I had. I was told around $1100 $1300 to do it and if they had problems with the rotor or bearing it would go up. Sounded like if it would not come off to start they just beat it off and charge you for a new one.
If the Mods don't want this post just let me know, if it is to big I can cut it down.
I just hear people that talk of working on the motor and doing lots of other stuff but when it comes to working on a big axle like this and you bring in the word Ball Joint, they farm it out. No need it's not that hard.
The one thing that I did not get into was the size of all the nuts bolts and sockets needed. Maybe at a later date I can add that and put the TQ numbers for everything. As I look in the shop book and other shop books plus the spec for the bolts of that size the TQ is all over the place, so get it good and tight and use lock tite. The TQ don't give a wet or dry number and most of the lock tite we can get is a wet, you will get higher numbers, then the dry, that they used from the factory. That is why I did not cover it.
Break loose and removal of axle nut. You may want to hit it with penatrator oil the night before or early that day.
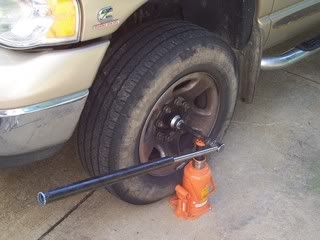
break lug nuts loose
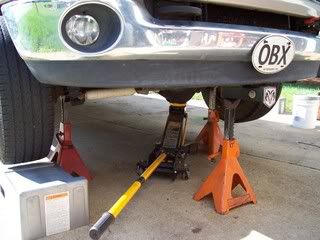
I drove up on ramps to make it easy to lift. only had to lift it a few inches.
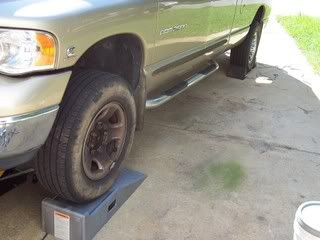
Block the rear tires front and rear as you will be starting the motor and moving the front around a lot.
I used three jack stands and left the floor jack under as a safety just because you are moving a lot of stuff around and starting the motor. I have a front hitch that I used for the center. If you lift the side you are working on higher the oil will not run out and no need to do anything with the diff. In this case the drivers side is about three inches higher.
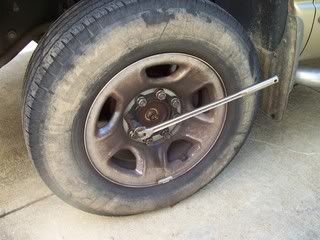
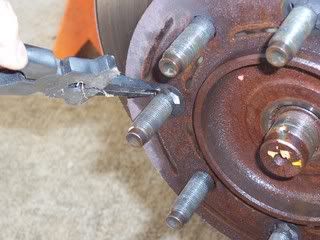
After removing the tire and wheel you have some retainers to pull off, this is a good time to hit the hub with a penatrator oil.
In this step you can give a little room for the pads, and it will let it drop on easy. If you don't do this you will need to get a pad pusher or C clamp and can damage you pads. That's why I did it on the truck it will just drop back on IF YOU DON'T TOUCH THE BRAKES WHEN YOU START THE TRUCK LATER.
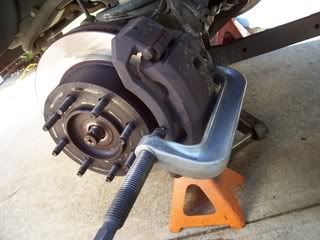
Next take out the two caliper bracket bolts. Take the caliper and bracket off as one, no reason to break it down. Then tie it out of the way with some 550 cord.
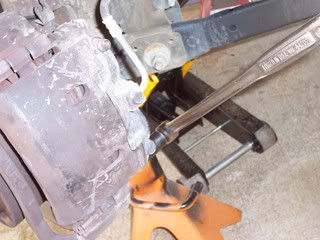
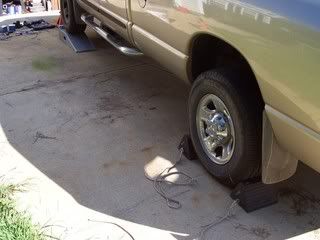
Next use a wood block and a SFH and maybe a BFH... Never hit the rotor with steel. Tap, tap, tap all the way around several times.
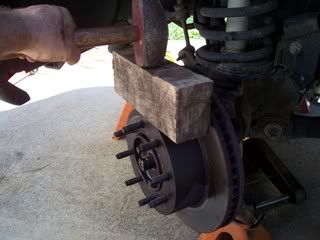
Then move the wood block the the area between the cooling fins and tap,tap a few more times all the way around. It takes time but will come off. Don't go hitting it hard or with steel, it will damage the rotor or the bearing.

I know a lot of people have been having problems with ball joints so when I did mine I took pictures and used only hand tools because a lot of people talk about how hard it is and what tools you must have. The ball joints were about $75-$80 or so each. The job took about 3 hrs or so on each side for me doing it with hand tools and not having help. The press with with cups for many axles was $250 and the other tools I had. I was told around $1100 $1300 to do it and if they had problems with the rotor or bearing it would go up. Sounded like if it would not come off to start they just beat it off and charge you for a new one.
If the Mods don't want this post just let me know, if it is to big I can cut it down.
I just hear people that talk of working on the motor and doing lots of other stuff but when it comes to working on a big axle like this and you bring in the word Ball Joint, they farm it out. No need it's not that hard.
The one thing that I did not get into was the size of all the nuts bolts and sockets needed. Maybe at a later date I can add that and put the TQ numbers for everything. As I look in the shop book and other shop books plus the spec for the bolts of that size the TQ is all over the place, so get it good and tight and use lock tite. The TQ don't give a wet or dry number and most of the lock tite we can get is a wet, you will get higher numbers, then the dry, that they used from the factory. That is why I did not cover it.
Break loose and removal of axle nut. You may want to hit it with penatrator oil the night before or early that day.
break lug nuts loose
I drove up on ramps to make it easy to lift. only had to lift it a few inches.
Block the rear tires front and rear as you will be starting the motor and moving the front around a lot.
I used three jack stands and left the floor jack under as a safety just because you are moving a lot of stuff around and starting the motor. I have a front hitch that I used for the center. If you lift the side you are working on higher the oil will not run out and no need to do anything with the diff. In this case the drivers side is about three inches higher.
After removing the tire and wheel you have some retainers to pull off, this is a good time to hit the hub with a penatrator oil.
In this step you can give a little room for the pads, and it will let it drop on easy. If you don't do this you will need to get a pad pusher or C clamp and can damage you pads. That's why I did it on the truck it will just drop back on IF YOU DON'T TOUCH THE BRAKES WHEN YOU START THE TRUCK LATER.
Next take out the two caliper bracket bolts. Take the caliper and bracket off as one, no reason to break it down. Then tie it out of the way with some 550 cord.
Next use a wood block and a SFH and maybe a BFH... Never hit the rotor with steel. Tap, tap, tap all the way around several times.
Then move the wood block the the area between the cooling fins and tap,tap a few more times all the way around. It takes time but will come off. Don't go hitting it hard or with steel, it will damage the rotor or the bearing.
I think I can... I think...
Joined: Aug 2004
Posts: 2,264
Likes: 0
From: Texas (DFW area)
About to replace the drivers side front U joint on my 2010. I can still use the writeup but those pics would have come in handy!! Should have done it the day I picked up the part!!!
Registered User
Joined: Mar 2006
Posts: 218
Likes: 2
From: Columbus, IN
If you goto this link https://wiki.dieseltruckresource.com...nt_Replacement
You can click on each individual image link and view them on Photo Buckets website.
You can click on each individual image link and view them on Photo Buckets website.