
Replace Your Front DANA/Spicer Axle Universal Joints

Thread Starter
1st Generation Admin
Joined: Jan 2005
Posts: 4,601
Likes: 118
From: Buies Creek, NC
Folks, this is another attempt to repay you for all that I've learned here. 
This is by no means "The Authoritative How-To" regarding replacing the front universal joints. These instructions are based solely on my experience with my heap exclusively using the best means I had at the moment.
In this job, I'm gonna replace the front axle universal joints.
NOTE: Keep in mind I'm working on the stock, OEM style front axle as installed by Dodge on a 1993 W250 4x4 ClubCab at 226K miles. Specifically the DANA/Spicer 60 4500# axle with OEM manual locking hubs. Another trucks mileage may vary.
Finally, I'm gonna pretty-much fast forward through the truck set-up & disassembly and concentrate on the universal joint replacement.
READ ALL THESE INSTRUCTIONS BEFORE ATTEMPTING THIS WORK.
With that, let's get started.
As always ~ SAFETY FIRST!
- Chock the rear wheels
- Set the emergency/parking brake.
- Disconnect the Negative battery cable from the battery.
- Have a known good fire extinguisher within sight.
- Have a clean, uncluttered work area.
- Have good lighting.
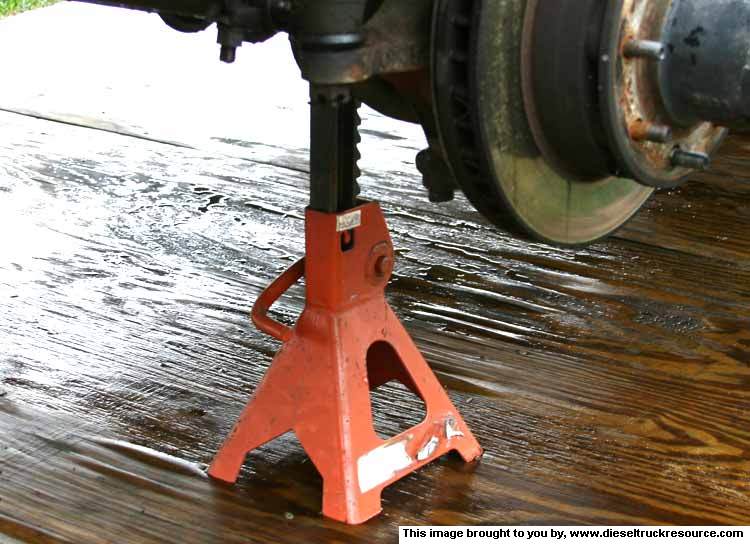
- Considering you'll be lifting/holding the vehicle with a jack and safety stands, be sure they're rated for the load with a good safety factor. Don't cut any corners here. Cinder-blocks WILL kill you! When considering all this, don't forget to include a strong, level area to park the truck.
- With any work I do, I usually power wash everything the night before. If you don't have the means at home, the local car-wash works well. If you don't walk away soaking wet with gritty/grime on your face, you need to strike it again.
- All right. Set the parking/emergency brake and chock the rear wheels. Go ahead and loosen the front wheel lug nuts while the truck is still on the ground.
- Safely raise and firmly support the front of the truck. I found about an inch clearance under the front tires worked well. It certainly made putting the tires back on much easier.
I used a 3-ton capacity safety stand set so that the hand of the stand supported the axle where the axle tube meets the knuckle assembly ~
Now go ahead and remove the tire ~
Again, fast forwarding through the tear-down;
- Remove the brake caliper assembly and brake pads.
- Hang the caliper with a length of coat-hanger wire from a hole in the fender-well. This will help ensure you don't screw-up a brake fluid hose.
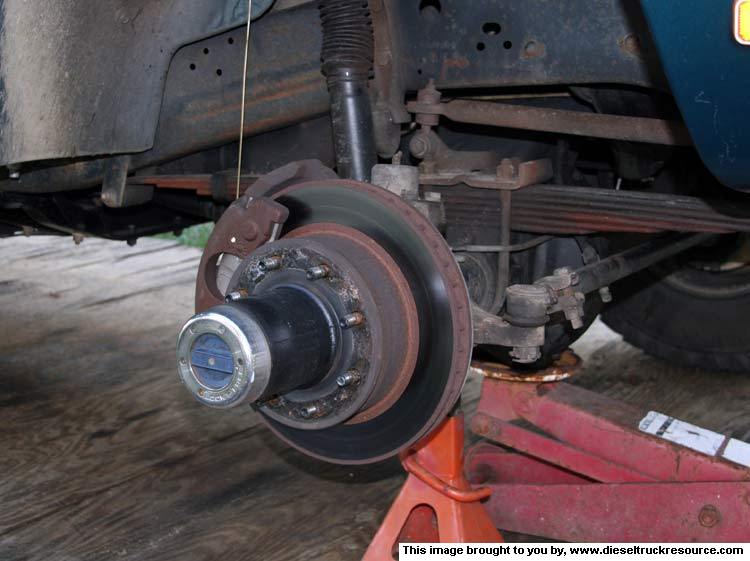
- Remove the brake rotor/hub assembly and wipe the spindle dry.
This thread should prove informative for doing so. ~ https://www.dieseltruckresource.com/...d.php?t=143024
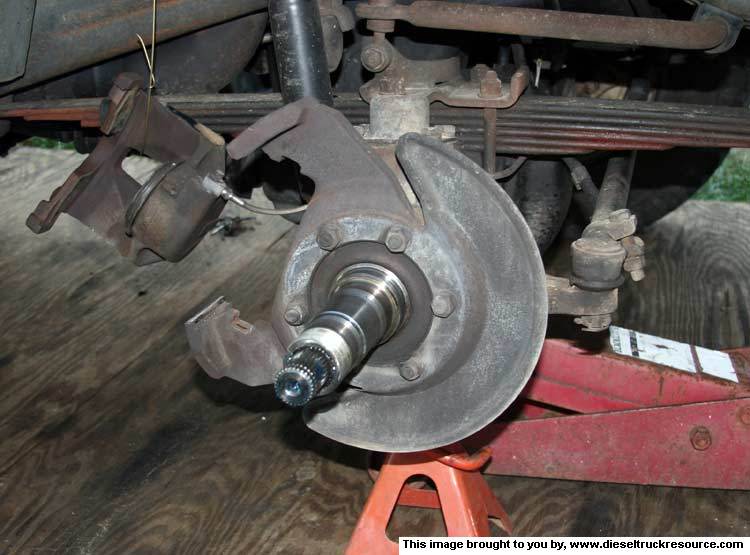
- Now remove the six (6) nuts and washers that secure the brake rotor shield and caliper mounting bracket. You may have to tap the bracket with a brass headed maul to loosen it. ~

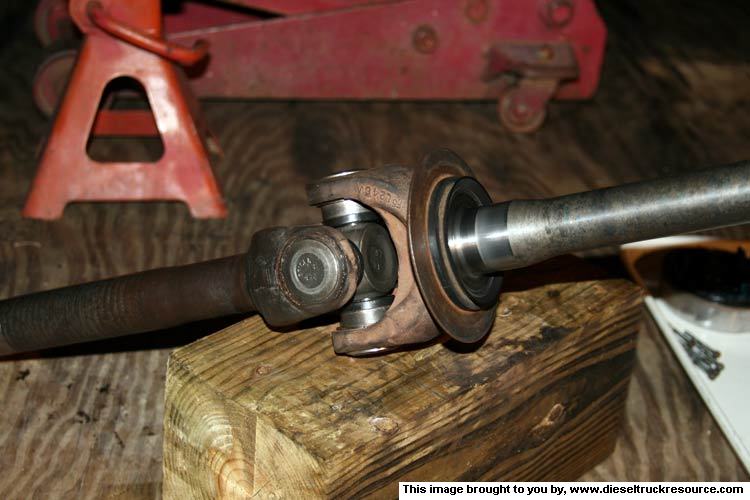
- Now remove the spindle. Again, you may have to tap it with a brass headed maul to initially loosen it. NOTE: The axle may very well tend to come out with the spindle. I thought it best to leave it in place so as to not screw up a seal. I simply pushed the end of the axle shaft into the spindle as I removed the spindle. ~
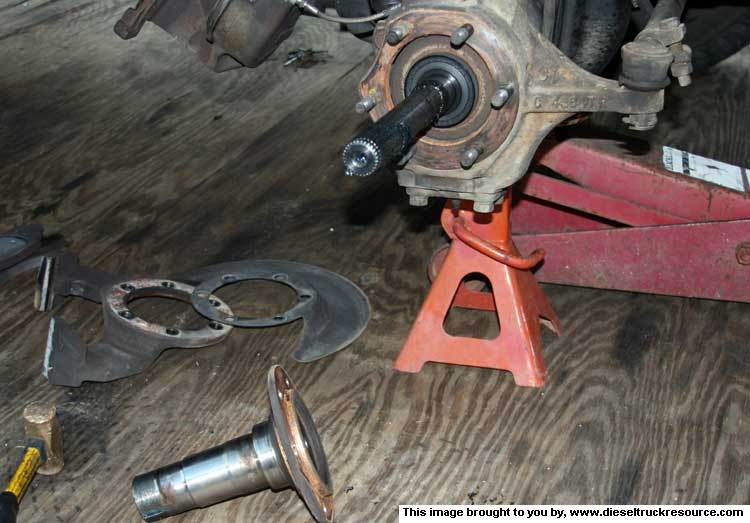
- Finally, pull the axle from the axle-tube. The driver's side axle shaft is much longer than the passenger side so be ready to help it out. ~
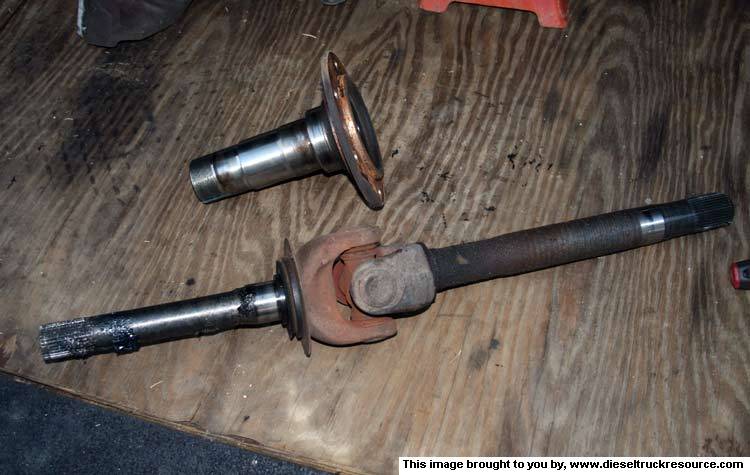
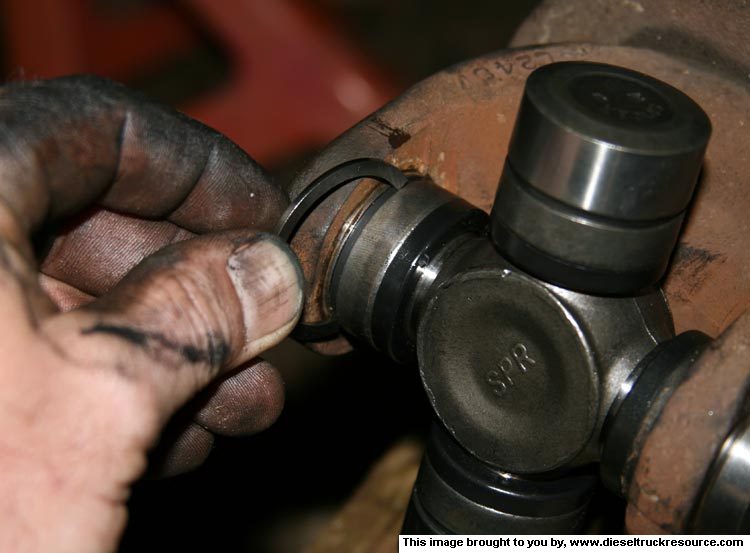
- In the above image, on the left side of the shaft, up against the universal joint as shown, there's a small rubber seal and bushing (greasy). Remove those and set aside.
OK.
- So as to ensure we put things back together as we found them, let's make some match marks on the halves of the shaft assembly. ~

This is by no means "The Authoritative How-To" regarding replacing the front universal joints. These instructions are based solely on my experience with my heap exclusively using the best means I had at the moment.
In this job, I'm gonna replace the front axle universal joints.
NOTE: Keep in mind I'm working on the stock, OEM style front axle as installed by Dodge on a 1993 W250 4x4 ClubCab at 226K miles. Specifically the DANA/Spicer 60 4500# axle with OEM manual locking hubs. Another trucks mileage may vary.
Finally, I'm gonna pretty-much fast forward through the truck set-up & disassembly and concentrate on the universal joint replacement.
READ ALL THESE INSTRUCTIONS BEFORE ATTEMPTING THIS WORK.
With that, let's get started.
As always ~ SAFETY FIRST!
- Chock the rear wheels
- Set the emergency/parking brake.
- Disconnect the Negative battery cable from the battery.
- Have a known good fire extinguisher within sight.
- Have a clean, uncluttered work area.
- Have good lighting.
- Considering you'll be lifting/holding the vehicle with a jack and safety stands, be sure they're rated for the load with a good safety factor. Don't cut any corners here. Cinder-blocks WILL kill you! When considering all this, don't forget to include a strong, level area to park the truck.
- With any work I do, I usually power wash everything the night before. If you don't have the means at home, the local car-wash works well. If you don't walk away soaking wet with gritty/grime on your face, you need to strike it again.
- All right. Set the parking/emergency brake and chock the rear wheels. Go ahead and loosen the front wheel lug nuts while the truck is still on the ground.
- Safely raise and firmly support the front of the truck. I found about an inch clearance under the front tires worked well. It certainly made putting the tires back on much easier.
I used a 3-ton capacity safety stand set so that the hand of the stand supported the axle where the axle tube meets the knuckle assembly ~
Now go ahead and remove the tire ~
Again, fast forwarding through the tear-down;
- Remove the brake caliper assembly and brake pads.
- Hang the caliper with a length of coat-hanger wire from a hole in the fender-well. This will help ensure you don't screw-up a brake fluid hose.
- Remove the brake rotor/hub assembly and wipe the spindle dry.
This thread should prove informative for doing so. ~ https://www.dieseltruckresource.com/...d.php?t=143024
- Now remove the six (6) nuts and washers that secure the brake rotor shield and caliper mounting bracket. You may have to tap the bracket with a brass headed maul to loosen it. ~
- Now remove the spindle. Again, you may have to tap it with a brass headed maul to initially loosen it. NOTE: The axle may very well tend to come out with the spindle. I thought it best to leave it in place so as to not screw up a seal. I simply pushed the end of the axle shaft into the spindle as I removed the spindle. ~
- Finally, pull the axle from the axle-tube. The driver's side axle shaft is much longer than the passenger side so be ready to help it out. ~
- In the above image, on the left side of the shaft, up against the universal joint as shown, there's a small rubber seal and bushing (greasy). Remove those and set aside.
OK.
- So as to ensure we put things back together as we found them, let's make some match marks on the halves of the shaft assembly. ~
Thread Starter
1st Generation Admin
Joined: Jan 2005
Posts: 4,601
Likes: 118
From: Buies Creek, NC
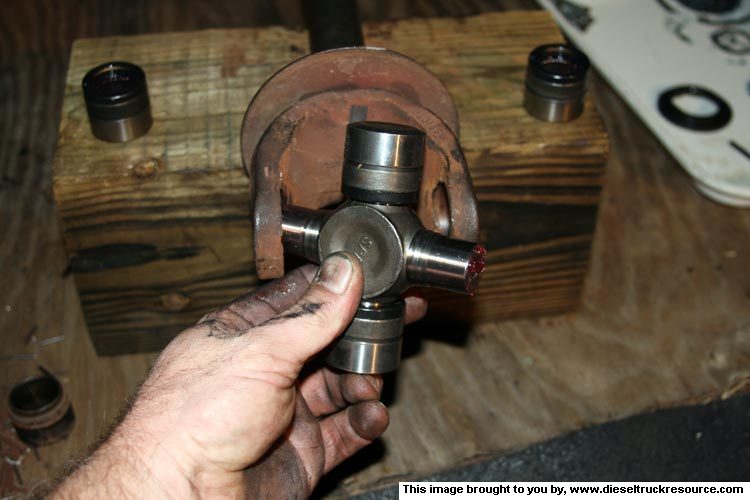
- To begin the replacement of the old universal joints, we need to remove the C-clips that secure the bearing caps of the universal joint's spider. I used a flat blade screwdriver to pry the old clips out. ~

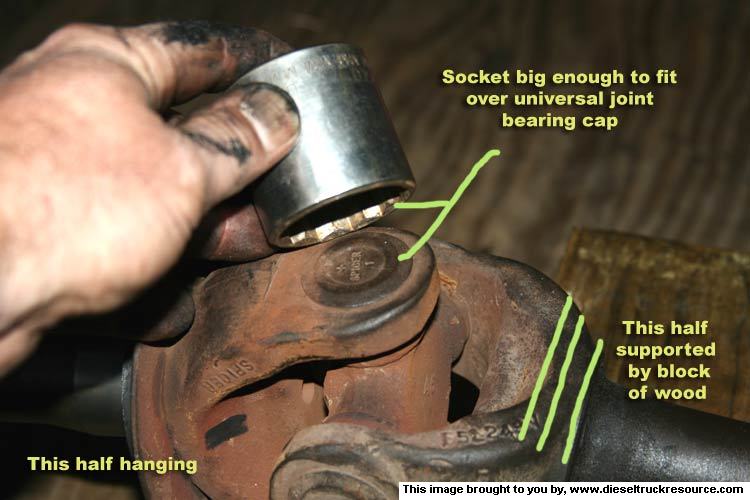
- We'll need to support one side of the shaft. I used a block of 6"x6" wood for this. Have the block of wood up against the spider, but not under it.
- I used a socket that's big enough to just completely surround the bearing cap without touching the cap. ~
- I used my heavy brass headed maul, and striking the socket, drifted the bearing cap up, and out of the shaft yolk. ~

- Remove the cap. You can see mine were about done. ~
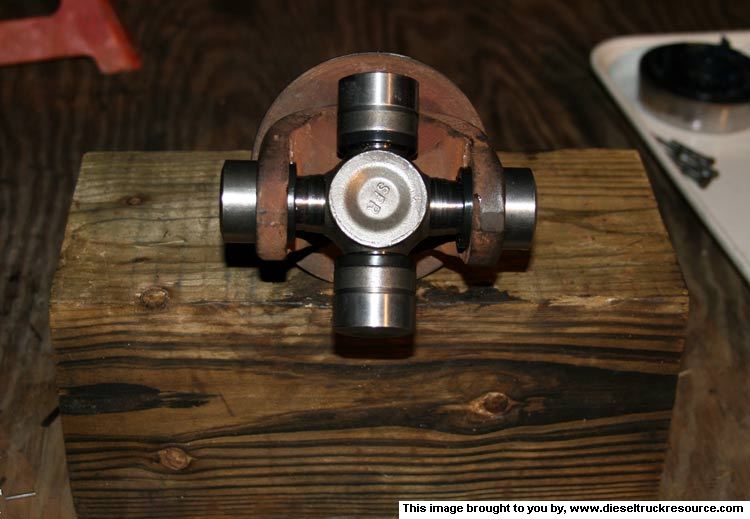
- Flip the assembly over to remove the opposite bearing cap in the same manner.
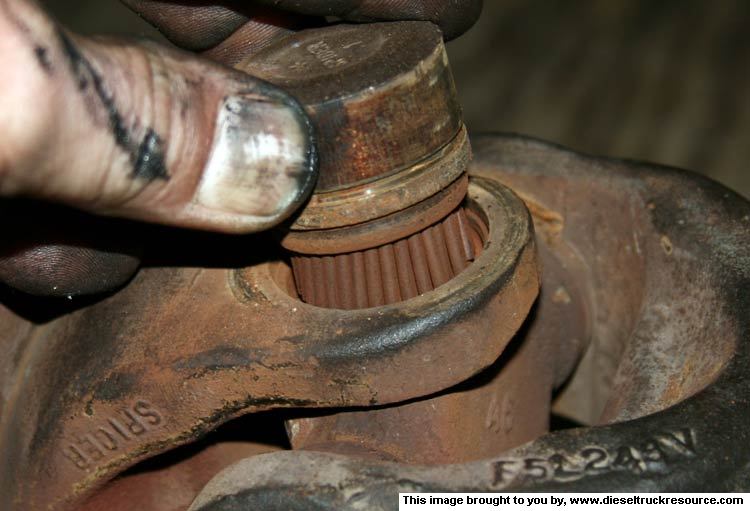
- Remove the now loose spider from the now loose axle yolk. You'll have to **** it sideways to get it out.
- Using a second block of wood, support the two free ends of the universal joint spider.
- Drift the bearing caps out of the second halve of the shaft assembly.
- Wipe the shaft surfaces and bearing cap bores clean.
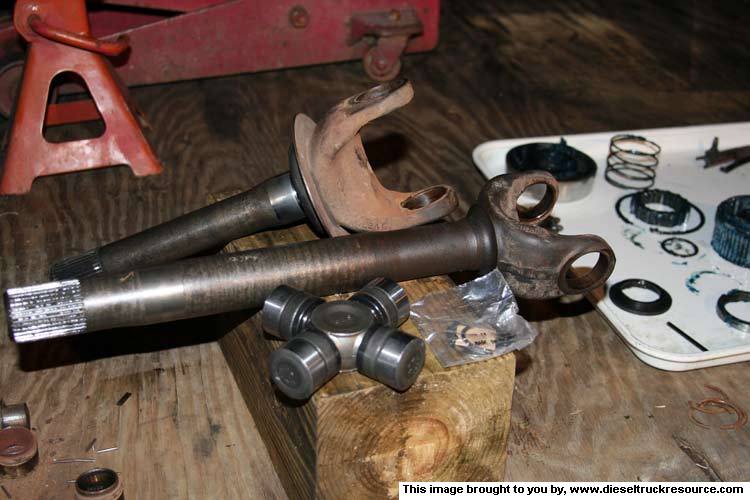
The old universal joint spider bearings were whooped. These are the stock/OEM non-greaseable type at 226 thousand miles. ~

Here's where we start putting things back together.
There are a few options for the DANA/Spicer wheel joints:
Forged with zerk ~ p/n SPL55-4X
Forged w/o zerk ~ p/n 5-806X
Old school cast ~ p/n 5-332X
- Remove two opposing caps from the new spider. Be careful not to get any trash in there. Don't add more grease if you're using non-greaseable spiders. Just like you removed the old spider, you'll need to **** the spider sideways to get it into the axle yolk.
- Start the new bearing caps into the yolk bores. Be sure to keep things clean. Be sure that none of the needle bearings fall out of place. I slid the new spider back and forth in the caps to help initially align things. ~
- We'll need to support one side of the shaft. I used a block of 6"x6" wood for this. Have the block of wood up against the spider, but not under it.
- I used a socket that's big enough to just completely surround the bearing cap without touching the cap. ~
- I used my heavy brass headed maul, and striking the socket, drifted the bearing cap up, and out of the shaft yolk. ~
- Remove the cap. You can see mine were about done. ~
- Flip the assembly over to remove the opposite bearing cap in the same manner.
- Remove the now loose spider from the now loose axle yolk. You'll have to **** it sideways to get it out.
- Using a second block of wood, support the two free ends of the universal joint spider.
- Drift the bearing caps out of the second halve of the shaft assembly.
- Wipe the shaft surfaces and bearing cap bores clean.
The old universal joint spider bearings were whooped. These are the stock/OEM non-greaseable type at 226 thousand miles. ~
Here's where we start putting things back together.
There are a few options for the DANA/Spicer wheel joints:
Forged with zerk ~ p/n SPL55-4X
Forged w/o zerk ~ p/n 5-806X
Old school cast ~ p/n 5-332X
- Remove two opposing caps from the new spider. Be careful not to get any trash in there. Don't add more grease if you're using non-greaseable spiders. Just like you removed the old spider, you'll need to **** the spider sideways to get it into the axle yolk.
- Start the new bearing caps into the yolk bores. Be sure to keep things clean. Be sure that none of the needle bearings fall out of place. I slid the new spider back and forth in the caps to help initially align things. ~
Thread Starter
1st Generation Admin
Joined: Jan 2005
Posts: 4,601
Likes: 118
From: Buies Creek, NC
- Using my brass headed maul and a block of wood, I positioned the yolk and spider such that one cap is square on the wood, the other cap straight up. I then begin tapping the caps into place, but not all the way. Be sure not to allow either cap to get c0cked sideways while driving them in. Flip the assembly over, going back and forth to help ensure proper alignment.
- Drive one side home enough to expose the C-clip groove. ~

- Install a new C-clip there now. ~
- Position the shaft yolk on the block of wood such that the remaining loose bearing cap is facing up.
- Drive home as with the first cap.
- Secure that cap into place with a new C-clip.
- Remember the Match-Marks? Position the second halve of the shaft assembly over the new spider paying attention to those marks.
- Install the remaining two bearing caps like the first two including new C-clips.
- Now clean it all well. ~
- Turning our attention to the axle tube, . . . . . well, it's a mess in there. Frankly, I'm not sure what to tell you. Wipe out as much as you can. The FSM doesn't address this. Clean the surfaces that the spindle mounts on. ~

- As best you can, slide the newly rebuilt axle shaft into the axle tube. Try to keep the loose end of the shaft supported on its way in so as not to pick up any trash along the way. Rotate the shaft so as to ensure it's engaged with the differential assembly splines.
- Remember the bushing and seal? Mine were in good shape so I simply wiped them clean, liberally greased, and reinstalled them. Make sure you grease the axle surfaces before sliding them on.
- The bushing first.
- The seal second. You'll notice one side of the seal is cupped. That cupped surface goes against the bushing. ~

- Now take the spindle and clean both ends. I used a cotton cloth to wipe away the grease. Look real hard at the needle bearing for any signs of abnormal wear. If it came apart on you, or you're in doubt, replace it. You'll need a bearing puller to get it out as well as possibly a special tool to install a new one though I imagine a socket will work. ~
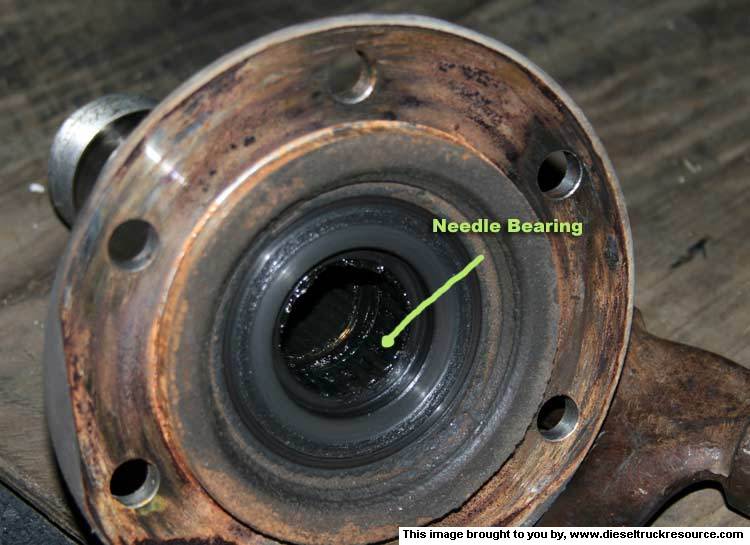
- Mine was OK, so after cleaning it well including the mounting surfaces, I repacked the bearing with new grease. ~
- Now carefully slide the spindle over the axle shaft and seat it to its mount. I used the brass maul to help seat it fully.
- Reinstall the brake caliper bracket.
- Reinstall the brake shield.
- Install the nuts and bring them to hand-tight with your wrench.
- Tighten them in the typical star pattern to 60 ~ 80 ft/lbs. I help ensure they drew up square, I first brought them to 50ft/lbs, then to 70ft/lbs.
- Now, referencing this thread where needed https://www.dieseltruckresource.com/...d.php?t=143024, reinstall the brake rotor/hub assembly and brake caliper assembly.
- Drive one side home enough to expose the C-clip groove. ~
- Install a new C-clip there now. ~
- Position the shaft yolk on the block of wood such that the remaining loose bearing cap is facing up.
- Drive home as with the first cap.
- Secure that cap into place with a new C-clip.
- Remember the Match-Marks? Position the second halve of the shaft assembly over the new spider paying attention to those marks.
- Install the remaining two bearing caps like the first two including new C-clips.
- Now clean it all well. ~
- Turning our attention to the axle tube, . . . . . well, it's a mess in there. Frankly, I'm not sure what to tell you.
Wipe out as much as you can. The FSM doesn't address this. Clean the surfaces that the spindle mounts on. ~- As best you can, slide the newly rebuilt axle shaft into the axle tube. Try to keep the loose end of the shaft supported on its way in so as not to pick up any trash along the way. Rotate the shaft so as to ensure it's engaged with the differential assembly splines.
- Remember the bushing and seal? Mine were in good shape so I simply wiped them clean, liberally greased, and reinstalled them. Make sure you grease the axle surfaces before sliding them on.
- The bushing first.
- The seal second. You'll notice one side of the seal is cupped. That cupped surface goes against the bushing. ~
- Now take the spindle and clean both ends. I used a cotton cloth to wipe away the grease. Look real hard at the needle bearing for any signs of abnormal wear. If it came apart on you, or you're in doubt, replace it. You'll need a bearing puller to get it out as well as possibly a special tool to install a new one though I imagine a socket will work. ~
- Mine was OK, so after cleaning it well including the mounting surfaces, I repacked the bearing with new grease. ~
- Now carefully slide the spindle over the axle shaft and seat it to its mount. I used the brass maul to help seat it fully.
- Reinstall the brake caliper bracket.
- Reinstall the brake shield.
- Install the nuts and bring them to hand-tight with your wrench.
- Tighten them in the typical star pattern to 60 ~ 80 ft/lbs. I help ensure they drew up square, I first brought them to 50ft/lbs, then to 70ft/lbs.
- Now, referencing this thread where needed https://www.dieseltruckresource.com/...d.php?t=143024, reinstall the brake rotor/hub assembly and brake caliper assembly.
Thread Starter
1st Generation Admin
Joined: Jan 2005
Posts: 4,601
Likes: 118
From: Buies Creek, NC
I finally bought the proper socket to fit the wheel bearing adjusting and jamb nuts. ") KD part number 3246. With that, I was able to set the bearings correctly. ~
KD part number 3246. With that, I was able to set the bearings correctly. ~
- Complete the reassembly with the manual locking hub mechanism.
- Reinstall tire.
- Reconnect the battery.
- Be sure to properly tighten your lug nuts.
- Be sure to test your brakes before going out for a test drive.
- Be sure to check the lug nuts after about 25 miles.
- Drive safely.
I hope this proves helpful to those interested.
KD part number 3246. With that, I was able to set the bearings correctly. ~
Originally Posted by 1993 FSM
- Install the wheel bearing inner lock nut on the spindle. Tighten the lock nut to 50ft/lbs to seat the bearings.
- Loosen the inner lock nut.
- Tighten the inner lock nut to 31 ~ 39ft/lbs while rotating the rotor/hub assembly.
- Back off the inner lock nut 135 ~ 150 degrees.
- Install the tabbed lock washer such that the inner lock nut pin is secured.
- Install and tighten the outer lock nut to 160 ~ 205ft/lbs.
The end-play after the final bearing adjustment should be within 0.001 inch to 0.010 inch.
- Reinstall tire.
- Reconnect the battery.
- Be sure to properly tighten your lug nuts.
- Be sure to test your brakes before going out for a test drive.
- Be sure to check the lug nuts after about 25 miles.
- Drive safely.
I hope this proves helpful to those interested.

Banned
Joined: May 2006
Posts: 333
Likes: 0
To clean the junk out of the tube, take a piece of all thread (threaded rod) and put a big fender washer on the end (sandwich between 2 nuts). Stick the washer in there, just guide it on the top of the tube, and when you hit the diff set it down on the bottom of the tube and pull it out.
Can also just use a piece of steel rod and weld a washer to the end. That's what I did.
Can also just use a piece of steel rod and weld a washer to the end. That's what I did.

Registered User
Joined: Oct 2007
Posts: 35
Likes: 0
From: Washington state
nice write up global.but instead of beating on the ears of the axel.i ve used a modifyied C-clamp with a socket (bigger than the bearing cap) welded on the solid side and a short piece of round stock on the other. line them up crank down the clamp and volla no more beating your axel with a hammer
Trending Topics
DTR's "Cooler than ice cubes 14 miles North of North Pole" member
Joined: Oct 2006
Posts: 1,797
Likes: 9
From: 14mi North of North Pole
nice write up global.but instead of beating on the ears of the axel.i ve used a modifyied C-clamp with a socket (bigger than the bearing cap) welded on the solid side and a short piece of round stock on the other. line them up crank down the clamp and volla no more beating your axel with a hammer


Registered User
Joined: Feb 2003
Posts: 788
Likes: 89
From: Nevada Co., CA
When those front axle u-joints freeze up they can wreak havoc with your steering! Found that out a few years ago. Not having a press, I always beat on my axles - carefully. I support one of the yokes on 2 blocks of wood - one on either side - then then tap on the other axle to pop the cup loose.

Registered User
Joined: Feb 2007
Posts: 1,540
Likes: 0
From: Pen Argyl Pennsylvania
David Thanks for this great write up. It helped tremendously and made it very easy. I just wish I had the right socket now I have to go borrow one from the local Dodge dealer in the morning so I can tighten the axle nut's (mine is the older 2 9/16" but needs to be square instead of the rounded one I bought).
Registered User
Joined: Mar 2004
Posts: 4,767
Likes: 5
From: port crane, NY
David Thanks for this great write up. It helped tremendously and made it very easy. I just wish I had the right socket now I have to go borrow one from the local Dodge dealer in the morning so I can tighten the axle nut's (mine is the older 2 9/16" but needs to be square instead of the rounded one I bought).
