
Rebuild Your CTD Starter

Registered User
Joined: Dec 2006
Posts: 252
Likes: 0
From: PNW
Nice writeup...
I've only got one comment
Got a list of those "sources"? Where did you get your parts and how much?
I've only got one comment
Further digging reveals there's a number of sources for the common parts available to us. Some offer upgraded components if need be.


Chapter President
Joined: Aug 2004
Posts: 3,481
Likes: 2
From: Kingsville, MD
Well bringing this one back from the dead. It's a great post.
I had problems with mine, starter click, then Friday the starter stuck. So Friday night i rebuilt the solinoid and all is well again. Very easy job.
Here's a pic of my contacts.
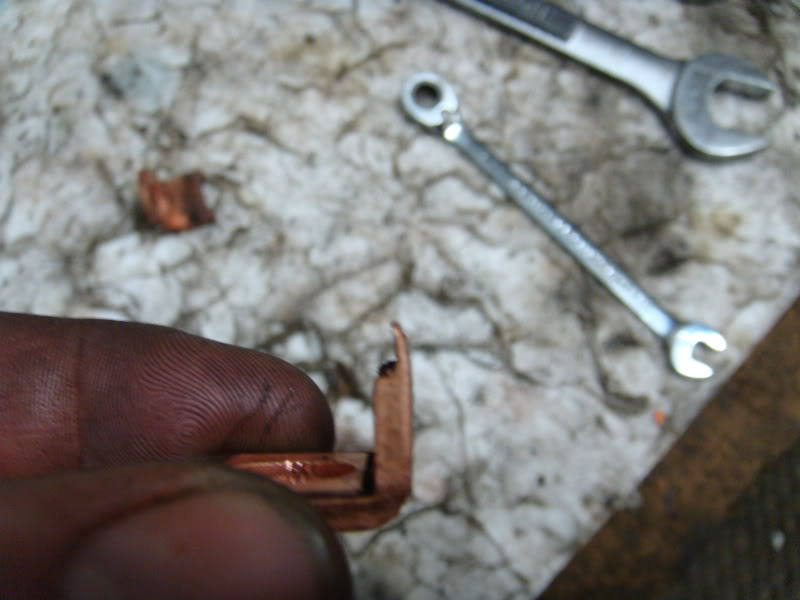
I got the contacts from Larry B's or under $40 shipped.
I had problems with mine, starter click, then Friday the starter stuck. So Friday night i rebuilt the solinoid and all is well again. Very easy job.
Here's a pic of my contacts.
I got the contacts from Larry B's or under $40 shipped.

Registered User


Joined: Oct 2005
Posts: 6,457
Likes: 95
From: KENTUCKY
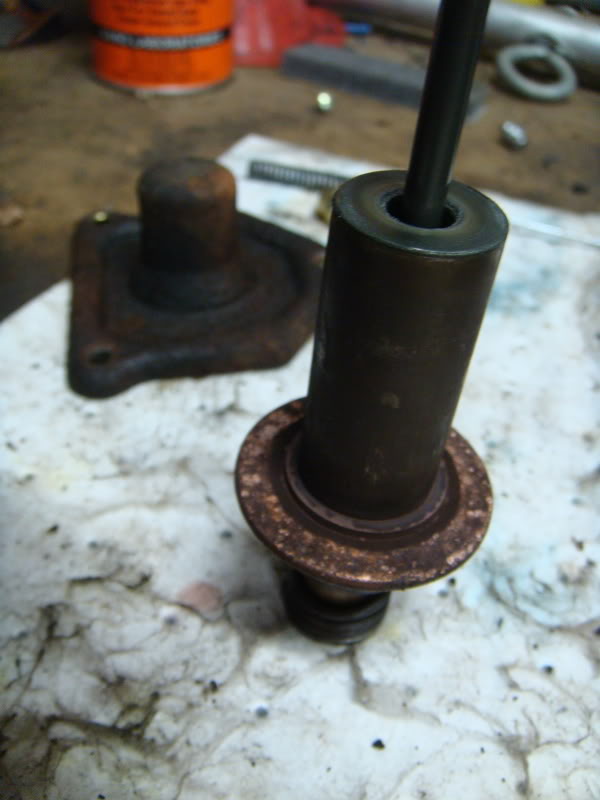
the plunger, spring and ball bearing are what engages the starters pinion gear with the ring gear of the engines flywheel/flex-plate. The ball bearing works just as the name implies and smooths the movement of those parts.
It would seem that it would be in that little ball-bearings best interest to be lubricated with something; what is recommended---a dab of Kendall Super Blu maybe ??
Also, I assume there are some gears in the starter housing; should I also lube them ??
I got my screw-on brushes from Larry Bucks and my solenoid and wide contacts kit from this guy :
http://stores.shop.ebay.com/Alternat...__W0QQ_armrsZ1
He throws in a bonus pair of wide contacts.
Thanks.


Registered User
Joined: Nov 2007
Posts: 780
Likes: 42
Good write up-
You can turn the armature if you have access to a small lathe. It's important to clean the armature and the slots between the copper.
I believe crocus cloth is more correct than sandpaper. Maybe a fine file like a #4 single cut would work also.
Michael
You can turn the armature if you have access to a small lathe. It's important to clean the armature and the slots between the copper.
I believe crocus cloth is more correct than sandpaper. Maybe a fine file like a #4 single cut would work also.
Michael
Best Paint (Getrag category)
Joined: Dec 2007
Posts: 2,122
Likes: 0
From: Eagle Ne
Just did this to my starter and all is well again
Didn't want to be at a pull this weekend and have to crawl under the truck and whack the starter with a hammer everytime I had to fire it
I got all my parts from Fred's Auto Electric in Lincoln NE, The wider contacts and plunger were 28$ and the brushes were 4$ each for a total of 47$ and some change. They had everything in stock also
Registered User
Joined: Oct 2005
Posts: 6,457
Likes: 95
From: KENTUCKY
Registered User
Joined: Oct 2005
Posts: 6,457
Likes: 95
From: KENTUCKY
Okay, I got the starter all apart on the bench.
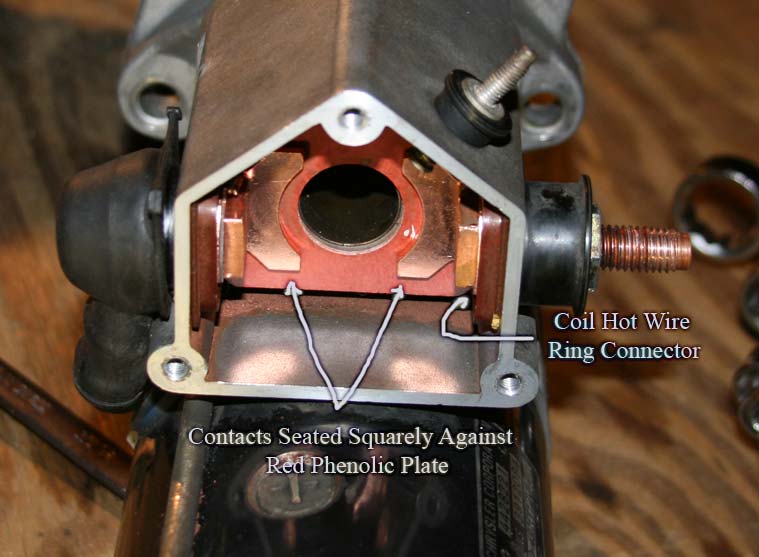
I have a little confusion over the solenoid HOT wire connection.
In the picture, the arrow that labels it points to the battery-cable stud; whereas, in the starter I am working on, it is on the opposite side at the starter-motor cable stud.
Is the picture wrong, or is the starter I have wrong ??
Also, the plunger-shaft that I took out is obviously lubed with some kind of very slippery gray grease; did we ever decide what kind of lube should be used ??
Thanks.
Adminstrator-ess

Joined: Mar 2003
Posts: 22,594
Likes: 19
From: New Holland, PA
I don't see that it really matters which cable stud goes to the battery and which one goes to the motor.
I'd use brake caliper grease in very small amounts. It gets really hot in there and you don't want something that gets runny at high temps.
I'd use brake caliper grease in very small amounts. It gets really hot in there and you don't want something that gets runny at high temps.
Registered User
Joined: Oct 2005
Posts: 6,457
Likes: 95
From: KENTUCKY
I was meaning that tiny wire soldered onto the thin plate.
Mine was/is on the motor-cable stud; whereas, the arrow in the picture points to the battery-cable side.
Thanks.
Registered User
Joined: Oct 2005
Posts: 6,457
Likes: 95
From: KENTUCKY
Well, I followed the instructions almost to the letter and she just took off in the truck, so I guess all is good.
Here is the thread that got me started down this road :
https://www.dieseltruckresource.com/...r-t245293.html
Some gourd-head had put RED LocTite on the starter-bolts, forcing me to resort to a cheater-pipe on my 12-point 10MM Harbor Freight Pittsburgh boxed-end wrench.
Once again, my appreciation of Harbor Freight Pittsburgh tools paid off; a MAC or Snap-On would have snapped like glass with all the force I had to use.
I had one heck of a fight getting that one hidden bottom bolt out.
I had to walk it out the entire way 1/12 of a turn at a time.
Some idiot
idiot had squished the vent-tube between the starter and engine, along with some kind of automatic transmission cable, both tight against the head of that bolt.
Surely this isn't the common practice is it ??
I remembered that when I installed the starter on my Ford/Cummins I didn't even pick up a box-end wrench, doing the whole job with ratchet and extensions.
No way was that going to be possible on this one with that tube and cable both right in the way.
When the starter went back in, I routed that cable way over along the frame and completely out of the way; then, after everything else was installed, I put back on the vent-tube, letting it pass between the frame and starter, again entirely out of the way.
I was able to use the ratchet/extensions/socket to re-install the starter.
The solenoid cover bolts were finger-loose; but, then, I had to resort to my impact-driver (the kind you smack with a hammer) to loosen the brush screws.
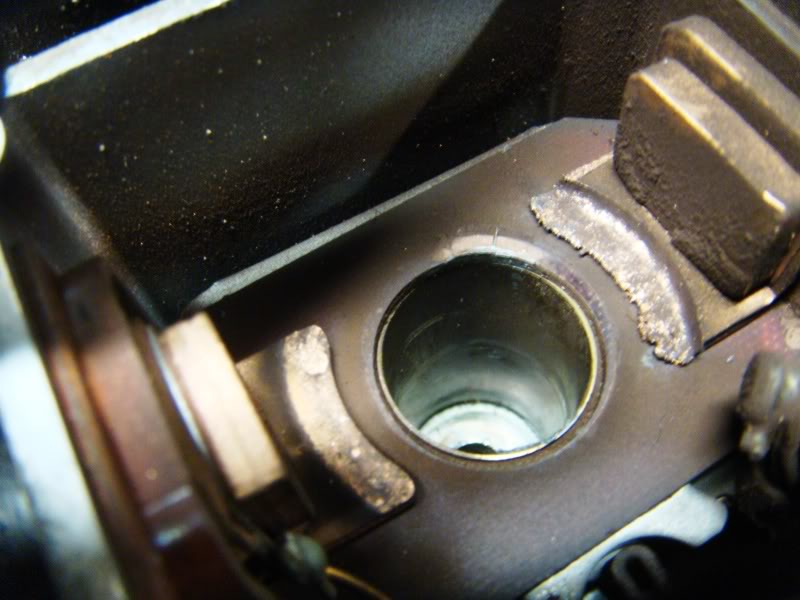
The contacts were not nearly so bad as I had hoped to find them; although, the solenoid washer/contact was quite pitted.
That copper washer could be flipped over and good to go again, if I could figure out how to do so.
When I got into the brush-holder, the entire brush area was buried in black nasty grease/grime; I couldn't even tell what or where anything was; is this common for the brush-holder to be so covered with grime ??
Once I got things clean enough to see what was going on, I found the brushes worn nearly into the braided copper cables, and worn in a wedge shape, definitely in need of replacement.
For what it is worth, here is a list of the various wrenches/tools I used :
Starter wire = 8-MM socket
Battery-cable = 15-MM socket
Starter bolts = 12-point 10-MM box-end wrench and ratchet/extension/socket
Solenoid cover bolts = 8-MM socket
Contact bolts heads = 15-MM open-end wrench
Contact bolts nuts = 17-MM box-end wrench (a socket can be used, but is too "tippy" and may mess things up)
Starter-motor bolts (the long skinny ones) = 12-MM socket
Brush screws = #2 Phillips
Thank You Mr BC847 for such good instructions.
Here is the thread that got me started down this road :
https://www.dieseltruckresource.com/...r-t245293.html
Some gourd-head had put RED LocTite on the starter-bolts, forcing me to resort to a cheater-pipe on my 12-point 10MM Harbor Freight Pittsburgh boxed-end wrench.
Once again, my appreciation of Harbor Freight Pittsburgh tools paid off; a MAC or Snap-On would have snapped like glass with all the force I had to use.
I had one heck of a fight getting that one hidden bottom bolt out.
I had to walk it out the entire way 1/12 of a turn at a time.
Some
idiot had squished the vent-tube between the starter and engine, along with some kind of automatic transmission cable, both tight against the head of that bolt.Surely this isn't the common practice is it ??
I remembered that when I installed the starter on my Ford/Cummins I didn't even pick up a box-end wrench, doing the whole job with ratchet and extensions.
No way was that going to be possible on this one with that tube and cable both right in the way.
When the starter went back in, I routed that cable way over along the frame and completely out of the way; then, after everything else was installed, I put back on the vent-tube, letting it pass between the frame and starter, again entirely out of the way.
I was able to use the ratchet/extensions/socket to re-install the starter.
The solenoid cover bolts were finger-loose; but, then, I had to resort to my impact-driver (the kind you smack with a hammer) to loosen the brush screws.
The contacts were not nearly so bad as I had hoped to find them; although, the solenoid washer/contact was quite pitted.
That copper washer could be flipped over and good to go again, if I could figure out how to do so.
When I got into the brush-holder, the entire brush area was buried in black nasty grease/grime; I couldn't even tell what or where anything was; is this common for the brush-holder to be so covered with grime ??
Once I got things clean enough to see what was going on, I found the brushes worn nearly into the braided copper cables, and worn in a wedge shape, definitely in need of replacement.
For what it is worth, here is a list of the various wrenches/tools I used :
Starter wire = 8-MM socket
Battery-cable = 15-MM socket
Starter bolts = 12-point 10-MM box-end wrench and ratchet/extension/socket
Solenoid cover bolts = 8-MM socket
Contact bolts heads = 15-MM open-end wrench
Contact bolts nuts = 17-MM box-end wrench (a socket can be used, but is too "tippy" and may mess things up)
Starter-motor bolts (the long skinny ones) = 12-MM socket
Brush screws = #2 Phillips
Thread Starter
1st Generation Admin
Joined: Jan 2005
Posts: 4,601
Likes: 118
From: Buies Creek, NC
Hey now. 
I've been at the beach while you did this. I was on a laptop with the little touchpad thing (no mouse). I mighta been drinking a little. I hate the touchpad thing.
It's been a couple of years now since I've messed with that starter. Wow! two years. Time flies.
- As for your question about that ring connector in there with the contacts, . . . . just put it back like you found it. That's what I did. For the life of me I can't remember how it works in there (The electrical schematic). I know I looked.
- My crankcase vent tube as well as my automatic transmission's TV cable were jammed in there like you describe. I don't know what they were thinking with the vent tube.
- Not sure about how it sticks together in there like that, but a lot of the grime stuff you found in the brush-holder is the powder residue from the brushes themselves. I've seen a lot of that mess in elevator machine rooms from the AC/DC motor/Gen sets. They've big brush assemblies like that. The carbon black gets all over and into everything.
I'm glad this thread helped you in fixing your starter.
Friday evening, on our way to the beach, I managed to time it so we were synchronized in movement with a big thunder storm. I had to stop and let it get ahead of us. While waiting, we enjoyed this . . . .

I've been at the beach while you did this. I was on a laptop with the little touchpad thing (no mouse). I mighta been drinking a little. I hate the touchpad thing.
It's been a couple of years now since I've messed with that starter. Wow! two years. Time flies.
- As for your question about that ring connector in there with the contacts, . . . . just put it back like you found it. That's what I did.
For the life of me I can't remember how it works in there (The electrical schematic). I know I looked. - My crankcase vent tube as well as my automatic transmission's TV cable were jammed in there like you describe. I don't know what they were thinking with the vent tube.
- Not sure about how it sticks together in there like that, but a lot of the grime stuff you found in the brush-holder is the powder residue from the brushes themselves. I've seen a lot of that mess in elevator machine rooms from the AC/DC motor/Gen sets. They've big brush assemblies like that. The carbon black gets all over and into everything.
I'm glad this thread helped you in fixing your starter.
Friday evening, on our way to the beach, I managed to time it so we were synchronized in movement with a big thunder storm.
I had to stop and let it get ahead of us. While waiting, we enjoyed this . . . .