
LED turn and tail lights.


Thread Starter
Administrator


Joined: Nov 2004
Posts: 4,084
Likes: 235
From: Southern California
LED turn and tail lights.
LED turn signal lamps and taillights.
Part-1
Since I had my truck in the shop for the last 3 weeks to be completely repainted I took this opportunity to do some more lighting upgrades.
This will show you how to replace the boring looks like every other Dodge front side marker and turn signal lamps.
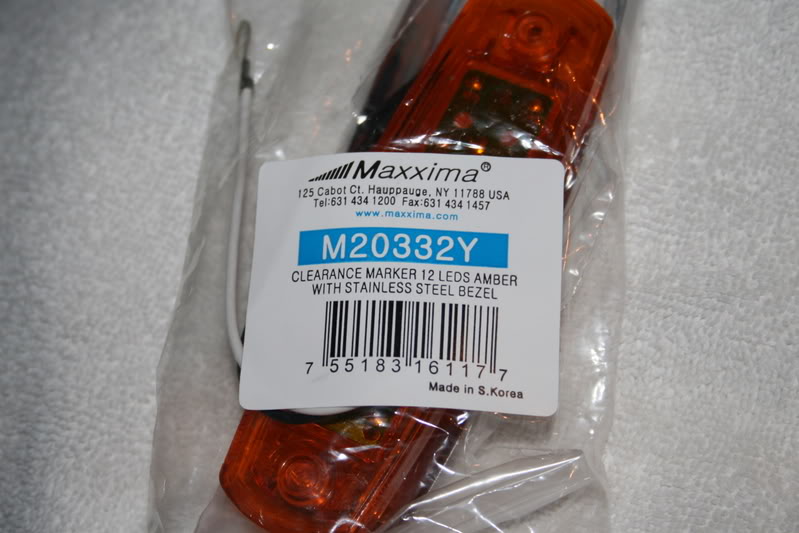
While the truck was in the shop I went to my lighting supply house and looked at a lot of lights and finally came up with the ones that have the widest viewing angle and were the brightest, also I wanted it to be able to fit without any or very minimal modifications. So I chose these. They are made by Maxxima and you can get then at better truck parts, Truck stops or lighting distributors.
The light should cost around $10.00 apiece.
www.maxxima.com
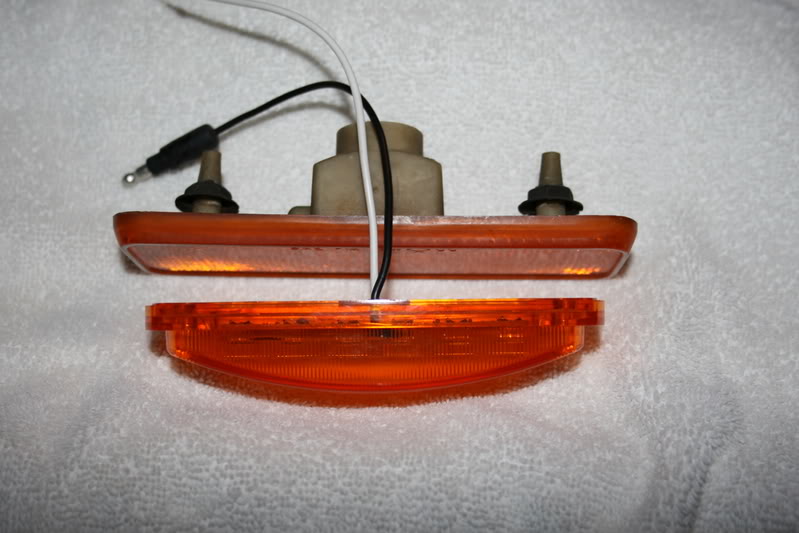
Here is the new lamp compared to the original lamp housing.
Since the original lamps in the truck use a #194 wedge base lamp I decided to make a plug to be able to replace the bulb so I do not have to cut into the wiring. With the idea already in my head I just had to find the materials to make it, I found it right on my workbench, Copper clad phenolic board for making printed circuits.

Following my pictures and directions you can make a plug that will simply plug in where the bulb was removed.
To start, layout on the copper clad board, 3/8� wide by 1�long, you will need to make 2 of these so use the entire end of the board.
Then in the center of the 3/8 draw a line the length dividing each in two.
Next at this time it is easier to handle to cut the traces into the copper, lay a metal straightedge on the line and using a sharp utility knife, hold it sideways and scrape along the length of the line, by doing this several times you want to make the cut about .030 wide from end to end. NOW flip it over and do the same on the backside of the board, each side MUST be insulated from the other side. This sounds more complicated than it really is.
When they are scraped clean then sandwich them between 2 blocks of a 2X4 and carefully cut them out with a fine tooth hacksaw, dress the ragged edges with a fine file then cut them to length with a good pair of diagonal cutters, just snap them to the 1� length.
I was going to etch some more for myself but since most of you would not know how then I figured this would be the easiest way for to duplicate my design.
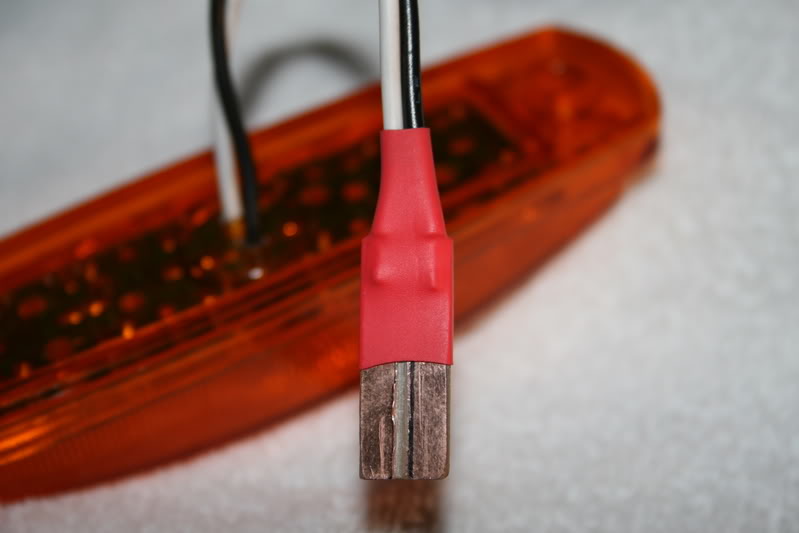
Next trim the wires from the lamp, clean and tin the copper pads and carefully solder the wires to the board.
The polarity in not important because you can simply reverse the plug if it is incorrect.
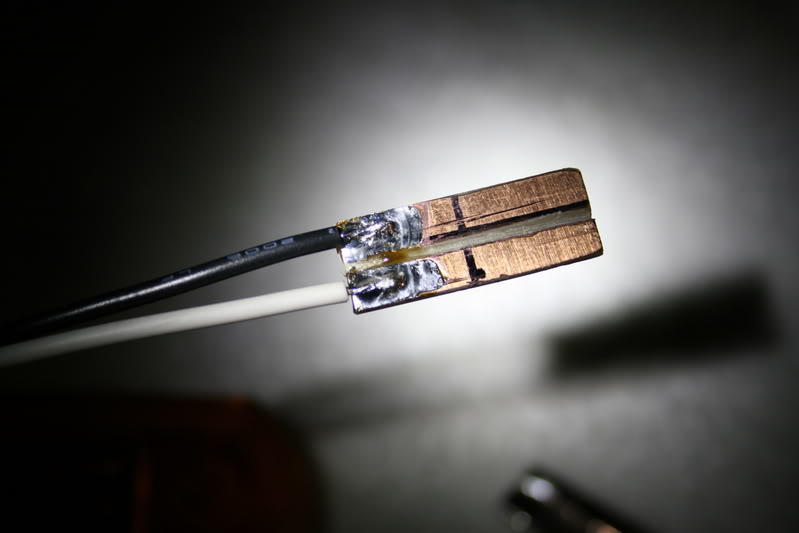
This is how the plug should look like when the leads are soldered onto it.
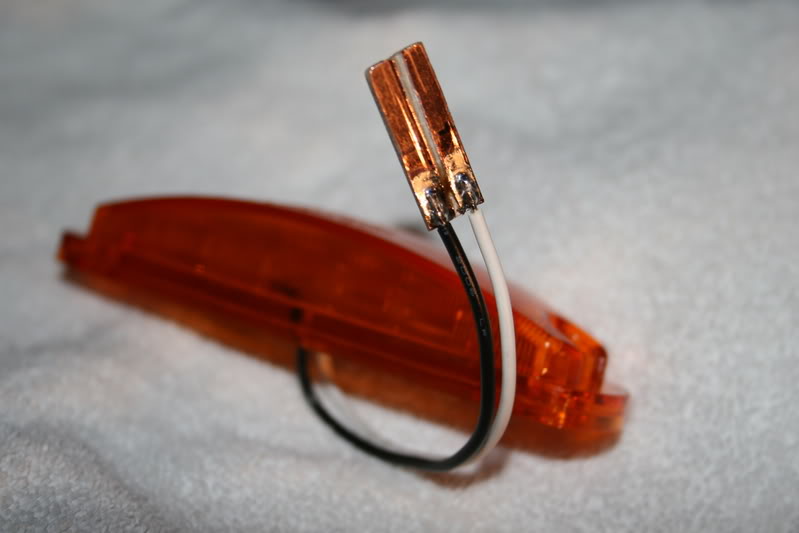
After you double check your work then shrink some heat shrink tubing over it to seal it in.
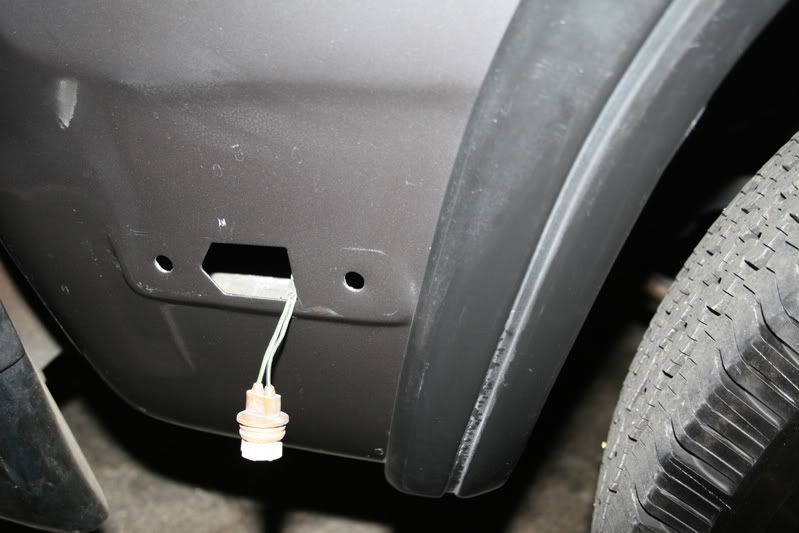
Here is the lamp socket you will be plugging the new plug into.
Since I had the body shop leave the lights off, this is the time you will need to remove your existing lamps. They are a pain to remove because they are fastened in from the backside, and you have to reach in from inside the hood.
Just take your time and don�t fall into the engine bay.
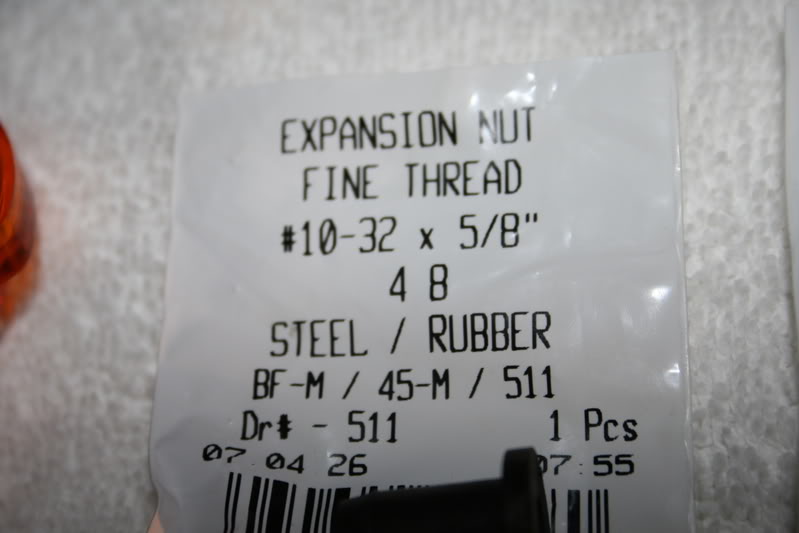
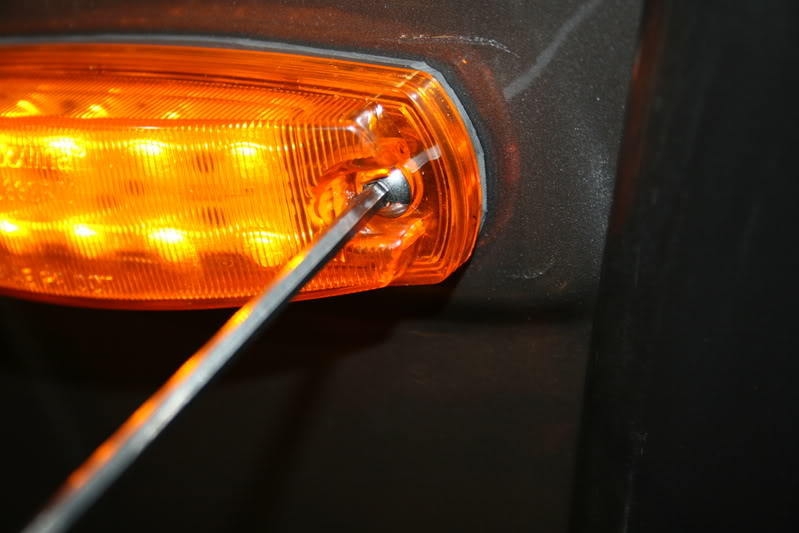
Now to secure the new light into the fender being a blind hole I gave some thought as to how I could install the nut and be able to tighten it from the outside.
Introducing the Expansion Nut, you cannot see it too well but it looks like a little rubber top hat with threads in the inside. When you tighten the screw inside it, it expands.
You can get these at Home Depot or any decent hardware store. You will also need 4) 10x32x1� Stainless Steel Button Head screws.
Now insert the Expansion Plugs into the mounting holes for the light and while an assistant is holding the new LED lamp, turn on your headlights and insert the new plug into the socket as if it were a lamp, if the LED�s don�t light then reverse the plug in the socket. When it is working satisfactorily then put a wrap of some good Scotch33 tape around it to hold it in and to seal out the moisture.
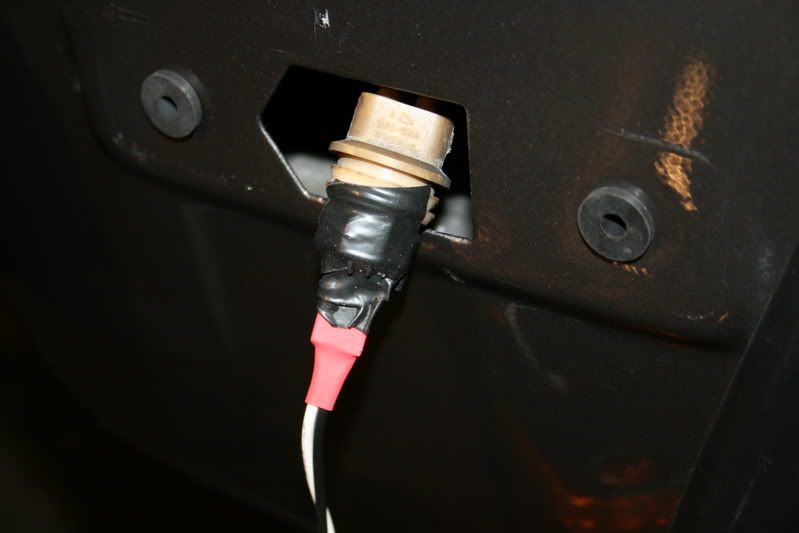
Before I get to far ahead of myself, you will need to make yourself a rubber gasket for the back of the lamps to seal them to the body and also to raise them off the body to clear the thickness of the expansion nut�s head, to do this take a piece of rubber, neoprene or even cork gasket material and punch a center hole for the wires then setting the lamp on the gasket, trace around the light, then cut it out with a good pair of scissors. Use a punch mark out the mounting hole location, when you cut out these holes you need to make them large enough to clear the heads of the rubber expansion nut.
Also you will have to VERY carefully enlarge the holes in the lamp to 7/32 using the drill on LOW speed and in incremental steps so you don�t crack the housings.
Now you can assemble the lamp onto the gasket and secure them with the button head screws. As you snug up the screws the plugs will expand and secure the lamp to the fender.
Just snug it up.
Part-1
Since I had my truck in the shop for the last 3 weeks to be completely repainted I took this opportunity to do some more lighting upgrades.
This will show you how to replace the boring looks like every other Dodge front side marker and turn signal lamps.
While the truck was in the shop I went to my lighting supply house and looked at a lot of lights and finally came up with the ones that have the widest viewing angle and were the brightest, also I wanted it to be able to fit without any or very minimal modifications. So I chose these. They are made by Maxxima and you can get then at better truck parts, Truck stops or lighting distributors.
The light should cost around $10.00 apiece.
www.maxxima.com
Here is the new lamp compared to the original lamp housing.
Since the original lamps in the truck use a #194 wedge base lamp I decided to make a plug to be able to replace the bulb so I do not have to cut into the wiring. With the idea already in my head I just had to find the materials to make it, I found it right on my workbench, Copper clad phenolic board for making printed circuits.
Following my pictures and directions you can make a plug that will simply plug in where the bulb was removed.
To start, layout on the copper clad board, 3/8� wide by 1�long, you will need to make 2 of these so use the entire end of the board.
Then in the center of the 3/8 draw a line the length dividing each in two.
Next at this time it is easier to handle to cut the traces into the copper, lay a metal straightedge on the line and using a sharp utility knife, hold it sideways and scrape along the length of the line, by doing this several times you want to make the cut about .030 wide from end to end. NOW flip it over and do the same on the backside of the board, each side MUST be insulated from the other side. This sounds more complicated than it really is.
When they are scraped clean then sandwich them between 2 blocks of a 2X4 and carefully cut them out with a fine tooth hacksaw, dress the ragged edges with a fine file then cut them to length with a good pair of diagonal cutters, just snap them to the 1� length.
I was going to etch some more for myself but since most of you would not know how then I figured this would be the easiest way for to duplicate my design.
Next trim the wires from the lamp, clean and tin the copper pads and carefully solder the wires to the board.
The polarity in not important because you can simply reverse the plug if it is incorrect.
This is how the plug should look like when the leads are soldered onto it.
After you double check your work then shrink some heat shrink tubing over it to seal it in.
Here is the lamp socket you will be plugging the new plug into.
Since I had the body shop leave the lights off, this is the time you will need to remove your existing lamps. They are a pain to remove because they are fastened in from the backside, and you have to reach in from inside the hood.
Just take your time and don�t fall into the engine bay.
Now to secure the new light into the fender being a blind hole I gave some thought as to how I could install the nut and be able to tighten it from the outside.
Introducing the Expansion Nut, you cannot see it too well but it looks like a little rubber top hat with threads in the inside. When you tighten the screw inside it, it expands.
You can get these at Home Depot or any decent hardware store. You will also need 4) 10x32x1� Stainless Steel Button Head screws.
Now insert the Expansion Plugs into the mounting holes for the light and while an assistant is holding the new LED lamp, turn on your headlights and insert the new plug into the socket as if it were a lamp, if the LED�s don�t light then reverse the plug in the socket. When it is working satisfactorily then put a wrap of some good Scotch33 tape around it to hold it in and to seal out the moisture.
Before I get to far ahead of myself, you will need to make yourself a rubber gasket for the back of the lamps to seal them to the body and also to raise them off the body to clear the thickness of the expansion nut�s head, to do this take a piece of rubber, neoprene or even cork gasket material and punch a center hole for the wires then setting the lamp on the gasket, trace around the light, then cut it out with a good pair of scissors. Use a punch mark out the mounting hole location, when you cut out these holes you need to make them large enough to clear the heads of the rubber expansion nut.
Also you will have to VERY carefully enlarge the holes in the lamp to 7/32 using the drill on LOW speed and in incremental steps so you don�t crack the housings.
Now you can assemble the lamp onto the gasket and secure them with the button head screws. As you snug up the screws the plugs will expand and secure the lamp to the fender.
Just snug it up.
Thread Starter
Administrator
Joined: Nov 2004
Posts: 4,084
Likes: 235
From: Southern California
LED turn signal lamps and taillights.
Part-2
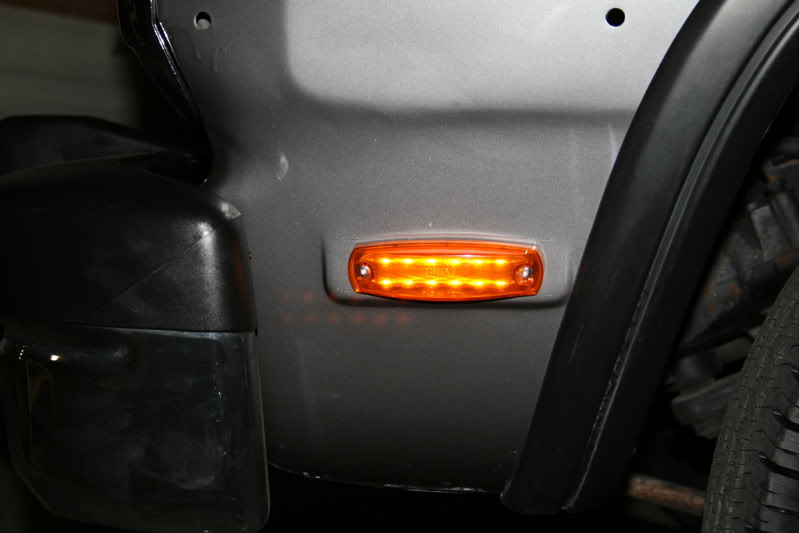
Here is how the new light looks in place of the old incandescent style.
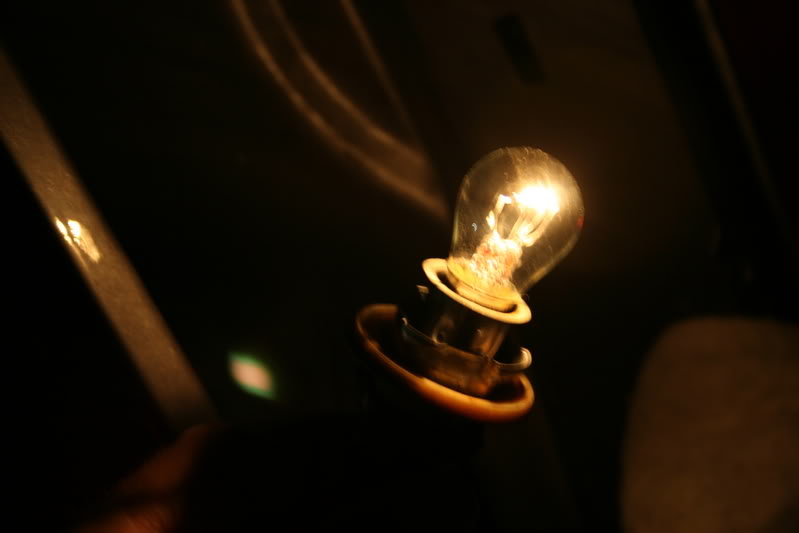
Now that the front is completed we will move on the rear of the truck and replace the #1157 Tail and Stop lamps.
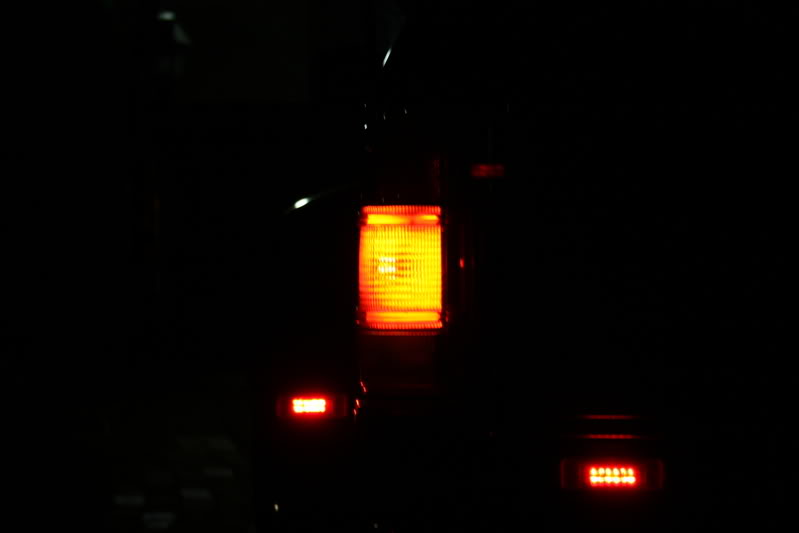
This is what the standard #1157 dual filament bulb looks like; this is the intensity of the Tail lamp
This is the new High Flux LED module I will be replacing the fragile glass bulb with.
There are 13 high intensity LED�s on this puppy.

This is what it looks like in the Tail light intensity, there is a bank of LED�s facing in all directions, I had to photograph them at an angle because they are so bright.
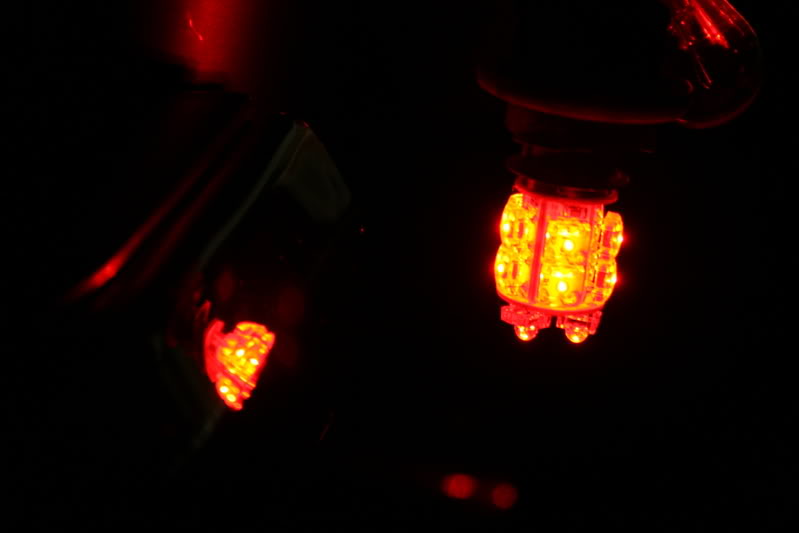
There it is with the Stop illuminated.
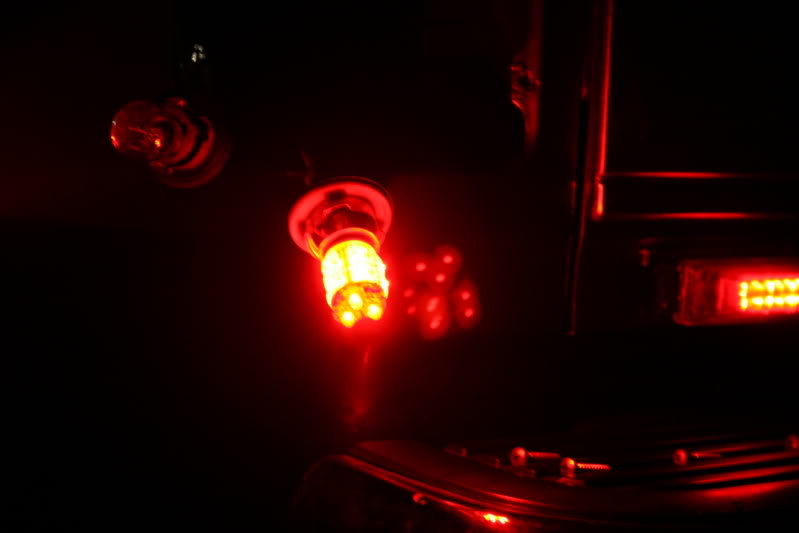
A note about these photographs, they were shot at .30/sec that is a half second exposure and it makes them just a bit brighter than they actually are maybe 10% but they really are MUCH BRIGHTER that the originals that were on the truck.
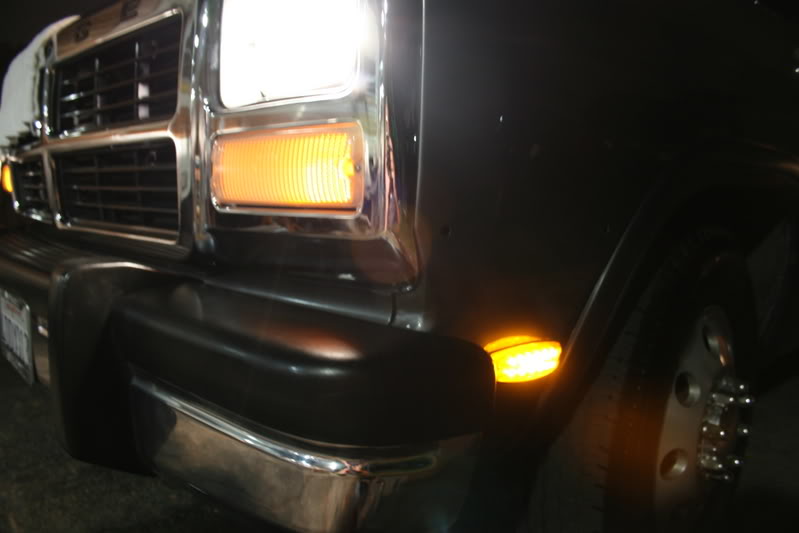
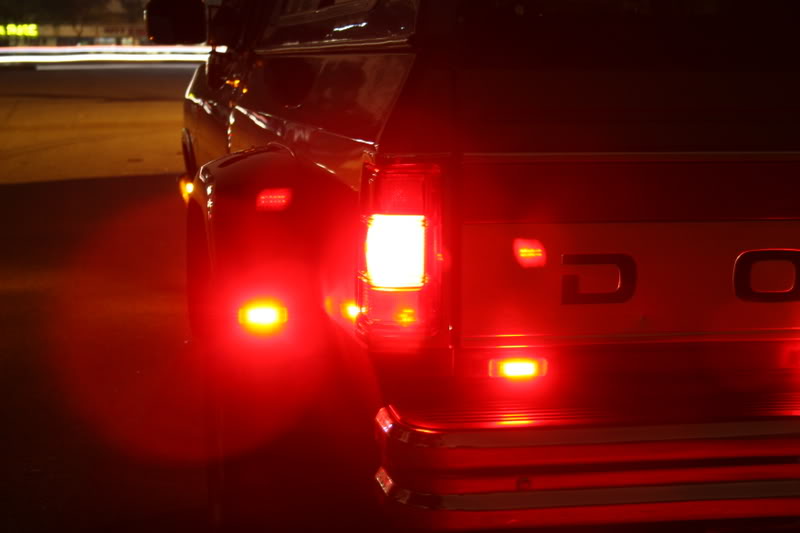
Here is a shot of the front corner showing the front lamp for a comparison.
This was photographed at .30 sec
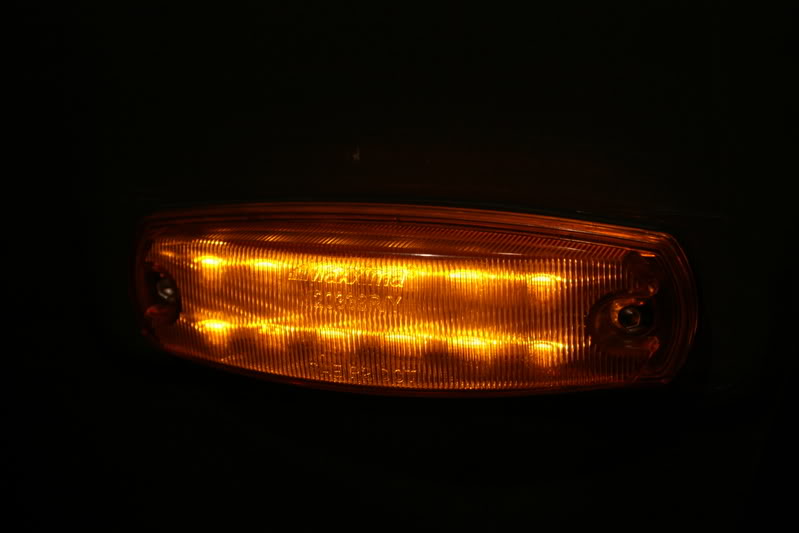
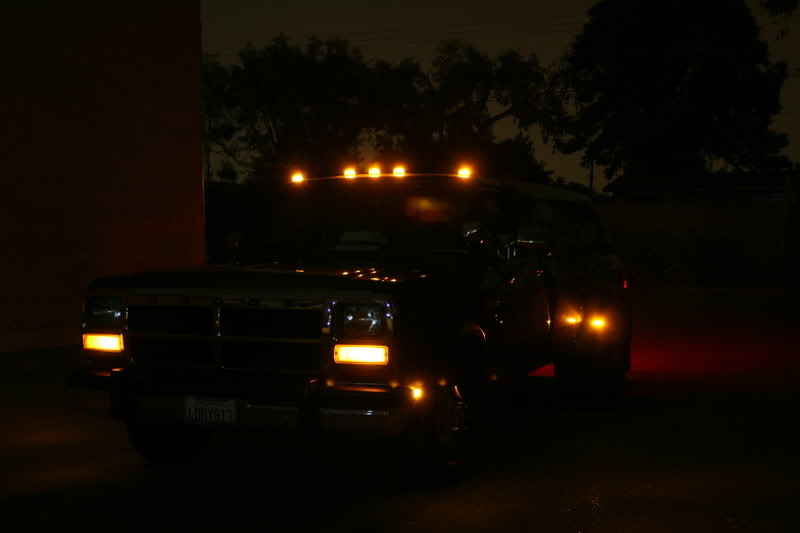
Here is the new side lights showing the 12 LED�s inside, they are all at an angle following the curvature of the lens so you are always looking into the hot spot of at least 2 of them.
Here is a good side shot showing what someone would see at an intersection.
This one was head on into the side lamp; the lamp on the hood is a reflection.

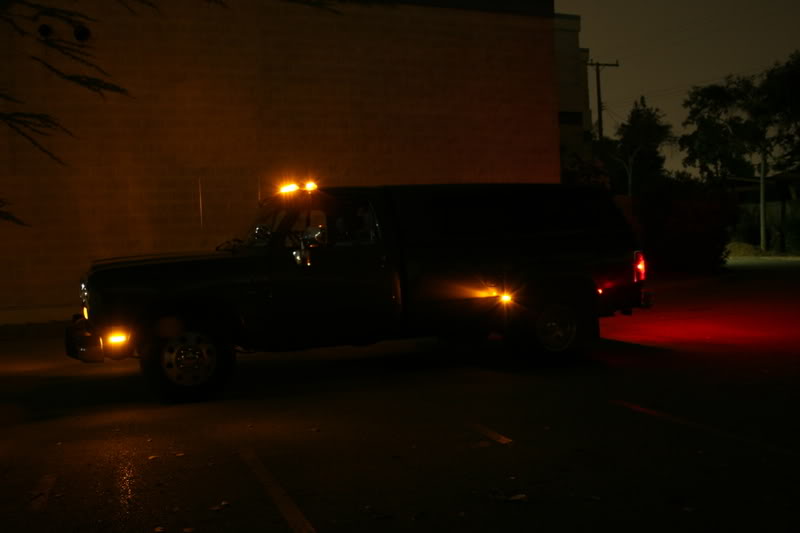
Here is almost a head on view showing the cab marker lights.
Part-2
Here is how the new light looks in place of the old incandescent style.
Now that the front is completed we will move on the rear of the truck and replace the #1157 Tail and Stop lamps.
This is what the standard #1157 dual filament bulb looks like; this is the intensity of the Tail lamp
This is the new High Flux LED module I will be replacing the fragile glass bulb with.
There are 13 high intensity LED�s on this puppy.
This is what it looks like in the Tail light intensity, there is a bank of LED�s facing in all directions, I had to photograph them at an angle because they are so bright.
There it is with the Stop illuminated.
A note about these photographs, they were shot at .30/sec that is a half second exposure and it makes them just a bit brighter than they actually are maybe 10% but they really are MUCH BRIGHTER that the originals that were on the truck.
Here is a shot of the front corner showing the front lamp for a comparison.
This was photographed at .30 sec
Here is the new side lights showing the 12 LED�s inside, they are all at an angle following the curvature of the lens so you are always looking into the hot spot of at least 2 of them.
Here is a good side shot showing what someone would see at an intersection.
This one was head on into the side lamp; the lamp on the hood is a reflection.
Here is almost a head on view showing the cab marker lights.
Thread Starter
Administrator
Joined: Nov 2004
Posts: 4,084
Likes: 235
From: Southern California
LED turn signal lamps and taillights.
Part-3
Here is a view from the rear.
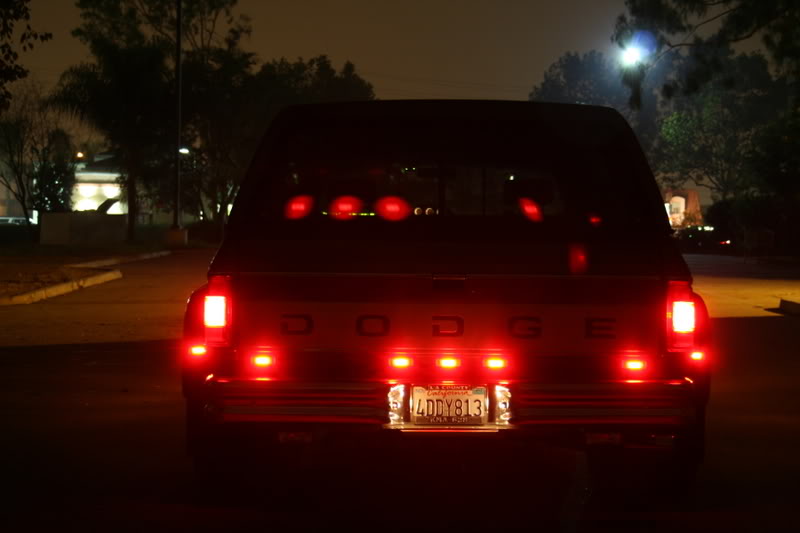
This is the Stoplight; again remember it is about 10% brighter than it really is.
This will kind of give you an idea of the color temperature of the lamps.
I am real satisfied with this modification with my lighting system, I did not have to replace my flasher but it could be because I already have a heavy-duty flasher for a semi tractor.
I am now on the search for a flasher with a faster flash rate, It is currently preset at 1 flash per second but I am looking for a flash rate of 4 flashes per second which is now attainable using LED�s.
For now I might just modify my current flasher module since it is using a simple R/C circuit.
I am also impressed with the attack and decay of the lamps that is when they flash, they come on and off in a burst of light opposed to an incandescent lamp that fades out as the tungsten filament cools.
A little information about the lamps:
Here is where I bought the lights from; they sell lighting products for the trucking industry, Police, Fire and Ambulance vehicles.
They are about 10 miles from me in Santa Fe Springs.
They have all of the latest LED light bars and concealed grille strobes you can play with; I was like being in heaven.
I ask them if there was any warranty on the lights and he said there is a 100,000-hour warranty on the LED�s and said if they ever go out to bring them back and they will replace them for free.
http://www.thelighthouseinc.com/asp/default.asp
This is the website for the company that sells the Taillight assembly, BUT I bought them all together from The Light House.
http://www.heavy-dutylighting.com/
Here is the module I am using.
http://www.heavy-dutylighting.com/pr...uid=aA0F950DB4
Here are the particulars on the items:
2) HDL1157RSD LED Bulbs -------------- @$9.75 each $19.50
2) MAXM20332Y 12 LED Marker Lamp -- @$10.00 each $20.00
-----------------------------------------------------$39.50
--------------------------------------------- CA. Tax $3.26
----------------------------------------------- Total $42.76
I hope you find this article informative and it will help you in your conversion if you choose to do so.
If you have any questions feel free to ask.
Jim in Southern California.
Part-3
Here is a view from the rear.
This is the Stoplight; again remember it is about 10% brighter than it really is.
This will kind of give you an idea of the color temperature of the lamps.
I am real satisfied with this modification with my lighting system, I did not have to replace my flasher but it could be because I already have a heavy-duty flasher for a semi tractor.
I am now on the search for a flasher with a faster flash rate, It is currently preset at 1 flash per second but I am looking for a flash rate of 4 flashes per second which is now attainable using LED�s.
For now I might just modify my current flasher module since it is using a simple R/C circuit.
I am also impressed with the attack and decay of the lamps that is when they flash, they come on and off in a burst of light opposed to an incandescent lamp that fades out as the tungsten filament cools.
A little information about the lamps:
Here is where I bought the lights from; they sell lighting products for the trucking industry, Police, Fire and Ambulance vehicles.
They are about 10 miles from me in Santa Fe Springs.
They have all of the latest LED light bars and concealed grille strobes you can play with; I was like being in heaven.
I ask them if there was any warranty on the lights and he said there is a 100,000-hour warranty on the LED�s and said if they ever go out to bring them back and they will replace them for free.
http://www.thelighthouseinc.com/asp/default.asp
This is the website for the company that sells the Taillight assembly, BUT I bought them all together from The Light House.
http://www.heavy-dutylighting.com/
Here is the module I am using.
http://www.heavy-dutylighting.com/pr...uid=aA0F950DB4
Here are the particulars on the items:
2) HDL1157RSD LED Bulbs -------------- @$9.75 each $19.50
2) MAXM20332Y 12 LED Marker Lamp -- @$10.00 each $20.00
-----------------------------------------------------$39.50
--------------------------------------------- CA. Tax $3.26
----------------------------------------------- Total $42.76
I hope you find this article informative and it will help you in your conversion if you choose to do so.
If you have any questions feel free to ask.
Jim in Southern California.

Trending Topics
Registered User


Joined: Sep 2004
Posts: 4,053
Likes: 135
From: Tijeras, New Mexico, 7,000ft up
Sticky time!
Thanks for the great writeup. I tried the replacement LED tail light bulbs from Schlep Boys and they wern't bright enough and didn't last. I figure 14 volts was hard on them...
Thanks for the great writeup. I tried the replacement LED tail light bulbs from Schlep Boys and they wern't bright enough and didn't last. I figure 14 volts was hard on them...

Thread Starter
Administrator
Joined: Nov 2004
Posts: 4,084
Likes: 235
From: Southern California
http://www.thelighthouseinc.com/asp/default.asp
I just also added all of this information to the article.
Jim
Thread Starter
Administrator
Joined: Nov 2004
Posts: 4,084
Likes: 235
From: Southern California
I forgot to ask if anyone know how many #194 lamps there are on our instrument cluster?
I would have to go through a lot of picture files to find it.
This is also on the conversion list.
Thanks Jim
I would have to go through a lot of picture files to find it.
This is also on the conversion list.
Thanks Jim

Registered User
Joined: May 2006
Posts: 309
Likes: 1
From: Michigan
Jim,
Had you already replaced all the running lights with LED's? I ordered the truck-lite LED modules from NAPA and snapped them inplace of all the old running lights.
What did you use for cab clearance LED's?
Had you already replaced all the running lights with LED's? I ordered the truck-lite LED modules from NAPA and snapped them inplace of all the old running lights.
What did you use for cab clearance LED's?
Registered User
Joined: Jul 2006
Posts: 172
Likes: 0
From: AK
Nice job on all the lights, I did the cab lights just like yours after having the roof re-painted. They look awesome and are bright. Thanks for the sticky on those, that made it real easy. Nice looking truck by the way.
Thread Starter
Administrator
Joined: Nov 2004
Posts: 4,084
Likes: 235
From: Southern California
I had replaced all of the marker lights on the fenders and across the tail gate with TruckLite LED lamps. I like the lifetime warranty.
The LED's on the cab are Grote Lamps, Here is the article I made on the installation.
Jim
https://www.dieseltruckresource.com/...d.php?t=100449