
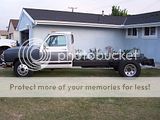
Dually bed project


Administrator


Joined: Nov 2004
Posts: 4,084
Likes: 235
From: Southern California
Yep, that is the factory tank and the sending unit for the '90 and it also has an rollover valve in it which is identical to the '91.5 sending unit. The tank is also shaped slightly different than the one out of the '91.5. I'll see if I can get some pictures of these differences.
Maybe early '91 (non i/c) started the threaded ring?
Maybe early '91 (non i/c) started the threaded ring?
When I fill the tank to the top fuel pours out onto the ground at about $1.00 per minuet for the next hour and that gets me sick watching my money running down the drain but lately I have only been putting in about $75.00 every 3 days and that keeps me below the 1/2 mark so it doesn't leak.
You can get the FUEL RATED hose for your filler neck from Hose Man or any other industrial hose supplier.
Diesel fuel will eat up the rubber in ordinary radiator hose in no time.
Jim
Thread Starter
Registered User
Joined: Mar 2008
Posts: 4,389
Likes: 114
From: Orange County, California
Got quite a bit more done yesterday and today. Some wiring along the frame rail got wrapped it in split loom and zip-tied from the rear all the way to the engine compartment along with other misc. wiring while I was in there. I also painted the frame from the cab back.
The work I accomplished yesterday consisted of wiring factory 4-way plugs for the taillights.
Then, I decided to remove the steps/running boards. It really cleaned up the look of the truck as well as make it seem as though is sits a little higher. If anyone is interested, I'll have the steps listed in the classifieds.


The work I accomplished yesterday consisted of wiring factory 4-way plugs for the taillights.


Then, I decided to remove the steps/running boards. It really cleaned up the look of the truck as well as make it seem as though is sits a little higher. If anyone is interested, I'll have the steps listed in the classifieds.

 .
.


Registered User
Joined: Sep 2011
Posts: 176
Likes: 0
From: Austin, TX
When I fill the tank to the top fuel pours out onto the ground at about $1.00 per minuet for the next hour and that gets me sick watching my money running down the drain but lately I have only been putting in about $75.00 every 3 days and that keeps me below the 1/2 mark so it doesn't leak.
Jim
Jim
Administrator
Joined: Nov 2004
Posts: 4,084
Likes: 235
From: Southern California
Hey if you need one of these like I do, that space looks like the perfect place to mount one of these.

Specifications
Rated Output at 104� F (40�C)
�Stick: 600 A, 44 V (26.4 kW), 40% duty cycle
�MIG/FCAW: 500 A, 40 V (20 kW), 100 % duty cycle
Output Power Range
�CC/AC: 20 - 575 A*
�CC/DC: 20 - 750 A
�CV/DC: 14 - 40 V
�Battery Charger 12/24 V, 50-750 A*
�Air Compressor: 100 PSI, 60 CFM, 100 % duty cycle
* Deluxe Model Only
Generator Power- rated at 104�F (40�C)
�5,500 watts Peak - 4,000 watts Continuous
�20,000 watts 3-phase / 12,000 1-phase Continuous*
* Deluxe Model Only
Net Weight
�Base & Cold Weather Models: 1931 lbs (876 kg)
�Deluxe Model: 1956 lb (887 kg)
Engine
�Turbocharged 64 hp Deutz Diesel
Jim
Thread Starter
Registered User
Joined: Mar 2008
Posts: 4,389
Likes: 114
From: Orange County, California
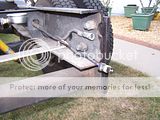
Hey TRENDZ, I didn't have to cut any of my frame at the rear. I guess whoever installed the flatbed on the truck back in '90 did in order to fit that bed on it. I did have to cut a notch in each of the foremost mounts on the bed to clear a crossmember rivet on the frame. I'll take more detailed pictures here in a little bit. I also had to cut the little "feet" on the underside where the frame goes up and over the axle. I cut only the pads off leaving the spot welded bases on. I think the front 2 might be hindering me from lining up the body lines to the cab so I might work them some more with the sawzall and see if I can't cut through the spot welds. I'd rather be too low and have to shim it than be too high.
How did you bolt the front of your bed down when you installed yours? Were you able to get hold of some factory brackets? I'm finding out that the brake line along the driver side frame rail will be in the way when I drill through for the mounting holes. I'm hoping it has enough slack/flex in it that I can hold it away from the frame to keep from puncturing it with a drill bit.
How did you bolt the front of your bed down when you installed yours? Were you able to get hold of some factory brackets? I'm finding out that the brake line along the driver side frame rail will be in the way when I drill through for the mounting holes. I'm hoping it has enough slack/flex in it that I can hold it away from the frame to keep from puncturing it with a drill bit.

Registered User
Joined: Sep 2009
Posts: 196
Likes: 4
To get mine to fit, I cut off the feet like you did, both in front of- and behind the axle hump. The rear most bed mount bolts go straight through to the frame with no spacers. The second most rearward mounting bolts go through the framerail then through spacers (big washers). Everything in front of the axle was fabricated. I used rectangular tubing with caps welded onto the ends, than drilled holes in the caps as needed.
One thing I should mention though. My cab has a 1" body lift. I'm not real sure that your body lines will be easily lined up without that 1". You may need to chop into the cross support rails that those feet were attached to. I will try to take some detailed pics of the mounting. You may come up with a better way of doing it. Right now it's raining out, and I aint gettin wet!
One thing I should mention though. My cab has a 1" body lift. I'm not real sure that your body lines will be easily lined up without that 1". You may need to chop into the cross support rails that those feet were attached to. I will try to take some detailed pics of the mounting. You may come up with a better way of doing it. Right now it's raining out, and I aint gettin wet!
Thread Starter
Registered User
Joined: Mar 2008
Posts: 4,389
Likes: 114
From: Orange County, California
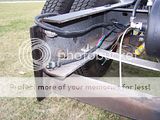
I actually got to looking at everything again and took some dimensions from the top of the frame to the cab. Turns out the upper cab bushings are bulged out on the driver side causing a sag that puts it lower than the passenger side by about a 1/4". Looks like I'll need to pick up some new ones soon. Hopefully that's the ticket to aligning the body to the cab.
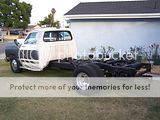
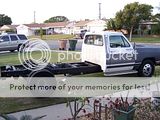
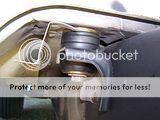
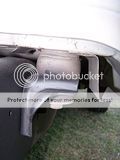
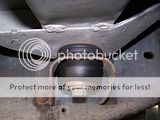
Anyhow, here are some more pictures I just took.
Passenger and driver side alignment

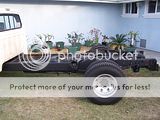
Driver side bed mount mod
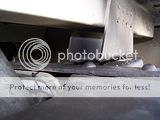
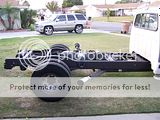
Passenger side bed mount mod
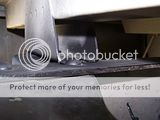
Brackets on the frame
Fore and aft "feet" on passenger side removed

Fore and aft "feet" on driver side removed


Anyhow, here are some more pictures I just took.
Passenger and driver side alignment


Driver side bed mount mod

Passenger side bed mount mod

Brackets on the frame

Fore and aft "feet" on passenger side removed


Fore and aft "feet" on driver side removed


Thread Starter
Registered User
Joined: Mar 2008
Posts: 4,389
Likes: 114
From: Orange County, California
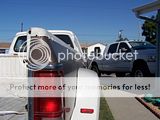
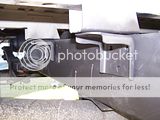
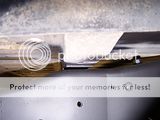
Replaced the cab insulators, installed the Jim Lane tailgate "lock," and re-installed the air tank for my on-board air system.
Driver side
 [
[

Passenger side


Keep in mind the driver side front of the bed still sits a little high until I can cut the remainder of the "feet."


Driver side
 [
[


Passenger side


Keep in mind the driver side front of the bed still sits a little high until I can cut the remainder of the "feet."


