
Chas'in Leaks . . .


Registered User
Joined: Jul 2003
Posts: 3,833
Likes: 2
From: Raleigh, NC

Thread Starter
1st Generation Admin
Joined: Jan 2005
Posts: 4,601
Likes: 118
From: Buies Creek, NC
I also noticed it doesn't have the second of two ports into the water jacket on the side of the head under the intake log. The rear-most is used for the temp sensor right there behind the fuel heater/filter.
On my truck, the second OEM port of the same kind is right there pretty-much under the throttle bracket area. That second one is where the above installed coolant adjunct is suppose to return the coolant from the air compressor.
I guess that narrows down where I'm gonna plumb the thing less I drill and tap another hole. Still haven't gone through all the different routing options and the subsequent results in my head.

Phil, it honestly started as installing an upgraded head. The smaller projects just happen to be a LOT easier done with the head off.

Show truck? I dunno. It's just a sleepy grocery-getter.
")

I took the exhaust manifold and the disassembled turbo exhaust housing down to my good friends at Loop Road Auto Parts in Garner, NC. There, Tracy drilled the exhaust housing's volute divider wall for the waste-gate and glass-beaded the exterior of all the parts. With that, I took it all home, reassembled the waste-gate cover, washed it all with brake cleaner and coated it all with aluminum paint that's rated for 1500*F. It's baking in the oven as I type this.
It's gonna look kinda funny under the hood. Everything's satin black for it's heat emission capabilities. The exhaust manifold and turbocharger exhaust housing are bright silver for it's heat retention capabilities.

And then I'll get behind a big-rig in a rain storm and that will be the end of that.


It's suppose to rain tomorrow and storm tomorrow night. perhaps worse than this past Tuesday night. Crap! I'm fixing to go out and re - better secure everything.

Registered User
Joined: Jul 2003
Posts: 3,833
Likes: 2
From: Raleigh, NC

Thread Starter
1st Generation Admin
Joined: Jan 2005
Posts: 4,601
Likes: 118
From: Buies Creek, NC
Phil, you may agree the weather has made it somewhat difficult to enjoy working outdoors recently. 
I've finally been able to get back to it and have managed to get the engine's wiring harness cleaned up. I incorporated the cool-down timer's solenoid feed line and the KSB over-ride feed into the loom.
I'm planning to chase the block's head bolt holes one more time with the bottoming tap and then clean the block's deck tomorrow.
Then put the head on . . . . one day.
alwaysonDTR
Joined: Dec 2007
Posts: 2,551
Likes: 0
From: Keizer, oregon
So tonight found me finishing that block coolant adjunct install. In it's OEM intended application, it takes coolant from the rear of the block and sends it to the engine mounted air compressor for cooling purposes and back to the base of the head. The pressure difference between the cylinder jacket and the head (head gasket provides the restriction/throttling/distribution) is what provides the flow in that branch of the coolant circuit.
In my application, it's gonna improve the consistency of the cylinder jacket temps as it will increase the circulation specific to that area (from the pump, through the jacket and back to the pump inlet) . I haven't nailed down exactly where I'm gonna connect the line yet.
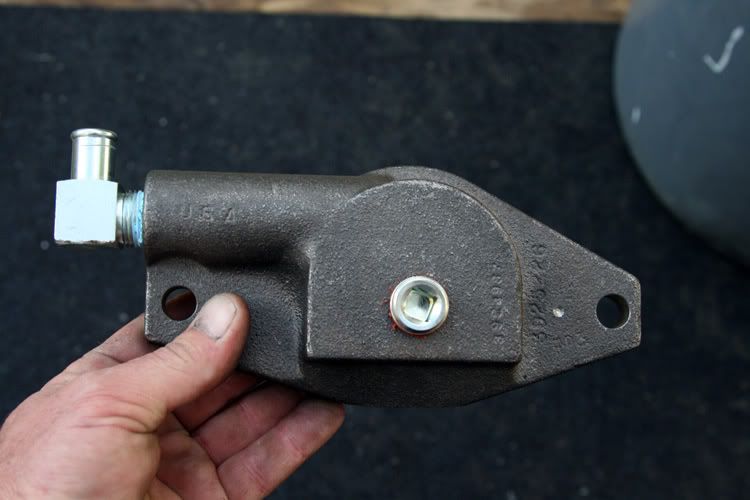
So using my trusty dental mirror, I sanded the rear of the block to remove any paint and stuff so the O-ring will seal correctly. Watch the knuckles, there's only about .75" to 1.25" to work with ~
I then take my cutting torch and gouge a slice in the freeze plug and remove it. Careful of that cylinder wall! ~
Now slip the adjunct in there and bolt it down. ~
That boy's in there like a hair in a biscuit!
I've still got to verify TDC and dress the wiring harness, then on to putting the head back on.
In my application, it's gonna improve the consistency of the cylinder jacket temps as it will increase the circulation specific to that area (from the pump, through the jacket and back to the pump inlet) . I haven't nailed down exactly where I'm gonna connect the line yet.
So using my trusty dental mirror, I sanded the rear of the block to remove any paint and stuff so the O-ring will seal correctly. Watch the knuckles, there's only about .75" to 1.25" to work with ~
I then take my cutting torch and gouge a slice in the freeze plug and remove it. Careful of that cylinder wall! ~
Now slip the adjunct in there and bolt it down. ~
That boy's in there like a hair in a biscuit!
I've still got to verify TDC and dress the wiring harness, then on to putting the head back on.
oh and i pull some of your pics out to shorten it up a bit
Thread Starter
1st Generation Admin
Joined: Jan 2005
Posts: 4,601
Likes: 118
From: Buies Creek, NC
As such, it comes with all needed to install the device (OEM Cummins parts) less where you're gonna plumb the water too. Currently, I'm leaning toward Teeing it into the cab heater return. With that routing, it will provide a constant minimum circulation of the coolant within the cylinder jacket exclusively (meaning without flowing through the radiator).
(And thanks for not making us scroll through all the mess
 ).
).
Thread Starter
1st Generation Admin
Joined: Jan 2005
Posts: 4,601
Likes: 118
From: Buies Creek, NC
It was nice outside this evening.
- Got me an ELL shaped piece of 5/8" hose for the coolant adjunct installed (before the head goes on). I found a nice metal 1/2" into a 5/8" TEE for the other end of the hose. It'll be here tomorrow.
- The other day I bottom-tapped the cylinder head bolt holes for the studs and did an initial cleaning of the holes. Tonight, I liberally lubricated the bolt holes with some WD40 type stuff, then repeatedly ran the bottoming-tap in and out of the holes, cleaning the flutes each time the tap came up. I got a LOT of "Stuff" out of the holes right there under the exhaust ports of the head. It appears the OEM bolts don't go near as deep as the hole is. Anyhoot, I flushed them clean and as such, one can run the tap in and out with one finger spinning the Tee-Handle of the tap.
- I scrubbed the Block's deck with one of those copper scouring pads you find under the kitchen sink. I kept things wet with the WD40 stuff all the while. Wiping it clean with a towel finds the original milling ridges intact albeit stained by the OEM install. Works for me.

I got the studs run in by hand to ensure the threads are right.
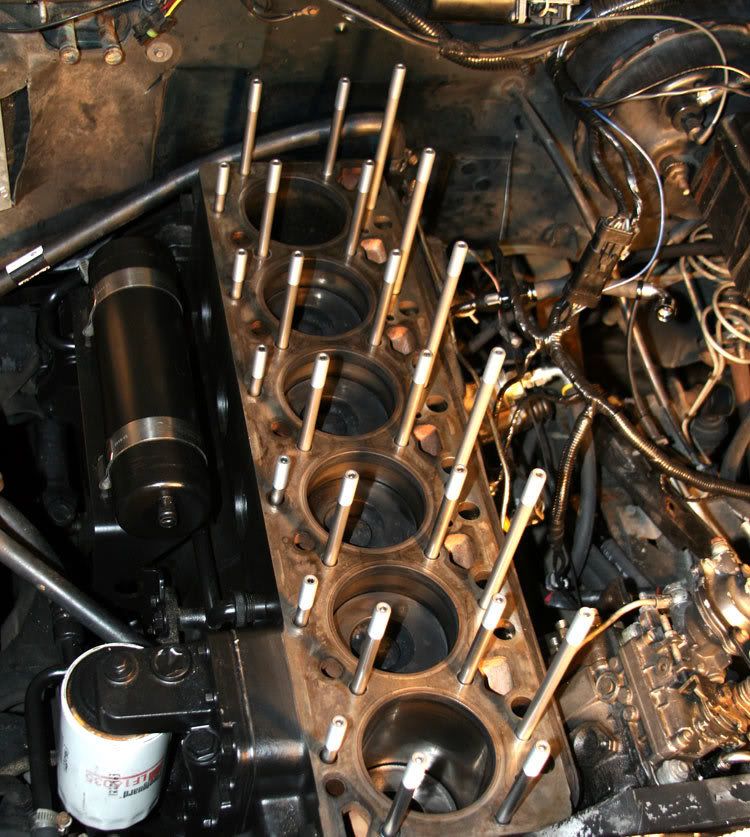
I reckon I'll set the head on tomorrow . . . . .
- Got me an ELL shaped piece of 5/8" hose for the coolant adjunct installed (before the head goes on). I found a nice metal 1/2" into a 5/8" TEE for the other end of the hose. It'll be here tomorrow.
- The other day I bottom-tapped the cylinder head bolt holes for the studs and did an initial cleaning of the holes. Tonight, I liberally lubricated the bolt holes with some WD40 type stuff, then repeatedly ran the bottoming-tap in and out of the holes, cleaning the flutes each time the tap came up. I got a LOT of "Stuff" out of the holes right there under the exhaust ports of the head. It appears the OEM bolts don't go near as deep as the hole is. Anyhoot, I flushed them clean and as such, one can run the tap in and out with one finger spinning the Tee-Handle of the tap.
- I scrubbed the Block's deck with one of those copper scouring pads you find under the kitchen sink. I kept things wet with the WD40 stuff all the while. Wiping it clean with a towel finds the original milling ridges intact albeit stained by the OEM install. Works for me.
I got the studs run in by hand to ensure the threads are right.
I reckon I'll set the head on tomorrow . . . . .

Registered User
Joined: Oct 2005
Posts: 316
Likes: 0
From: Winnipeg, MB, Canada
I know that you have set the hed studs in the block already. Here is my thought, what if you had only set the short stids in the head only with the exopy, and then set the head on then installed the rest of the studs with exopy on the bottom of the threads?
This is rather than cutting the cowl. Just an idea for the future installers. And in the future you would still have to cut hte cowl or remove then engine.
I personally find that removing the engine doing the work and reinstalling it is not a big issue. Far easier than a lot of the newer diesel engine(specially where it is easier to pull the cabs than just pull the engine or do head gaskets)


Registered User
Joined: May 2005
Posts: 2,510
Likes: 1
From: Belvidere, NJ
I know that you have set the hed studs in the block already. Here is my thought, what if you had only set the short stids in the head only with the exopy, and then set the head on then installed the rest of the studs with exopy on the bottom of the threads?
This is rather than cutting the cowl. Just an idea for the future installers. And in the future you would still have to cut hte cowl or remove then engine.
I personally find that removing the engine doing the work and reinstalling it is not a big issue. Far easier than a lot of the newer diesel engine(specially where it is easier to pull the cabs than just pull the engine or do head gaskets)
This is rather than cutting the cowl. Just an idea for the future installers. And in the future you would still have to cut hte cowl or remove then engine.
I personally find that removing the engine doing the work and reinstalling it is not a big issue. Far easier than a lot of the newer diesel engine(specially where it is easier to pull the cabs than just pull the engine or do head gaskets)
Thread Starter
1st Generation Admin
Joined: Jan 2005
Posts: 4,601
Likes: 118
From: Buies Creek, NC
Mike, I had initially posted some junk about having glued the studs in place and was fixing to cut the cowling to give the head clearance to go over the studs.
I was trying to be funny . . . . .. it didn't work.

Tonight I plan on setting the head. I've got to call PDR first though as the new head isn't marked which end is to the front.
Thread Starter
1st Generation Admin
Joined: Jan 2005
Posts: 4,601
Likes: 118
From: Buies Creek, NC
The weather today was wonderful!
All along thus far, things done to the engine have for the most part, been a foundational thing. This head install is no exception. Obviously, with all the time and money invested, it'd be a shame to see the engine scatter due to a universal joint popping it's nut in the heat of the moment for example. So while the head was still off, I snuck in some titanium valve spring retainers with hardened collets. While they may not be necessary at 3200rpm (currently), I think I'm gonna be close enough that they would be cheap insurance (Besides, I got them at a killer price due to someone not paying attention to their website prices and keeping them updated. Oops! )

Anyhoot, Once they were in, I made one more check of the block's deck, the head's mating surface, gasket's clean and right side up, the two little block/head dowel things were in place, and set that boy on there. Installed the studs, lubed the threads and washers, and started torquing the head down.
I went in 25ft/lb increments from loose to 125ft/lbs in the typical spiral pattern. The initial 25ft/lb, 50ft/lb, and 75ft/lb increments were repeated as needed till all were at the full value before proceeding to the next increment.
Of course, the valve push-rods, pedestals and rocker-arms were installed in the process of installing the studs.
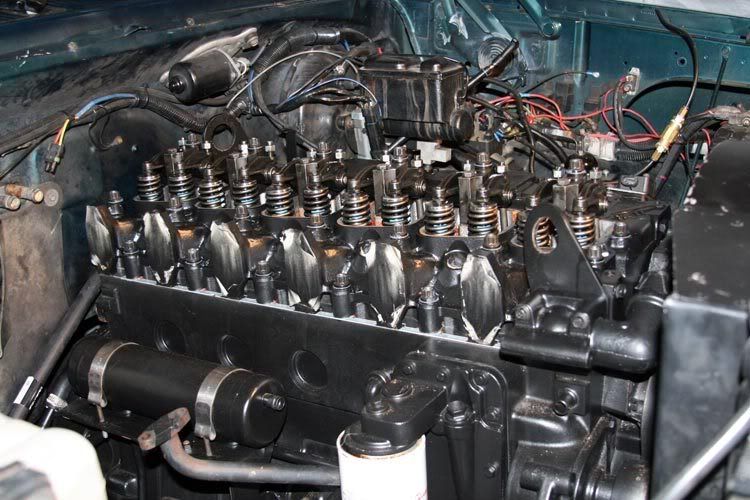
I've already got to change that coolant adjunct hose routing as I didn't account for the engine's exhaust manifold. No problem. I will have to remove some of the webbing inside the valve covers where the studs touch inside, but it looks like it won't take much to clear things.
Tomorrow, I reckon I'll try to get the left side of the engine installed.
It won't be as long as it has been.
All along thus far, things done to the engine have for the most part, been a foundational thing. This head install is no exception. Obviously, with all the time and money invested, it'd be a shame to see the engine scatter due to a universal joint popping it's nut in the heat of the moment for example. So while the head was still off, I snuck in some titanium valve spring retainers with hardened collets. While they may not be necessary at 3200rpm (currently), I think I'm gonna be close enough that they would be cheap insurance (Besides, I got them at a killer price due to someone not paying attention to their website prices and keeping them updated. Oops! )
Anyhoot, Once they were in, I made one more check of the block's deck, the head's mating surface, gasket's clean and right side up, the two little block/head dowel things were in place, and set that boy on there. Installed the studs, lubed the threads and washers, and started torquing the head down.
I went in 25ft/lb increments from loose to 125ft/lbs in the typical spiral pattern. The initial 25ft/lb, 50ft/lb, and 75ft/lb increments were repeated as needed till all were at the full value before proceeding to the next increment.
Of course, the valve push-rods, pedestals and rocker-arms were installed in the process of installing the studs.
I've already got to change that coolant adjunct hose routing as I didn't account for the engine's exhaust manifold. No problem. I will have to remove some of the webbing inside the valve covers where the studs touch inside, but it looks like it won't take much to clear things.
Tomorrow, I reckon I'll try to get the left side of the engine installed.
It won't be as long as it has been.

