


BC's Twin Install / AKA: "I'm Gonna Blow Up My Heap!" (updated as it occurs)


Thread Starter
1st Generation Admin
Joined: Jan 2005
Posts: 4,601
Likes: 118
From: Buies Creek, NC
Ooooooo! Shiny parts! 
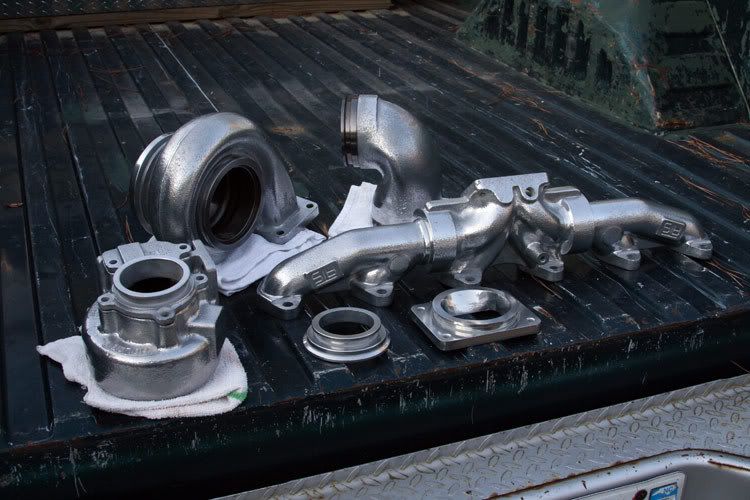
Is there any reason why I can't replace the standard manifold-to-head bolts with stainless steel? For that matter, all the bolts for the hot-pipe/adapters?
The difference in strength at elevated temperatures shouldn't be an issue as we don't run that hot. I think.
Is there any reason why I can't replace the standard manifold-to-head bolts with stainless steel? For that matter, all the bolts for the hot-pipe/adapters?
The difference in strength at elevated temperatures shouldn't be an issue as we don't run that hot. I think.


Thread Starter
1st Generation Admin
Joined: Jan 2005
Posts: 4,601
Likes: 118
From: Buies Creek, NC

Registered User
Joined: Aug 2007
Posts: 353
Likes: 0
From: VICTORIA B.C.
BC847,
I work at a Ford dealer and Ford ran stainless exhaust manifold studs on some of there 4.6l and 5.4l back when the first came out. Most of them broke and and they had a TSB out to change them over to regular steel studs. I think Stainless is to brittle and cant take the expanding and contracting. But then again we are talking about Ford.
Your call, my .02
Nice job so far (as always)
I work at a Ford dealer and Ford ran stainless exhaust manifold studs on some of there 4.6l and 5.4l back when the first came out. Most of them broke and and they had a TSB out to change them over to regular steel studs. I think Stainless is to brittle and cant take the expanding and contracting. But then again we are talking about Ford.
Your call, my .02
Nice job so far (as always)

Registered User
Joined: Apr 2007
Posts: 666
Likes: 0
From: Central Mi
How 'bout some hi-temp silver paint ??
I doubt anyone is going to give your engine that close an inspection that they'd notice the bolts were painted ??
Yer not going to enter any shows, are ya?
I doubt anyone is going to give your engine that close an inspection that they'd notice the bolts were painted ??
Yer not going to enter any shows, are ya?

Thread Starter
1st Generation Admin
Joined: Jan 2005
Posts: 4,601
Likes: 118
From: Buies Creek, NC

With my just recently installing the new head, I took the time to paint the ATS exhaust manifold and turbocharger's exhaust housing.
- Sand-blasted all the iron nice and clean.
- Chemically washed with solvent type cleaner.
- Coated with 1700*F silver paint as per instructions.
- Cured the paint by baking in the oven @ 350*F for a couple of hours followed by 500*F for a couple more hours. Stunk the house up real good.

It lasted about two weeks.

- The paint never burned or discolored. It flaked off in large sheets (bond failure).
I am my worst critic. "Showing" the truck is like anything else, . . . .it's relative. I'll figure something out, if only what won't work.

Thanks for the kind words folks. After some husband/wife business, I'm fixing to go finish the fabrication of another bracket that will hold the transmission heat exchanger and supplemental fluid filter. Both will just fit between the driver's side of the transmission and that left frame rail.

Pics coming soon.

Thread Starter
1st Generation Admin
Joined: Jan 2005
Posts: 4,601
Likes: 118
From: Buies Creek, NC
Well then . . . . .
I've got to move the transmission's heat exchanger from it's stock location under the exhaust manifold to make room for the new primary turbocharger.
As you know there's not a lot of room elsewhere to put it.
Cyphering with my tape measure, cutting and pounding on more speed limit sign sheet aluminum yields the following . .. . .
This is the frame side of the bracket . . . you'll see . . . .
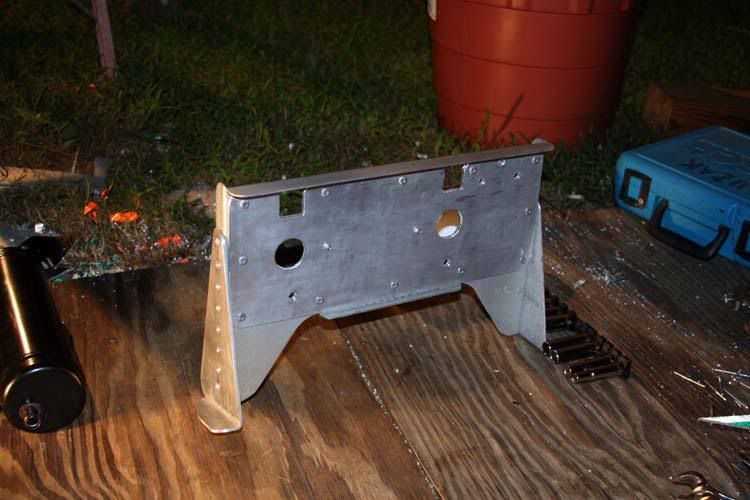
This is the transmission side of the bracket . . .
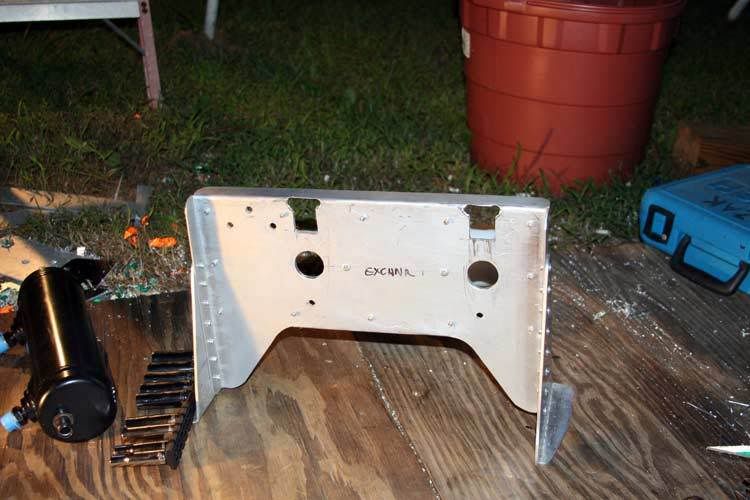
Nail the transmission fluid filter on the frame side . . .
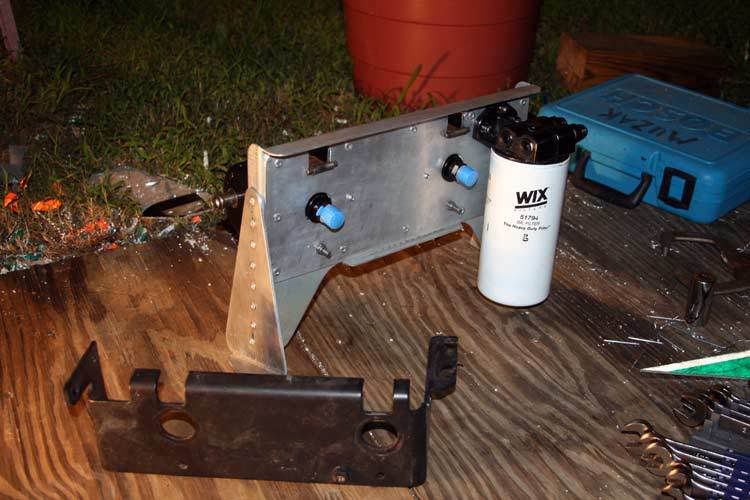
Followed by the heat exchanger on the transmission side . . . .
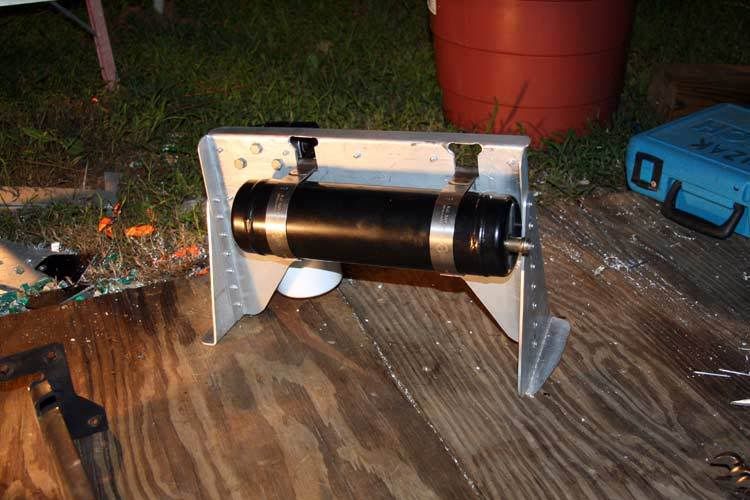
I made the main plate of the bracket thick enough that I could mimic the factory mounting of the heat exchanger using the OEM stainless band-clamps . ..
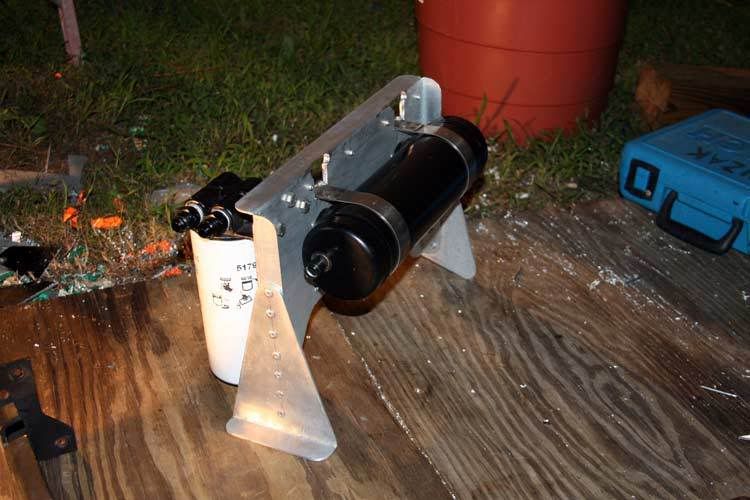
Now sneak that boy under the truck and nest it in between the transmission's frame cross-member and the rear skid-plate cross-member. Right there between the transmission and the driver's frame rail.
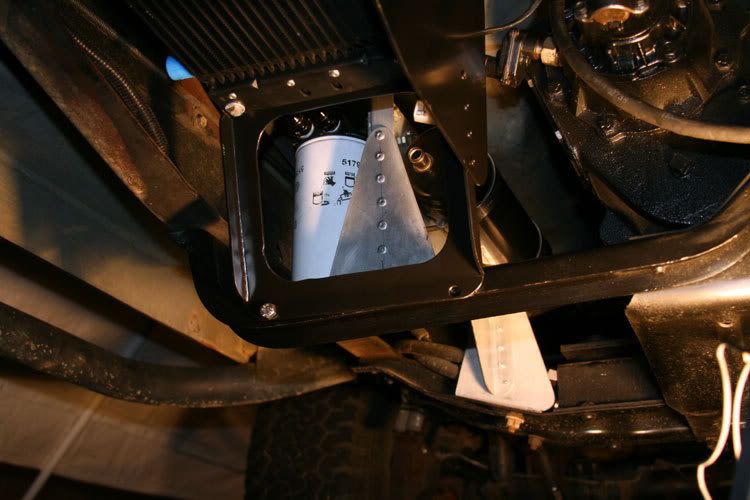
Here's from the driver's side, looking forward. That's the supplemental transmission oil cooler to the upper right.
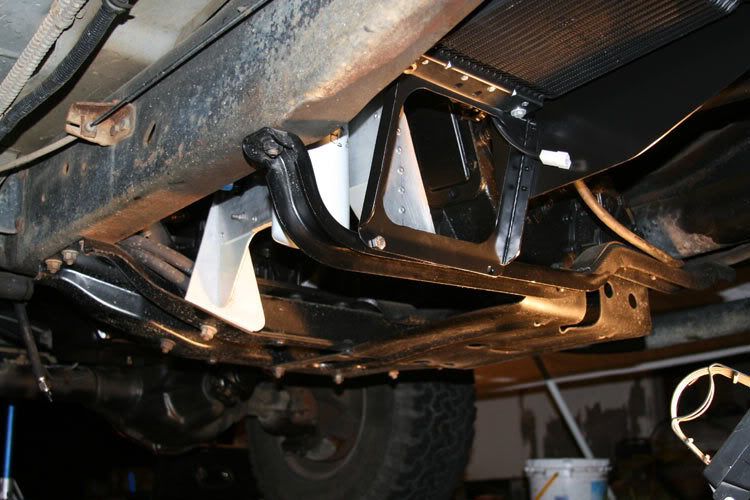
Since then, I've painted the bracket.
Shoot! I had to send the hot-pipe back to JetHot as for unknown reasons, they failed to coat the entire exterior of the piece. Specifically around both inlet and outlet flanges. As such, in a weeks time, I'd have a big purdy hot-pipe system with two big honk'in rings of rust in the mix. Gus, with JetHot, is promising to make it right. The gist of the warranty promises no sub-surface corrosion as long as I own the part in question. For three years, no sub-surface corrosion will present on the surface, else they pay 100% of re-coating the part. After that, I get to pay 50% of the re-coating cost. If I burn the coating in the 1st three years, I get to pay 50%. There's other fine print, but it's gonna be worth it I think.
The Bigger Honk'in Muffler should be here any day now. I've got to snake a five inch pipe back over the rear axle. That ought to be a hoot.
I've got to move the transmission's heat exchanger from it's stock location under the exhaust manifold to make room for the new primary turbocharger.
As you know there's not a lot of room elsewhere to put it.
Cyphering with my tape measure, cutting and pounding on more speed limit sign sheet aluminum yields the following . .. . .
This is the frame side of the bracket . . . you'll see . . . .
This is the transmission side of the bracket . . .
Nail the transmission fluid filter on the frame side . . .
Followed by the heat exchanger on the transmission side . . . .
I made the main plate of the bracket thick enough that I could mimic the factory mounting of the heat exchanger using the OEM stainless band-clamps . ..
Now sneak that boy under the truck and nest it in between the transmission's frame cross-member and the rear skid-plate cross-member. Right there between the transmission and the driver's frame rail.
Here's from the driver's side, looking forward. That's the supplemental transmission oil cooler to the upper right.
Since then, I've painted the bracket.
Shoot! I had to send the hot-pipe back to JetHot as for unknown reasons, they failed to coat the entire exterior of the piece. Specifically around both inlet and outlet flanges. As such, in a weeks time, I'd have a big purdy hot-pipe system with two big honk'in rings of rust in the mix.
Gus, with JetHot, is promising to make it right. The gist of the warranty promises no sub-surface corrosion as long as I own the part in question. For three years, no sub-surface corrosion will present on the surface, else they pay 100% of re-coating the part. After that, I get to pay 50% of the re-coating cost. If I burn the coating in the 1st three years, I get to pay 50%. There's other fine print, but it's gonna be worth it I think.The Bigger Honk'in Muffler should be here any day now. I've got to snake a five inch pipe back over the rear axle. That ought to be a hoot.

Registered User

Joined: Jul 2004
Posts: 1,252
Likes: 52
From: Whitehorse, cultural hub of the universe..
BC, for painting high temp parts, try using high temp BBQ paint as a primer, flat black, and we have had much success with it over the years.
we have had engines overheat to the point of seizure, without even discoloring the paint topcoat, when using the BBQ paint as a primer. this included around the exhaust ports on gassers.
Might not work as well on exhaust manifold parts, although the BBQ paint as a final coat on headers has been ok.
we have had engines overheat to the point of seizure, without even discoloring the paint topcoat, when using the BBQ paint as a primer. this included around the exhaust ports on gassers.
Might not work as well on exhaust manifold parts, although the BBQ paint as a final coat on headers has been ok.


Thread Starter
1st Generation Admin
Joined: Jan 2005
Posts: 4,601
Likes: 118
From: Buies Creek, NC
BC, for painting high temp parts, try using high temp BBQ paint as a primer, flat black, and we have had much success with it over the years.
we have had engines overheat to the point of seizure, without even discoloring the paint topcoat, when using the BBQ paint as a primer. this included around the exhaust ports on gassers.
Might not work as well on exhaust manifold parts, although the BBQ paint as a final coat on headers has been ok.
we have had engines overheat to the point of seizure, without even discoloring the paint topcoat, when using the BBQ paint as a primer. this included around the exhaust ports on gassers.
Might not work as well on exhaust manifold parts, although the BBQ paint as a final coat on headers has been ok.
. . . As a primer huh? That's not a bad idea.

Thread Starter
1st Generation Admin
Joined: Jan 2005
Posts: 4,601
Likes: 118
From: Buies Creek, NC
Well, I can't say that I'm hurting myself to get it all together. 
Today I'm cyphering any AN hose fittings that I still need to order. Otherwise . . .
- Complete the wiring of the above trans oil cooler (power, Auto/Manual switch in the cab, etc). I'm gonna use the two unused ports of the trans oil filter for the cooler's thermostat as well as the OEM overdrive fluid thermostat.
- Route the engine coolant hoses from the engine to the relocated transmission heat exchanger. I may very well use that coolant adjunct I recently installed on the back of the cylinder bank for the coolant source. I'm also planning on installing a 1/4 turn ball-valve in the coolant line to stop the flow when racing.
- When I get the hot-pipe back from JetHot, I can then do a fitment install of the twins so as to nail down the exhaust system. In addition to the new exhaust down-pipe, after the transfer case, I'll be going from a four inch system to a five inch system. All to better accommodate the increased exhaust gas volume while keeping it quiet.
- Adjust the Stock-Pot cold air feed to the new primary location.
- Nail down the cab heater plumbing.
- Then most likely remove the twins and paint the center sections, compressor housings and associated cold pipes . . . satin black. Same thing with the new exhaust components.
- While the above paint's drying, do a forth . . . or fifth (I can't remember just now) re-torque of the head studs.
I'm sure I've forgotten some minor details. It won't be near as long as it has been.
Today I'm cyphering any AN hose fittings that I still need to order. Otherwise . . .
- Complete the wiring of the above trans oil cooler (power, Auto/Manual switch in the cab, etc). I'm gonna use the two unused ports of the trans oil filter for the cooler's thermostat as well as the OEM overdrive fluid thermostat.
- Route the engine coolant hoses from the engine to the relocated transmission heat exchanger. I may very well use that coolant adjunct I recently installed on the back of the cylinder bank for the coolant source. I'm also planning on installing a 1/4 turn ball-valve in the coolant line to stop the flow when racing.
- When I get the hot-pipe back from JetHot, I can then do a fitment install of the twins so as to nail down the exhaust system. In addition to the new exhaust down-pipe, after the transfer case, I'll be going from a four inch system to a five inch system. All to better accommodate the increased exhaust gas volume while keeping it quiet.
- Adjust the Stock-Pot cold air feed to the new primary location.
- Nail down the cab heater plumbing.
- Then most likely remove the twins and paint the center sections, compressor housings and associated cold pipes . . . satin black. Same thing with the new exhaust components.
- While the above paint's drying, do a forth . . . or fifth (I can't remember just now) re-torque of the head studs.
I'm sure I've forgotten some minor details. It won't be near as long as it has been.