
AFC modification

Thread Starter
Registered User
Joined: Sep 2007
Posts: 479
Likes: 0
AFC modification
Hello Folks! This is my first attempt at including pics w/ info. so if its not correctly posted, bear w/ me. Hopefully ya'll will find this useful. And understandable! 
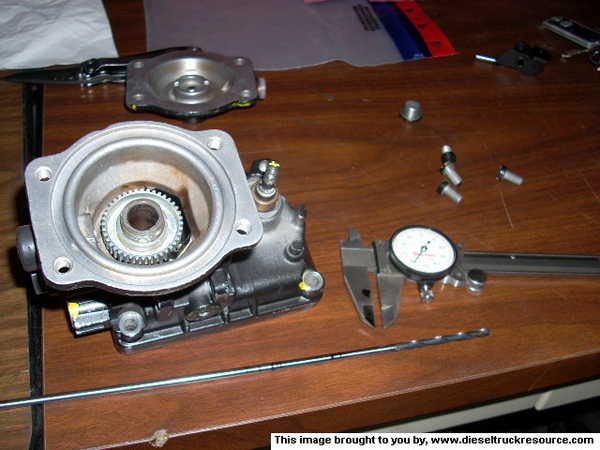
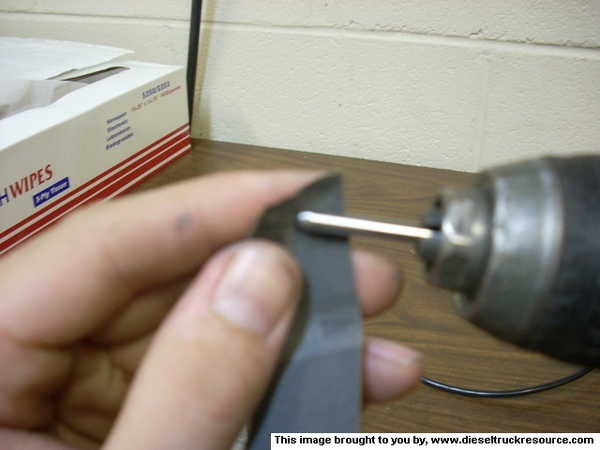
This mod is a way to use the total fueling of having the AFC foot ground off and use an even deeper cut pin, but retain full afc control. We are going to be replacing the smaller pin that rides between the AFC cone and AFC lever. This pin is approx. 15/16" long. After grinding the foot you loose a good bit of control of the governor and "gain" low speed smoke/idle haze, along with a few more H.P. Which is what we're after. I have been looking for quite some time for the part needed (PIN) to make this possible. The reason for not being able to use any piece of round stock SS is, as many of you know, the hardness of the metal. I read in a thread in 1stgen.org. that a needle bearing could be used for this. I have looked and called everywhere around my area and can't find a distributor of bearing parts. So one day while kicking the idea around I thought of using the shank of a cobalt drill bit. It should be plenty hard and can be found in many sizes and lengths. I used a 5/32" drill bit w/ a shank length of 10 in. I used such a long drill bit cause it was readily available at work and allows for a few tries if the first attempt doesn't make par.
Here is a picture of the bit I used.
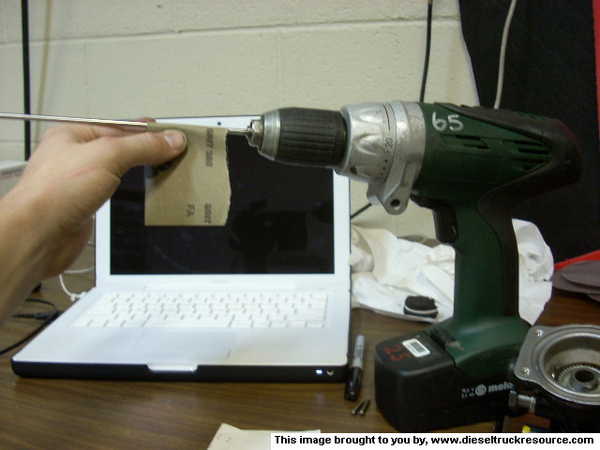
Because the pin rides inside of an O-ring we need to make sure that it is a nice polished surface. So to accomplish this I used a drill and some sand paper (320 grit) and a green scotch-brite pad. I wasn't sure how accurate the tolerance's would stay, but accross its length its within +/- .002"
Here's a pic showing how I sanded it and keep it symetrical. Its also a quite speedy process.
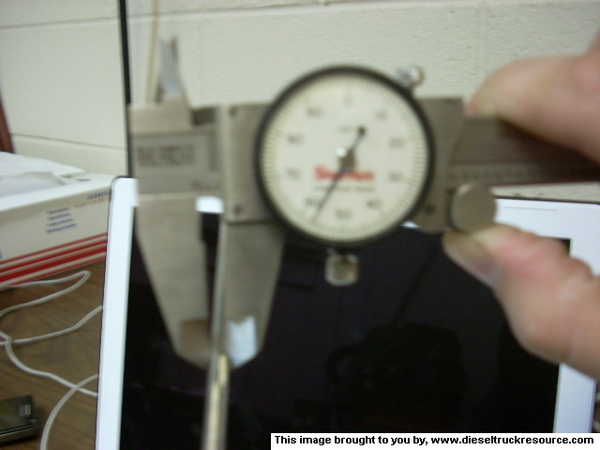
After some sanding use a dial caliper and check to see that your keeping the diameter uniform along its length. It should read between .156" - .158" You really don't want to let it get below .156" otherwise it may not maintain a tight seal in the O-ring.
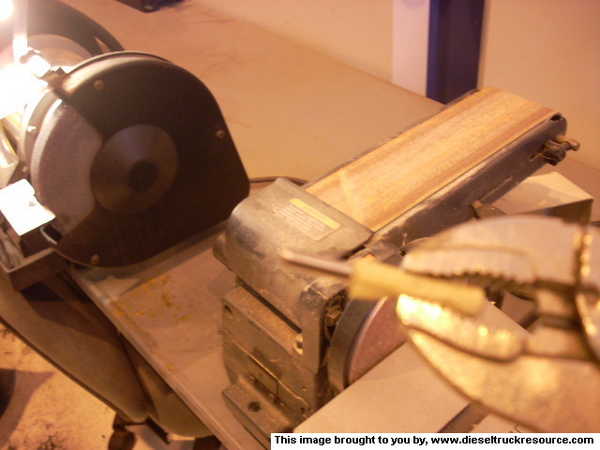
Once you've got a good 2" area polished then you want to cut out a
section about 1.25" in length. This is a tad long so we can grind it to an accurate length and bevel the ends.
You may want to do a test fit at this time. If the pin is any larger than .158" it won't fit through the hole. Once you've gotten the pin to the correct length give it a another go in the drill to polish out the ends.
It took me a couple times of installing the pin into the housing w/ the AFC lever and AFC cone to get the length just right. You want it to be able to install/remove the AFC cone so don't leave it too long, but maintain a tight fit w/ the lever installed and the cone at its highest point.
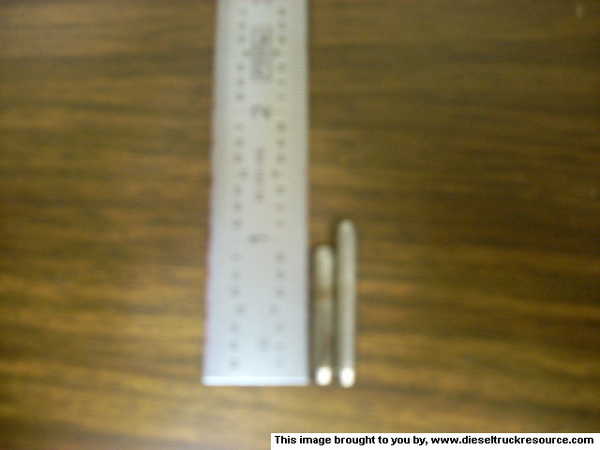
Here is a pic of the new pin next to the old, shorter, pin. The new, longer, pin is approx. 3/16" longer. Mine came out closer to a finished product of 1/8" longer after test fitting.
I hope this has been of some interest to some of ya'll. If anyone notices anything incorrect, lacking, or a better way of doing something, please, let me know. I had to throw this together real quick before class this morning.
This mod is a way to use the total fueling of having the AFC foot ground off and use an even deeper cut pin, but retain full afc control. We are going to be replacing the smaller pin that rides between the AFC cone and AFC lever. This pin is approx. 15/16" long. After grinding the foot you loose a good bit of control of the governor and "gain" low speed smoke/idle haze, along with a few more H.P. Which is what we're after. I have been looking for quite some time for the part needed (PIN) to make this possible. The reason for not being able to use any piece of round stock SS is, as many of you know, the hardness of the metal. I read in a thread in 1stgen.org. that a needle bearing could be used for this. I have looked and called everywhere around my area and can't find a distributor of bearing parts. So one day while kicking the idea around I thought of using the shank of a cobalt drill bit. It should be plenty hard and can be found in many sizes and lengths. I used a 5/32" drill bit w/ a shank length of 10 in. I used such a long drill bit cause it was readily available at work and allows for a few tries if the first attempt doesn't make par.
Here is a picture of the bit I used.
Because the pin rides inside of an O-ring we need to make sure that it is a nice polished surface. So to accomplish this I used a drill and some sand paper (320 grit) and a green scotch-brite pad. I wasn't sure how accurate the tolerance's would stay, but accross its length its within +/- .002"
Here's a pic showing how I sanded it and keep it symetrical. Its also a quite speedy process.
After some sanding use a dial caliper and check to see that your keeping the diameter uniform along its length. It should read between .156" - .158" You really don't want to let it get below .156" otherwise it may not maintain a tight seal in the O-ring.
Once you've got a good 2" area polished then you want to cut out a
section about 1.25" in length. This is a tad long so we can grind it to an accurate length and bevel the ends.
You may want to do a test fit at this time. If the pin is any larger than .158" it won't fit through the hole. Once you've gotten the pin to the correct length give it a another go in the drill to polish out the ends.
It took me a couple times of installing the pin into the housing w/ the AFC lever and AFC cone to get the length just right. You want it to be able to install/remove the AFC cone so don't leave it too long, but maintain a tight fit w/ the lever installed and the cone at its highest point.
Here is a pic of the new pin next to the old, shorter, pin. The new, longer, pin is approx. 3/16" longer. Mine came out closer to a finished product of 1/8" longer after test fitting.
I hope this has been of some interest to some of ya'll. If anyone notices anything incorrect, lacking, or a better way of doing something, please, let me know. I had to throw this together real quick before class this morning.
Registered User
Joined: May 2004
Posts: 2,867
Likes: 0
From: Golden, Colorado
I'm glad someone finally did this and documented it! And also found something else to make the longer pin from that didn't involve buying a bunch of needle bearings to take apart for one needle. haha
Looks good, hope to do it myself some day!
Aaron
Looks good, hope to do it myself some day!
Aaron
Thread Starter
Registered User
Joined: Sep 2007
Posts: 479
Likes: 0
Well I got the pics up. I had one to many http://'s in there  . Not sure how the one at the bottom got there
  . Anyways, I hope this is useful and if anyone has already done this and sees a prob. w/ any of it, feel free to let me know. I'm hoping to put it in the truck this weekend and test it, but w/ my new school and work schedule who knows. Later! Oh, thanks for the compliment Apwatson50!
. Not sure how the one at the bottom got there . Anyways, I hope this is useful and if anyone has already done this and sees a prob. w/ any of it, feel free to let me know. I'm hoping to put it in the truck this weekend and test it, but w/ my new school and work schedule who knows. Later! Oh, thanks for the compliment Apwatson50!

 ! Thanks!
Registered User
Joined: Jan 2008
Posts: 690
Likes: 0
From: Vancouver island
So, if im reading this right, you can cut your fuel pin to basically the other side (assuming its a solid one) and that longer pin will follow it all the way making for more travel on the afc cone, in turn making less smoke at low boost and gives it even more power at high boost? Or, is it just lessening the smoke at low boost?
If im thinking right (which i dont usually do) if the afc cone is ground too far the pin will just sit fully extended not touching the cone... right? So wouldnt this just pull some of the low boost smoke (depending on your cone)?
Hope you understand what im talkin about...
If im thinking right (which i dont usually do) if the afc cone is ground too far the pin will just sit fully extended not touching the cone... right? So wouldnt this just pull some of the low boost smoke (depending on your cone)?
Hope you understand what im talkin about...
Trending Topics
Thread Starter
Registered User
Joined: Sep 2007
Posts: 479
Likes: 0
Yes, you're understanding it correctly. It will let you grind the foot and the pin a good bit further back. You would just have to take measurements based off your pin length and what not. They will all be very close if not exact in length. Maybe a .001 difference since you're making it by hand. Yes it will reduce low end smoke while allowing more fuel across the board.


Registered User
Joined: Jan 2008
Posts: 690
Likes: 0
From: Vancouver island
Thanks for bringin this back up. Im gonna do it!
Does anybody know the spring rates of the afc springs and have some sort of conversion for how far the spring compresses per psi of boost? (on a given pre-load)
Eg: how far would the spring be compressed at full pre-load at 15 psi?
Does anybody know the spring rates of the afc springs and have some sort of conversion for how far the spring compresses per psi of boost? (on a given pre-load)
Eg: how far would the spring be compressed at full pre-load at 15 psi?

Registered User
Joined: Apr 2005
Posts: 3,253
Likes: 0
From: Terre Haute,IN
my update 8/11/09
1/8 inch longer and you can still remove the afc cone? The longest I could get to where the cone would still be removable was 3/64. I thought about leaving the pin longer and just 'permanently' installing the fuel cone. Put it in first, then install the guide pin, then the afc lever and button it back up. Only one would have to remove the pump top, pull the afc lever and guide pin to remove the afc cone...
Haven't been able to test it except for a 3rd gear blast. Just that gear felt better, we'll see. First I have to pull the pump top and put some sealant on the two ball bearings holding the rod that the afc lever rides on. The one time, in dozens of pump top R&R jobs, I listen to some of you online that don't use sealant, it leaks ..
..
Haven't been able to test it except for a 3rd gear blast
. Just that gear felt better, we'll see. First I have to pull the pump top and put some sealant on the two ball bearings holding the rod that the afc lever rides on. The one time, in dozens of pump top R&R jobs, I listen to some of you online that don't use sealant, it leaks..
Thread Starter
Registered User
Joined: Sep 2007
Posts: 479
Likes: 0
I do not know for sure, but the pin that rides on the cone may be slightly different stock lengths. Mine was a very tight fit and because of how difficult it could be sometimes to take the cone out I made a little groove in the side of the cone so I could turn the cone and pull it out. I didn't include that cause I did it after completing the write up, sorry! Something else I did was where the ***** get pressed back in I tapped and installed screws with sealant. Much, much easier to deal with!