1990 D250 to W250


Thread Starter
Registered User
Joined: Aug 2013
Posts: 4,918
Likes: 603
From: Tulsa, OK
Getting a bit farther today. This is the beginning of the transmission hump swap. T he new hump held in place (roughly) by Clecos. there is a little interference with the old hump on the drivers side I assume for shift likkage clearance for the 727.
The plan at this point is to get everything out of the way. Then run a Sharpe around the new hump and use paint remover to get rid of the ole paint.
I think the metal on these things is thin enough without excessive sanding.
The plan at this point is to get everything out of the way. Then run a Sharpe around the new hump and use paint remover to get rid of the ole paint.
I think the metal on these things is thin enough without excessive sanding.

Thread Starter
Registered User
Joined: Aug 2013
Posts: 4,918
Likes: 603
From: Tulsa, OK
I am going to weld it in. With the sheet metal so thin on the late 80s to 90s I worry about losing the strength from cutting out the bends. If it were just the top I would be inclined to make a removable cover.
It fits a little better now after I did some "body work" on the stock tunnel

Registered User


Joined: Dec 2010
Posts: 6,838
Likes: 1,683
From: Land of the Toxic Avenger
Thread Starter
Registered User
Joined: Aug 2013
Posts: 4,918
Likes: 603
From: Tulsa, OK

Thread Starter
Registered User
Joined: Aug 2013
Posts: 4,918
Likes: 603
From: Tulsa, OK
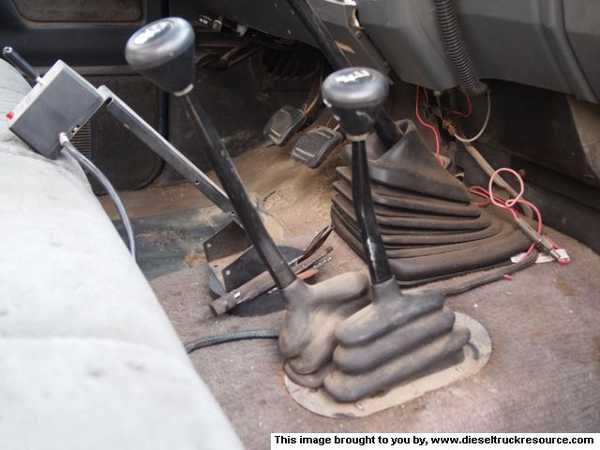
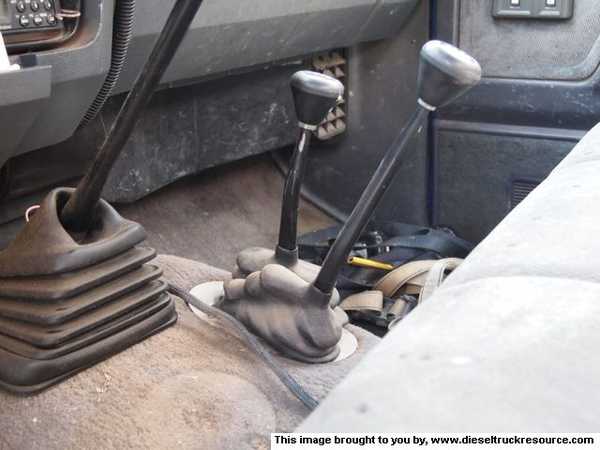
This morning I trimmed 3/4" off the front of the trans tunnel that is going in my truck. I also figured Now is a good time to open up and brace the transfer case shifter opening. I am working on a twin stick set up using modified stock sticks. A member here was kind enough to let me have stock stick and linkage for shipping. Thanks Tim.
More on that later.
I started trimming the thing resonated so much I couldn't stand the noise. Throwing my welding jacket on it stopped the resonation.
More on that later.
I started trimming the thing resonated so much I couldn't stand the noise. Throwing my welding jacket on it stopped the resonation.
Thread Starter
Registered User
Joined: Aug 2013
Posts: 4,918
Likes: 603
From: Tulsa, OK
I decided if I open up the transfer case shifter hole up 1 1/8" toward the passenger side I gain enough clearance ( If I figured right.
I also wanted to brace the opening to give the screws some more meat to grab onto.
The problem is if I used a 2.5" hole saw(same radius as stock. the centers of the pilot holes are only 1" apart.
What would happen is the first hole cuts out the pilot hole for the second cut.
My cure is to tack a second piece of 18 gauge under the part to be cut. then drill the pilot holes to 1/32" over 1/4"
I also use a piece of straight rod for the pilot in the hole saws. They run truer this way.
anyway I cut just enough to clear the top piece of metal leaving around 1/2 or so of the second layer, the top piece comes off. leaving the pilot hole in the second. I have used this technique to enlarge holes in firewalls too.
The first picture is the rough layout of the cut.
The second is the layout of the brace that will go under the floor.
The last picture is the top holes cut out and the piece of scrap tacked to the bottom of it. There are also some rough lines I to show how it will be cut.
This is where the battery in my camera crapped out. I did too after I removed the bottom plate. This is also how I will make my shifter boot bezels. Oh what am I going to use for boots?
edit- I added one more pic.
Registered User
Joined: Mar 2014
Posts: 1,296
Likes: 308
From: PA near Harrisburg
Hmmm...Looks oddly familiar. 
I ended up buying an electric metal shear from Harbor Freight to do the cutting on my tunnel/cover. I tried a pneumatic body saw, cut off wheel on a grinder, sawzall, and a saber saw with a fine toothed metal blade in it. All of the saws created too much vibration to be useful. The metal shears work really well in a straight or barely curving line. They are fast, make a clean cut, and won't inadvertently cut anything extra. I tried to stay above the tunnel curves when I cut mine to maintain the original rigidity. I had to cut below the curve on the passenger side and that led to a lot of flex in the side of the tunnel. I secured the cover with #10x1/2" sheet metal screws and it seems just as strong as the original now. I put the cover on with screws because I know it will come back to bite me if I welded it.
Looks good Mark.
Thread Starter
Registered User
Joined: Aug 2013
Posts: 4,918
Likes: 603
From: Tulsa, OK
Hmmm...Looks oddly familiar.
I ended up buying an electric metal shear from Harbor Freight to do the cutting on my tunnel/cover. I tried a pneumatic body saw, cut off wheel on a grinder, sawzall, and a saber saw with a fine toothed metal blade in it. All of the saws created too much vibration to be useful. The metal shears work really well in a straight or barely curving line. They are fast, make a clean cut, and won't inadvertently cut anything extra. I tried to stay above the tunnel curves when I cut mine to maintain the original rigidity. I had to cut below the curve on the passenger side and that led to a lot of flex in the side of the tunnel. I secured the cover with #10x1/2" sheet metal screws and it seems just as strong as the original now. I put the cover on with screws because I know it will come back to bite me if I welded it.
Looks good Mark.
I didn't have problems with vibration so much as the thin metal made a lot of noise.

I used a cutoff wheel this time. I use the thinnest ones I can find. when I put a new one on I spin it a fast as the die grinder will go and touch the edge of the wheel to a big brake drum that sits by the bench. That cures the out of round problem.
I have a 4' stomp shear. But like you said it only works on flat parts.
The plasma cutter is by far my favorite cutting tool. but it isn't always the best for the job at hand. I also have the pneumatic version of the one you have. I think the electric one may be better.
I think with the brace and bezel I will be ok. we shall see.
Looks like I am going to have to start looking for red leather coats in the thrift store to make shift boots out of.
Thread Starter
Registered User
Joined: Aug 2013
Posts: 4,918
Likes: 603
From: Tulsa, OK
Got the braces cut out. I need to layout the hole patterns
I think I will make the boot bezels the same shape as these parts. not as wide as the top part though. I also am going to weld nuts to the bottom. That gives me a better choice of fasteners.
I think I will make the boot bezels the same shape as these parts. not as wide as the top part though.
I also am going to weld nuts to the bottom. That gives me a better choice of fasteners.

Registered User

Joined: Apr 2002
Posts: 1,602
Likes: 93
From: Richmond, VA
FWIW, When I did my twin stick install, I used a Dodge lever from an '80's gasser with 208 xfer & the stock diesel lever mounted to doubled up stock pivots on a longer pivot shaft. The two levers nested nicely & don't take up too much space , and I didn't have to trim the shifter hole at all. The 208 style lever is a little longer and I have it operating the rear output shaft. It makes it a little easier to reach when doing the range shift starting up with a loaded trailer, which is why I really wanted the twin stick to begin with.
One thing that I think would be really slick, but haven't worked on, would be a way to select to lock the two shifters together, so when I want to stay in 4wd I can just do a single range shift with one lever . . .
Its looking good Mark!
One thing that I think would be really slick, but haven't worked on, would be a way to select to lock the two shifters together, so when I want to stay in 4wd I can just do a single range shift with one lever . . .
Its looking good Mark!
Thread Starter
Registered User
Joined: Aug 2013
Posts: 4,918
Likes: 603
From: Tulsa, OK
FWIW, When I did my twin stick install, I used a Dodge lever from an '80's gasser with 208 xfer & the stock diesel lever mounted to doubled up stock pivots on a longer pivot shaft. The two levers nested nicely & don't take up too much space , and I didn't have to trim the shifter hole at all. The 208 style lever is a little longer and I have it operating the rear output shaft. It makes it a little easier to reach when doing the range shift starting up with a loaded trailer, which is why I really wanted the twin stick to begin with.
One thing that I think would be really slick, but haven't worked on, would be a way to select to lock the two shifters together, so when I want to stay in 4wd I can just do a single range shift with one lever . . .
Its looking good Mark!
One thing that I think would be really slick, but haven't worked on, would be a way to select to lock the two shifters together, so when I want to stay in 4wd I can just do a single range shift with one lever . . .
Its looking good Mark!
My plan is basically the same as what you did. One of the parts that I have had been welded below where the stick mounts so I was just going to cut it there and add a piece there. I haven't worked all the details out yet. I do have a parts list for McMaster Carr though. And one for dome DOM tubing. All total the shift ***** I picked are the biggest single expense.
Can you post a pic of yours? I am always open to ideas.
Registered User
Joined: Mar 2014
Posts: 1,296
Likes: 308
From: PA near Harrisburg
The metal shears I picked up are the ones that are on the end of a handheld drill (p/n 68199). They work great for straight lines. I used that for the straight cuts and tin snips for the corners.
Thread Starter
Registered User
Joined: Aug 2013
Posts: 4,918
Likes: 603
From: Tulsa, OK