
Installing Polyurethane Spring Tip Inserts


Thread Starter
Administrator


Joined: Nov 2004
Posts: 4,084
Likes: 235
From: Southern California
Part-1
Installing Spring Tip Inserts.
As all of you know I have been in search for the reason that we all have such a rough ride on our 1st.Gen trucks.
In my previous article I removed the spring packs and after removing all of the leaves I then ground off all of the rough surfaces and then polished them to a smooth finish.
I then installed a poly-liner between each leaf before I reassembled the pack.
This made quite an improvement in the quality of the ride over what I had.
Now over time my ride has slowly degraded and was now experiencing a somewhat harsh ride in addition to the sound levels in the cab being noticeable higher.
I knew at the time this was not going to be a permanent fix and I was looking for something better.
After looking under a lot of trucks and asking lots of questions I knew what I had to do.
Actually it was an idea I already had but I needed to figure out how to do it.
Instead of the Poly-Liner that I used in-between each leaf I am going to install a Spring Tip Insert at the tip of each leaf.
Now the only problem with doing that is our leaves do not have the required 7/16� hole at the end of the leaf for the insert to snap into.
Now you know that a little problem like that won�t stop me, I just had to figure out how to drill holes in my springs, and then find a way to come up a simpler way to show all of you how to do it.
Actually the answer was quite simple and you can do it at home.
So today I am going to show you how to remove your leaf springs, drill holes in the tips and install Polyurethane Spring Tip Inserts for a Smooth Ride.
Assuming you have the required skill and knowledge to perform this repair you should have no problems doing it yourself but a helper is advisable.
If you do not have the skills then you could print out these instructions and take it to someone who can.
In addition to what is required to remove and refinish the leaf springs in the previous article this is what you will need:
Do not purchase the rolls of Poly Liner, it will not be needed.
Access to a decent 1Hp Drill Press.
2) 7/16" COBALT Drill Bits (Home Depot, Rigid brand)
20) Polyurethane Spring Tip Inserts (2 required for each leaf) Spring Shop
Cooling lubricant for drill
To prepare your springs you need to follow the instructions from my previous article up to the beginning of Part-2 to start with smooth springs.
https://www.dieseltruckresource.com/...d.php?t=207334
Now as before the most important thing is Safety.
Just let me say this once more and then we will get started.
FIRST find a place you can work on the truck that is flat and level as possible, this is important for safety also find a place where you can be safe from people walking around you last thing you would want is for some kids to get hurt or your wife or GF bump your truck off the jack with you under it.
Safety First, Chock the front wheels.
Then get into the truck and take it out of gear and let it roll onto the chock to wedge the wheel tight.
Loading the Chock like this prevents the truck from having to roll into the chock to have to stop at a critical moment when several inches of movement could end in disaster.
Now I did both sides at the same time but I would suggest only one at a time so the will have a sample if something goes wrong.
You will need a good floor jack and a set of 6 Ton Jack Stands that will support the weight of the back of the truck safely.
Although it might be tempting, Never, Never, Never use Cinder Blocks to support anything you are going to get underneath.
Ok lets get to work.
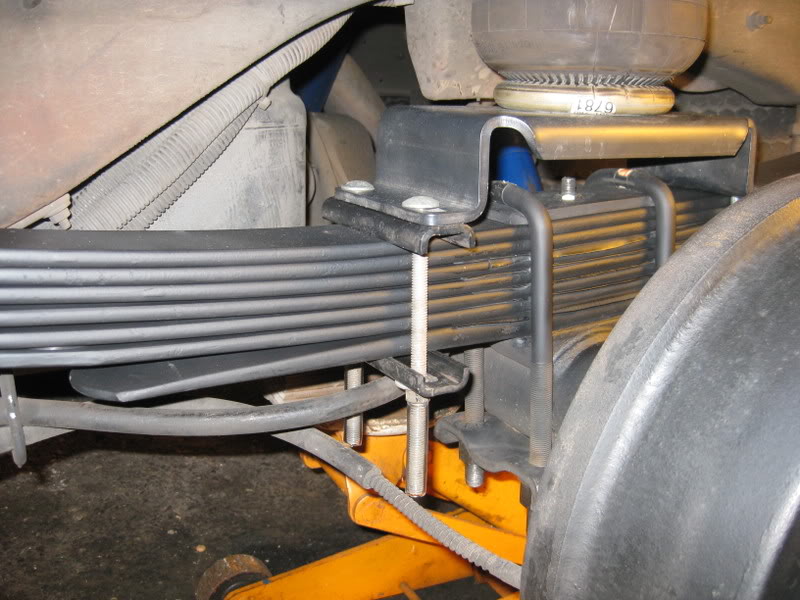
Jack up the truck by the frame as high as you can get it and support the frame in front of the rear axle is preferred but you can also support it at the rear of the frame.
Then lower the jack and then shake the truck a bit to make sure it is secured.
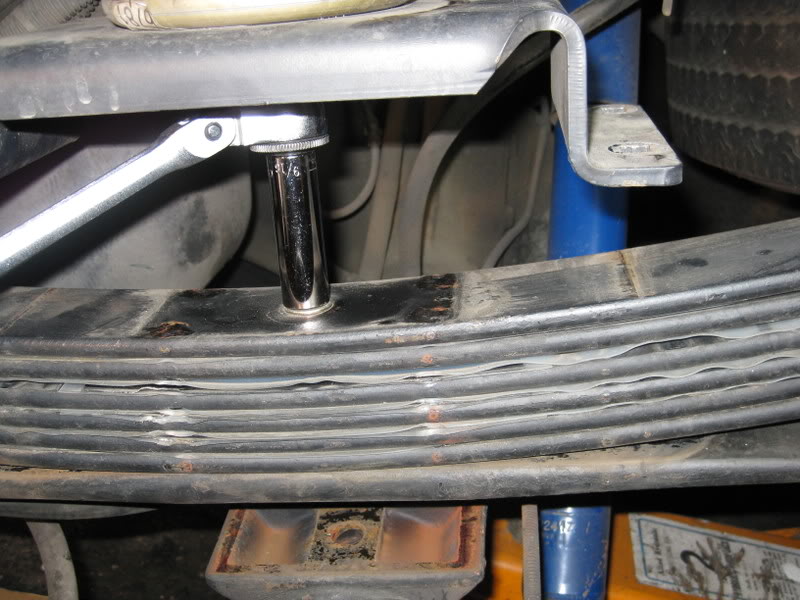
Then using your floor jack from the rear support the axle tubes at either side of the differential (I used a block of 2X4 on the cradle of the jack) Remove both rear tires and get then safely out of the way.
Leave the jack under the axle with the wheels remove and then slowly jack up the axle until it is not hanging from the spring.
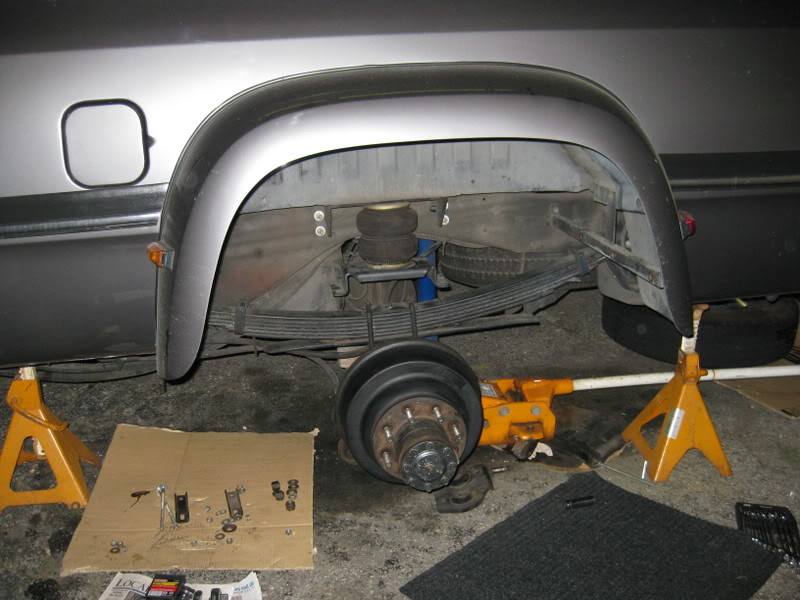
Here you can see how the liners I had installed were starting to take their toll.
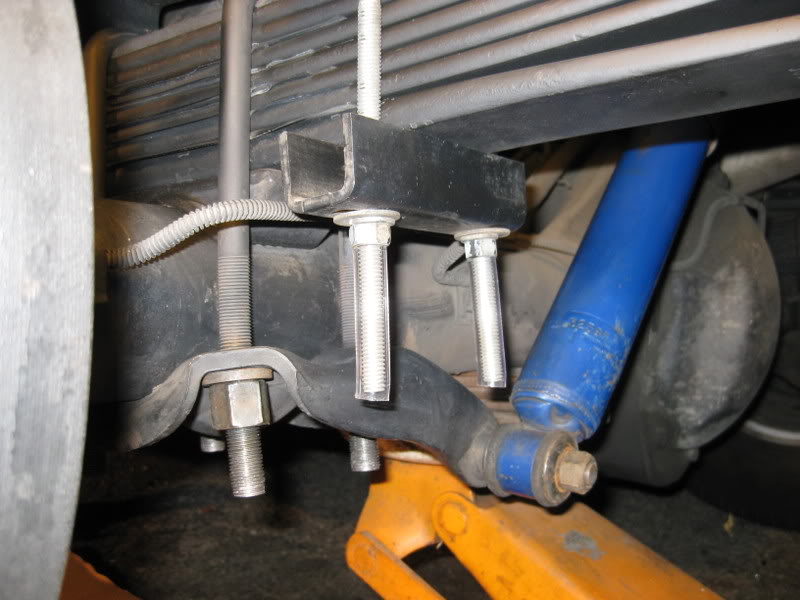
So now if you have them you will need to remove all of the lower mounting hardware for your Air Bags, just the 4 bolts and then remove the center bolt from the Air Bag and remove the lower bracket and set it aside.
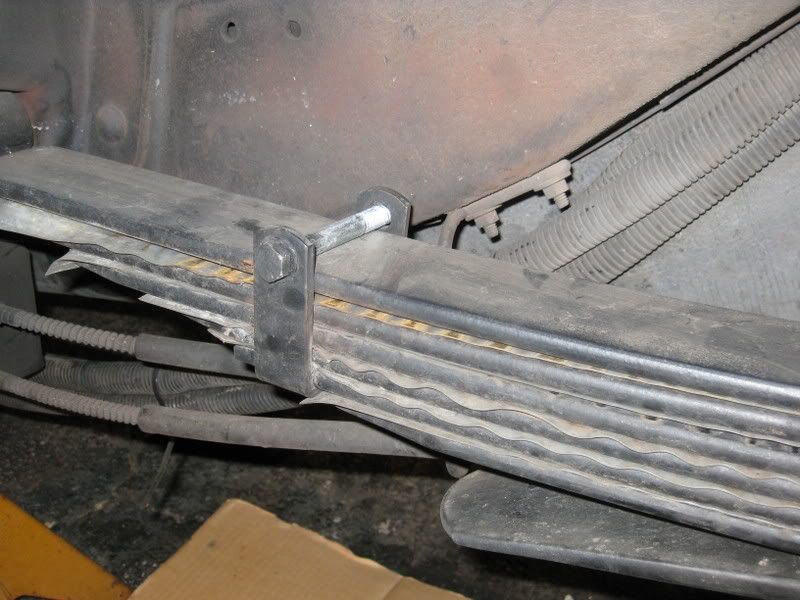
You will also need to remove the 2) 3/8� nuts from the bolts from the spring clamp, but leave the bolts in place for now.
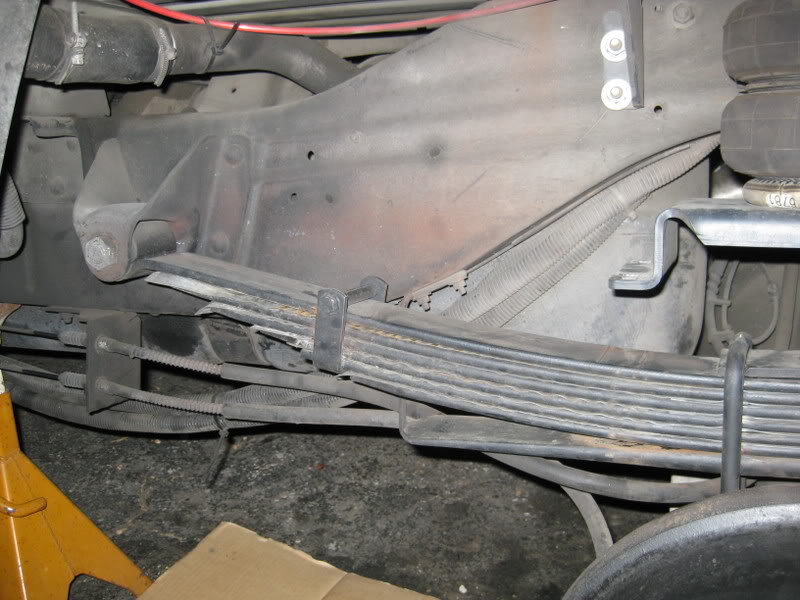
Also do the same for the rear spring clamp and again leave the bolt in place for now.
Remove your Mud Flaps if you have them
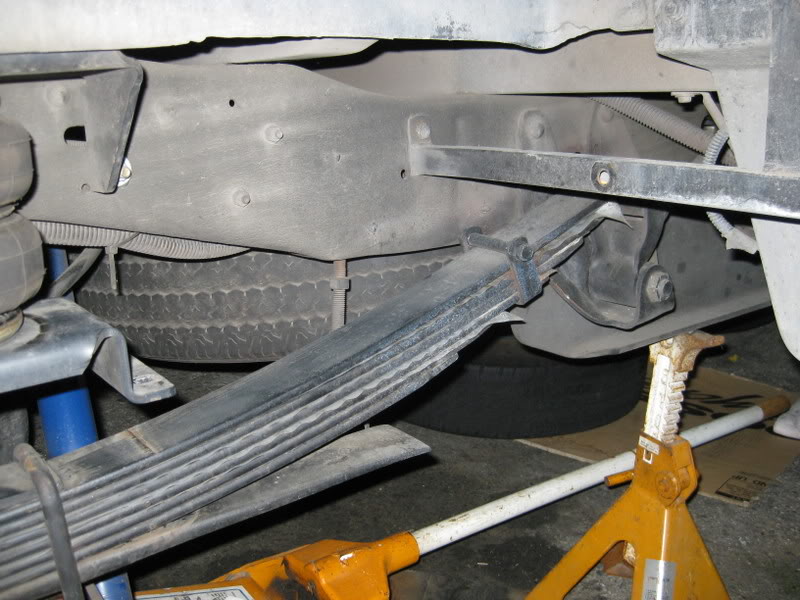
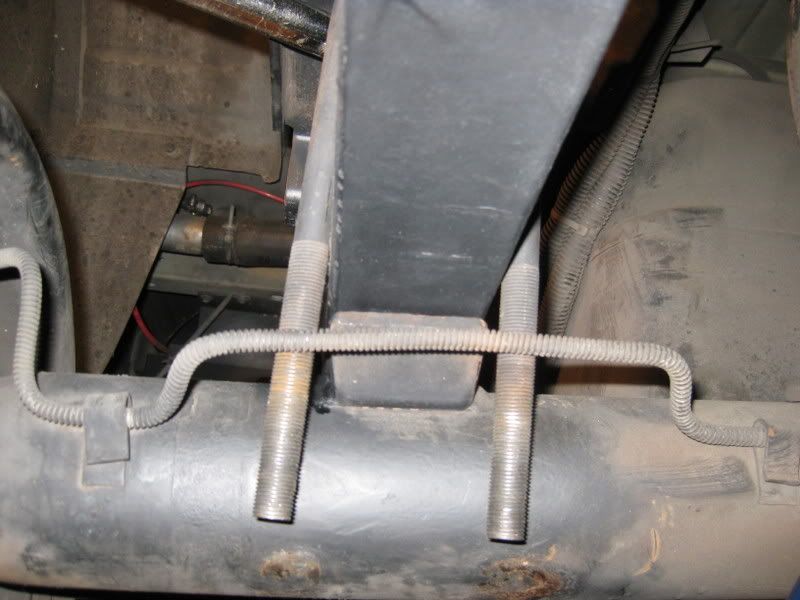
Using a wire brush clean off the threads of your U-bolts and lubricate them with a shot of WD-40, PB Blaster or even some Diesel Fuel and let it soak in.
Remove your lower shock absorber nut, washer and then release the lower end of the shock.
Caution.
If you have a Gas Charges Shock make sure to keep clear of its path as it is extending as it can easily injure you.
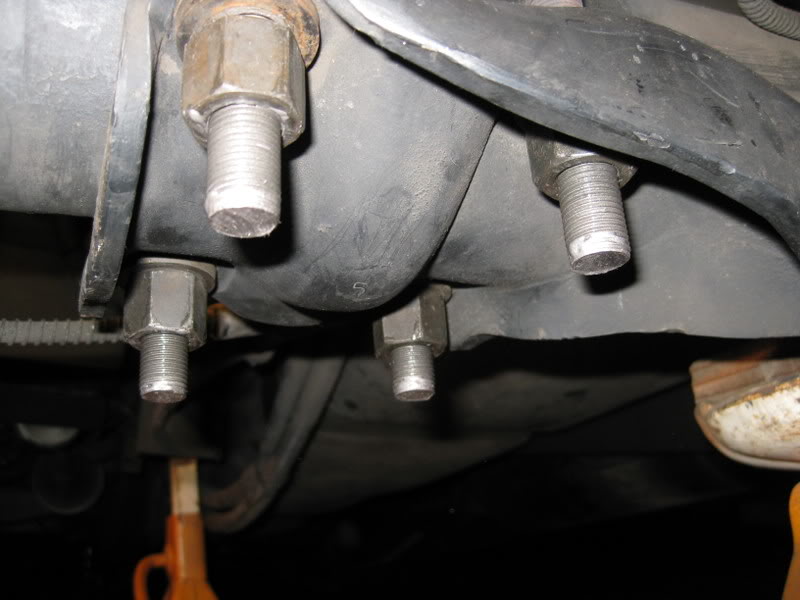
Using an impact wrench loosen up the 4 nuts from the U-bolts and carefully remove them taking care not to gall them and ruin the U-bolt.
If they show and signs of damage, REPLACE them.
After the nuts were removed then carefully remove the lower bracket and set it aside.
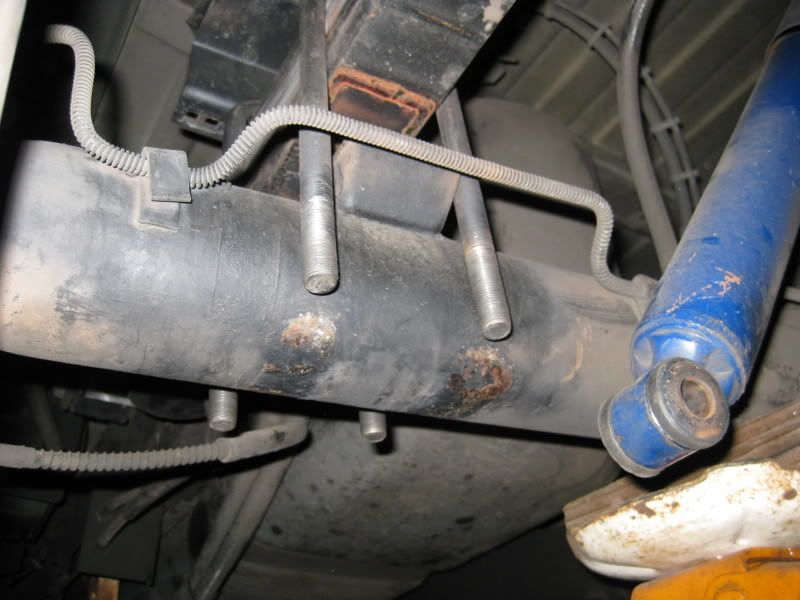
This is why I recommend that you removed the lower Air Bag bracket.
Now is the time when you want to loosen the 3/8� nut on the center bolt.
You might need to lower the axle down a bit and secure the head of the center pin with a pair of Vice-Grips. (Incase you did not know, the head of the bolt is round like with no flats.)
Now you can lower the axle down until you have about 3 or 4 inches between the spring and the top of the spring perch.
Now is when a helper would be dandy or it can be easily done by yourself.
First a word about leaf springs, depending on the condition of your existing springs, spring rate, if they are not stock but are an aftermarket LIFT spring, Arch height.
While they are compressed into the pack they can exert THOUSANDS of pounds of explosive force if the center bolt containing them was suddenly released.
Without paying the proper attention to restrain them with a clamp or press the results could easily become fatal.
First the most important think to know is NEVER get any body part near or in the possible path of a flying piece of steel.
Especially your HEAD, they can always amputate a hand or fingers but your head always seems to explode when it is hit.
A careless move can end in only seconds.
The spring shop where I get my parts from assembles the new packs with a big hydraulic press that squeezes them together while the center bolt in installed and you can see the holes in the ceiling and walls where wayward leaves have exited the building.
I am not trying to scare you so you don�t try to do this fix but I am just saying to PLEASE be careful.
On our Dually you will probably be able to compress them with one good grip but this fix is for all for our trucks both 2 and 4 wheel drive.
So check out the situation according to what your springs look like.
Ok I am finished with my morally required PSA.
Ok so now you want to carefully jack up the axle and take the weight off the spring until you can easly remove the bolts from both of the spring clamps.
Now you can remove the 3/8� nut from the center bolt and then have a helper slowly lower the axle until the lower set of springs drop away from the remaining spring.
Take it down low enough to have a few inches between the top 2 and then reach in and reinstall the nut so you can retain the remaining springs.
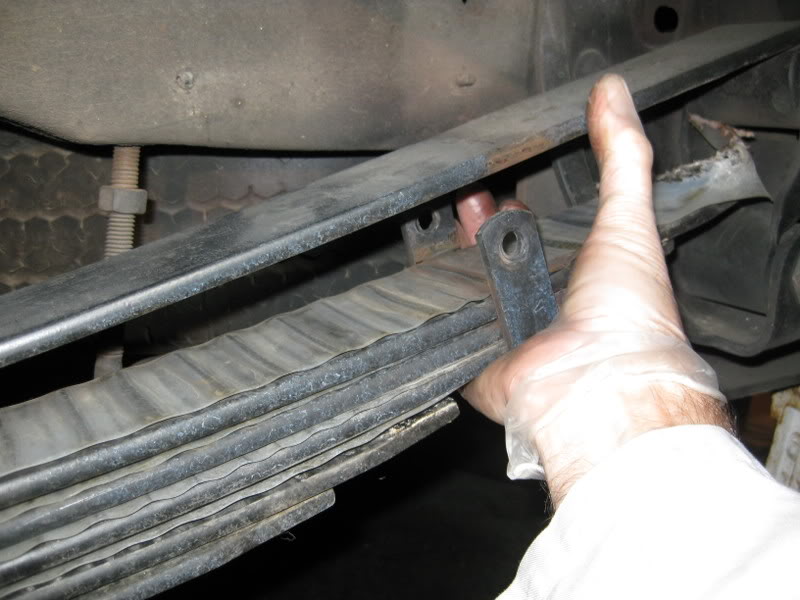
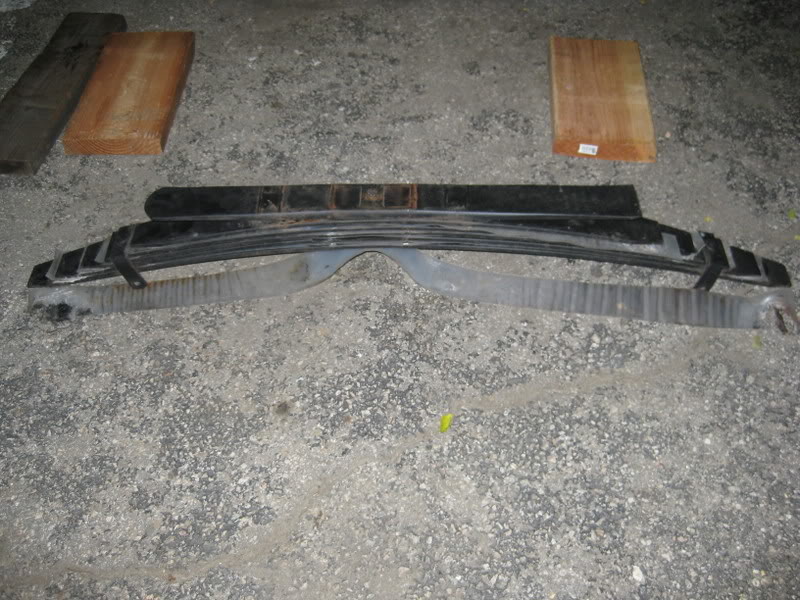
Now you can tip the entire pack outward and then carefully lift the entire spring pack out from behind the brake drum and place it onto the ground on top of a couple of pieces of 2x6 blocks of wood.
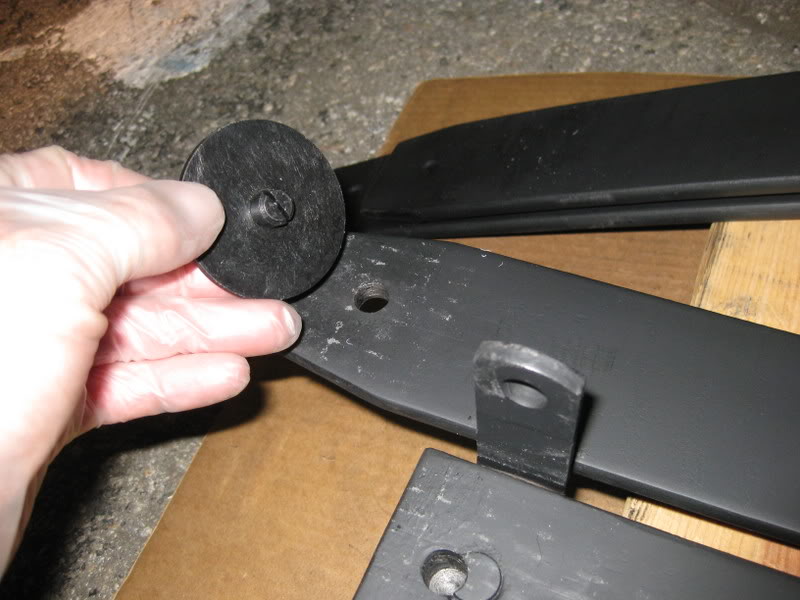
Now for the big moment you have been waiting for after anxiously reading through my story wondering what these things look like.
Here is my magical cure for the terrible ride I have putting up with since 1999.
Yes it is these little Polyurethane Spring Tip Bushings.
If you look on any of the newer trucks you will find them hidden in-between each leaf.
Installing Spring Tip Inserts.
As all of you know I have been in search for the reason that we all have such a rough ride on our 1st.Gen trucks.
In my previous article I removed the spring packs and after removing all of the leaves I then ground off all of the rough surfaces and then polished them to a smooth finish.
I then installed a poly-liner between each leaf before I reassembled the pack.
This made quite an improvement in the quality of the ride over what I had.
Now over time my ride has slowly degraded and was now experiencing a somewhat harsh ride in addition to the sound levels in the cab being noticeable higher.
I knew at the time this was not going to be a permanent fix and I was looking for something better.
After looking under a lot of trucks and asking lots of questions I knew what I had to do.
Actually it was an idea I already had but I needed to figure out how to do it.
Instead of the Poly-Liner that I used in-between each leaf I am going to install a Spring Tip Insert at the tip of each leaf.
Now the only problem with doing that is our leaves do not have the required 7/16� hole at the end of the leaf for the insert to snap into.
Now you know that a little problem like that won�t stop me, I just had to figure out how to drill holes in my springs, and then find a way to come up a simpler way to show all of you how to do it.
Actually the answer was quite simple and you can do it at home.
So today I am going to show you how to remove your leaf springs, drill holes in the tips and install Polyurethane Spring Tip Inserts for a Smooth Ride.
Assuming you have the required skill and knowledge to perform this repair you should have no problems doing it yourself but a helper is advisable.
If you do not have the skills then you could print out these instructions and take it to someone who can.
In addition to what is required to remove and refinish the leaf springs in the previous article this is what you will need:
Do not purchase the rolls of Poly Liner, it will not be needed.
Access to a decent 1Hp Drill Press.
2) 7/16" COBALT Drill Bits (Home Depot, Rigid brand)
20) Polyurethane Spring Tip Inserts (2 required for each leaf) Spring Shop
Cooling lubricant for drill
To prepare your springs you need to follow the instructions from my previous article up to the beginning of Part-2 to start with smooth springs.
https://www.dieseltruckresource.com/...d.php?t=207334
Now as before the most important thing is Safety.
Just let me say this once more and then we will get started.
FIRST find a place you can work on the truck that is flat and level as possible, this is important for safety also find a place where you can be safe from people walking around you last thing you would want is for some kids to get hurt or your wife or GF bump your truck off the jack with you under it.
Safety First, Chock the front wheels.
Then get into the truck and take it out of gear and let it roll onto the chock to wedge the wheel tight.
Loading the Chock like this prevents the truck from having to roll into the chock to have to stop at a critical moment when several inches of movement could end in disaster.
Now I did both sides at the same time but I would suggest only one at a time so the will have a sample if something goes wrong.
You will need a good floor jack and a set of 6 Ton Jack Stands that will support the weight of the back of the truck safely.
Although it might be tempting, Never, Never, Never use Cinder Blocks to support anything you are going to get underneath.
Ok lets get to work.
Jack up the truck by the frame as high as you can get it and support the frame in front of the rear axle is preferred but you can also support it at the rear of the frame.
Then lower the jack and then shake the truck a bit to make sure it is secured.
Then using your floor jack from the rear support the axle tubes at either side of the differential (I used a block of 2X4 on the cradle of the jack) Remove both rear tires and get then safely out of the way.
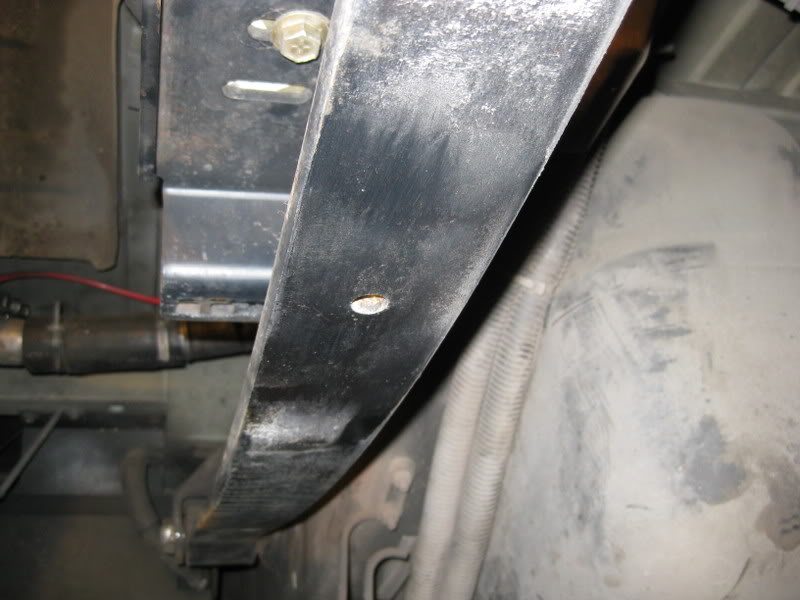
Leave the jack under the axle with the wheels remove and then slowly jack up the axle until it is not hanging from the spring.
Here you can see how the liners I had installed were starting to take their toll.
So now if you have them you will need to remove all of the lower mounting hardware for your Air Bags, just the 4 bolts and then remove the center bolt from the Air Bag and remove the lower bracket and set it aside.
You will also need to remove the 2) 3/8� nuts from the bolts from the spring clamp, but leave the bolts in place for now.
Also do the same for the rear spring clamp and again leave the bolt in place for now.
Remove your Mud Flaps if you have them
Using a wire brush clean off the threads of your U-bolts and lubricate them with a shot of WD-40, PB Blaster or even some Diesel Fuel and let it soak in.
Remove your lower shock absorber nut, washer and then release the lower end of the shock.
Caution.
If you have a Gas Charges Shock make sure to keep clear of its path as it is extending as it can easily injure you.
Using an impact wrench loosen up the 4 nuts from the U-bolts and carefully remove them taking care not to gall them and ruin the U-bolt.
If they show and signs of damage, REPLACE them.
After the nuts were removed then carefully remove the lower bracket and set it aside.
This is why I recommend that you removed the lower Air Bag bracket.
Now is the time when you want to loosen the 3/8� nut on the center bolt.
You might need to lower the axle down a bit and secure the head of the center pin with a pair of Vice-Grips. (Incase you did not know, the head of the bolt is round like with no flats.)
Now you can lower the axle down until you have about 3 or 4 inches between the spring and the top of the spring perch.
Now is when a helper would be dandy or it can be easily done by yourself.
First a word about leaf springs, depending on the condition of your existing springs, spring rate, if they are not stock but are an aftermarket LIFT spring, Arch height.
While they are compressed into the pack they can exert THOUSANDS of pounds of explosive force if the center bolt containing them was suddenly released.
Without paying the proper attention to restrain them with a clamp or press the results could easily become fatal.
First the most important think to know is NEVER get any body part near or in the possible path of a flying piece of steel.
Especially your HEAD, they can always amputate a hand or fingers but your head always seems to explode when it is hit.
A careless move can end in only seconds.
The spring shop where I get my parts from assembles the new packs with a big hydraulic press that squeezes them together while the center bolt in installed and you can see the holes in the ceiling and walls where wayward leaves have exited the building.
I am not trying to scare you so you don�t try to do this fix but I am just saying to PLEASE be careful.
On our Dually you will probably be able to compress them with one good grip but this fix is for all for our trucks both 2 and 4 wheel drive.
So check out the situation according to what your springs look like.
Ok I am finished with my morally required PSA.
Ok so now you want to carefully jack up the axle and take the weight off the spring until you can easly remove the bolts from both of the spring clamps.
Now you can remove the 3/8� nut from the center bolt and then have a helper slowly lower the axle until the lower set of springs drop away from the remaining spring.
Take it down low enough to have a few inches between the top 2 and then reach in and reinstall the nut so you can retain the remaining springs.
Now you can tip the entire pack outward and then carefully lift the entire spring pack out from behind the brake drum and place it onto the ground on top of a couple of pieces of 2x6 blocks of wood.
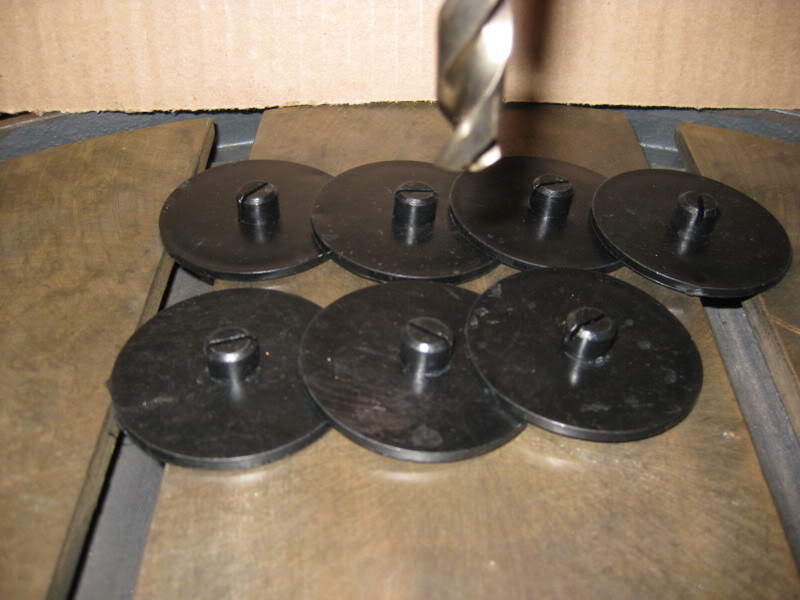
Now for the big moment you have been waiting for after anxiously reading through my story wondering what these things look like.
Here is my magical cure for the terrible ride I have putting up with since 1999.
Yes it is these little Polyurethane Spring Tip Bushings.
If you look on any of the newer trucks you will find them hidden in-between each leaf.
Thread Starter
Administrator
Joined: Nov 2004
Posts: 4,084
Likes: 235
From: Southern California
Part-2
Ok now that you know that I need to somehow get some holes into the ends of each of my springs.
Now you are probably thinking how is he going to do that, it is actually easier than you think if you have the right equipment.
First of all Leaf Springs are made out of extremely hard steel in fact it is called Spring Steel so to be able to drill a hole through hardened steel you are going to need a drill bit that it harder than the spring.
The answer if you haven�t already guessed it is COBALT.
They are readily available at most well stocked hardware stores.
I bought mine at Home Depot and of all the different brands they carry the only ones that were COBALT were sold by RIGID and were $17.99 apiece.
You are going to need to get yourself 2 of them for this project.
First of all to drill them you are going to need a Drill Press. I had to go out and buy myself a nice Craftsmen floor model because I need it.
There is no way you could drill these holes with a hand drill other than if you had a Magnetic Base Drill in your workshop.
Next I needed some way to hold the leaf and position it consistently and be able to secure the weight of the entire length onto the table of my drill press.
That was the easy part.
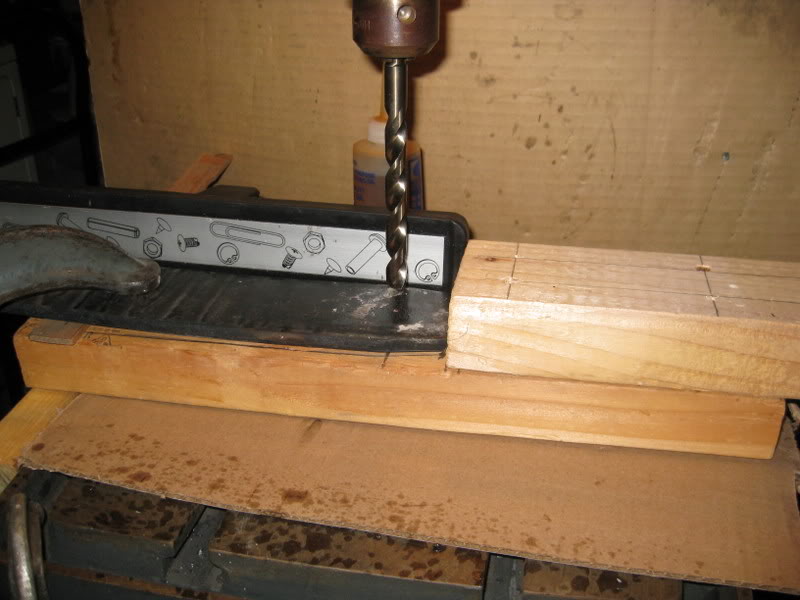
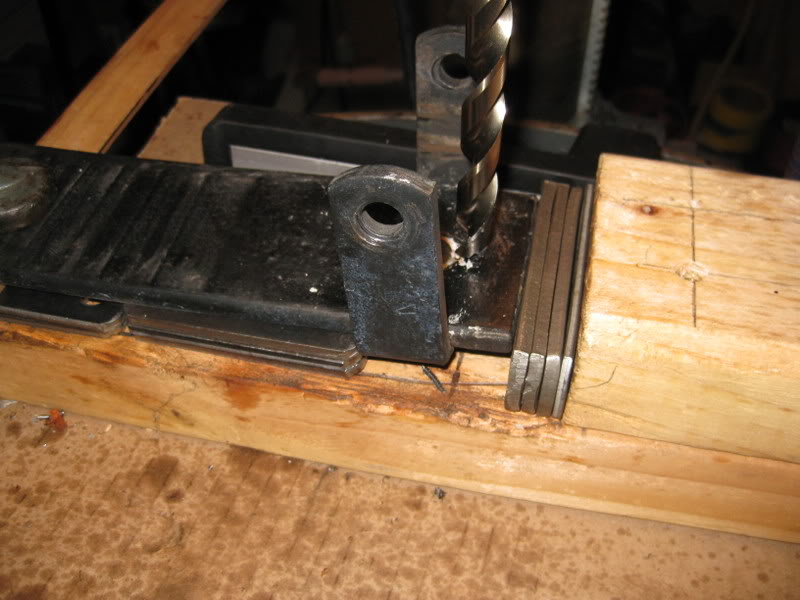
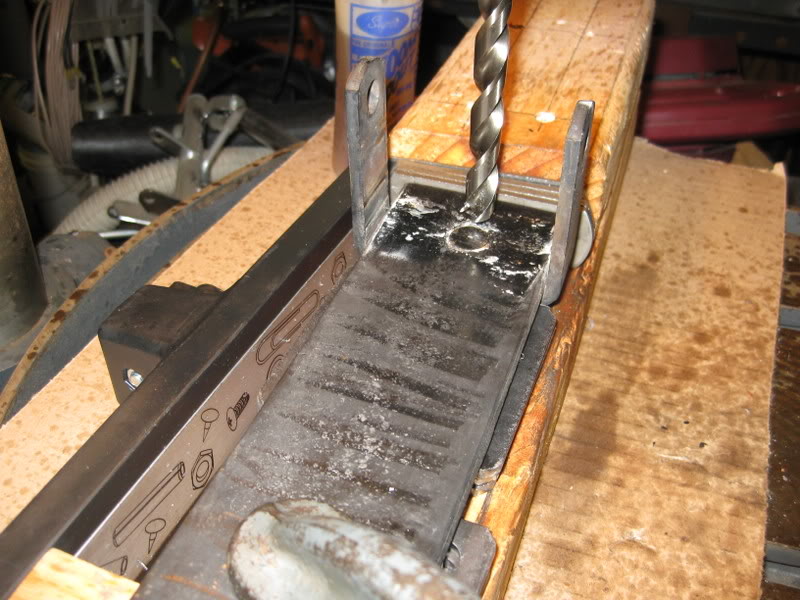
Using several blocks of 2x4 I made a simple jig and clamped it to the edge of the table, now all I have to do is to butt the end of the spring against the stop, align it in-between 2 lines and hold it with a big C-clamp.
The long black and silver thing in the background is a magnet to catch the curls as they leave the drill bit.
Notice the shim to the left of the clamp; this is needed to keep the spring tip flat because of the arch.
I drilled the 7/16� hole 1�� from the edge of the leaf and directly in the center of the width.
This is not critical but you want to keep them close to the end because this where the contact point is once they are reassembled.
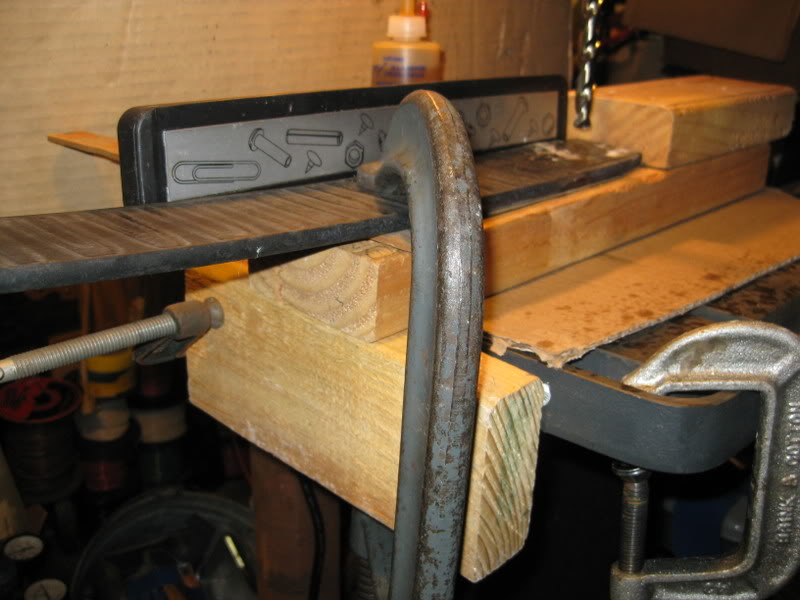
Here you can see how the jig is secured to the table of the drill press with the smaller C-clamp on the left and the larger one to secure the leaf itself.
Also out of view where I supported the opposite end of the leaf over the top of a trash dolly with 2 pairs of Vice-Grips as guides. You can be creative here.
Now to drill the holes.
First: You need to use the lowest speed your drill press can go. I set mine on 200 RPM.
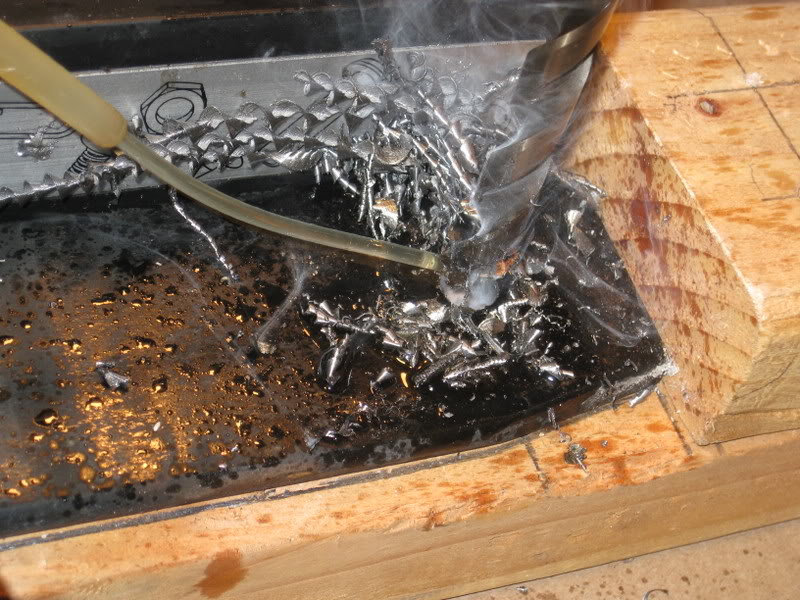
Second: You must use lubrication and must keep the drill bit COOL or you will burn it up
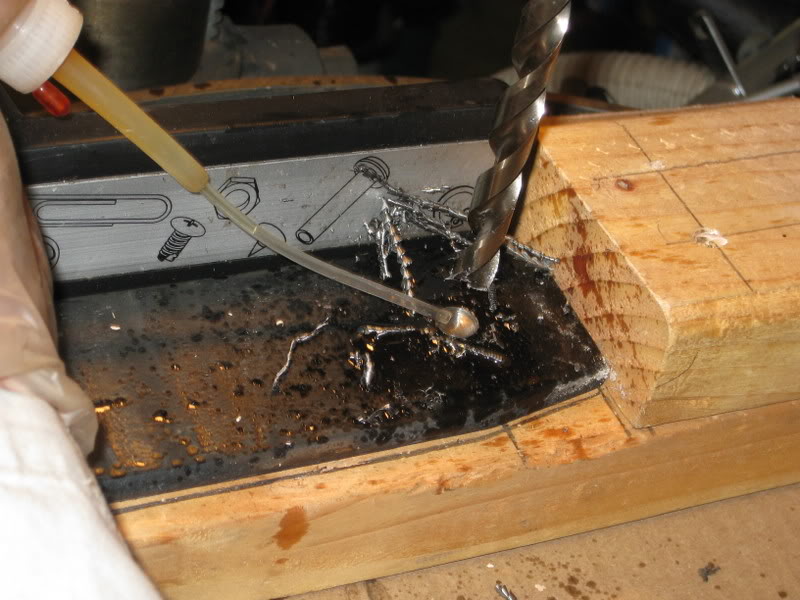
Drop a puddle of oil on the spot and bringing the drill into the metal start adding some force for a few seconds and then let up, add more oil and then keep repeating this process until the hole is almost through, more oil and then ease the drill bit through the last part of the spring.
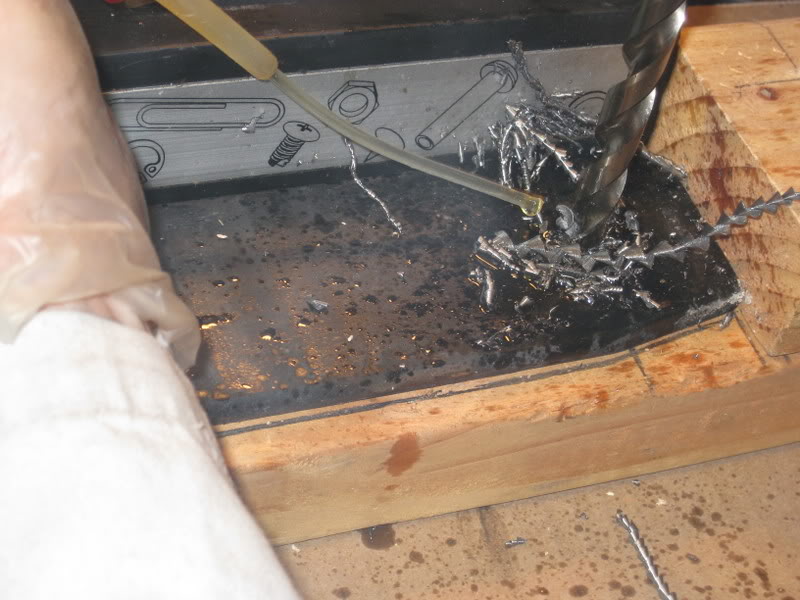
Then I backed up the drill, turned it OFF and ran some cool oil down the flutes of the drill bit to cool it off.
The hole is done; after I got the system down I could jig up the leaf, clamp it down and drill the hole in about 5 minutes for each spring tip.
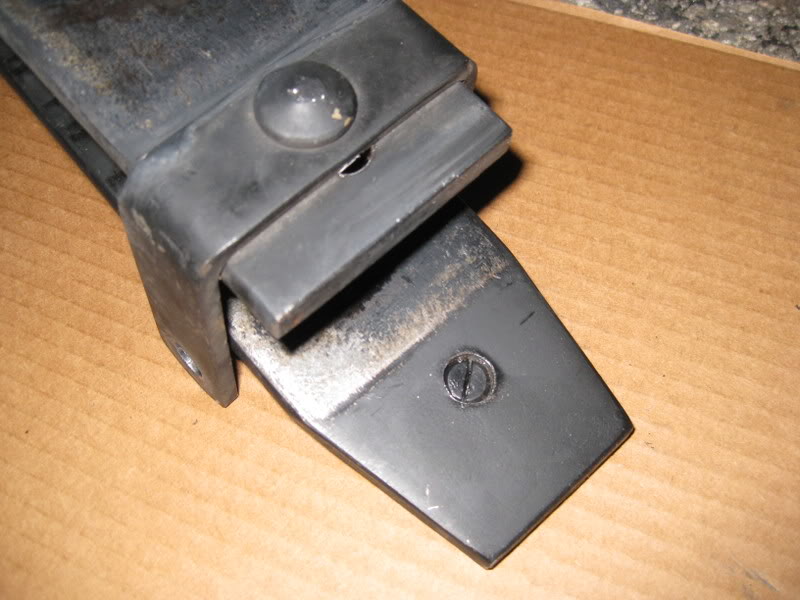
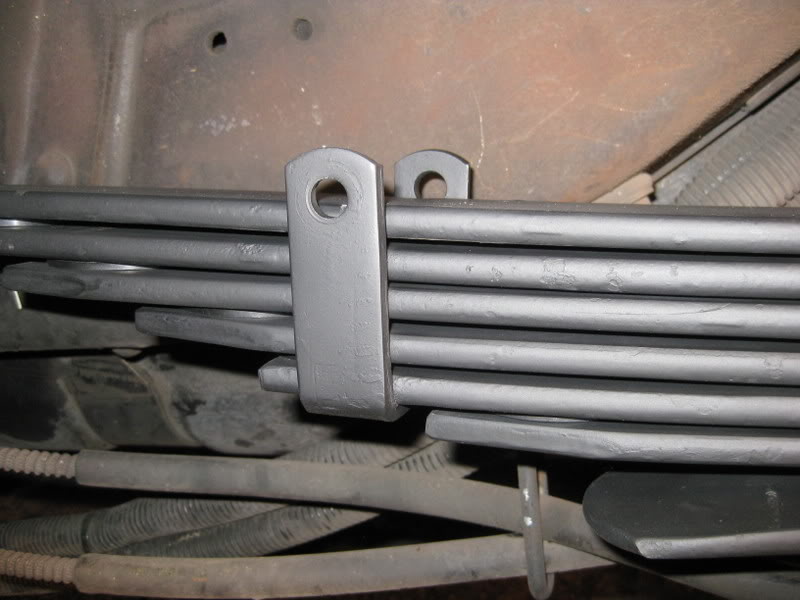
Now on the spring pack there are 2 clamps at opposite ends of 2 adjoining leaves and since there were only 4 holes to drill I didn�t figure I would need to make a separate jig so I improvised and used a couple of pieces of steel to create an alternate stop on the jig, this worked just as I planned
On this end of the leaf there was a rivet in the way that held the clamp on so I moved it a bit closer to the end at ��. This hole actually took out the edge of the rivet but it was fine.
Yes I planed it that way.
See how the edge of the leaf will contact the adjoining leaf? This is where the bushing will now be.
My springs have been polished and the edges chamfered and it still wore into the leaf, you should look at what your spring pack looks like.
After I got all of the holes drilled I wiped each one down using lacquer thinner to remove all of the lubricating oil and then I deburred both sides of the holes, then I laid it flat and hand polished the ends till they were nice and smooth to the touch.
I could have used the grinder and flap wheel here but I chose to do it by hand, also it was around midnight.
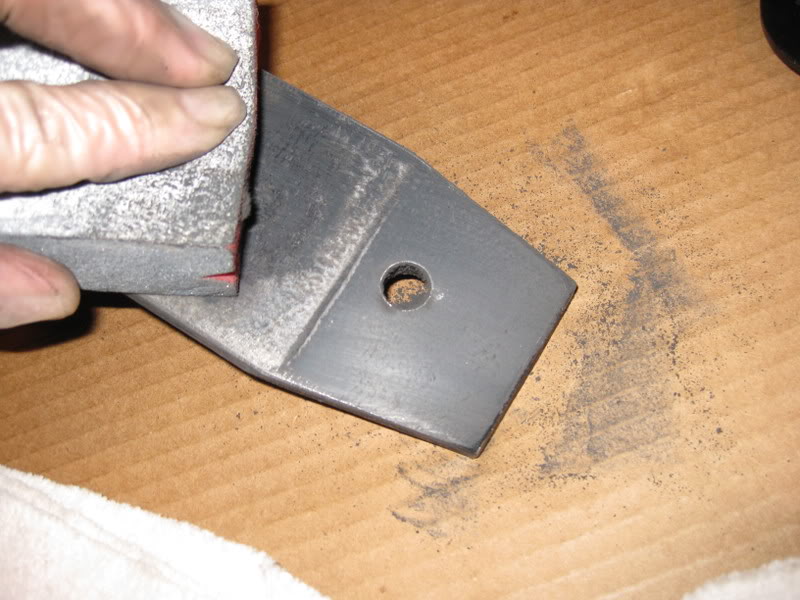
Then after they were all ground and polished I wiped them down again and then sprayed them using Rust-Oleum Rust Reformer Paint taking care to not leave any bare steel exposed.
Ok now that you know that I need to somehow get some holes into the ends of each of my springs.
Now you are probably thinking how is he going to do that, it is actually easier than you think if you have the right equipment.
First of all Leaf Springs are made out of extremely hard steel in fact it is called Spring Steel so to be able to drill a hole through hardened steel you are going to need a drill bit that it harder than the spring.
The answer if you haven�t already guessed it is COBALT.
They are readily available at most well stocked hardware stores.
I bought mine at Home Depot and of all the different brands they carry the only ones that were COBALT were sold by RIGID and were $17.99 apiece.
You are going to need to get yourself 2 of them for this project.
First of all to drill them you are going to need a Drill Press. I had to go out and buy myself a nice Craftsmen floor model because I need it.
There is no way you could drill these holes with a hand drill other than if you had a Magnetic Base Drill in your workshop.
Next I needed some way to hold the leaf and position it consistently and be able to secure the weight of the entire length onto the table of my drill press.
That was the easy part.
Using several blocks of 2x4 I made a simple jig and clamped it to the edge of the table, now all I have to do is to butt the end of the spring against the stop, align it in-between 2 lines and hold it with a big C-clamp.
The long black and silver thing in the background is a magnet to catch the curls as they leave the drill bit.
Notice the shim to the left of the clamp; this is needed to keep the spring tip flat because of the arch.
I drilled the 7/16� hole 1�� from the edge of the leaf and directly in the center of the width.
This is not critical but you want to keep them close to the end because this where the contact point is once they are reassembled.
Here you can see how the jig is secured to the table of the drill press with the smaller C-clamp on the left and the larger one to secure the leaf itself.
Also out of view where I supported the opposite end of the leaf over the top of a trash dolly with 2 pairs of Vice-Grips as guides. You can be creative here.
Now to drill the holes.
First: You need to use the lowest speed your drill press can go. I set mine on 200 RPM.
Second: You must use lubrication and must keep the drill bit COOL or you will burn it up
Drop a puddle of oil on the spot and bringing the drill into the metal start adding some force for a few seconds and then let up, add more oil and then keep repeating this process until the hole is almost through, more oil and then ease the drill bit through the last part of the spring.
Then I backed up the drill, turned it OFF and ran some cool oil down the flutes of the drill bit to cool it off.
The hole is done; after I got the system down I could jig up the leaf, clamp it down and drill the hole in about 5 minutes for each spring tip.
Now on the spring pack there are 2 clamps at opposite ends of 2 adjoining leaves and since there were only 4 holes to drill I didn�t figure I would need to make a separate jig so I improvised and used a couple of pieces of steel to create an alternate stop on the jig, this worked just as I planned
On this end of the leaf there was a rivet in the way that held the clamp on so I moved it a bit closer to the end at ��. This hole actually took out the edge of the rivet but it was fine.
Yes I planed it that way.
See how the edge of the leaf will contact the adjoining leaf? This is where the bushing will now be.
My springs have been polished and the edges chamfered and it still wore into the leaf, you should look at what your spring pack looks like.
After I got all of the holes drilled I wiped each one down using lacquer thinner to remove all of the lubricating oil and then I deburred both sides of the holes, then I laid it flat and hand polished the ends till they were nice and smooth to the touch.
I could have used the grinder and flap wheel here but I chose to do it by hand, also it was around midnight.
Then after they were all ground and polished I wiped them down again and then sprayed them using Rust-Oleum Rust Reformer Paint taking care to not leave any bare steel exposed.
Thread Starter
Administrator
Joined: Nov 2004
Posts: 4,084
Likes: 235
From: Southern California
Part-3
Now that the paint had had time to dry it is now time the install the Polyurethane Spring Tip Inserts into the holes we just drilled.
Here on the underside you can see how they are secured to the leaf, the protrusion will snap into the 7/16� hole snugly and keep it in its place as it now sits at the tip of each leaf.
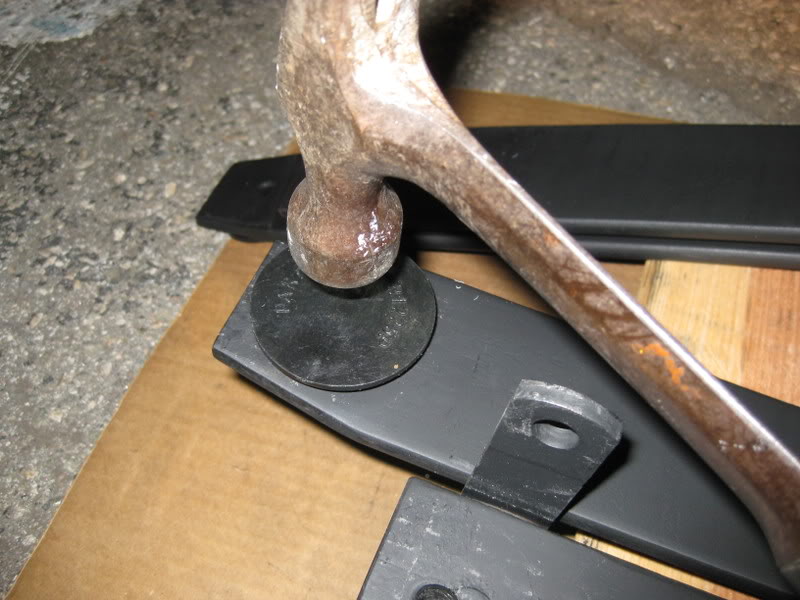
After you press the Insert into the hole and you have it lined up the way you want it then you need to tap it into the hole with a gentle tap of a hammer and seat it flat onto the leaf.
Now with a trial fit with all of the leaves in the pack you can now see how they are going to work.
Now instead of the tips of the leaves scraping into its adjoining leaf as the leaf spring compresses and rebounds we now have 2 pieces of spring steel sliding across the surface of each other with a disc of Polyurethane to greatly reduce the friction.
One thing I will have to tell you, when I was stacking the leaves to put them all together they were slipping all over the place as I was trying to line up the hole for the center bolt.
With 2 fingers I could slide the entire weight of all of the leaves across itself with almost no effort.
Then I took it apart again and set them out on a piece of corrugated I begin to assemble the spring pack from the top down by cradling the largest leaf between 2 pieces of 2x6, I would lay down a piece of liner and then the metal spacer, then liner and then the next leaf doing this until I was to the overload leaf.
Then I inserted the Center Bolt, washer and nut.
Again remember:
One of the requirements for this modification to work is that you need to follow my instructions up to the beginning of Part-2
https://www.dieseltruckresource.com/...d.php?t=207334
You must grind all of the leaves of all of the rough surfaces and the friction surfaces must be polished to a slick finish.
The polyurethane inserts are going to wear after time but by removing all of the rough abrasive surfaces rust the spring will be allowed to compress and rebound effortsly and quietly and not be grinding into the surface of the insert.
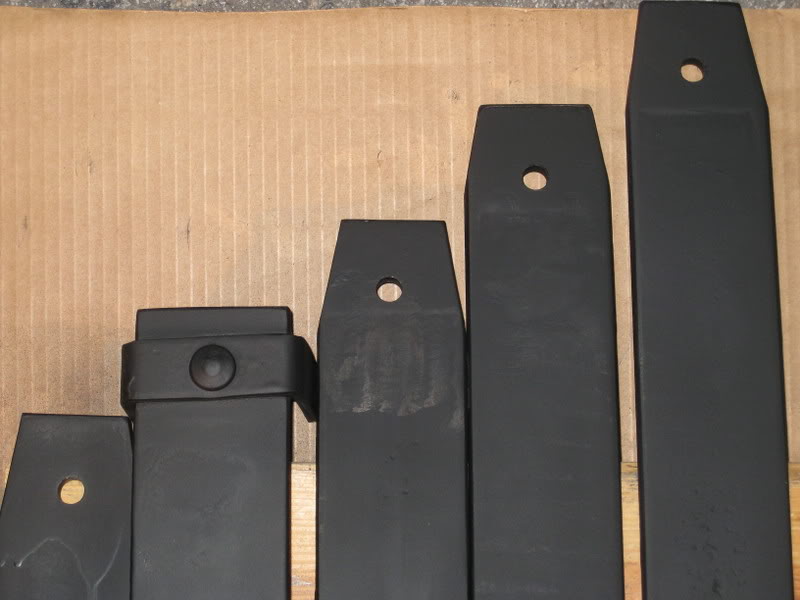
Here is a closer view of the temporarily reassembled spring pack.
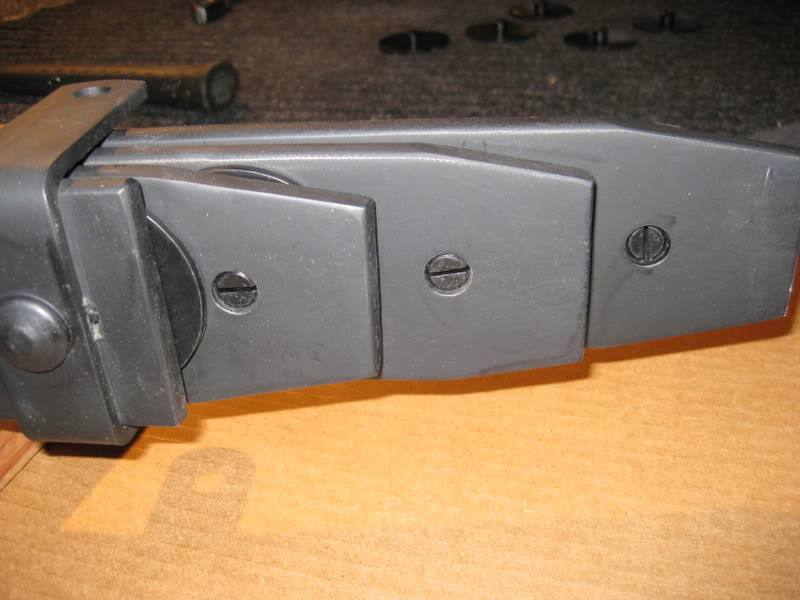
Now we must pay some attention the main leaf that is still installed on the truck, No inserts will go here but its surface is going to get the same treatment and be polished.
It was then wiped down using lacquer thinner and after a quick masking job it was coated using several coats of Rust-Oleum Semi Flat Paint.
Now we return it to the truck and reinstall it in the reverse order of the disassembly.
After you set the spring pack back on top of the perch then remove the nut and washer from the center bolt and then with a helper carefully lift the entire pack up to the main leaf guiding the bolt through the hole.
At this time you can help hold the leaves up by inserting the bolt through the clamps.
You can now reinstall the washer and nut onto the center bolt and then snug it up.
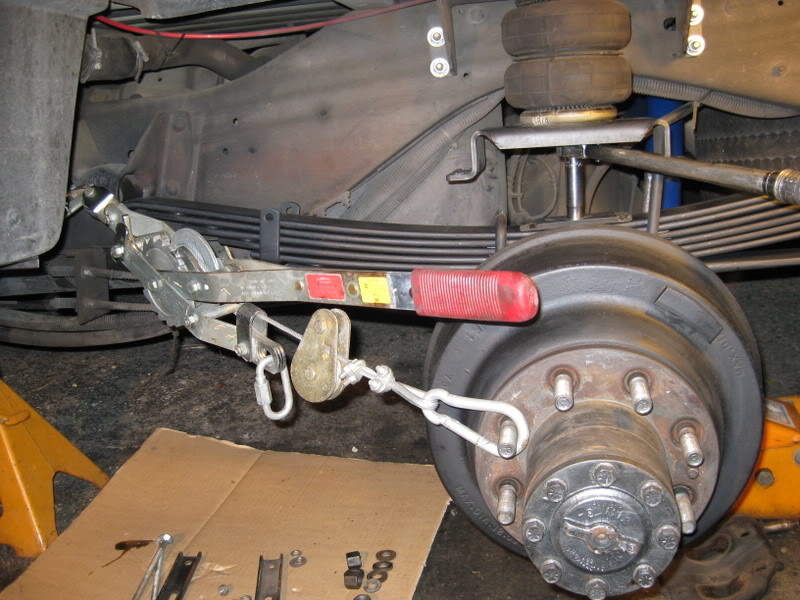
After you get the leaves lined up you need to raise the axle back into place and trying to line up the head of the center bolt into the hole in the middle of the perch.
Now drop the U-bolts over the leaves, you will probably have to jog the leaves around to get the U-bolts to drop in.
I used a Come-Along to pull my axle back into position and then used a big screwdriver to move the pack till it dropped into the hole.
Keep your body parts out of the way.
Make sure the steel plate is under the top of the U-bolts; it has a hole in the center where the nut and washer will protrude through.
When you are sure the U-bolts will line up then you need to torque the nut on the Center Bolt to 70-Foot Pounds.
Make sure the rear U-bolt goes between the axle tube and the brake line, on the front it will go behind the parking brake cable.
Then while lying under the truck reinstall the lower cover and shock bracket and move it all of the way up to the axle taking care not to damage the threads.
I used some Silver Anti-Seize to the insides of the nuts and then threaded them onto the ends of the 4 bolts.
I used the impact wrench and carefully ran them onto the bolts but stopped before it touched the bracket.
After making sure it was on straight I tightened them up by hand making sure the bracket was on level and all 4 bolts were about the same length, then I tightened them up using the impact wrench to about 90-Foot Pounds.
Using my Torque Wrench I tightened them all to 100 foot-pounds.
I will check and re-torque then at least twice in the next week because the liner material will compress.
Now that the paint had had time to dry it is now time the install the Polyurethane Spring Tip Inserts into the holes we just drilled.
Here on the underside you can see how they are secured to the leaf, the protrusion will snap into the 7/16� hole snugly and keep it in its place as it now sits at the tip of each leaf.
After you press the Insert into the hole and you have it lined up the way you want it then you need to tap it into the hole with a gentle tap of a hammer and seat it flat onto the leaf.
Now with a trial fit with all of the leaves in the pack you can now see how they are going to work.
Now instead of the tips of the leaves scraping into its adjoining leaf as the leaf spring compresses and rebounds we now have 2 pieces of spring steel sliding across the surface of each other with a disc of Polyurethane to greatly reduce the friction.
One thing I will have to tell you, when I was stacking the leaves to put them all together they were slipping all over the place as I was trying to line up the hole for the center bolt.
With 2 fingers I could slide the entire weight of all of the leaves across itself with almost no effort.
Then I took it apart again and set them out on a piece of corrugated I begin to assemble the spring pack from the top down by cradling the largest leaf between 2 pieces of 2x6, I would lay down a piece of liner and then the metal spacer, then liner and then the next leaf doing this until I was to the overload leaf.
Then I inserted the Center Bolt, washer and nut.
Again remember:
One of the requirements for this modification to work is that you need to follow my instructions up to the beginning of Part-2
https://www.dieseltruckresource.com/...d.php?t=207334
You must grind all of the leaves of all of the rough surfaces and the friction surfaces must be polished to a slick finish.
The polyurethane inserts are going to wear after time but by removing all of the rough abrasive surfaces rust the spring will be allowed to compress and rebound effortsly and quietly and not be grinding into the surface of the insert.
Here is a closer view of the temporarily reassembled spring pack.
Now we must pay some attention the main leaf that is still installed on the truck, No inserts will go here but its surface is going to get the same treatment and be polished.
It was then wiped down using lacquer thinner and after a quick masking job it was coated using several coats of Rust-Oleum Semi Flat Paint.
Now we return it to the truck and reinstall it in the reverse order of the disassembly.
After you set the spring pack back on top of the perch then remove the nut and washer from the center bolt and then with a helper carefully lift the entire pack up to the main leaf guiding the bolt through the hole.
At this time you can help hold the leaves up by inserting the bolt through the clamps.
You can now reinstall the washer and nut onto the center bolt and then snug it up.
After you get the leaves lined up you need to raise the axle back into place and trying to line up the head of the center bolt into the hole in the middle of the perch.
Now drop the U-bolts over the leaves, you will probably have to jog the leaves around to get the U-bolts to drop in.
I used a Come-Along to pull my axle back into position and then used a big screwdriver to move the pack till it dropped into the hole.
Keep your body parts out of the way.
Make sure the steel plate is under the top of the U-bolts; it has a hole in the center where the nut and washer will protrude through.
When you are sure the U-bolts will line up then you need to torque the nut on the Center Bolt to 70-Foot Pounds.
Make sure the rear U-bolt goes between the axle tube and the brake line, on the front it will go behind the parking brake cable.
Then while lying under the truck reinstall the lower cover and shock bracket and move it all of the way up to the axle taking care not to damage the threads.
I used some Silver Anti-Seize to the insides of the nuts and then threaded them onto the ends of the 4 bolts.
I used the impact wrench and carefully ran them onto the bolts but stopped before it touched the bracket.
After making sure it was on straight I tightened them up by hand making sure the bracket was on level and all 4 bolts were about the same length, then I tightened them up using the impact wrench to about 90-Foot Pounds.
Using my Torque Wrench I tightened them all to 100 foot-pounds.
I will check and re-torque then at least twice in the next week because the liner material will compress.
Thread Starter
Administrator
Joined: Nov 2004
Posts: 4,084
Likes: 235
From: Southern California
Part-4
Now that the leaves have been installed and the U-bolts and Center Bolt have all been torqued down.
It now is time to raise up the axle so you can get the working weight of the truck onto the new spring and compress it.
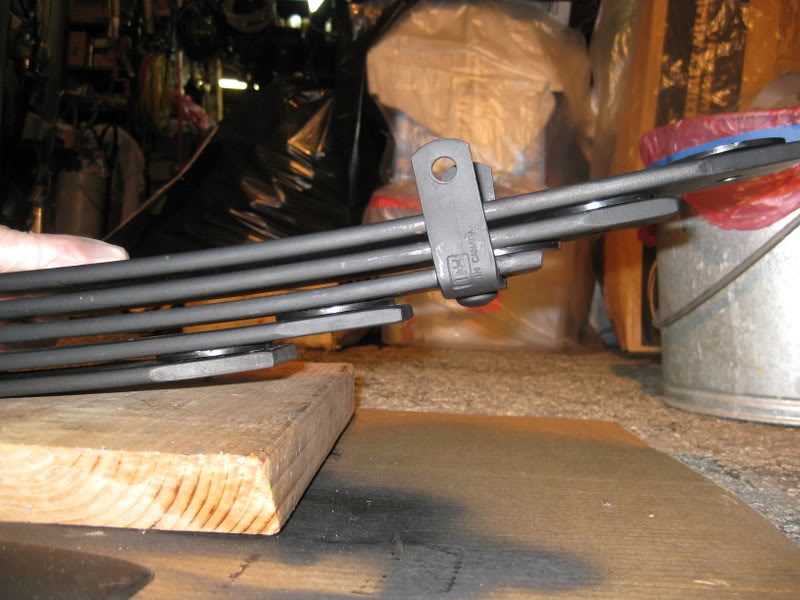
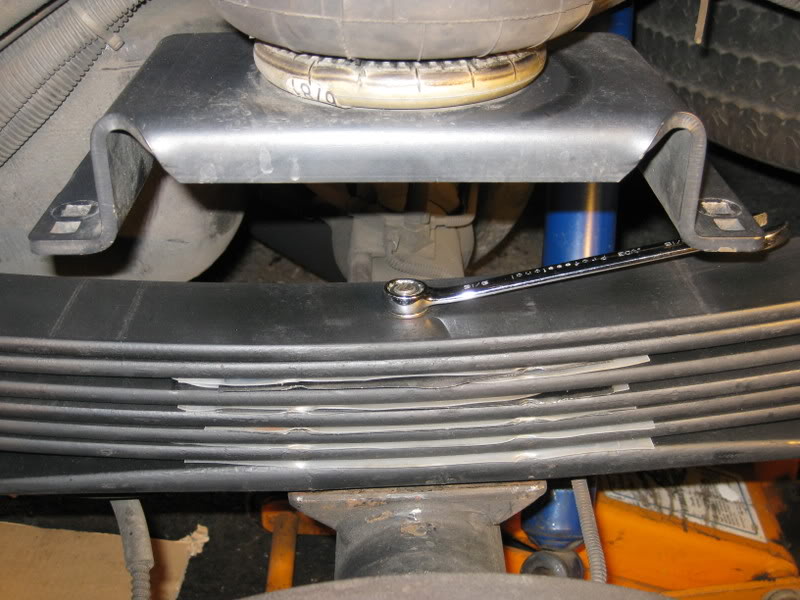
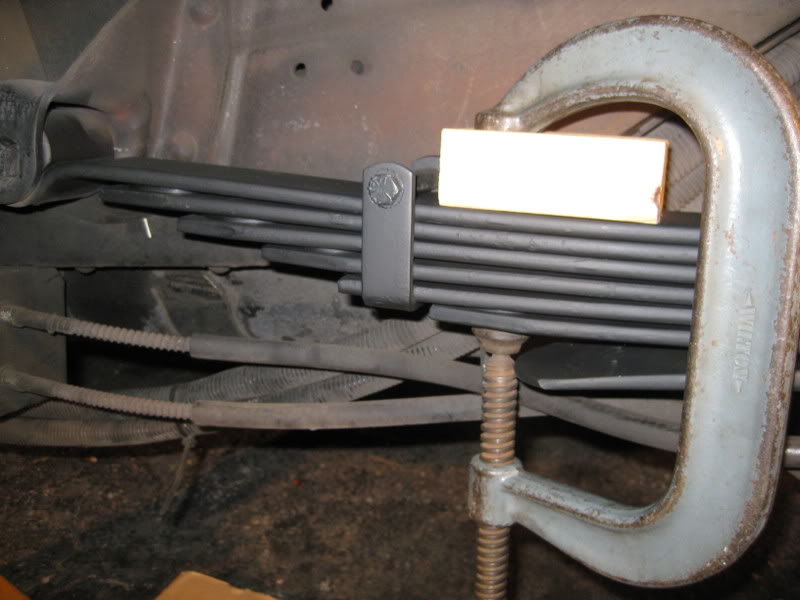
Here you see the added thickness of the new inserts makes the task of inserting the clamp bolt a bit more difficult.
Here is what you need to do, a block of wood on the top leaf and then using a large C-clamp you will compress all of the leaves together enough to insert the 3/8� bolt through the bushing to capture all of the leaves.
Then you can add the nut and tighten it up.
You will need to do this to both the front and rear clamps.
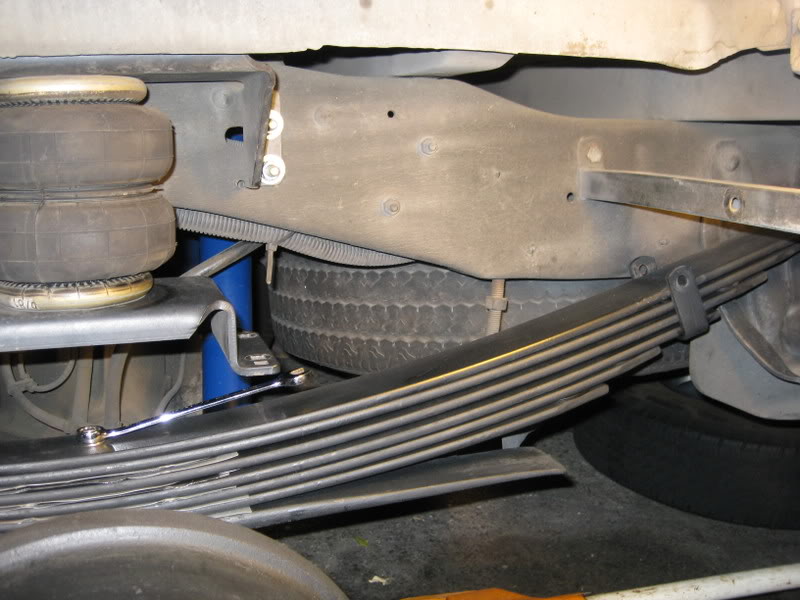
From here I had to reinstall the lower bracket and hardware for my Firestone Air Bags.
After I installed the lower bracket and the bolts, I aired up the Air Bags till they were almost touching the springs and them moved the lower bracket around until it found its natural position and then tightened it down.
I did this so when the bag is inflated it will not be out of alignment with the axle.
I see this U-bolt looks a bit crooked so I am going to get some from my spring man so I can have it to replace.
Here I reconnected my shock absorber.
Now I am all finished with this side, a once over to make sure I didn�t forget anything and then I touched up any scratches I made on the leaves while installing them.
Now it is off to the other side.
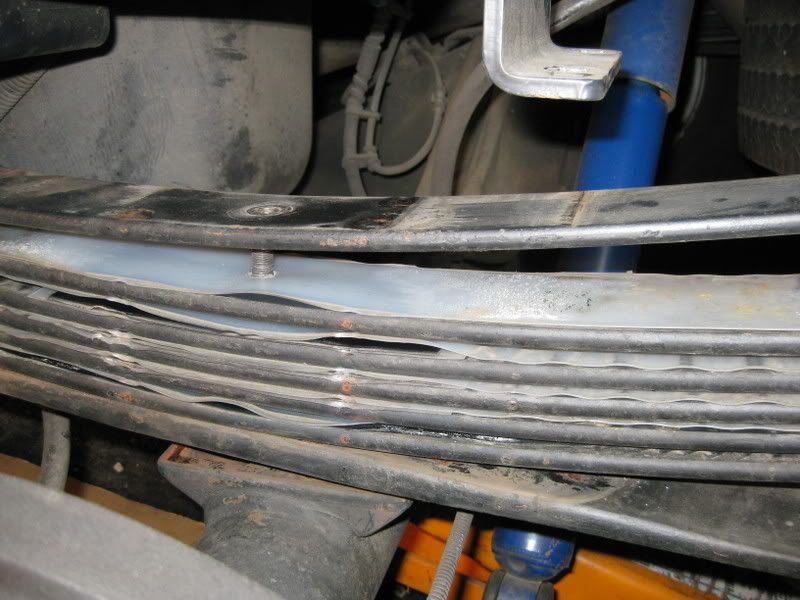
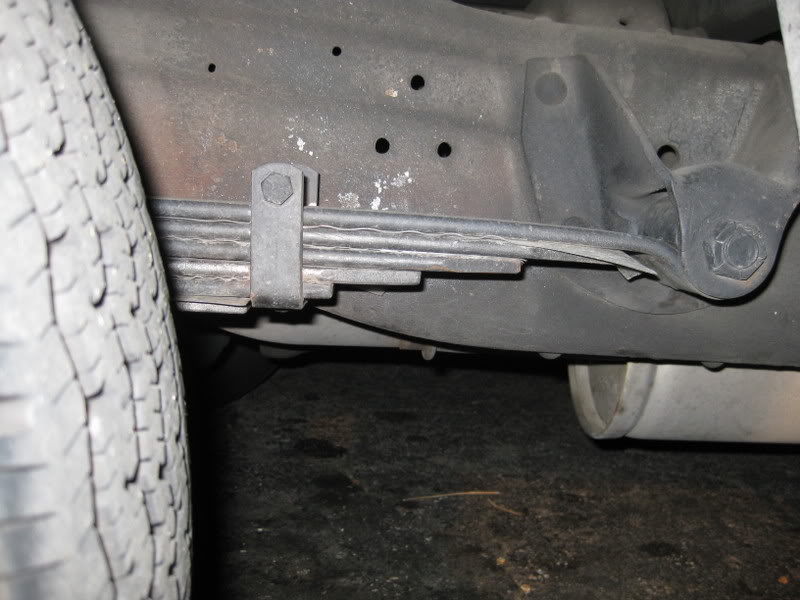
Here is a comparison of what the working ends of the leaves looked like before I installed the Spring Tip Inserts.
Although I still had some liner material in between each leaf it was mostly back to steel on steel, which is, why my ride was degrading and harsh again.
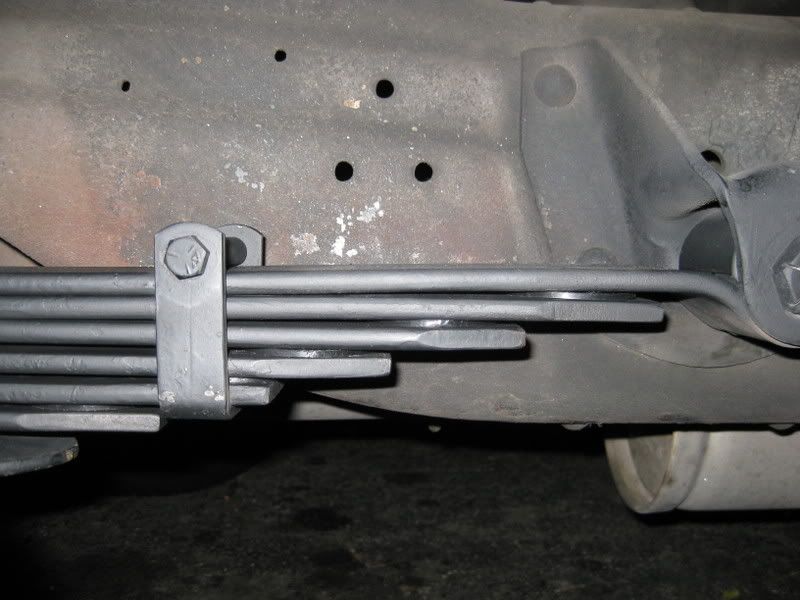
Now see the difference.
Instead of the 2 pieces of hardened steel grinding back and forth on top of each other, they now slide effortlessly on a cushion of Polyurethane making it smoother and quieter.
Except for doing the other spring and reinstalling the tires, the job is compete.
I was not is a hurry and I took my time.
You should be able to complete the entire project in 1 day and not have any problems.
Looking through a lot of Shop Manuals and TSB�s I found later trucks had these in their springs.
TSB I02-04-00 Rev A
Where to find the Spring Tip Inserts:
I found this part as a replacement for late model Dodge Trucks. I went to my local dealer and they would have to be ordered.
Liner Spring Tip # 52113136AA @ $4.50 ea.
10@ $4.50 = $45.00 + $3.72 Ca. tax =$48.72
So I went to Atlas Spring where I had them rearched and after a little talk I found they install them on custom springs they sell.
www.atlasleafspring.com
We talked awhile about my truck and they all looked under the hood.
I bought 20 of them for $25.00 or $1.25 each.
Check the Phone Book or the Internet Phone Book for Spring Rebuilding of Rearching in your area and ask if they will sell them to you.
If you cannot find any locally you could PM me and we could work out a way for me to ship them to you.
Now for the fun part.
I took it for a test drive. Just driving down the street I could tell how much better it was riding.
I made it to the freeway and went for a short trip west on the I-10, where my truck would have been riding hard and hitting the expansion joints it was riding very smooth.
I now had better control of the truck and on the parts of the Lane #3 roadbed that it would have usually had to slow down because of the bucking, now I could give it throttle and the barley felt the road.
I kept saying to myself Wow this is great I cannot believe this it is smooth.
Before I knew it the quick trip had gone about 20 miles down all of the freeways I used to dread driving.
In all of my excitement I called home and noticed I could hear, the truck was a lot quieter inside, I was still getting the engine noise but I had no idea how much of it before was from the road.
I did this modification last week and I and still so excited about it. It is actually fun to drive on the freeway now.
Before I would keep having CD�s and DVD�s falling out of the holder on the passengers visor onto to floor and nothing would stay put on the seat but now nothing moves.
This rides so much better I wish there was another member in this area that could take a ride and be a witness.
I have always wondered how much of the mechanical/ structural failures on the truck are because of the rough cyclic bouncing ride, I am thinking Cowl Cracks and misaligned doors.
I realize it is hard for me to convince you just how much smoother my truck rides so I put together a short video of a run down the freeway.
Before the truck would be quite noticeably shaking inside the cab and you would hear the drivers visor shake.

Both these trips reached speeds of about 80 MPH, see how they drive here in California?

I hope this gives you the confidence to fix the springs on your truck, you cannot believe what a difference it will make.
A note on how quiet it is inside my truck, Saturday I came to a stop light on the way home and I was hearing a real faint Boom Boom Boom so I was looking all around the truck for what was causing this, finally I rolled down the drivers window and was startled to hear the entire Covina High School Marching Band on the grass Cheerleaders and all practicing for the Christmas Parade less that 50 feet from me.
Wow..
I rolled up the window and all of the sound went away.
You really have to pay attention because I have had an ambulance 2 cars away and could not hear the siren.
Thank you for allowing me to pass on a small bit of my knowledge onto anyone who will listen.
Jim
Now that the leaves have been installed and the U-bolts and Center Bolt have all been torqued down.
It now is time to raise up the axle so you can get the working weight of the truck onto the new spring and compress it.
Here you see the added thickness of the new inserts makes the task of inserting the clamp bolt a bit more difficult.
Here is what you need to do, a block of wood on the top leaf and then using a large C-clamp you will compress all of the leaves together enough to insert the 3/8� bolt through the bushing to capture all of the leaves.
Then you can add the nut and tighten it up.
You will need to do this to both the front and rear clamps.
From here I had to reinstall the lower bracket and hardware for my Firestone Air Bags.
After I installed the lower bracket and the bolts, I aired up the Air Bags till they were almost touching the springs and them moved the lower bracket around until it found its natural position and then tightened it down.
I did this so when the bag is inflated it will not be out of alignment with the axle.
I see this U-bolt looks a bit crooked so I am going to get some from my spring man so I can have it to replace.
Here I reconnected my shock absorber.
Now I am all finished with this side, a once over to make sure I didn�t forget anything and then I touched up any scratches I made on the leaves while installing them.
Now it is off to the other side.
Here is a comparison of what the working ends of the leaves looked like before I installed the Spring Tip Inserts.
Although I still had some liner material in between each leaf it was mostly back to steel on steel, which is, why my ride was degrading and harsh again.
Now see the difference.
Instead of the 2 pieces of hardened steel grinding back and forth on top of each other, they now slide effortlessly on a cushion of Polyurethane making it smoother and quieter.
Except for doing the other spring and reinstalling the tires, the job is compete.
I was not is a hurry and I took my time.
You should be able to complete the entire project in 1 day and not have any problems.
Looking through a lot of Shop Manuals and TSB�s I found later trucks had these in their springs.
TSB I02-04-00 Rev A
Where to find the Spring Tip Inserts:
I found this part as a replacement for late model Dodge Trucks. I went to my local dealer and they would have to be ordered.
Liner Spring Tip # 52113136AA @ $4.50 ea.
10@ $4.50 = $45.00 + $3.72 Ca. tax =$48.72
So I went to Atlas Spring where I had them rearched and after a little talk I found they install them on custom springs they sell.
www.atlasleafspring.com
We talked awhile about my truck and they all looked under the hood.
I bought 20 of them for $25.00 or $1.25 each.
Check the Phone Book or the Internet Phone Book for Spring Rebuilding of Rearching in your area and ask if they will sell them to you.
If you cannot find any locally you could PM me and we could work out a way for me to ship them to you.
Now for the fun part.
I took it for a test drive. Just driving down the street I could tell how much better it was riding.
I made it to the freeway and went for a short trip west on the I-10, where my truck would have been riding hard and hitting the expansion joints it was riding very smooth.
I now had better control of the truck and on the parts of the Lane #3 roadbed that it would have usually had to slow down because of the bucking, now I could give it throttle and the barley felt the road.
I kept saying to myself Wow this is great I cannot believe this it is smooth.
Before I knew it the quick trip had gone about 20 miles down all of the freeways I used to dread driving.
In all of my excitement I called home and noticed I could hear, the truck was a lot quieter inside, I was still getting the engine noise but I had no idea how much of it before was from the road.
I did this modification last week and I and still so excited about it. It is actually fun to drive on the freeway now.
Before I would keep having CD�s and DVD�s falling out of the holder on the passengers visor onto to floor and nothing would stay put on the seat but now nothing moves.
This rides so much better I wish there was another member in this area that could take a ride and be a witness.
I have always wondered how much of the mechanical/ structural failures on the truck are because of the rough cyclic bouncing ride, I am thinking Cowl Cracks and misaligned doors.
I realize it is hard for me to convince you just how much smoother my truck rides so I put together a short video of a run down the freeway.
Before the truck would be quite noticeably shaking inside the cab and you would hear the drivers visor shake.
Both these trips reached speeds of about 80 MPH, see how they drive here in California?
I hope this gives you the confidence to fix the springs on your truck, you cannot believe what a difference it will make.
A note on how quiet it is inside my truck, Saturday I came to a stop light on the way home and I was hearing a real faint Boom Boom Boom so I was looking all around the truck for what was causing this, finally I rolled down the drivers window and was startled to hear the entire Covina High School Marching Band on the grass Cheerleaders and all practicing for the Christmas Parade less that 50 feet from me.
Wow..
I rolled up the window and all of the sound went away.
You really have to pay attention because I have had an ambulance 2 cars away and could not hear the siren.
Thank you for allowing me to pass on a small bit of my knowledge onto anyone who will listen.
Jim

Registered User
Joined: Apr 2004
Posts: 1,115
Likes: 0
From: North of Calgary Alberta
mhhh yep and Very little rust or dirty. great write up as usual ..... IS THERE ANYTHING ON YOUR TRUCK THAT IS DIRTY cough cough sorry green eye of jealousy rearing its ugly head
Trending Topics

Registered User
Joined: Nov 2007
Posts: 780
Likes: 42
Jim,
Give us a status again in 6 months. I hope these are more durable than the poly spacer sheeting. I'd add to anyone doing this in the future, make sure the hole is debured well- maybe a slight chamber on both sides.
Very cool!
Michael
Give us a status again in 6 months. I hope these are more durable than the poly spacer sheeting. I'd add to anyone doing this in the future, make sure the hole is debured well- maybe a slight chamber on both sides.
Very cool!
Michael
Thread Starter
Administrator
Joined: Nov 2004
Posts: 4,084
Likes: 235
From: Southern California
Every time I wash my truck I first wash out the engine compartment and dry everything off using compressed air.
Since I have always dome my own work I have always kept everything clean.
There is nothing like dirt dropping in your eyes when you are lifting a transmission in by hand.
Thread Starter
Administrator
Joined: Nov 2004
Posts: 4,084
Likes: 235
From: Southern California
I have no doubt these inserts will last for years, especially since the mating surface it has to rub against is polished to a nice smooth finish.
It might not have looked like it but all of the holes were deburred, after it was ground flat I made a slight chamfer using a hand reamer.
Anyone who has a 1st. Gen should really consider doing this.
Today I took the family on a short 100-mile road trip all of it was freeway and all being a heavily used truck route.
My truck has NEVER ridden this smooth since I have owned it, the ride was awesome.
It is also so much quieter inside that we could talk without shouting; I guess I had never realized just how loud it is inside our cab.
I always have considered my truck almost perfect except for the ride but never connected always being fatigued when we got to our destination because of the rough ride, but it really makes a difference.
I found that future maintence on the springs will be easy.
By removing the 2 bolts from the spring clamps, I can air up the Air Bags with 100 PSI and the leaves will separate enough to replace the inserts with little effort.
Jim
Registered User
Joined: Feb 2005
Posts: 2,658
Likes: 85
Hey Jim Thanks for the great write up. This is probably another days worth of work to add to my endless list of my 1972 diesel crew cab power wagon build. How about putting these bushing in the front springs on stock 4x4s?
Thread Starter
Administrator
Joined: Nov 2004
Posts: 4,084
Likes: 235
From: Southern California
I would recommend doing this to any leaf spring especially on our trucks with so much weight on the front axle.
It is really not a difficult task to drill the spring; the trick is using the Cobalt drill bit, lubrication and low speed so you do not burn it up.
I got it down to 5 minuets per hole after I set up the jig.
My truck has never ridden as smooth as it does now and now it is also so much quieter inside I figure was from all of the road noise being transmitted through the frame.
Did you hear how quiet and muffled the sound was in the videos; it still gets a bit loud around 80 MPH though.
We can now carry on a conversation without shouting.
I would love to have an old Power Wagon Ambulance from about 1945-50 and restore it except for the engine and drop in a 4BT.
Thanks.
Jim
Registered User
Joined: Apr 2008
Posts: 129
Likes: 2
From: Temecula, Ca.
"This rides so much better I wish there was another member in this area that could take a ride and be a witness."
I would be honored to take a ride in your truck. I am about an hour away. PM me, if you like.
Then I'll take you for a ride in mine--leaking shocks, no air bags and rusty springs.
We can avoid the speed bumps and I'll bring an extra neck brace.
I would be honored to take a ride in your truck. I am about an hour away. PM me, if you like.
Then I'll take you for a ride in mine--leaking shocks, no air bags and rusty springs.
We can avoid the speed bumps and I'll bring an extra neck brace.

Registered User
Joined: Jan 2009
Posts: 1
Likes: 0
My 1st Gen 2000 Dodge Durango is fitted with � spring tip inserts � at the leaves' ends, as Mr. Lane�s post shows us how to retrofit your leafs to allow for the installation of the inserts. Though my situation was a little different because the Durango already had them installed but, they were just worn-out.
If you work on your own �stuff�, the biggest problem that I run into was knowing the correct terminology for the name of the part! After searching the web for squeaking rear leaf springs, most people were refering to the inserts as � anti-friction pads � and that just confussed the situation.
Jim�s post helped to correct the terminology, and gave me a clue as to where to source the parts, duh contact someone that builds/rebuilds leaf springs! I should have just called the *********** for the part name/number but, I didn�t and I took the long way around to the answer. The part number 15604067 that I purchased from Midwest Spring is a GM # and not a Dodge part # but, appear to be the same thing.
A special thanks to Mr. John Rush at John�s 4x4 Center (and Drive-Radio) 6367 Arapahoe Road Boulder, CO 80303 (303) 449-9661 for the lead to Midwest Spring & Chassis Service in Denver.
Below is the 3 different sources that I found, that stock polyurethane � Spring Tip Inserts �, the two places in Denver will punch holes in your leafs as well as build you new leaf springs if needed!
Midwest Spring & Chassis Service, Ltd/ Midwest Truck Parts & Services
5075 Cook St
Denver, CO 80216
(303) 296-1515 (just ask for the nice elderly hippy dude in parts, sorry I missed his name,
Denver Spring & Suspension
3510 Brighton Blvd
Denver, CO 80216
(303) 295-7638
AutoandTruckSprings.com (B&T Sales Company, Inc.)
P.O. Box 1136
Skippack, PA 19474-1136
(610) 584-5428
Last edited by Kevin in Denver; Jan 16, 2009 at 11:26 AM. Reason: Spelling