How to repair a leaking Governor Shaft and Fuel Screw
 04-03-2009, 06:15 AM
#1
Administrator
Thread Starter

Part-1
How to repair a leaking Governor Shaft;
When you have fuel leaking down the front of the VE pump it will either run down to the bottom of the pump housing and drip onto the ground, or it might leak down to the bottom of the block and make its way to the rear of the engine either way making a mess to your nice clean engine.
This will show you how easy it is to replace the leaking o-ring and stop the leak; I am also going to show you how to replace the o-ring on the Fuel Screw.
The first thing that you need to do is to remove the injection pump from the engine, sorry there is no other way.
Ok now that you have the pump out and it sitting on your work surface this is what you should be looking at.
Behind this nut and washer lies the Governor Shaft.
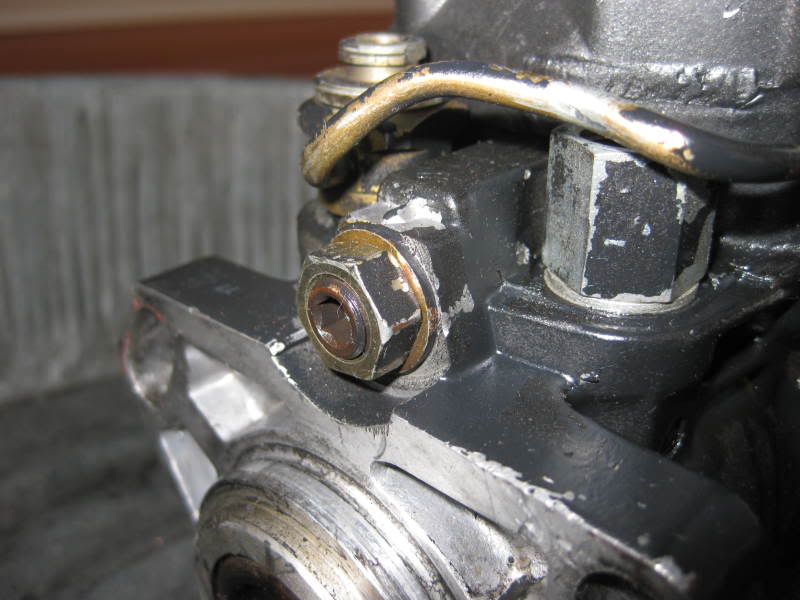
You do NOT have to open your pump unless you are performing some other operation inside such as installing your 3200RPM spring.
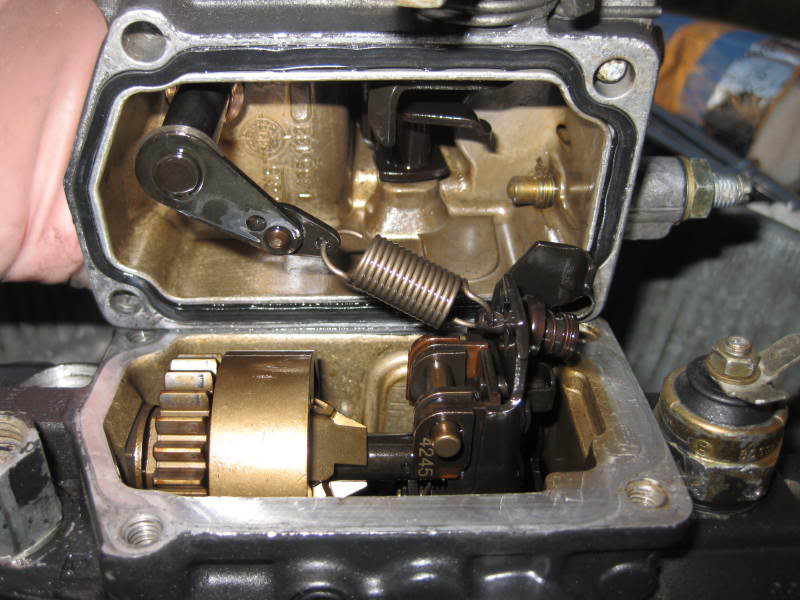
This is what the inside of your pump look like, to the left you see the drum shaped mechanism with the gear teeth, this houses the centrifugal flyweights of the governor that are driven off the main shaft in the lower half of the housing, Also you can see the infamous �3200 Spring� and if you follow it to the right you can see the �Top Hat� and spring where it sits on the right side of the lever.
Also on the right side of the top half you can see the Fuel Screw as it enters the housing, this presses against the lever that is just behind the Top Hat assembly.
The governor uses centrifugal flyweights and the tension of the governor spring to limit the speed of our engines.
Now that you had a look into your pump let�s get back to the leak.
First you need to remove the nut from the end of the governor shaft and then remove the washer and set them aside.
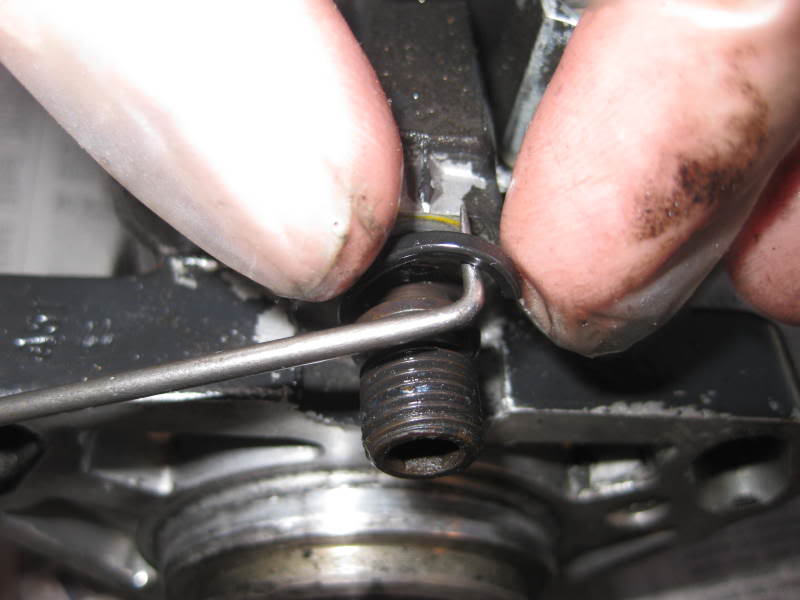
Then using the appropriate metric hex wrench carefully back out the threaded shaft until the old o-ring has passed out of the body and there is enough room so you can remove it but do not back it any farther than absolutely necessary.
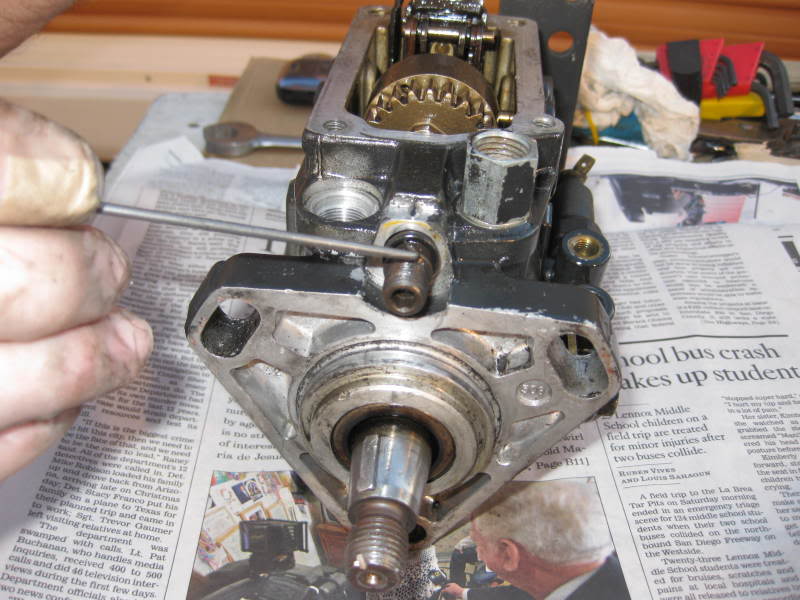
Here you see how the shaft is sealed in the housing with an o-ring, now using a dental pick of a suitable tool you can remove the old leaking o-ring, try not to stretch or break it so you can compare it to the new one.
Mine was so brittle that it broke when I was trying to lift it out of the groove.
Here I will match it up the an o-ring that I took from my Bosch Repair Kit, you will see that the new one is quite a bit fatter and not so flat.
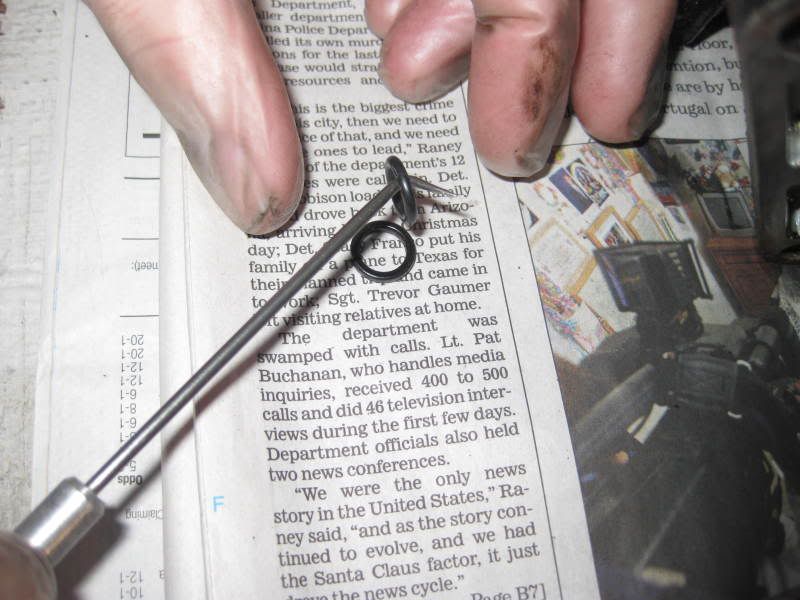
OK now you need to roll the new o-ring onto the governor shaft using care so you do not nick the surface, if you do then it will probably leak just like the old one, so be careful.
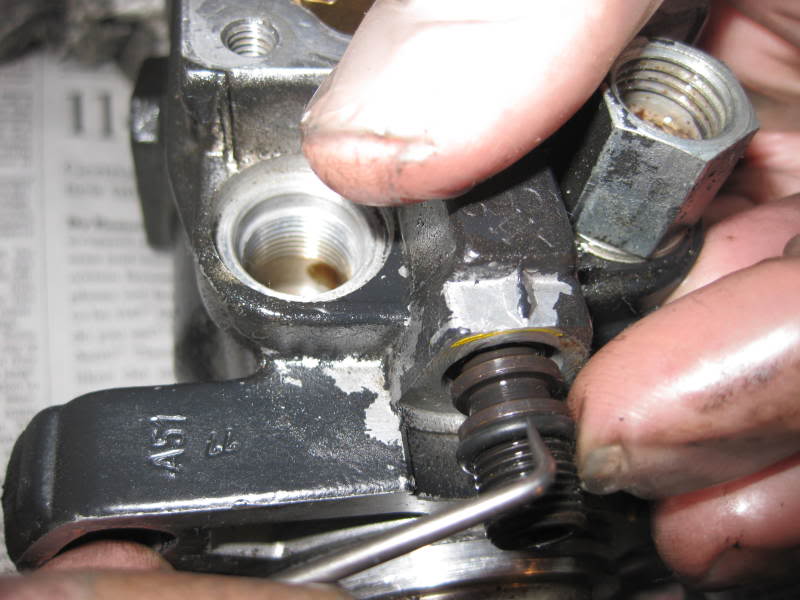
After you roll it up to the groove in the shaft you need to gently move it into the groove as I am doing here.
Now after you get the new o-ring into the groove you should very carefully using your pick, lift the o-ring out of the groove very slightly and encircle the shaft a few times to allow the o-ring a chance to straighten itself out incase it got twisted when it was being installed.
This is just something that I like to do, it would be like having tour socks twisted, it would work but it just won�t feel right.
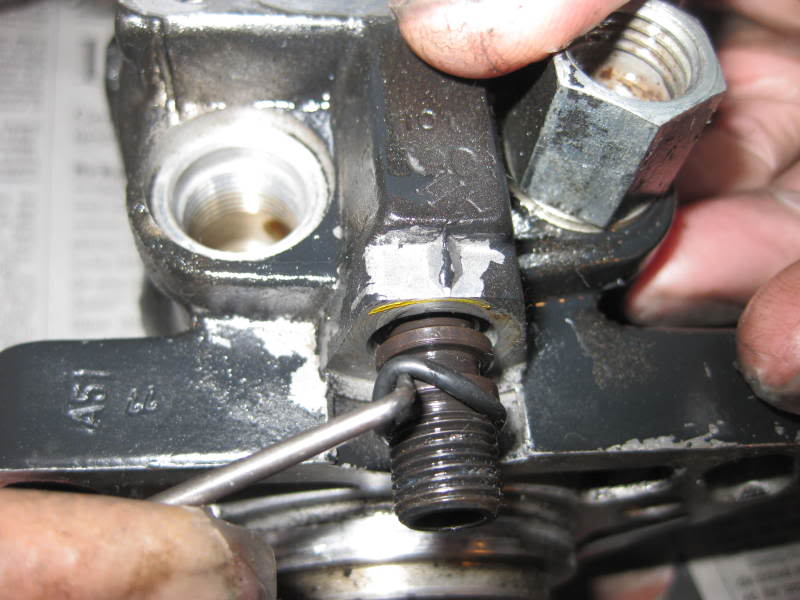
Ok you have just repaired the leak on the Governor Shaft, all that you need to do from here is to first lubricate the o-ring (I use STP Oil Treatment) and then carefully screw it back into the housing till it is snug and then replace the washer and screw on the nut snugging it up with a wrench and then you art finished.
How to repair a leaking Governor Shaft;
When you have fuel leaking down the front of the VE pump it will either run down to the bottom of the pump housing and drip onto the ground, or it might leak down to the bottom of the block and make its way to the rear of the engine either way making a mess to your nice clean engine.
This will show you how easy it is to replace the leaking o-ring and stop the leak; I am also going to show you how to replace the o-ring on the Fuel Screw.
The first thing that you need to do is to remove the injection pump from the engine, sorry there is no other way.
Ok now that you have the pump out and it sitting on your work surface this is what you should be looking at.
Behind this nut and washer lies the Governor Shaft.
You do NOT have to open your pump unless you are performing some other operation inside such as installing your 3200RPM spring.
This is what the inside of your pump look like, to the left you see the drum shaped mechanism with the gear teeth, this houses the centrifugal flyweights of the governor that are driven off the main shaft in the lower half of the housing, Also you can see the infamous �3200 Spring� and if you follow it to the right you can see the �Top Hat� and spring where it sits on the right side of the lever.
Also on the right side of the top half you can see the Fuel Screw as it enters the housing, this presses against the lever that is just behind the Top Hat assembly.
The governor uses centrifugal flyweights and the tension of the governor spring to limit the speed of our engines.
Now that you had a look into your pump let�s get back to the leak.
First you need to remove the nut from the end of the governor shaft and then remove the washer and set them aside.
Then using the appropriate metric hex wrench carefully back out the threaded shaft until the old o-ring has passed out of the body and there is enough room so you can remove it but do not back it any farther than absolutely necessary.
Here you see how the shaft is sealed in the housing with an o-ring, now using a dental pick of a suitable tool you can remove the old leaking o-ring, try not to stretch or break it so you can compare it to the new one.
Mine was so brittle that it broke when I was trying to lift it out of the groove.
Here I will match it up the an o-ring that I took from my Bosch Repair Kit, you will see that the new one is quite a bit fatter and not so flat.
OK now you need to roll the new o-ring onto the governor shaft using care so you do not nick the surface, if you do then it will probably leak just like the old one, so be careful.
After you roll it up to the groove in the shaft you need to gently move it into the groove as I am doing here.
Now after you get the new o-ring into the groove you should very carefully using your pick, lift the o-ring out of the groove very slightly and encircle the shaft a few times to allow the o-ring a chance to straighten itself out incase it got twisted when it was being installed.
This is just something that I like to do, it would be like having tour socks twisted, it would work but it just won�t feel right.
Ok you have just repaired the leak on the Governor Shaft, all that you need to do from here is to first lubricate the o-ring (I use STP Oil Treatment) and then carefully screw it back into the housing till it is snug and then replace the washer and screw on the nut snugging it up with a wrench and then you art finished.
 04-03-2009, 06:17 AM
#2
Administrator
Thread Starter
Part-2
The Fuel Screw.
This one is real easy and it can be performed without removing the injection pump from the engine however I already had it out.
All you need to do is to be able to remove the Fuel Screw from the pump so depending on what is in the way you might need to remove some brackets.
Here we go.
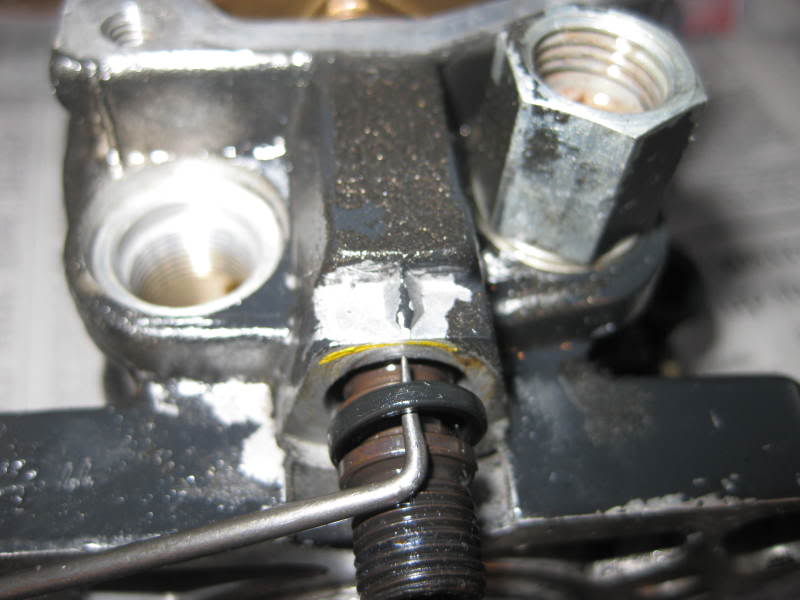
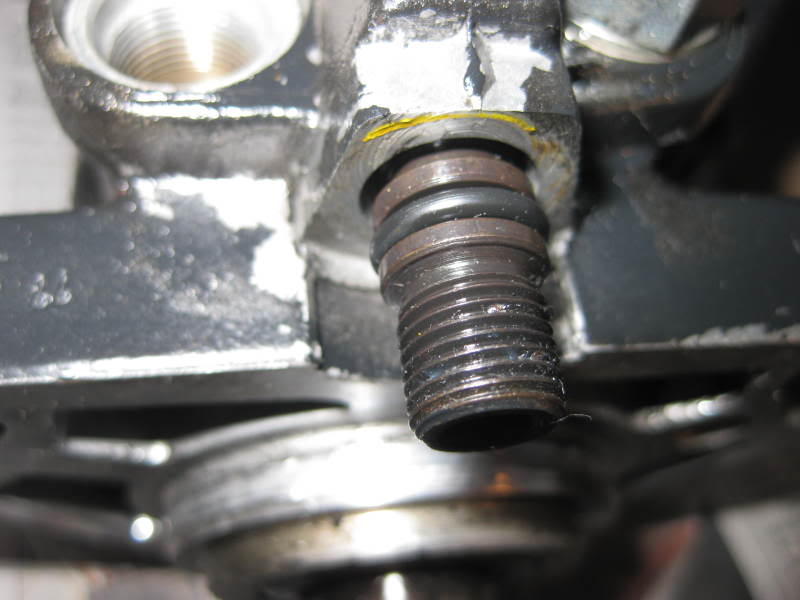
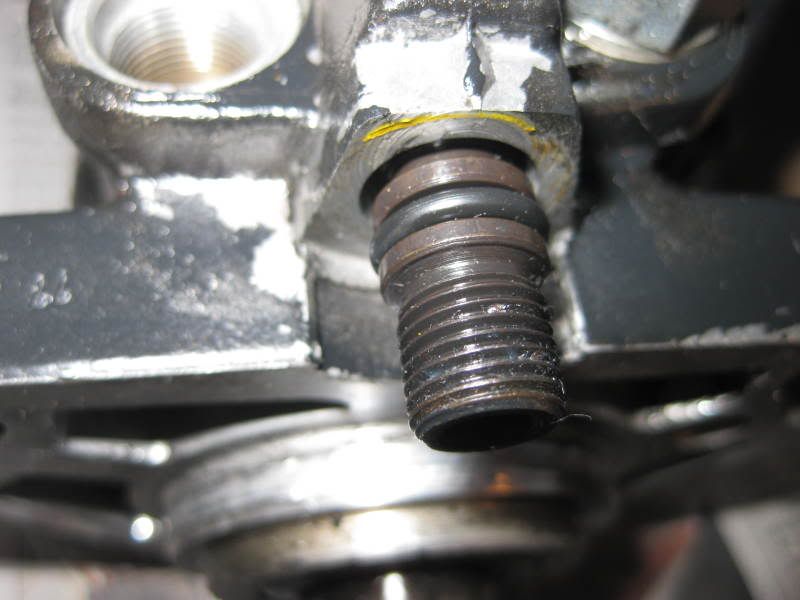
This is very Important, you first need to measure the distance from the end of the screw where the slot is to somewhere on the housing accurately for reference so the screw can be reinstalled at it�s original setting.
You could also carefully count the number of threads protruding past the nut and use this for reference, anyway you do it, you want to be able to screw it back in the same amount of turns as when you took it out.
It is also a good idea to take a picture of it so incase you forgot.
So after you have all of the data recorded you can unscrew the screw from the pump
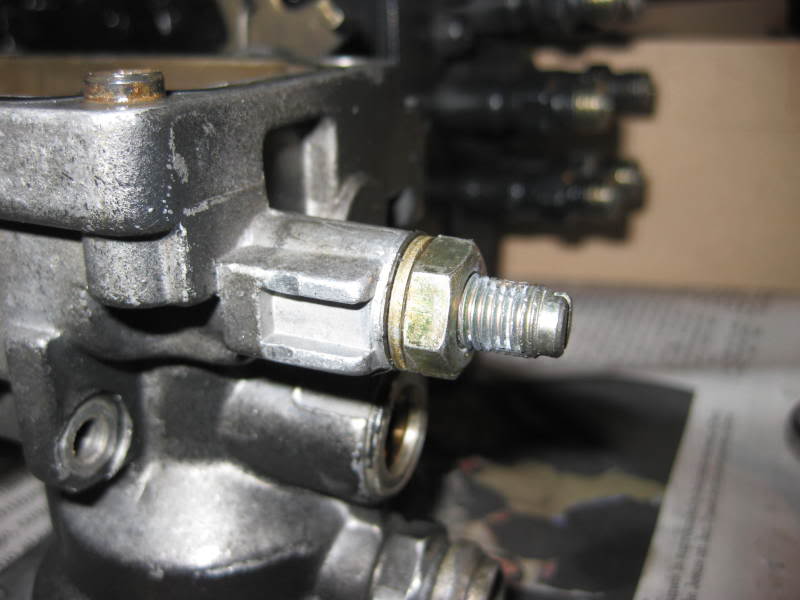
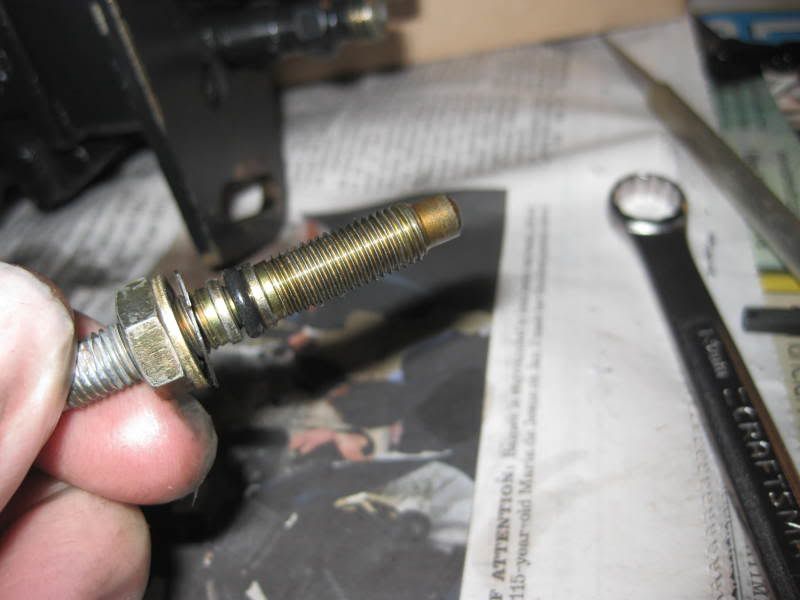
Here you are looking at the Fuel Screw, this is the thing that can give you so much power by turning it just a few turns but this is also the same screw that can turn your pistons into puddles of molten aluminum if turned too far and you failed to watch your EGT�s.
OK now it is a easy task to replace the old o-ring with a new one that you found in your Bosch Repair Kit, again apply some lubrication and then screw it back into the housing taking it back to the same setting that you recorded in your notes.
You are finished.
You will need to get yourself a Bosch DGK-121 Repair Kit from your local fuel injection repair shop.
Dental pick or suitable tool to manipulate O-rings.
You will also need these Metric Hex socket werenches:
5mm Hex socket wrench (the kind with the swivel ball on the end)
8mm Hex socket wrench (to remove the nut from the throttle shaft)
Again thank you for allowing me to share some of my vast knowledge that I have gained through almost a half century of first tinkering and then working on and then teaching others.
Not bragging but I have worked at and have mastered many fields including Electrical, Electronics, Mechanics both Gas and Diesel, HVAC both mobile and commercial residential as well as most of the building trade.
Also if there is any specific picture of any part you might need for reference let me know because there is a good chance that I might have it.
Until the next one.
Jim
The Fuel Screw.
This one is real easy and it can be performed without removing the injection pump from the engine however I already had it out.
All you need to do is to be able to remove the Fuel Screw from the pump so depending on what is in the way you might need to remove some brackets.
Here we go.
This is very Important, you first need to measure the distance from the end of the screw where the slot is to somewhere on the housing accurately for reference so the screw can be reinstalled at it�s original setting.
You could also carefully count the number of threads protruding past the nut and use this for reference, anyway you do it, you want to be able to screw it back in the same amount of turns as when you took it out.
It is also a good idea to take a picture of it so incase you forgot.
So after you have all of the data recorded you can unscrew the screw from the pump
Here you are looking at the Fuel Screw, this is the thing that can give you so much power by turning it just a few turns but this is also the same screw that can turn your pistons into puddles of molten aluminum if turned too far and you failed to watch your EGT�s.
OK now it is a easy task to replace the old o-ring with a new one that you found in your Bosch Repair Kit, again apply some lubrication and then screw it back into the housing taking it back to the same setting that you recorded in your notes.
You are finished.
You will need to get yourself a Bosch DGK-121 Repair Kit from your local fuel injection repair shop.
Dental pick or suitable tool to manipulate O-rings.
You will also need these Metric Hex socket werenches:
5mm Hex socket wrench (the kind with the swivel ball on the end)
8mm Hex socket wrench (to remove the nut from the throttle shaft)
Again thank you for allowing me to share some of my vast knowledge that I have gained through almost a half century of first tinkering and then working on and then teaching others.
Not bragging but I have worked at and have mastered many fields including Electrical, Electronics, Mechanics both Gas and Diesel, HVAC both mobile and commercial residential as well as most of the building trade.
Also if there is any specific picture of any part you might need for reference let me know because there is a good chance that I might have it.
Until the next one.
Jim
04-03-2009, 09:47 AM
#3
Registered User

Join Date: Jan 2008
Location: Quinton, New Jersey (middle of nowhere)
Posts: 7,547
Likes: 0
Received 2 Likes
on
2 Posts
Nice!! this is a common problem a lot of people ask about. i can't see the pics because im at school but im sure they're amaziing.
Dave... sticky!
Dave... sticky!
04-03-2009, 06:38 PM
#4
Adminstrator-ess
Stuck it.  Thanks for another great writeup, Jim!
Here's an o-ring install tip I learned from my brother (electron microscope repair guy). Use sharpened bamboo sticks instead of metal picks, that way you will not cut the o-ring or scratch the metal.
Thanks for another great writeup, Jim! Here's an o-ring install tip I learned from my brother (electron microscope repair guy). Use sharpened bamboo sticks instead of metal picks, that way you will not cut the o-ring or scratch the metal.
 02-17-2015, 11:43 AM
#6
Thank you for bumping this back to the top and thank you Mr. Lane.
I had totally forgotten (or maybe never knew) about this oring. And I believe it might have been one of the ones that was leaking originally on my pump. I will now pull my pump again and perform this reseal. No problem. Easier now than later.
I had totally forgotten (or maybe never knew) about this oring. And I believe it might have been one of the ones that was leaking originally on my pump. I will now pull my pump again and perform this reseal. No problem. Easier now than later.
02-17-2015, 12:45 PM
#7
Ok you have just repaired the leak on the Governor Shaft, all that you need to do from here is to first lubricate the o-ring (I use STP Oil Treatment) and then carefully screw it back into the housing till it is snug and then replace the washer and screw on the nut snugging it up with a wrench and then you art finished.
Anyway, from what other brief info I was able to find, this position has something to do with the "vacuum" of the initial injection event and needs to be placed back to the same spot.
Unfortunately for me, I didn't count the turns, but on another thread they mentioned 2.6 turns from the bottom. I will just put it in the spot I can best guess that makes it look like your original picture here with just barely one thread protruding out of the nut.


Trending Topics
02-17-2015, 06:16 PM
#8
I just installed the governor shaft oring, and I'm really screwed up. I don't know if I need to screw it in snug or backout some. Got 2 different versions on here. Please someone let me know I would like to reinstall my IP pump!
02-17-2015, 08:22 PM
#9
Every pump is different. You needed to count the number of turns when removing it, or mark / reference it somehow to replace it to the original location. You'd see for yourself that screwing it in "snug" won't work, the nut barely has enough bite to thread on more than a turn. The consensus is about 2.5 turns backed out from "snug" with the screw flush or barely protruding past the nut. Reference Jim's pic with it still installed above and try to make it look like that.
edit: this thread discusses it a bit. It isn't a critical or even adjustable. Just make sure it is back to about where it originally was, if you can.
edit: this thread discusses it a bit. It isn't a critical or even adjustable. Just make sure it is back to about where it originally was, if you can.
02-17-2015, 08:43 PM
#10
So one other tidbit I found were instructions on how to set the governor screw.
1.) Bottom it out
2.) back it out until it is flush with the pump mounting face
3.) turn it in 1.75 turns.
4.) install / torque lock nut/washer.
I just did the 2.5 turns backed out from bottomed. But that may not be a good reference. Who knows.
1.) Bottom it out
2.) back it out until it is flush with the pump mounting face
3.) turn it in 1.75 turns.
4.) install / torque lock nut/washer.
I just did the 2.5 turns backed out from bottomed. But that may not be a good reference. Who knows.
 12-12-2017, 09:27 AM
#12

Don't waste money, use Teflon tape to fix leak without removing injection pump!
Cost me .87 cents to fix leak permanently. Use a flat head screwdriver to gently bend the tube back to gain clearance to the governor nut and washer. Then get some Teflon tape, lay out about a foot, and quadruple it thick. Then twist it into a rope. Make two of these ropes, one for each side of the washer that is behind the governor nut. Loosen the governor nut just enough to gain clearances on both sides of the washer. Take a Teflon rope and make a lasso by putting it around the fat end of a screwdriver and twisting just a little. Then take the lasso of Teflon tape and guide it over the nut and behind the washer, then twist tight without breaking the rope, Repeat but this time put the lasso between the nut and washer, again twist tight without breaking. Then without cutting off the excess tighten the govenor screw.Now it won't leak, and is permanent, no need to replace o ring. I will also note that Teflon tape can be used to seal leaks on the KSB solenoid by wrapping old leaking o rings on shaft. Make sure your return screen in the banjo bolt is clear or you continue to have problems. Enjoy this .87 cent side of the road shortcut, desperation is the heart of innovation. Richard
Last edited by nativegator; 12-12-2017 at 09:28 AM. Reason: typo
The following users liked this post:
brianshog (06-30-2021)
12-13-2017, 06:49 AM
#13
Registered User

I would just replace the O ring. Teflon tape is not designed to be used that way and will eventually fail. And probably at the worst possible time.
12-13-2017, 10:13 AM
#14
Many do not posses the tools, time, or skillset
While I am in agreement that the o ring should be replaced when the VE pump is removed, I would still apply this Teflon before I reinstalled it. Removal of the VE pump by unqualified mechanics can be a nightmare. Not all mechanics should try it. Working on the VE pump really should be done by a qualified injection shop. All these right ways cost money, towing, and downtime. That's why many choose to learn and fix it themselves. But they don't always succeed, and may lead to a bigger mechanical failure. I developed this fix when it was needed for unqualified regular folks who need to stop a fuel leak on the side of the road. O rings cannot be replaced on the fly. This fix I believe is permanent because of the physical barrier created by Teflon, but is easily and quickly repeatable. For this reason even the most skilled mechanic I would believe would use this method if traveling while the O ring let go. It is dangerous to have any fuel leaking, and bad for the highway, parking lot,, and environment. Certainly I appreciate the work that went into this post, but I warn the average persons is not qualified to, or posses the knowledge to safety replace the O ring. I have seen many who make thier living with these trucks, and in the dead of winter or the middle of nowhere this fix is a lifesaving one as if was for me. There are shops and mechanics that are predators out there, and allot of poor folks just trying to survive in this world. God bless them and the one who started this wonderful post. There is excellent information here.My wife and me broke down this summer and this post help me repair my truck. My wife died October 18, and I know she wanted me to post this. I sold my truck to bury her, but I hope this helps someone. Richard
Last edited by nativegator; 12-13-2017 at 10:18 AM. Reason: typo
The following 3 users liked this post by nativegator:
12-13-2017, 11:06 AM
#15
Registered User
While I am in agreement that the o ring should be replaced when the VE pump is removed, I would still apply this Teflon before I reinstalled it. Removal of the VE pump by unqualified mechanics can be a nightmare. Not all mechanics should try it. Working on the VE pump really should be done by a qualified injection shop. All these right ways cost money, towing, and downtime. That's why many choose to learn and fix it themselves. But they don't always succeed, and may lead to a bigger mechanical failure. I developed this fix when it was needed for unqualified regular folks who need to stop a fuel leak on the side of the road. O rings cannot be replaced on the fly. This fix I believe is permanent because of the physical barrier created by Teflon, but is easily and quickly repeatable. For this reason even the most skilled mechanic I would believe would use this method if traveling while the O ring let go. It is dangerous to have any fuel leaking, and bad for the highway, parking lot,, and environment. Certainly I appreciate the work that went into this post, but I warn the average persons is not qualified to, or posses the knowledge to safety replace the O ring. I have seen many who make thier living with these trucks, and in the dead of winter or the middle of nowhere this fix is a lifesaving one as if was for me. There are shops and mechanics that are predators out there, and allot of poor folks just trying to survive in this world. God bless them and the one who started this wonderful post. There is excellent information here.My wife and me broke down this summer and this post help me repair my truck. My wife died October 18, and I know she wanted me to post this. I sold my truck to bury her, but I hope this helps someone. Richard

Sorry to hear about your wife passing Richard. prayers for you and your family.
The following 2 users liked this post by mknittle:
brianshog (07-05-2021),
edwinsmith (12-13-2017)