where is the information? evaporator core R&R
 05-31-2007, 02:07 PM
#1
Registered User
Thread Starter
Join Date: Nov 2004
Location: redford michigan
Posts: 225
Likes: 0
Received 0 Likes
on
0 Posts
where is the information? air conditioning in dodge trucks
Where is the most complete info about our dodge ac systems?
I have searched it here and find bits and pieces of info. I was hoping someone knows where to find it on the net.
new info!
I found a local shop through a refferal that will fill and add the dye to my system and are not charge me till they make a repair. they sound very reasonable.
I talked to pete from fixinrams today and he made a reccomendation that made good sence. suggesting I get the system charged and have the dye put in it yet again.
like they say, It's getting hot in here. lol
Last edited by OUTDOORSMAN; 05-31-2007 at 03:54 PM. Reason: new info
 05-31-2007, 05:56 PM
#2

Go over to www.dodgetrucks.org . In the forums(can't remember which one)there is a very good writeup on the evap core r&r. It is pinned, so you won't have any trouble finding it. This repair is pretty involved, but easily done by the home mechanic. HTH. BTW, the suggestion to recharge and add dye is a good one. It may be that the evap is not bad and something else is at fault.
05-31-2007, 06:37 PM
#3
Registered User

I have 27 photo's, 1.3megs, downloaded from this site, I believe, showing the removal of the evaporator core. Someone took the time to take the photos and post them. If you can't find them on this site, I can e-mail them to you. Just send be a e-mail to DavHaw@Aol.Com and I will sent them to you.
Florescent Dye is the way to go for detection. If its coming out the pee hole
your evaporator is shot. I had the dye done to mine after the entire system was replaced when we all thought the evaporator was leaking. Well, it was, BAD. There was also about 7 other leaks, which the guys that replaced the system had to fix. 700 bucks to do the evap.
Dave
05-31-2007, 09:25 PM
#4
Registered User
Thread Starter
Join Date: Nov 2004
Location: redford michigan
Posts: 225
Likes: 0
Received 0 Likes
on
0 Posts
I have had the system recharged 3 times in the last 2 years. the first time it lasted the season, the next time it failed the next day so I took the truck to another shop that evacuated the system, recharged it correctly and they said they added the dye. Well the very next day I had no a/c. So I had the truck in yet another shop and they checked with a light and said if there was dye they would have seen it. I thought I could trust that the one shop added the dye. I now do not believe they did. Tommorow morning the dye will be added and we'll see what happens. I did not use 3 different shops intentionally. It was just a happen of circumstance.
I will post the results. thanks
sending pm for pic info.
I will post the results. thanks
sending pm for pic info.
05-31-2007, 09:35 PM
#5
DTR's 'Go to Guy'
I have seen it take 2 or 3 times of adding dye to get it to show thru the evaporator drain. When you take it apart you wil see why. So many leaves and dirt and mud in the bottom of the housing it takes A LOT of the dye to get thru all of that. If you have added dye that many times and still can't find the leak , I will bet my pycheck on the evaporator core. I can do one with cordless tools and air tools in about 4.5 hours including the recharge. Wouldn't take this on if you are timid. You basically have to take the entire dash out and set it in the seats. 
05-31-2007, 09:43 PM
#6
Registered User
Thread Starter
Join Date: Nov 2004
Location: redford michigan
Posts: 225
Likes: 0
Received 0 Likes
on
0 Posts
Thanks Dave!
Dude, I am not timid at all. lol... But I do like to know what I am doing and the correct way of doing it. I will have to have my nieghbor give me a hand with it if I have to replace the evaporator core. I am 6'7", I have very big hands and cant fit them in alot of the tighter places nor can I get my head in alot of places to see what I am doing So I ask alot of questions and try to be Educated in the adventure I am about to take. lol...Plus I dont have the $ to pay someone to do it and just like doing these things myself. kinda adventureist I guess. lol...
Dude, I am not timid at all. lol...
But I do like to know what I am doing and the correct way of doing it. I will have to have my nieghbor give me a hand with it if I have to replace the evaporator core. I am 6'7", I have very big hands and cant fit them in alot of the tighter places nor can I get my head in alot of places to see what I am doing So I ask alot of questions and try to be Educated in the adventure I am about to take. lol...Plus I dont have the $ to pay someone to do it and just like doing these things myself. kinda adventureist I guess. lol...
05-31-2007, 10:24 PM
#7
DTR's 'Go to Guy'
If you need more, just let me know! Hope this covers most of it.
Start with the dash removal of course before trying to take out the HVAC Unit, I mixed them up in the pastes.
HVAC Unit
REMOVAL
WARNING: ON VEHICLES EQUIPPED WITH AIRBAGS, DISABLE THE AIRBAG SYSTEM BEFORE ATTEMPTING ANY STEERING WHEEL, STEERING COLUMN, OR INSTRUMENT PANEL COMPONENT DIAGNOSIS OR SERVICE. DISCONNECT AND ISOLATE THE BATTERY NEGATIVE (GROUND) CABLE, THEN WAIT TWO MINUTES FOR THE AIRBAG SYSTEM CAPACITOR TO DISCHARGE BEFORE PERFORMING FURTHER DIAGNOSIS OR SERVICE. THIS IS THE ONLY SURE WAY TO DISABLE THE AIRBAG SYSTEM. FAILURE TO TAKE THE PROPER PRECAUTIONS COULD RESULT IN AN ACCIDENTAL AIRBAG DEPLOYMENT AND POSSIBLE PERSONAL INJURY.
WARNING: IF THE VEHICLE IS EQUIPPED WITH AIR CONDITIONING, REVIEW THE WARNINGS AND CAUTIONS IN PLUMBING BEFORE PERFORMING THE FOLLOWING OPERATION. (Refer to 24 - HEATING & AIR CONDITIONING/PLUMBING - WARNING) (Refer to 24 - HEATING & AIR CONDITIONING/PLUMBING - CAUTION)
The HVAC housing assembly must be removed from the vehicle and disassembled for service access of the heater core, a/c evaporator, and each of the various mode control doors.
Disconnect and isolate the battery negative cable.
If the vehicle is not equipped with air conditioning, go to Step 6. If the vehicle is equipped with air conditioning, recover the refrigerant from the system. (Refer to 24 - HEATING & AIR CONDITIONING/PLUMBING - STANDARD PROCEDURE - REFRIGERANT RECOVERY)
Remove the instrument panel from the vehicle(Refer to 23 - BODY/INSTRUMENT PANEL - REMOVAL).
Disconnect the liquid line refrigerant line fitting from the evaporator inlet tube. (Refer to 24 - HEATING & AIR CONDITIONING/PLUMBING - STANDARD PROCEDURE - A/C LINE COUPLERS) Install plugs in, or tape over all of the opened refrigerant line fittings.
Remove the accumulator. (Refer to 24 - HEATING & AIR CONDITIONING/PLUMBING/ACCUMULATOR - REMOVAL) Install plugs in, or tape over all of the opened refrigerant line fittings.
Drain the engine cooling system(Refer to 7 - COOLING - STANDARD PROCEDURE) and (Refer to 7 - COOLING - STANDARD PROCEDURE).
Disconnect the heater hoses from the heater core tubes.
Remove the Powertrain Control Module (PCM) from the dash panel and set it aside, but do not unplug the PCM wire harness connectors. Refer to Electronic Control Modules for the procedures.
Remove the nuts from the HVAC housing mounting studs on the engine compartment side of the dash panel.
Remove the nuts that secure the HVAC housing to the mounting studs on the passenger compartment side of the dash panel (HVAC HOUSING REMOVE/INSTALL).
Pull the HVAC housing rearward far enough for the mounting studs and the evaporator condensate drain tube to clear the dash panel holes.
Remove the HVAC housing from the vehicle.
1 - EVAPORATOR LOCATION
2 - BOTTOM HALF OF HVAC HOUSING
3 - TOP HALF OF HVAC HOUSING
Dash
REMOVAL
WARNING: ON VEHICLES EQUIPPED WITH AIRBAGS, DISABLE THE AIRBAG SYSTEM BEFORE ATTEMPTING ANY STEERING WHEEL, STEERING COLUMN, SEAT BELT TENSIONER, OR INSTRUMENT PANEL COMPONENT DIAGNOSIS OR SERVICE. DISCONNECT AND ISOLATE THE BATTERY NEGATIVE (GROUND) CABLE, THEN WAIT TWO MINUTES FOR THE AIRBAG SYSTEM CAPACITOR TO DISCHARGE BEFORE PERFORMING FURTHER DIAGNOSIS OR SERVICE. THIS IS THE ONLY SURE WAY TO DISABLE THE AIRBAG SYSTEM. FAILURE TO TAKE THE PROPER PRECAUTIONS COULD RESULT IN ACCIDENTAL AIRBAG DEPLOYMENT AND POSSIBLE PERSONAL INJURY.
NOTE: Before starting this procedure, be certain to turn the steering wheel until the front wheels are in the straight-ahead position.
Disconnect and isolate the battery negative cable.
Remove the Airbag Control Module (ACM) and bracket from the floor panel transmission tunnel. (Refer to 8 - ELECTRICAL/RESTRAINTS/AIRBAG CONTROL MODULE - REMOVAL).
Remove the trim from the left and right cowl side inner panels. (Refer to 23 - BODY/INTERIOR/COWL TRIM COVER - REMOVAL).
Remove the steering column opening cover from the instrument panel. (Refer to 23 - BODY/INSTRUMENT PANEL/STEERING COLUMN OPENING COVER - REMOVAL).
Remove the two screws that secure the inside hood latch release handle to the instrument panel lower reinforcement and lower the release handle to the floor.
Disconnect the clockspring pigtail wire connector from the instrument panel wire harness connector located on the instrument panel lower reinforcement.
If the vehicle is so equipped, disconnect the overdrive lockout switch pigtail wire connector from the instrument panel wire harness connector near the instrument panel lower reinforcement.
Remove the steering column from the vehicle, but do not remove the driver airbag, the steering wheel, or the switches from the column. Be certain that the steering wheel is locked and secured from rotation to prevent the loss of clockspring centering. (Refer to 19 - STEERING/COLUMN - REMOVAL).
From under the driver side of the instrument panel, perform the following:
Disengage the park brake release handle linkage rod from the park brake mechanism on the left cowl side inner panel. (Refer to 5 - BRAKES/PARKING BRAKE/RELEASE - REMOVAL).
Disconnect the instrument panel wire harness connector from the park brake switch on the park brake mechanism.
Disconnect the three connectors (one from the body wire harness, and two from the headlamp and dash wire harness) from the three connector receptacles located closest to the dash panel on the back of the Junction Block (JB).
Remove the screw from the center of the headlamp and dash wire harness to instrument panel wire harness bulkhead connector and disconnect the connector.
Disconnect the instrument panel wire harness to door wire harness connector located directly below the instrument panel wire harness to headlamp and dash wire harness bulkhead connector.
If the vehicle is equipped with the Infinity sound system option, disconnect the Infinity wire harness connector from the instrument panel wire harness connector that is secured to the outboard side of the instrument panel wire harness to headlamp and dash wire harness bulkhead connector.
Disconnect the instrument panel wire harness connector from the stop lamp switch.
Disconnect the heater-A/C housing vacuum harness connector from the heater-A/C control vacuum harness connector located near the left end of the heater-A/C housing.
From under the passenger side of the instrument panel, disconnect the two halves of the radio antenna coaxial cable connector.
Loosen the right and left instrument panel cowl side roll-down bracket screws about 13 mm (0.50 inch) (Instrument Panel Assembly Remove/Install).
Remove the five screws that secure the top of the instrument panel to the top of the dash panel, removing the center screw last.
Roll down the instrument panel and install a temporary hook in the center hole on top of the instrument panel. Secure the other end of the hook to the center hole in the top of the dash panel. The hook should support the instrument panel in its rolled down position about 46 cm (18 inches) from the dash panel.
With the instrument panel supported in the roll-down position, disconnect the instrument panel wire harness connectors from the heater-A/C housing wire harness connectors.
With the aid of an assistant, remove the temporary hook and lift the instrument panel assembly off of the roll-down bracket screws and remove it from the vehicle.
Trending Topics
06-01-2007, 03:52 PM
#8
Registered User
Thread Starter
Join Date: Nov 2004
Location: redford michigan
Posts: 225
Likes: 0
Received 0 Likes
on
0 Posts
thanks Dude.
I went down to the shop today and they evacuated the system wich they said it was empty then they vacume tested the system and the machine said there was no leak so they filled the system and added the dye. They also checked with the black light and found no sign that the dye was added before.
we'll see what happens. It has been working all day today. tommorow is another story though. lol...
thanks for the help. It is much appreciated.
06-09-2007, 10:30 PM
#9
Chapter President
Well started doing mine today. Not as bad as it seems, just time consuming.
You don't need to take everything apart.
Here is what i did so far.
Disconnect batteries.
Remove both panel's on either side (screw on floor will let you get it out.)
remove kick panel and remove two nuts holding the steering column up.
loosen the bolt next to the emergency brake. Don't take out!
Pass side
remove glove box, unhook the electrical connectors on heater box
remove bolts from the Air bag control on hump and take bracket out.
unplug the vacuum drivers side of hump, should be 4 hoses one plug
Get ratchet strap ready.
take 5 screws on top of dash out by the windshield.
take bolt out of pass side kick panel HOLD DASH IT WILL TRY TO FALL
fix strap from the grab handle above door and put through right side of dash and support it with the strap. You should be able to get enough room to get the box out.
take nut off on top center of box, it has a ground strap attached to it, 2 nuts are there, one on top of another.
remove nut on right side corner of the box. hangs straight down.
now to the engine compartment.
remove air filter
remove AC lines i had to use a special tool for these.
remove heater hoses, had to cut these off.
take out 3 screws holding the ECM to fire wall. There is a nut hidden under there you gotta get off.
1 nut on firewall to the left of the valve cover, 2 close to the AC lines.
the box should now come out with some pulling and wiggling.
Taking the box apart is pretty straight forward, there is a hidden screw, take one of the vents off and you will see it. i noticed it from seeing the boss on the outside of the seam.
take old core out and clean out put in new core and put back together.
I got the box back in dash bolted in, but will finish in the morning.
OH ya my dash is really cracked now.
But i know how to take the dash out to change it when the money tree is ready.
I'll post pics later.
06-12-2007, 06:20 AM
#11
Chapter President
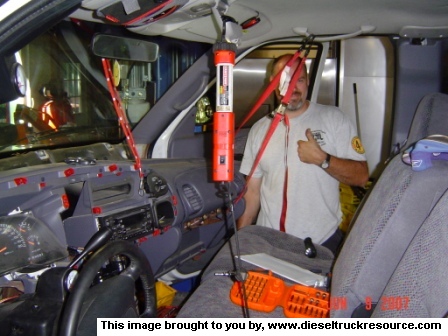
Here are a couple of pics
The first one is hanging the dash, just use a ratchet strap. It gives you just enough room to get the box out.
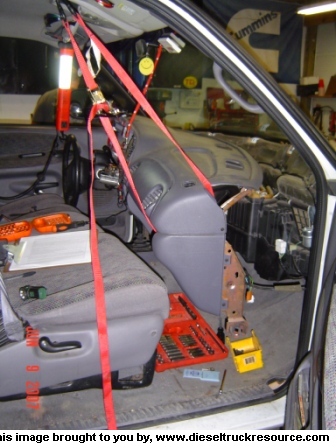
This is the box and you can see at the top the hidden screw. You have to remove the duct to find it. this is a pic of the bottom of the box.

pic from the other side.
The first one is hanging the dash, just use a ratchet strap. It gives you just enough room to get the box out.
This is the box and you can see at the top the hidden screw. You have to remove the duct to find it. this is a pic of the bottom of the box.
pic from the other side.
06-12-2007, 07:23 AM
#12
DTR's 'Go to Guy'
OOOO, What a familiar sight! I used to cover the seat and just set the dash on the pass side seat. I like the ratchet strap idea though! If you tilt the wheel all the way down and slide the seat all the way back you can push the steering column dang near to the floor to get a little more room. Then you can lay the whole dash across the seats. My wide rear end ( no not a dually  ) would have a hard time fitting in there!
) would have a hard time fitting in there!

 06-13-2010, 06:47 PM
#14

Thanks for the info..It help me change my evaporator and heater core.
isn't the ECM mounted on the engine and TCM on the firewall..either way I knew which one needed removing.
Thanks
-dkenny
isn't the ECM mounted on the engine and TCM on the firewall..either way I knew which one needed removing.
Thanks
-dkenny
07-01-2010, 04:46 PM
#15
Registered User

Join Date: Jun 2010
Posts: 1
Likes: 0
Received 0 Likes
on
0 Posts
Great short cut
That is a Great short cut scottsjeeprolet
I just did my truck.
I was an GM Auto Tech (flat Rate) for 25 years and I always look short cut.
I came across your post here and what a time saver. I did my in my driveway in 4 hours, taking my time and drinking beer.
Thank you very much.
Ken
I just did my truck.
I was an GM Auto Tech (flat Rate) for 25 years and I always look short cut.
I came across your post here and what a time saver. I did my in my driveway in 4 hours, taking my time and drinking beer.
Thank you very much.
Ken