DIY: LED gauge cluster lights
 04-19-2008, 08:47 PM
#1
Registered User
Thread Starter
Join Date: Jul 2007
Location: Hurricane, Utah
Posts: 166
Likes: 0
Received 0 Likes
on
0 Posts
DIY: LED gauge cluster lights
I just bought the truck, and the first thing I needed to do was replace some of the lights in the gauge cluster. I'm kind of a nerd, so I changed the main (6) bulbs to LED's.
You will need:
(6) 194 or equivalent bulbs. (Scroll down halfway- WLED-WHP6 LED Wedge Base Bulbs).
T-20 torx end (I think)
screwdriver (or whatever your dash is held together with)
If it was all I did, it would have taken me less than an hour to do.
Here is what they looked like before. Burnt out and different colors.
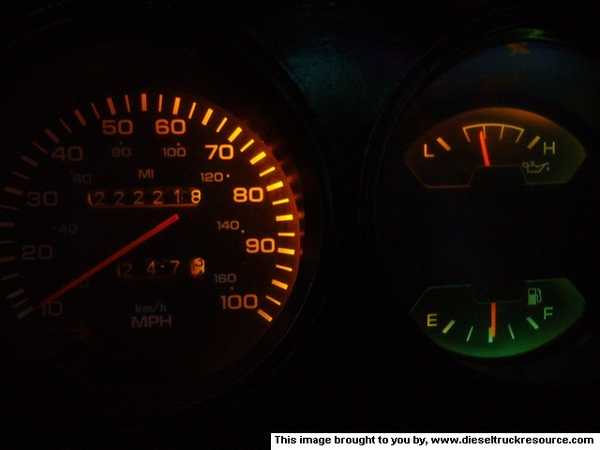

They are the same size as a 194 bulb and fit fine.

First, take of the main dashboard cover. It goes all the way from the headlight **** to the radio. It is held in by a bunch of screws and some friction fit tabs.
Behind the "Cummins Turbo Diesel" and 4x4 status cluster, there are a few things to undo before you can get the whole thing out of the way.
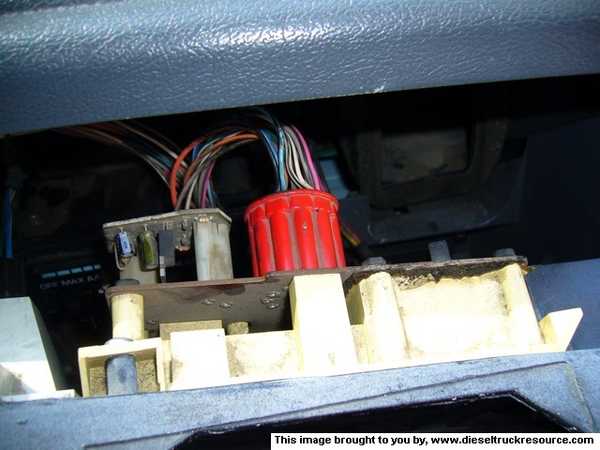
Now that you have some room to work, unscrew the screws highlighted here:

There is a little arm that attaches to the back of the A/C controls. Loosen the A/C controls so you can undo the arm.

Now that the gauge cluster is unscrewed from the dashboard, undo these two connections:
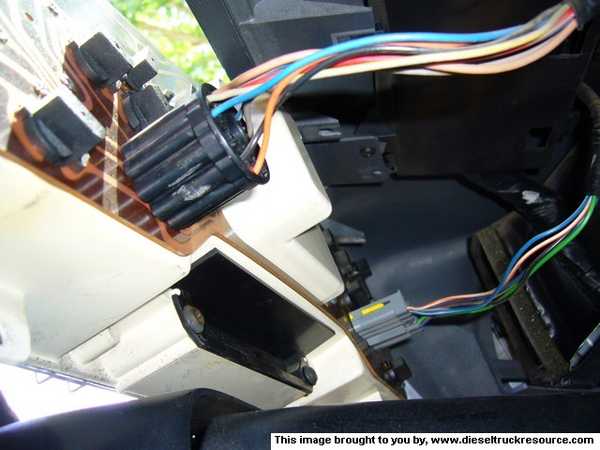
Here are the bulbs we will be replacing. The two cluster of three bulbs are turn signals, idiot lights, high beam indicators, etc... They will be checked, but not replaced.

You will need:
(6) 194 or equivalent bulbs. (Scroll down halfway- WLED-WHP6 LED Wedge Base Bulbs).
T-20 torx end (I think)
screwdriver (or whatever your dash is held together with)
If it was all I did, it would have taken me less than an hour to do.
Here is what they looked like before. Burnt out and different colors.
They are the same size as a 194 bulb and fit fine.
First, take of the main dashboard cover. It goes all the way from the headlight **** to the radio. It is held in by a bunch of screws and some friction fit tabs.
Behind the "Cummins Turbo Diesel" and 4x4 status cluster, there are a few things to undo before you can get the whole thing out of the way.
Now that you have some room to work, unscrew the screws highlighted here:
There is a little arm that attaches to the back of the A/C controls. Loosen the A/C controls so you can undo the arm.
Now that the gauge cluster is unscrewed from the dashboard, undo these two connections:
Here are the bulbs we will be replacing. The two cluster of three bulbs are turn signals, idiot lights, high beam indicators, etc... They will be checked, but not replaced.
 04-19-2008, 08:48 PM
#2
Registered User
Thread Starter
Join Date: Jul 2007
Location: Hurricane, Utah
Posts: 166
Likes: 0
Received 0 Likes
on
0 Posts
I wanted to take the blue/green colored filters out so I took off the printed circuit board. Once that is off, you will be able to see the filters. They are easily taken out. Some of mine were melted, and two fell out and were rattling around inside the cluster that is why half of the speedo is orange and not green.


To retrieve the filters, I had to take the front part of the gauge cluster off. This is easily done, simply by unscrewing the screws and disassembling.

At this point I took the clear plastic inside and gently washed with a microfiber cloth and some mild dishsoap then wiped out all of the dust around the trip-meter reset post.
Once I re-assembled the front part, I installed the LED lights. It is as simple as plug and play.

I turned them on to test, and they worked, but it is too light still to post pictures. Look for them later on today.
To retrieve the filters, I had to take the front part of the gauge cluster off. This is easily done, simply by unscrewing the screws and disassembling.
At this point I took the clear plastic inside and gently washed with a microfiber cloth and some mild dishsoap then wiped out all of the dust around the trip-meter reset post.
Once I re-assembled the front part, I installed the LED lights. It is as simple as plug and play.
I turned them on to test, and they worked, but it is too light still to post pictures. Look for them later on today.

 04-19-2008, 11:45 PM
#5
Registered User

Join Date: Mar 2007
Location: Minnesota
Posts: 365
Likes: 0
Received 0 Likes
on
0 Posts
Haha, the dash lights were supposed to be green, eh? I suppose that'd explain those weird greenish colored plastic flakes I found floating around at the bottom of my gauge cluster when I took it out.
04-20-2008, 01:31 AM
#6
Registered User
Looks good. Nice write-up. If I took pictures the way you did, y'all would just get a bunch of pics of my belly .
.
How did you decide which, out of all the lights shown, to get?
Are they dimable?
.How did you decide which, out of all the lights shown, to get?
Are they dimable?
04-20-2008, 02:31 AM
#7
Registered User
Join Date: Feb 2008
Location: Queens, NY
Posts: 228
Likes: 0
Received 0 Likes
on
0 Posts
Yes they will dim mainly the only difference is what color you want. Like right now I have whits gauges with Red Led's that are the 4 unit ones. The ones fanbrain used are 6 die that are much brighter but only com in white at the moment.
Autolumination.com
Superbrightleds.com
Whitegauges.net
Autolumination.com
Superbrightleds.com
Whitegauges.net
Trending Topics
04-20-2008, 03:00 PM
#9
Registered User
Thread Starter
Join Date: Jul 2007
Location: Hurricane, Utah
Posts: 166
Likes: 0
Received 0 Likes
on
0 Posts
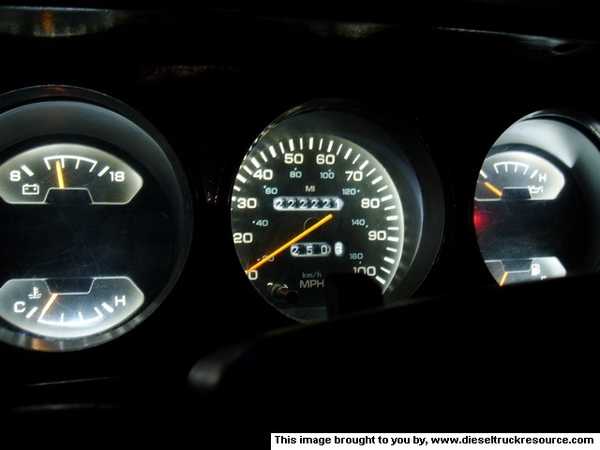
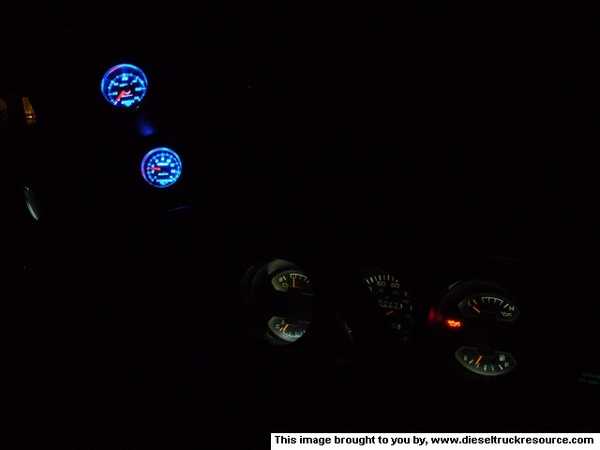
Update: night pics
They can be dimmed, just not to the same extent as a normal incandescent bulb. It's a limitation of LED's.
On to the night time pictures:
Even though these are 1 second exposures, it is pretty close to the real thing.


 04-20-2008, 06:21 PM
#10
Registered User
Join Date: May 2004
Location: Weatherford, TX
Posts: 242
Likes: 0
Received 0 Likes
on
0 Posts
Great job, I was gonna do mine 3 weeks ago but they didn't have the led that I wanted at the chrome shop, then I got sent to AR. for work for 4 days which turned into 2 weeks  . I think I'll those that have 5 LED's and 4 are on the side that are on that site.
. I think I'll those that have 5 LED's and 4 are on the side that are on that site.
04-20-2008, 09:18 PM
#13
Registered User
Thread Starter
Join Date: Jul 2007
Location: Hurricane, Utah
Posts: 166
Likes: 0
Received 0 Likes
on
0 Posts
 04-24-2008, 05:13 PM
#15
Registered User
So I got mine yesterday and took the dash apart today and put one of the leds in the socket fits perfect but didn't light up, I noticed that the original bulbs had wires stick out the bottom to make the electrical connections. Looks like I need to get a solder gun to make these work. Also, any tips on how to get a broken bulb out of one of the sockets?